


Injector Cup R&R
Thread Starter
|
Post Fiend
Joined: Nov 2007
Posts: 9,549
Likes: 14
From: Payson, AZ
I completed my injector cup R&R and here is my write-up. I know it's been done before but I have a little more to add then the previous write-up.
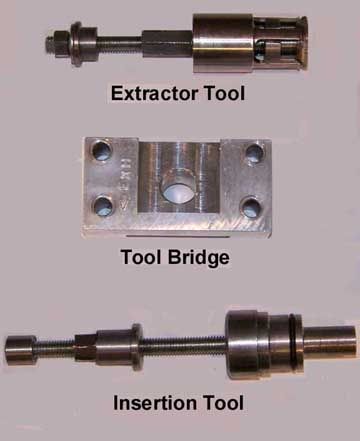
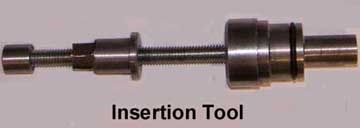
The injector cup R&R tool set I used.
I got the tool set on LOAN from Riffraff Diesel when ordering the new cups.
First a little up front info before I get into the actual procedure.
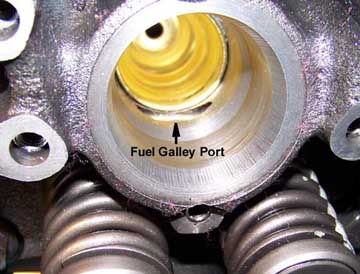
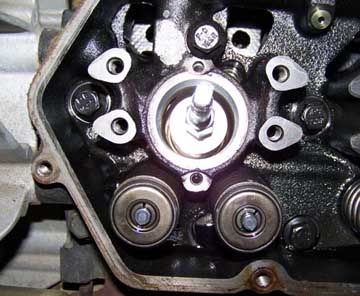
The tool set came with no instructions but it was easy to figure out how the tools worked. The only real problem was to be able to figure out when installing the cups if they were fully seated. My suggestion is to check the depth of a couple of the old cups before you start pulling them out. As a reference you can use the top edge of the cup in relation to the bottom edge of the fuel port in the injector bore. Just using your finger to feel the space between the two you will be able to gauge the proper depth. If you have a depth gauge that would be the best way. With a depth gauge you can measure between the top of the bore and the top edge of the cup. The picture below is of a new cup that has already been installed but will illustrate what I mean by the top edge of cup and bottom edge of fuel port. Top edge of cup is just below bottom edge of fuel port. I didn’t think of this until I had all the cups pulled. I just had to wing it when I put the new cups in.
Cup Removal
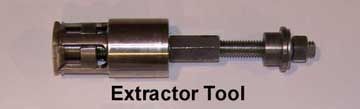
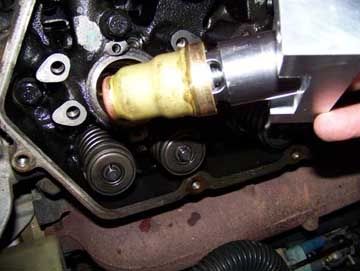
The extraction tool has four fingers that spread out as you tighten the elongated nut.
The fingers have a sharp edge that dig into the sides of the cup.
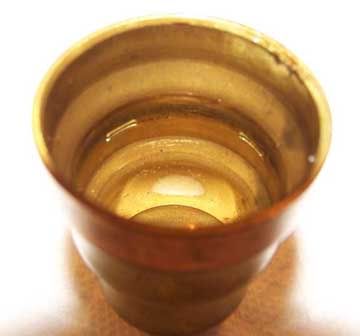
These are the marks left inside the cup from the extractor tool.
Before removing the cups the coolant needs to be drained to a level below the heads because the cups seal the coolant passage from the injector bore and the injector nozzle hole at the bottom of the coolant passage that goes into the combustion chamber. You don’t want coolant leaking into the combustion chambers. I did a complete drain since I will be doing a full flush and refill with ELC.
Center the extractor tool inside the cup and using an open end wrench tighten down the elongated nut as much as you can. The end of the threaded rod has two flat spots to hold with a wrench or other suitable tool. Do not damage the threads at the end of the threaded rod because it makes it difficult to get the nut off. Once the fingers get a grip you won’t need to hold the threaded rod. Tighten as much as you can. The first one I did I thought was tight enough but the extractor didn’t get a good grip and the cup did not come out.
Once the extraction tool is tight in the cup place the bridge over the rod with the orientation mark (you'll know this mark when you see it) face up and pointing toward the exhaust side of head. Next put on the collar, washer and nut. Finger tighten the nut and then using a socket and ratchet start turning clockwise to pull the cup. On five of the eight cups as soon as the nut started to get tight I heard a metallic snap as the cup released, but it still took a lot of turning before the cup finally came out. The other three never made a sound. When using the extractor you do not need to use the rocker pedestal bolts to hold the bridge in place.
Keep turning until the bridge comes loose and then just lift
up on the bridge and the cup comes out with the extractor.
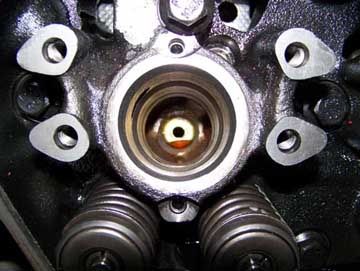
After removing the cup clean any old sealant that may be in the injector bore. The sides of all the bores seemed perfectly clean and smooth and I just wiped them out. I saw no need to use a wire brush. There was a trace of sealant at the point where the bottom of the cup seats into an indent at the bottom of the coolant passage. The pic below is the injector bore after an injector cup has been removed. The dark half moon shape just below the injector nozzle hole is the only sealant residue I could see and was the same in all bores. I’m guessing it was where the sealant settled after initial install of the cups during the original engine assembly. I used a long thin shaft flat blade screwdriver to scrap it off and a small tube hooked to a vacuum to suck it out. The pieces were miniscule and probably didn’t need to be removed but I wanted to be thorough.
It’s not difficult but a PITA to have to remove the rockers, pedestals and push rods to use the tools. If you are only replacing one cup not a bad job at all, but if you are replacing all eight there are a lot of bolts to remove.
Cup Install
The cup insertion tool is a screw drive ram that forces the cup down into the injector bore.
Instructions from the Ford manual on applying the Loctite.

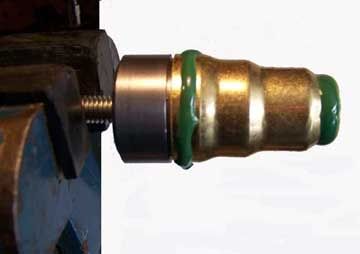
I placed the collar of the tool in a vise to hold it so I could rotate it while applying a bead of the Loctite 620 to the top and bottom of the cup. Turning the tool as I applied the Loctite kept it from dripping off and helped spread it in an even coat.
When putting the cup into the bore be as careful as you can not to make contact with the sides of the bore until the cup is deep inside. Once the cup is in slowly turn it to spread the Loctite at the top of the cup and press it in by hand as tight as possible.
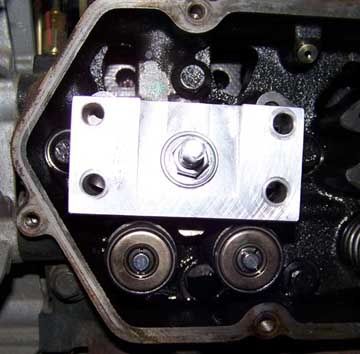
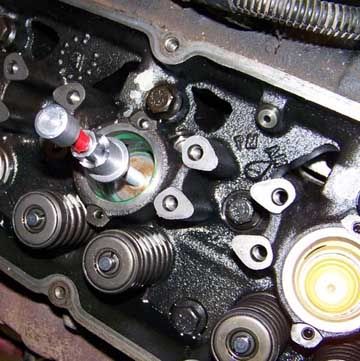
Tool and cup in bore.
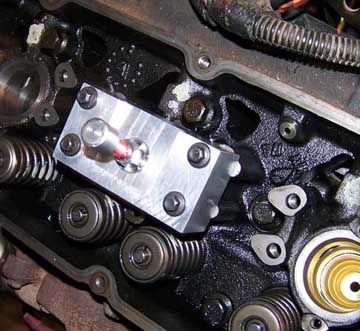
Next place the bridge over the insertion tool and mount it to the head using four rocker pedestal bolts. You do not have to torque the bolts. Just get them finger tight and then about a quarter turn with an 8mm socket to get them snug. Turn the nut counter clock wise to seat the cup. I turned the bolt using an open end wrench until it felt like the cup was bottomed out and wouldn’t turn anymore without over torqueing it. Like I said before, there were no instructions so I was on my own and why I suggested measuring the depth of an old cup before removing.
Once the cup has bottomed out turn the nut clock wise just a bit to loosen and then remove the rocker pedestal bolts and remove the bridge and tool. Clean the bore of the Loctite that squeezes past the top of the cup. Seems like almost all of the Loctite applied to the top of cup squeezes out but what does remain fills any voids that could cause coolant to leak past the cup or actually to keep fuel from leaking past the cup into the coolant since the fuel pressure is higher then the coolant pressure.
Two things I would like to go over again:
1) The extractor needs to be very tight to get a good grip to be able to pull out the cup. If the cup doesn’t pull out re-insert the tool and tighten it even more. Once you get one out you will know how tight it has to be. Once I figured this out the remaining seven came out on the first try.
2) The insertion tool needs to be turned as tight as possible to ensure the cup gets fully seated. A depth gauge or another method to measure the depth of a couple of original cups would be the best way to be sure the new cup is fully seated. I wish I had thought of this before pulling all the old cups. I just tightened each one as much as possible until I felt that they were bottomed out. From what I could tell when done inserting all the cups they were all the same depth.
Here is something I discovered after removing the cups. The pic below is an original cup with 105K miles and one that was replaced under warranty by the dealership at 46K miles.

It is difficult to see in this pic but looking at the actual cups the bottom of the original cup (on left) was flat, but the bottom of the cup installed by dealership had a slight bulge. I never had a problem so I can only assume that when the injector was torqued down it distorted the cup enough to bottom out and seat properly.
I admit I didn’t really know what to look for, but I didn’t find any evidence of coolant leaking past any cup.
After seeing how the injector fits in the cup
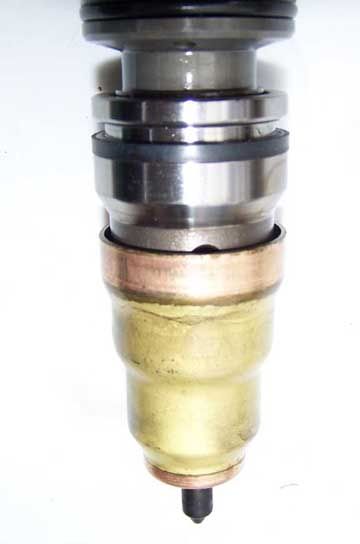
and how the cup seals in the bore and down in the injector nozzle hole indent at the bottom of the coolant passage it is hard to believe that any coolant could get into the oil if the sealant were to fail. If the sealant failed at the top of the cup it would be like a cracked cup and fuel would get in the coolant and if the sealant failed at the bottom of cup coolant could get into the combustion chamber. If my next UOA shows coolant in the oil then I will tackle the messy job of replacing the o-rings and gaskets on the oil cooler as was suggested. And please, I don’t want to hear “I told you so”. I’ve learned my lesson. To be honest if I were not pulling all the old injectors to put in new ones I would not have replaced the cups until I saw a sign of trouble, like fuel in the coolant. Well at least I now have new cups, and I know the sealant is compatible with the new ELC coolant. Considering the time, effort and money I put into this injector cup R&R if you have an Early 99 go with the Ford non-SCA gold coolant and not ELC. That gold stuff is good for 100k anyway. Live and learn.
Here is the write-up in PDF:
I got the tool set on LOAN from Riffraff Diesel when ordering the new cups.
First a little up front info before I get into the actual procedure.
The tool set came with no instructions but it was easy to figure out how the tools worked. The only real problem was to be able to figure out when installing the cups if they were fully seated. My suggestion is to check the depth of a couple of the old cups before you start pulling them out. As a reference you can use the top edge of the cup in relation to the bottom edge of the fuel port in the injector bore. Just using your finger to feel the space between the two you will be able to gauge the proper depth. If you have a depth gauge that would be the best way. With a depth gauge you can measure between the top of the bore and the top edge of the cup. The picture below is of a new cup that has already been installed but will illustrate what I mean by the top edge of cup and bottom edge of fuel port. Top edge of cup is just below bottom edge of fuel port. I didn’t think of this until I had all the cups pulled. I just had to wing it when I put the new cups in.
The extraction tool has four fingers that spread out as you tighten the elongated nut.
The fingers have a sharp edge that dig into the sides of the cup.
Before removing the cups the coolant needs to be drained to a level below the heads because the cups seal the coolant passage from the injector bore and the injector nozzle hole at the bottom of the coolant passage that goes into the combustion chamber. You don’t want coolant leaking into the combustion chambers. I did a complete drain since I will be doing a full flush and refill with ELC.
Center the extractor tool inside the cup and using an open end wrench tighten down the elongated nut as much as you can. The end of the threaded rod has two flat spots to hold with a wrench or other suitable tool. Do not damage the threads at the end of the threaded rod because it makes it difficult to get the nut off. Once the fingers get a grip you won’t need to hold the threaded rod. Tighten as much as you can. The first one I did I thought was tight enough but the extractor didn’t get a good grip and the cup did not come out.
Once the extraction tool is tight in the cup place the bridge over the rod with the orientation mark (you'll know this mark when you see it) face up and pointing toward the exhaust side of head. Next put on the collar, washer and nut. Finger tighten the nut and then using a socket and ratchet start turning clockwise to pull the cup. On five of the eight cups as soon as the nut started to get tight I heard a metallic snap as the cup released, but it still took a lot of turning before the cup finally came out. The other three never made a sound. When using the extractor you do not need to use the rocker pedestal bolts to hold the bridge in place.
up on the bridge and the cup comes out with the extractor.
After removing the cup clean any old sealant that may be in the injector bore. The sides of all the bores seemed perfectly clean and smooth and I just wiped them out. I saw no need to use a wire brush. There was a trace of sealant at the point where the bottom of the cup seats into an indent at the bottom of the coolant passage. The pic below is the injector bore after an injector cup has been removed. The dark half moon shape just below the injector nozzle hole is the only sealant residue I could see and was the same in all bores. I’m guessing it was where the sealant settled after initial install of the cups during the original engine assembly. I used a long thin shaft flat blade screwdriver to scrap it off and a small tube hooked to a vacuum to suck it out. The pieces were miniscule and probably didn’t need to be removed but I wanted to be thorough.
It’s not difficult but a PITA to have to remove the rockers, pedestals and push rods to use the tools. If you are only replacing one cup not a bad job at all, but if you are replacing all eight there are a lot of bolts to remove.
I placed the collar of the tool in a vise to hold it so I could rotate it while applying a bead of the Loctite 620 to the top and bottom of the cup. Turning the tool as I applied the Loctite kept it from dripping off and helped spread it in an even coat.
When putting the cup into the bore be as careful as you can not to make contact with the sides of the bore until the cup is deep inside. Once the cup is in slowly turn it to spread the Loctite at the top of the cup and press it in by hand as tight as possible.
Next place the bridge over the insertion tool and mount it to the head using four rocker pedestal bolts. You do not have to torque the bolts. Just get them finger tight and then about a quarter turn with an 8mm socket to get them snug. Turn the nut counter clock wise to seat the cup. I turned the bolt using an open end wrench until it felt like the cup was bottomed out and wouldn’t turn anymore without over torqueing it. Like I said before, there were no instructions so I was on my own and why I suggested measuring the depth of an old cup before removing.
Once the cup has bottomed out turn the nut clock wise just a bit to loosen and then remove the rocker pedestal bolts and remove the bridge and tool. Clean the bore of the Loctite that squeezes past the top of the cup. Seems like almost all of the Loctite applied to the top of cup squeezes out but what does remain fills any voids that could cause coolant to leak past the cup or actually to keep fuel from leaking past the cup into the coolant since the fuel pressure is higher then the coolant pressure.
Two things I would like to go over again:
1) The extractor needs to be very tight to get a good grip to be able to pull out the cup. If the cup doesn’t pull out re-insert the tool and tighten it even more. Once you get one out you will know how tight it has to be. Once I figured this out the remaining seven came out on the first try.
2) The insertion tool needs to be turned as tight as possible to ensure the cup gets fully seated. A depth gauge or another method to measure the depth of a couple of original cups would be the best way to be sure the new cup is fully seated. I wish I had thought of this before pulling all the old cups. I just tightened each one as much as possible until I felt that they were bottomed out. From what I could tell when done inserting all the cups they were all the same depth.
Here is something I discovered after removing the cups. The pic below is an original cup with 105K miles and one that was replaced under warranty by the dealership at 46K miles.
It is difficult to see in this pic but looking at the actual cups the bottom of the original cup (on left) was flat, but the bottom of the cup installed by dealership had a slight bulge. I never had a problem so I can only assume that when the injector was torqued down it distorted the cup enough to bottom out and seat properly.
I admit I didn’t really know what to look for, but I didn’t find any evidence of coolant leaking past any cup.
and how the cup seals in the bore and down in the injector nozzle hole indent at the bottom of the coolant passage it is hard to believe that any coolant could get into the oil if the sealant were to fail. If the sealant failed at the top of the cup it would be like a cracked cup and fuel would get in the coolant and if the sealant failed at the bottom of cup coolant could get into the combustion chamber. If my next UOA shows coolant in the oil then I will tackle the messy job of replacing the o-rings and gaskets on the oil cooler as was suggested. And please, I don’t want to hear “I told you so”. I’ve learned my lesson. To be honest if I were not pulling all the old injectors to put in new ones I would not have replaced the cups until I saw a sign of trouble, like fuel in the coolant. Well at least I now have new cups, and I know the sealant is compatible with the new ELC coolant. Considering the time, effort and money I put into this injector cup R&R if you have an Early 99 go with the Ford non-SCA gold coolant and not ELC. That gold stuff is good for 100k anyway. Live and learn.
Here is the write-up in PDF:
Post Fiend
Joined: Mar 2007
Posts: 26,966
Likes: 50
From: Texas
Great write up Robin. Too bad you didn't think to stick a torque wrench on there to measure how tight to get the turn on the cup install. That's where the driver tool seems to have the advantage. The audible difference in sound is a nice hint.
Thread Starter
|
Post Fiend
Joined: Nov 2007
Posts: 9,549
Likes: 14
From: Payson, AZ
There is a striking service on the end of the insertion tool. Had there been some instructions with the tool it may have said to do that. Number 7 and 8 would be difficult to get a good swing at.
I am confident that they are seated. You can tell they are bottomed out on the last couple of quarter turns. Takes a whole lot of turning though.
I would bet that if you were turning that nut you would get to the point where you would say "Now I know that sucker is in there".
Post Fiend
Joined: Mar 2007
Posts: 26,966
Likes: 50
From: Texas
I'd go by feel before I tried converting a crows foot to torque. Sounds like there's enough turns using that thing that it might be worth while for Clay to find a machine shop that can make a socket that will fit the end.
Posting Guru
Joined: Feb 2007
Posts: 1,244
Likes: 1
From: North Cackalacky
Awesome write-up Robin. If I ever get to upgrade my injectors I was gonna do the cups while I was at it.
Any guide lines on how long to let the loctite cure before you refill the fluids?
Tried to rep ya but I'm in time out.
Any guide lines on how long to let the loctite cure before you refill the fluids?
Tried to rep ya but I'm in time out.
Thread Starter
|
Post Fiend
Joined: Nov 2007
Posts: 9,549
Likes: 14
From: Payson, AZ
The extractor accepts a socket thank goodness.
Thread Starter
|
Post Fiend
Joined: Nov 2007
Posts: 9,549
Likes: 14
From: Payson, AZ
Dan (Kwik) had a set of rockers, pedestals and push rods available and since I had to remove all mine I bought his and will install them. He had less then 100 miles on the ones he installed on one bank and since the noise didn't go away he bought the new long block and didn't need them. The others were never installed.
As far as the reps go it's the thought that counts and thanks.
Trending Topics

Posting Guru

Joined: Mar 2007
Posts: 1,905
Likes: 2
From: East Peoria, IL
Man, I already did this once on my e99, but they are leaking again. What was the charge from clay for cups and o-rings?
By the way, the cracks the fuel were getting through were probably hair line cracks that you will have to look very hard to see. I found a couple on my first set i could visually see
By the way, the cracks the fuel were getting through were probably hair line cracks that you will have to look very hard to see. I found a couple on my first set i could visually see
FTE Stories
Ford Trucks for Ford Truck Enthusiasts

Top 6 Best Deals Available on New Fords & Lincolns Right Now
Brett Foote
This Hennessey Takes the Expedition Tremor's Off-Roading Capability to the Next Level
Verdad Gallardo
Top 10 Fords at 2026 Carlisle Ford Nationals
Joe Kucinski
3 Best / 3 Worst Parts of Modern Ford Ownership
Brett Foote
10 Amazing Upgrades That Solve Common Ford Truck Owner Headaches
Pouria Savadkouei
Every 2026 Ford Engine Explained
Brett Foote
10 Ugly Ford Trucks That We Still Kinda Love
Joe Kucinski
10 Things Every Truck Owner NEEDS (2026 Edition)
Michael S. Palmer
Rezvani's Latest Post-Apocalyptic Monster Is a Ford F-150 Raptor Underneath
Verdad GallardoPREMIUM SPONSOR


Joined: Feb 2009
Posts: 6,039
Likes: 74
Man, I already did this once on my e99, but they are leaking again. What was the charge from clay for cups and o-rings?
By the way, the cracks the fuel were getting through were probably hair line cracks that you will have to look very hard to see. I found a couple on my first set i could visually see
By the way, the cracks the fuel were getting through were probably hair line cracks that you will have to look very hard to see. I found a couple on my first set i could visually see

Thread Starter
|
Post Fiend
Joined: Nov 2007
Posts: 9,549
Likes: 14
From: Payson, AZ
Thread Starter
|
Post Fiend
Joined: Nov 2007
Posts: 9,549
Likes: 14
From: Payson, AZ
I do think you were right Joe. The messy job of replacing oil cooler o-rings and gaskets is next on the list.
Postmaster
Joined: Jul 2006
Posts: 4,993
Likes: 2
From: Bend, OR
You are right. There is a lot of time involved removing that stuff. That's what I used to rationalize buying new rockers, pedestals and push rods to install rather than just re-installing the old.
I do think you were right Joe. The messy job of replacing oil cooler o-rings and gaskets is next on the list.
I do think you were right Joe. The messy job of replacing oil cooler o-rings and gaskets is next on the list.
Thread Starter
|
Post Fiend
Joined: Nov 2007
Posts: 9,549
Likes: 14
From: Payson, AZ
The extractor and inserter tool worked great on 7 & 8. If you mount a slide hammer on the extractor it would work great on the rest where there is room. And a driver tool for the others as well where there is room to get a bit of a swing. A combination of the new and old would be ideal.
Posting Guru
Joined: Mar 2007
Posts: 1,905
Likes: 2
From: East Peoria, IL
Thats why I'm considering buying Jim at Rosewood's tooling he made up