


Front left axle shaft play
Thread Starter
|
Veteran/Sheepdog


Joined: Feb 2012
Posts: 6,047
Likes: 110
From: Western AR

If both of my outer dust seals weren't dangling down there by the u-joints, I would have considered doing just that. I certainly don't want to spend the money if I don't have to.
Thread Starter
|
Veteran/Sheepdog
Joined: Feb 2012
Posts: 6,047
Likes: 110
From: Western AR
Ok. So I got her all done today, just waiting for the RTV to cure so I can put the diff oil in. Thought I would share some photos of the process for those who have not jumped into this procedure before. It really helps to have the seal installer, and I am fortunate enough to own one. It is stepped so that you get the seal on the axle PERFECTLY. It also doubles as the tool you use to push the seal into the knuckle and seat it at EXACTLY the right depth. I have read of others making seal drivers out of PVC, and I am all for engenuity and saving money. However, you might not get the depth just right on that seal, and that could have consequences down the road i.e.: hubs won't lock under vacuum and the inner dust seal wears out prematurely.
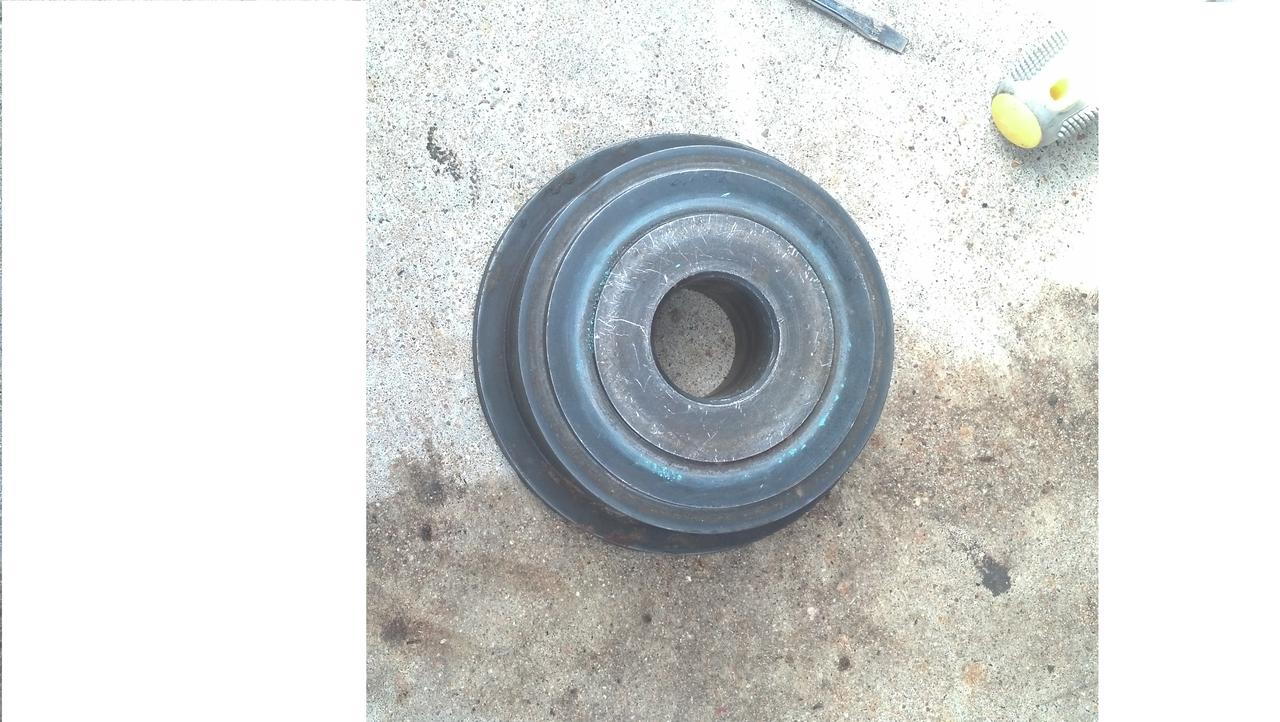
This is the seal driver used at the dealership.
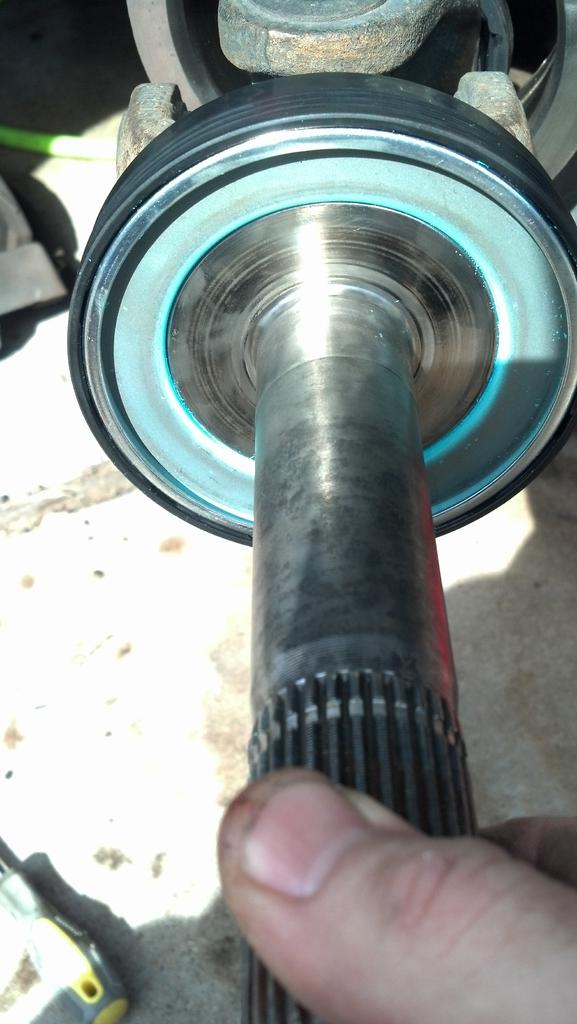
Here is the seal seated on the axle. You can see there is a slight step up from the flange of the axle to the flat area of the seal. That is where your plastic washer with the grooves in it will sit. This step must be exact, or your washer won't be able to do it's job....this equals no 4x4 ESOF action. I put the axle in a big vise to hold it while I drive the seal on. T
Here is the seal driver on the shaft. There is a special tool that fits over the axle behind the seal driver (I forgot to take a picture of it), and that gets hit with a big hammer. This exerts EVEN pressure to the seal and pops it right into the knuckle. A little bit of bearing grease on the outside of that seal before inserting it into the knuckle makes this go REALLY quick.

Starting position.

Driven to EXACTLY the right depth when the tool bottoms out.

The result is a inner dust seal that sits snug up against the axle tube and is able to do it's job correctly without wearing out prematurely.
If anyone on the forums needs the tool and cannot rent one locally, I will send it to you (you pay the postage). It will fit in a small Priority Mail box, and it only costs like $6 for a 2-3 day delivery. Kinda like the traveling hub zerk thing that is going around. You would just go to USPS.com, buy the label, save it as a .pdf file and then email it to me. Then send it back when you are done. $12 and piece of mind that you did it exactly to the right depth.
This is the seal driver used at the dealership.
Here is the seal seated on the axle. You can see there is a slight step up from the flange of the axle to the flat area of the seal. That is where your plastic washer with the grooves in it will sit. This step must be exact, or your washer won't be able to do it's job....this equals no 4x4 ESOF action. I put the axle in a big vise to hold it while I drive the seal on. T
Here is the seal driver on the shaft. There is a special tool that fits over the axle behind the seal driver (I forgot to take a picture of it), and that gets hit with a big hammer. This exerts EVEN pressure to the seal and pops it right into the knuckle. A little bit of bearing grease on the outside of that seal before inserting it into the knuckle makes this go REALLY quick.
Starting position.
Driven to EXACTLY the right depth when the tool bottoms out.
The result is a inner dust seal that sits snug up against the axle tube and is able to do it's job correctly without wearing out prematurely.
If anyone on the forums needs the tool and cannot rent one locally, I will send it to you (you pay the postage). It will fit in a small Priority Mail box, and it only costs like $6 for a 2-3 day delivery. Kinda like the traveling hub zerk thing that is going around. You would just go to USPS.com, buy the label, save it as a .pdf file and then email it to me. Then send it back when you are done. $12 and piece of mind that you did it exactly to the right depth.
Thread Starter
|
Veteran/Sheepdog
Joined: Feb 2012
Posts: 6,047
Likes: 110
From: Western AR
Thanks, John. Take the front tires off, take the brake rotor off, and then give that hub a spin. It should NOT spin freely. It should stop shortly after you let go of it. Also, listen closely while you spin it for any rolling noise (especially if it spins more than half a turn after you let go). Then, grab the lug studs and try to tilt the hub up and down side to side. This is all free and only takes about an hour for both sides to get a gauge on the health of your hub bearings. If you do it with the tire on, you will have a hard time telling whether it is the hub bearing or the ball joints. Very similar symptoms movement wise.
Thread Starter
|
Veteran/Sheepdog
Joined: Feb 2012
Posts: 6,047
Likes: 110
From: Western AR
So, I just finished a lengthy test drive with the X and its new hubs/seals. Half the 1.5" play in the steering wheel is gone, and she tracks even straighter than she was. Also, she quit pulling to the right when stomping on the brake. It was subtle when pulling to the right, but now it is completely gone. Here is a photo of my fancy smancy painted-up front diff cover...

Was going to paint it red, but the silver looked more appealing and sane.
For posterity, the axle seal part numbers are National #710493 (outer axle seal that seats in the knuckle $52) and National #710413 (inner dust seal between shaft tube and u-joint $19)
Was going to paint it red, but the silver looked more appealing and sane.
For posterity, the axle seal part numbers are National #710493 (outer axle seal that seats in the knuckle $52) and National #710413 (inner dust seal between shaft tube and u-joint $19)
Last edited by Nicmike; Feb 14, 2013 at 09:29 PM. Reason: part numbers!
New User
Joined: Oct 2012
Posts: 13
Likes: 0
I've got a question my first time replacing hubs on my truck like you I got lock out and e everything was moving around my question is which I think the pictures answered are there any bearings on the outter ends of the axle tube or seals. I know inby the pumpkin there is but I don't wanna pull all that off if I can just get new hubs. I thank you for your time.

Post Fiend
Joined: Mar 2009
Posts: 11,798
Likes: 14
From: Mt. Shasta California
Thanks, John. Take the front tires off, take the brake rotor off, and then give that hub a spin. It should NOT spin freely. It should stop shortly after you let go of it. Also, listen closely while you spin it for any rolling noise (especially if it spins more than half a turn after you let go). Then, grab the lug studs and try to tilt the hub up and down side to side. This is all free and only takes about an hour for both sides to get a gauge on the health of your hub bearings. If you do it with the tire on, you will have a hard time telling whether it is the hub bearing or the ball joints. Very similar symptoms movement wise.

Tuned
Joined: Jul 2014
Posts: 427
Likes: 4
This is great stuff man. I was wondering, do you have to pull the diff cover? My outer axle tube dust seal is loose and just rides around on the axle shaft. I was going to just cut it off since every other D60 I have owned had no outer seal stock.
Just pulled the diff cover last week, cleaned the diff and filled it up with 30 bucks worth of synthetic gear oil!
My hubs seals seem fine, and I do not have auto hubs. They are also tight. That axle tube dust seal seems to have been ineffective for quite some time too. Maybe I should just cut it all the way off and don't try and fix what isn't broke!
Very generous of you to offer up that tool.
FTE Stories
Ford Trucks for Ford Truck Enthusiasts

Top 6 Best Deals Available on New Fords & Lincolns Right Now
Brett Foote
This Hennessey Takes the Expedition Tremor's Off-Roading Capability to the Next Level
Verdad Gallardo
Top 10 Fords at 2026 Carlisle Ford Nationals
Joe Kucinski
3 Best / 3 Worst Parts of Modern Ford Ownership
Brett Foote
10 Amazing Upgrades That Solve Common Ford Truck Owner Headaches
Pouria Savadkouei
Every 2026 Ford Engine Explained
Brett Foote
10 Ugly Ford Trucks That We Still Kinda Love
Joe Kucinski
10 Things Every Truck Owner NEEDS (2026 Edition)
Michael S. Palmer
Rezvani's Latest Post-Apocalyptic Monster Is a Ford F-150 Raptor Underneath
Verdad Gallardo
Post Fiend
Joined: Mar 2009
Posts: 11,798
Likes: 14
From: Mt. Shasta California
Ok. So I got her all done today, just waiting for the RTV to cure so I can put the diff oil in. Thought I would share some photos of the process for those who have not jumped into this procedure before. It really helps to have the seal installer, and I am fortunate enough to own one. It is stepped so that you get the seal on the axle PERFECTLY. It also doubles as the tool you use to push the seal into the knuckle and seat it at EXACTLY the right depth. I have read of others making seal drivers out of PVC, and I am all for engenuity and saving money. However, you might not get the depth just right on that seal, and that could have consequences down the road i.e.: hubs won't lock under vacuum and the inner dust seal wears out prematurely.
This is the seal driver used at the dealership.
Attachment 68872
Here is the seal seated on the axle. You can see there is a slight step up from the flange of the axle to the flat area of the seal. That is where your plastic washer with the grooves in it will sit. This step must be exact, or your washer won't be able to do it's job....this equals no 4x4 ESOF action. I put the axle in a big vise to hold it while I drive the seal on. T
Attachment 68865
Here is the seal driver on the shaft. There is a special tool that fits over the axle behind the seal driver (I forgot to take a picture of it), and that gets hit with a big hammer. This exerts EVEN pressure to the seal and pops it right into the knuckle. A little bit of bearing grease on the outside of that seal before inserting it into the knuckle makes this go REALLY quick.
Attachment 68866
Starting position.
Attachment 68867
Driven to EXACTLY the right depth when the tool bottoms out.
Attachment 68868
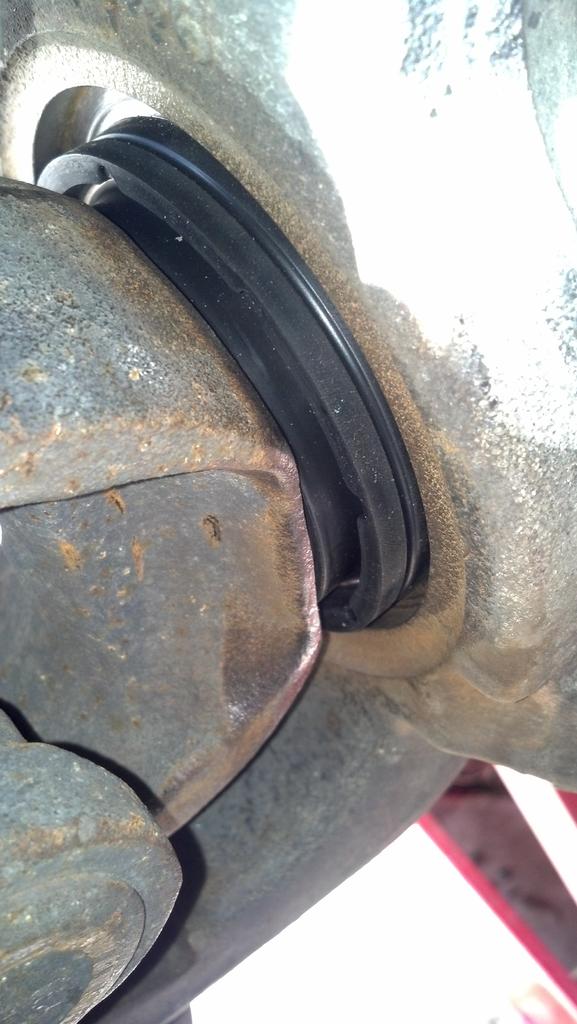
The result is a inner dust seal that sits snug up against the axle tube and is able to do it's job correctly without wearing out prematurely.
Attachment 68869
If anyone on the forums needs the tool and cannot rent one locally, I will send it to you (you pay the postage). It will fit in a small Priority Mail box, and it only costs like $6 for a 2-3 day delivery. Kinda like the traveling hub zerk thing that is going around. You would just go to USPS.com, buy the label, save it as a .pdf file and then email it to me. Then send it back when you are done. $12 and piece of mind that you did it exactly to the right depth.
This is the seal driver used at the dealership.
Attachment 68872
Here is the seal seated on the axle. You can see there is a slight step up from the flange of the axle to the flat area of the seal. That is where your plastic washer with the grooves in it will sit. This step must be exact, or your washer won't be able to do it's job....this equals no 4x4 ESOF action. I put the axle in a big vise to hold it while I drive the seal on. T
Attachment 68865
Here is the seal driver on the shaft. There is a special tool that fits over the axle behind the seal driver (I forgot to take a picture of it), and that gets hit with a big hammer. This exerts EVEN pressure to the seal and pops it right into the knuckle. A little bit of bearing grease on the outside of that seal before inserting it into the knuckle makes this go REALLY quick.
Attachment 68866
Starting position.
Attachment 68867
Driven to EXACTLY the right depth when the tool bottoms out.
Attachment 68868
The result is a inner dust seal that sits snug up against the axle tube and is able to do it's job correctly without wearing out prematurely.
Attachment 68869
If anyone on the forums needs the tool and cannot rent one locally, I will send it to you (you pay the postage). It will fit in a small Priority Mail box, and it only costs like $6 for a 2-3 day delivery. Kinda like the traveling hub zerk thing that is going around. You would just go to USPS.com, buy the label, save it as a .pdf file and then email it to me. Then send it back when you are done. $12 and piece of mind that you did it exactly to the right depth.
Cargo Master
Joined: Feb 2011
Posts: 3,450
Likes: 13
From: Forest lake minnesota
For you maybe , How about we just Thank the fellow FTE brother for offering something he paid money for and is offering for others to use..Like this Brent, Thank you Mike for offering your tools, Reps sent..
Post Fiend
Joined: Mar 2009
Posts: 11,798
Likes: 14
From: Mt. Shasta California
I did say thanks, but I am all for the fastest and easiest way to do things and the correct info. If you can't see where the seal is supposed to stop you probably wouldn't be able to use the special Ford tool either.
Cargo Master
Joined: Feb 2011
Posts: 3,450
Likes: 13
From: Forest lake minnesota
The Ford tool stops the seal in the proper location unlike the homemade one..
Post Fiend
Joined: Mar 2009
Posts: 11,798
Likes: 14
From: Mt. Shasta California
This is great stuff man. I was wondering, do you have to pull the diff cover? My outer axle tube dust seal is loose and just rides around on the axle shaft. I was going to just cut it off since every other D60 I have owned had no outer seal stock.
Just pulled the diff cover last week, cleaned the diff and filled it up with 30 bucks worth of synthetic gear oil!
My hubs seals seem fine, and I do not have auto hubs. They are also tight. That axle tube dust seal seems to have been ineffective for quite some time too. Maybe I should just cut it all the way off and don't try and fix what isn't broke!
Very generous of you to offer up that tool.
Just pulled the diff cover last week, cleaned the diff and filled it up with 30 bucks worth of synthetic gear oil!
My hubs seals seem fine, and I do not have auto hubs. They are also tight. That axle tube dust seal seems to have been ineffective for quite some time too. Maybe I should just cut it all the way off and don't try and fix what isn't broke!
Very generous of you to offer up that tool.
Seal stock?
Post Fiend
Joined: Mar 2009
Posts: 11,798
Likes: 14
From: Mt. Shasta California
Really? It takes about 2 seconds to see how deep your seal is and you might have to look 3 times (6 seconds). Of course it was nice of him to pass it around and I would do the same thing but it just isn't needed, many people in here have used the homemade one. No shipping, no waiting etc.
Thread Starter
|
Veteran/Sheepdog
Joined: Feb 2012
Posts: 6,047
Likes: 110
From: Western AR
This is great stuff man. I was wondering, do you have to pull the diff cover? My outer axle tube dust seal is loose and just rides around on the axle shaft. I was going to just cut it off since every other D60 I have owned had no outer seal stock.
Just pulled the diff cover last week, cleaned the diff and filled it up with 30 bucks worth of synthetic gear oil!
My hubs seals seem fine, and I do not have auto hubs. They are also tight. That axle tube dust seal seems to have been ineffective for quite some time too. Maybe I should just cut it all the way off and don't try and fix what isn't broke!
Very generous of you to offer up that tool.
Just pulled the diff cover last week, cleaned the diff and filled it up with 30 bucks worth of synthetic gear oil!
My hubs seals seem fine, and I do not have auto hubs. They are also tight. That axle tube dust seal seems to have been ineffective for quite some time too. Maybe I should just cut it all the way off and don't try and fix what isn't broke!
Very generous of you to offer up that tool.
No need to pull diff cover unless your inner bearing/inner seal are suspect or you are changing the oil.
The tool is in PA right now with another member. If anyone needs it, let me know, and I will get it forwarded over to you.