


Tune-up Troubles: Backfiring
Thread Starter
|
Senior User
Joined: Jan 2010
Posts: 249
Likes: 0
From: Mad City
Quite new to this stuff...
Details:
Truck: '75 F250 Highboy
Engine: '75 era FE (360 probably)
Distributor: Pertronix Billet-style HEI
Coil: Pertronix 45011
Wires: HEI
Plugs: new platinum, gapped to .054 vs .044 factory spec
I double- and triple-checked #1 "TDC" (compression stroke), plug wires (CCW 15426378) and leads ("key on 12V" to coil +, "ignition 12V" to coil "+", distributor red to coil +, distributor black to coil "-", ballast resistor removed). I marked "TDC" with chalk on the crankshaft pulley for future reference.
I adjusted the distributor position to +/- 20 degrees in 5 degree increments to see if I could get close to the correct timing location.
Best I could do was plumes of gasoline and smoke out the carb. Not many, but a few...
I went back to check TDC and discovered something very strange: The rotation of the crankshaft doesn't seem to rotate at the same rate as the distributor gear. This surprised me. Am I off by 180 degrees?
Help!

Junior User
Joined: Sep 2009
Posts: 55
Likes: 0
If you are getting back firing through the carb then you have a timing chain issue. Your intake valve is opening on the compression stroke. One easy way to tell is if you pull the passengers side valve cover you can watch the push rods as you rotate it over. If the valves are open then you need to replace your timing chain and reset your timing. it sounds like you are on the right path just check your timing first.
Thread Starter
|
Senior User
Joined: Jan 2010
Posts: 249
Likes: 0
From: Mad City
Thanks for the tip.
I was trying to avoid meeting my timing chain just yet, but looks like I can't procrastinate any more. Possibly has never been changed. The "good" news is that someone removed the balancer, so at least there's one step less on the tear-in. Have to still find a balancer from one of the yards, but it doesn't sound like it should be too hard..
I was trying to avoid meeting my timing chain just yet, but looks like I can't procrastinate any more. Possibly has never been changed. The "good" news is that someone removed the balancer, so at least there's one step less on the tear-in. Have to still find a balancer from one of the yards, but it doesn't sound like it should be too hard..
Post Fiend
Joined: Mar 2004
Posts: 6,056
Likes: 8
From: Union, Washington
It sounds to me that you are 180� out on the dist. still or you have the firing order wrong or backwards on the cap. Unless the timing chain is way the hell out it will not cause your symptoms and it is unlikely if the engine didn't do this before the tune up. The crank turns twice as fast as the cam (dist. gear).
FTE Leadership Emeritus


Joined: Jul 2002
Posts: 42,562
Likes: 423
From: Long Island USA

The crankshaft spins at twice the speed of the distributor. So, you can be 360 degrees off with the crankshaft, which works out to 180 degrees off at the distributor.
Normally, the spark plug fires on the compression stroke when both valves are closed. If you are 180 degrees out at the distributor, the spark plug will fire when the exhaust valve is almost closed, and if there's enough overlap, the intake valve is just starting to open. So? backfiring.
You COULD do a quicky, and just take all the spark plug wires at the distributor and move them 180 degrees.
Postmaster
Joined: Jan 2009
Posts: 4,584
Likes: 3
From: Chesapeake, Va.
Before you start ripping the front of the engine apart try this simple test first.
1. Take the cap off the dist., leave the rotor on.
2. Put a ratchet and socket on the bolt in the center of the balancer.
3. Rotate the engine 1/4 turn each way while watching the rotor.
4. If there is a lot of crank movement and little rotor movement both ways the gears and chain are shot.
Now you can start ripping the front of the engine apart.
Thread Starter
|
Senior User
Joined: Jan 2010
Posts: 249
Likes: 0
From: Mad City
Krewat: Thanks for the info. That's the type of stuff I love the heck out of FTE for...
Moto Mel: I think you MAY have been able to talk me out of it with your sage advice, but I've got a touch too much perfectionist in me:
I put in an order for a middle-of-the-line Cloyes timing set. I'll have to save off the new coolant I just added into a big pail to get it done, but since I'm gonna have to pull those crankshaft pulleys anyway to add a balancer (another thread), I figured I may as well just go ahead and actually do what the book (Haynes) says and actually find "true TDC".
Based on the condition of nearly every other part of the truck I've encountered, I figure a timing chain update won't hurt. I was trying to wait until I got the guts to do a full overhaul (hopefully next summer), but I don't want to blow out a head gasket with all of this guess-and-check stuff.
I'm guessing my (also clueless) buddy and I were off by 180 (ran okay before I started getting so adventurous) this last go around, but I'm going in... come he|| or high water.
Can anyone tell me what a timing pointer is and whether I'll need one? Saw one in the JEGS magazine...
Trending Topics
Postmaster
Joined: Jan 2009
Posts: 4,584
Likes: 3
From: Chesapeake, Va.
Originally Posted by jasonnerothin
I'm guessing my (also clueless) buddy and I were off by 180 (ran okay before I started getting so adventurous) this last go around, but I'm going in... come he|| or high water.
Can anyone tell me what a timing pointer is and whether I'll need one? Saw one in the JEGS magazine...
Can anyone tell me what a timing pointer is and whether I'll need one? Saw one in the JEGS magazine...
FTE Stories
Ford Trucks for Ford Truck Enthusiasts

Top 6 Best Deals Available on New Fords & Lincolns Right Now
Brett Foote
This Hennessey Takes the Expedition Tremor's Off-Roading Capability to the Next Level
Verdad Gallardo
Top 10 Fords at 2026 Carlisle Ford Nationals
Joe Kucinski
3 Best / 3 Worst Parts of Modern Ford Ownership
Brett Foote
10 Amazing Upgrades That Solve Common Ford Truck Owner Headaches
Pouria Savadkouei
Every 2026 Ford Engine Explained
Brett Foote
10 Ugly Ford Trucks That We Still Kinda Love
Joe Kucinski
10 Things Every Truck Owner NEEDS (2026 Edition)
Michael S. Palmer
Rezvani's Latest Post-Apocalyptic Monster Is a Ford F-150 Raptor Underneath
Verdad GallardoThread Starter
|
Senior User
Joined: Jan 2010
Posts: 249
Likes: 0
From: Mad City
Feel "better" now...
Finally got the front of my engine ripped apart. Here's what the current timing chain looks like:

And here's the deflection:
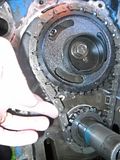
I'm gonna swap the whole thing out. In the first pic, you can kinda see that the "aluminum cup thingy" on top of the camshaft gear has moved (been deformed).
Just a quick question: I'm planning on turning the crankshaft to find TDC by using a pipe (monkey) wrench around a couple layers of shop rag. Is there a more elegant way of doing it?
FTE Leadership Emeritus
Joined: Jul 2002
Posts: 42,562
Likes: 423
From: Long Island USA
And by the way, the deflection you show doesn't look all that bad. But since you're there anyway, the cost of the chain is minimal. And use the crank bolt, BUT - space it out so you don't bottom the bolt in the crank - you can either strip the crank (or more likely the bolt) or get it so tight in there it'll be almost impossible to get out without a monkey wrench

Postmaster
Joined: Jan 2009
Posts: 4,584
Likes: 3
From: Chesapeake, Va.
Finally got the front of my engine ripped apart. Here's what the current timing chain looks like:
And here's the deflection:
I'm gonna swap the whole thing out. In the first pic, you can kinda see that the "aluminum cup thingy" on top of the camshaft gear has moved (been deformed).
That is the fuel pump cam and it's made that way. NOT deformed.
Just a quick question: I'm planning on turning the crankshaft to find TDC by using a pipe (monkey) wrench around a couple layers of shop rag. Is there a more elegant way of doing it?
Thread Starter
|
Senior User
Joined: Jan 2010
Posts: 249
Likes: 0
From: Mad City
Electric Choke Wiring
Okay, so the wiring doesn't seem to be quite right. I used Pertronix tech support to get help on this, but it doesn't seem to make sense what's going on - probably didn't understand correctly. (My machine has a Edelbrock #1406 carb with built-in choke + P'nix gear for HEI - not CD, mind you, just plain ol' HEI with a billet distributor).
I get that there are many 12V DC circuits in my rig, but for purposes of simplification, I view there as being two: 1. When the key is at "ignition", 2. When the key is turned to "on". Let's call them "I" and "on".
I heard the tech at Pertronix told me that the anode (+) on the coil needs a 12V lead from both, which makes sense to me. So now I have it wired is as follows:
1. Starter relay "I" to coil "+".
2. Old coil wire (less resistor) to coil "+".
3. Starter relay "I" to choke t-stat.
I'll leave the distributor wiring out for simplicity.
So, I used a voltmeter to check that the coil was getting current on both the "I" and the "on" circuits. And the choke assembly was getting current on "I".
But the problem is that the choke housing gets current on "+" as well (through the connection at the starter relay "I" electrode). I'm guessing that the "I" lead to the coil is on the wrong circuit.
Anyone got an obvious explanation for me that doesn't get me too deep into the factory wiring (that incidentally doesn't match the Haynes color codes ).
).
The word he used was "starter bypass".
I get that there are many 12V DC circuits in my rig, but for purposes of simplification, I view there as being two: 1. When the key is at "ignition", 2. When the key is turned to "on". Let's call them "I" and "on".
I heard the tech at Pertronix told me that the anode (+) on the coil needs a 12V lead from both, which makes sense to me. So now I have it wired is as follows:
1. Starter relay "I" to coil "+".
2. Old coil wire (less resistor) to coil "+".
3. Starter relay "I" to choke t-stat.
I'll leave the distributor wiring out for simplicity.
So, I used a voltmeter to check that the coil was getting current on both the "I" and the "on" circuits. And the choke assembly was getting current on "I".
But the problem is that the choke housing gets current on "+" as well (through the connection at the starter relay "I" electrode). I'm guessing that the "I" lead to the coil is on the wrong circuit.
Anyone got an obvious explanation for me that doesn't get me too deep into the factory wiring (that incidentally doesn't match the Haynes color codes
).The word he used was "starter bypass".
FTE Leadership Emeritus
Joined: Jul 2002
Posts: 42,562
Likes: 423
From: Long Island USA
The choke housing gets current when? When cranking? If so, doesn't matter, it won't hurt anything.
Does the "old coil wire" get voltage when cranking?
And on top of all this, does it run yet?
(oh, and a "+" is an ANODE not cathode, but don't use those terms to describe a coil, just use what's marked on the coil - "+" and "-")
Does the "old coil wire" get voltage when cranking?
And on top of all this, does it run yet?
(oh, and a "+" is an ANODE not cathode, but don't use those terms to describe a coil, just use what's marked on the coil - "+" and "-")
Thread Starter
|
Senior User
Joined: Jan 2010
Posts: 249
Likes: 0
From: Mad City
Doesn't run yet. I'm replacing the timing chain. Finally got time to work on her this week. Plan is to have her running again this afternoon.
I'll look into getting a better answer for your questions about charge when cranking once the engine's back together.
I discussed this with a guy who knows something about electronics (but not necessarily 70s era FoMoCo electronics). He suggested that "if I designed this system" the key mechanism "when cranking" and when "on" would supply ground and not voltage to the relay/coil.
Is that how it works? (That might explain why the battery would be sitting right next to the relay.)