


Dash lights not working
Thread Starter
|
Tuned

Joined: Apr 2010
Posts: 366
Likes: 3
Hello all. I just got my 55 F-100 the other day and now it's time to start working out some of the bugs-the first one being the dash lights. Since I pulled the bulbs and they look good, that rules out the simple fix. One thing I didn't do and probably should have was put a test light on the socket to see if its receiving and juice. Since the shaft on the light switch turns, I'm assuming this controls the brightness? Could this be possibly causing the problem? Since I'm new to the world of classic trucks I may have a few other questions-hopefully they won't be too dumb. Hopefully the shop manual that I ordered a few days ago wll be here soon to help me along. Appreciate any troubleshooting tips anyone can offer on the dash lights. Thanks!

Post Fiend
Joined: May 2008
Posts: 7,641
Likes: 21
From: Poway, Ca.
Hi Steve! Welcome to FTE.
I missed this the other day when you wrote it, so I'll tell you a few things that might help. This is my 5000th post by the way!
First of all that 55 was originally built with a 6 volt electrical system. We need to know if it has been converted to 12 volt.
The dash lights are VERY simple. There is power fed from the headlight switch through a rheostatic dimmer (the thing that turns) and the power goes right out to the light bulb socket.
What's important to note is that if the truck in now 12 volt. The dimmer won't work at all (won't dim) the lights just stay bright until you get almost all the way over to the off position on the dimmer. If you still have the 6 volt bulbs in there they won't work at all with the dimmer.
Also, the lights work because the sockets are clip mounted into the dash holes and that provides the ground for them. The contact has to be good, tight and dirt free between the socket and instrument panel. Also, the instrument panel has to have a good clean connection to the dash.
So what would I do to fix this problem. First, ascertain the voltage of the truck 6 or 12 volt.
Then pull one socket and clean it out and place a new bulb in it - of the correct voltage. Attach an alligator clip wire to the tangs of the socket and connect the other end to a good ground.
If your headlight switch has a set of tongs for a glass tube fuse on the back, replace the fuse with a new one - clean the contacts first. It's 10 amp.
Rotate the headlight switch **** fully to the right (fully clockwise) then pull the switch out to the first stop - parking lights. Check for a light - also check the parking lights and running lights to see if they come on. Then pull the headlight **** out to the last position - headlights. Check for a light again, and check to see that the headlights are on. If the headlights and parking lights came on and there were no dash light lit, the rheostat is shot and it's time for a new headlight switch.
If the switch is still good then cleaning the ground contact for the socket, replacing the bulb with the correct voltage, or replacing the fuse on the back of the headlight switch will probably fix the problem.
You can test the bulbs by touching the base of the bulb and the side of the bulb to a 9 volt battery.
Thread Starter
|
Tuned
Joined: Apr 2010
Posts: 366
Likes: 3
Hi Julie. Do I get a T-Shirt for being your 5000th post? LOL! Thank you very much for taking the time to help me troubleshoot the problem. Here are some further details I can share at this point.
The truck is stock and is a 6 volt system.
The dash is in remarkable shape with no signs of corrosion and the bulb socket fits good and tight. Like I mentioned in my original post, I should have hooked-up my test light and see if there was any current flowing.
Both parking lights and running lights are good. The previous owner told me that sometimes he had to "jiggle" the **** in order to get the dash lights to work. Sure sounds like a switch issue at this point.
My switch has the glass tube fuse and I will go ahead and check that as well.
Could I possibly disconnect the wire to the rheostat and reconnect to the tail light terminal on the switch?
Thanks again Juile!
Post Fiend
Joined: May 2008
Posts: 7,641
Likes: 21
From: Poway, Ca.
Well if everything works except the dash lights and you are jiggling the switch to get those to work, then yes I would say it's a bad contact at the switch - either the wire coming off the switch is loose (at the switch tab or in the connector itself) or the contact in the switch is bad. When you run the lights dimmed a lot those posts get hot and sometimes even melt.
Check the integrity of the wire connection first at the switch and if that doesn't help it's probably time for a new switch.
Check the integrity of the wire connection first at the switch and if that doesn't help it's probably time for a new switch.
Post Fiend
Joined: May 2008
Posts: 7,641
Likes: 21
From: Poway, Ca.
Trending Topics
Elder User
Joined: Mar 2008
Posts: 541
Likes: 0
From: Ardmore, TN / AL
FTE Stories
Ford Trucks for Ford Truck Enthusiasts

Top 10 Fords at 2026 Carlisle Ford Nationals
Joe Kucinski
3 Best / 3 Worst Parts of Modern Ford Ownership
Brett Foote
10 Amazing Upgrades That Solve Common Ford Truck Owner Headaches
Pouria Savadkouei
Every 2026 Ford Engine Explained
Brett Foote
10 Ugly Ford Trucks That We Still Kinda Love
Joe Kucinski
10 Things Every Truck Owner NEEDS (2026 Edition)
Michael S. Palmer
Rezvani's Latest Post-Apocalyptic Monster Is a Ford F-150 Raptor Underneath
Verdad Gallardo
Top 10 Most Expensive Ford Trucks Ever Sold on Bring a Trailer
Joe Kucinski
2027 Ford Super Duty Buyer's Guide (Every Model, Engine, & Package)
Brett Foote
Post Fiend
Joined: May 2008
Posts: 7,641
Likes: 21
From: Poway, Ca.
No offense taken, I just figured if it got missed once, the OP or someone with a similar problem reading this may have missed it to and wanted to refer them back to the whole discussion.
You are right, it's important, and probably worth mentioning twice!
You are right, it's important, and probably worth mentioning twice!
Elder User
Joined: Mar 2008
Posts: 541
Likes: 0
From: Ardmore, TN / AL
10-4, I run into that all the time on DC forklifts that I work on. I also see many static issues and shorted components(batteries, switches, transistors, relays, OTM cables) that cause multiple headaches. Batteries seem to cause the biggest problems due to lack of proper charging and watering procedures.
Thread Starter
|
Tuned
Joined: Apr 2010
Posts: 366
Likes: 3
55 Dash Lights
Good evening Julie. Well I learned one thing rather quick...power runs through the switch for when I took a small blade screwdriver to pry out the glass fuse, I received a quick spark. Anyhow, the fuse was good as well as the contacts were clean. I then removed one of the sockets from the dash and put my test light in the socket to see if it was receiving juice with the switch on...nothing! Unlike my 46 Ford Coupe, the light switch wire connections are really tight and hard to reach without removing the switch. Since my 54-55 F100 shop manual hasn't arrived, how is the light switch removed? I noticed a small screw on the bottom of the pull shaft **** but is there a lock clip that needs to be removed in order to pull the switch? Once I have the switch down to where I can check wire connections, if all connections are good and tight, what I may resort to doing is remove the connection from the rheostat and reconnect the dash light wire to the tail light terminal. I never dim the dash lights in the first place so I can live without that feature. I see replacement switches are a bit pricey. Thanks again for all of your help. Steve
Post Fiend
Joined: May 2008
Posts: 7,641
Likes: 21
From: Poway, Ca.
Hi!
Yep all headlight switches are hot! And the 55 channeled the generator power and distribution out through the light switch as well. Of course you tried rotating the **** completely from side to side to get them to turn on - right.
Disconnect your battery before you remove the switch.
There are two step to removing the switch. First, there is a small button on the bottom of the switch body. Make sure the headlight **** is all the way in, push the button and slowly pull out the **** while slowly rotating the ****. It should unlock and come completely out.
Then, there is a bezel screwed onto the switch body on the outside of the dash. Get a set of small long nose pliars, insert then into the two slots in the bezel and unscrew it. This may be a seperate slotted nut inside the bezel, but either way, it's gotta come out. The switch is now free.
Remember when testing those lights with power on you need to have the tester connected to a ground.
Once you have dropped the switch down, it should look like this:

The tab centered by the front rheostat should be the tab for the dash lights.
Remove the wire connector from the tab. Set the switch someplace it is not going to touch ground.
Reconnect your battery. Be careful, the round terminal on the switch is hot now as are the back two onthe other side!
Check for continuety between the connector on the wire going to the light, and ground.
If that's ok (if not you have a bad ground for the light socket or a broken wire), reinsert the pull **** (just push and twist) then after it locks pull it out all the way - be carefull all those terminals are hot.
Test for 6 volts between that center tab and ground. Try turning the **** and checking.
If that works then you have a wire problem running up to the light. If it doesn't then the rheostat is broke.
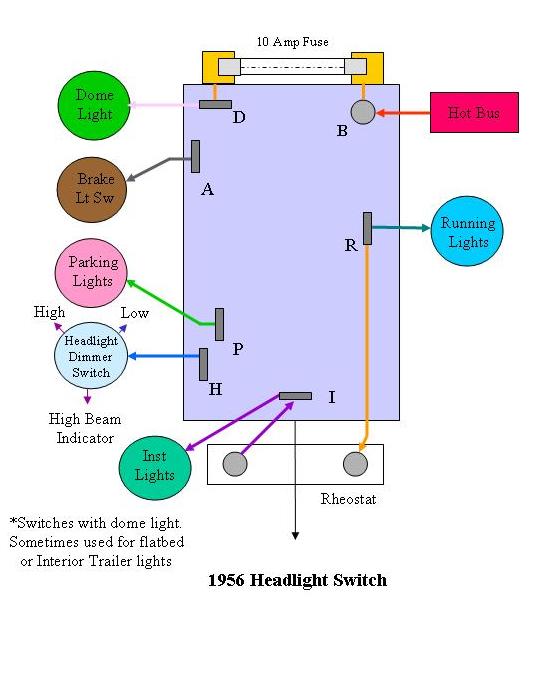
Disconnect the battery and label your wires. Disconnect the wires and take the switch to a work bench. Check for continuety from the center tab to the long brass tab in front on the right. Twist the **** while you check this. See if you can see the coiled hard wire in the rheostat. There is a small spring loaded arm/tab that should be pressing on the coil to make a contact as it turns. It may be the end of that long brass shunt coming back from the slotted post on the right center (marked "R" in teh drawing below). It may have bent so it's not making contact, and it may be broken off. If you can see it and it's not broken, try gently bending it onto the coil. If it's broke your screwed.
If you don't want to fool with it and don't need to dim the instrument lights, you can join the instrument light wire with the running light wire (get a new connector and put both wires in it and crimp together, then install on the running light terminal which is the long slotted one on the right hand side center marked "R" in the drawing below (the round post on the right toward the back of the switch is power in [HOT BUS]).
It's difficult to describe this stuff in writing - I hope this drawing helps.
Here's a drawing of a 56 switch. It should be the same except it has a 12 volt rheostat.
Yep all headlight switches are hot! And the 55 channeled the generator power and distribution out through the light switch as well. Of course you tried rotating the **** completely from side to side to get them to turn on - right.
Disconnect your battery before you remove the switch.
There are two step to removing the switch. First, there is a small button on the bottom of the switch body. Make sure the headlight **** is all the way in, push the button and slowly pull out the **** while slowly rotating the ****. It should unlock and come completely out.
Then, there is a bezel screwed onto the switch body on the outside of the dash. Get a set of small long nose pliars, insert then into the two slots in the bezel and unscrew it. This may be a seperate slotted nut inside the bezel, but either way, it's gotta come out. The switch is now free.
Remember when testing those lights with power on you need to have the tester connected to a ground.
Once you have dropped the switch down, it should look like this:
The tab centered by the front rheostat should be the tab for the dash lights.
Remove the wire connector from the tab. Set the switch someplace it is not going to touch ground.
Reconnect your battery. Be careful, the round terminal on the switch is hot now as are the back two onthe other side!
Check for continuety between the connector on the wire going to the light, and ground.
If that's ok (if not you have a bad ground for the light socket or a broken wire), reinsert the pull **** (just push and twist) then after it locks pull it out all the way - be carefull all those terminals are hot.
Test for 6 volts between that center tab and ground. Try turning the **** and checking.
If that works then you have a wire problem running up to the light. If it doesn't then the rheostat is broke.
Disconnect the battery and label your wires. Disconnect the wires and take the switch to a work bench. Check for continuety from the center tab to the long brass tab in front on the right. Twist the **** while you check this. See if you can see the coiled hard wire in the rheostat. There is a small spring loaded arm/tab that should be pressing on the coil to make a contact as it turns. It may be the end of that long brass shunt coming back from the slotted post on the right center (marked "R" in teh drawing below). It may have bent so it's not making contact, and it may be broken off. If you can see it and it's not broken, try gently bending it onto the coil. If it's broke your screwed.
If you don't want to fool with it and don't need to dim the instrument lights, you can join the instrument light wire with the running light wire (get a new connector and put both wires in it and crimp together, then install on the running light terminal which is the long slotted one on the right hand side center marked "R" in the drawing below (the round post on the right toward the back of the switch is power in [HOT BUS]).
It's difficult to describe this stuff in writing - I hope this drawing helps.
Here's a drawing of a 56 switch. It should be the same except it has a 12 volt rheostat.