Vintage Air install pictures
#1
 02-27-2010, 05:55 PM

Join Date: Oct 2005
Location: northwestern Ontario
Posts: 263,397
Received 4,195 Likes
on
2,688 Posts
Vintage Air install pictures
I was wondering if all who has installed a vintage air sure fit in thier 53-56 F100's could please post some pictures. I'm mostly interested with the under dash evaporator installation. The instruction sheet that comes with the kits sucks putting it mildly. If anyone knows of a good write up from a magizine or video from a show that has a link would be much appreciated. I wrote in another thread that I was discouraged, well I'm over that and only extremly frustrated now. I honestly don't know how they can call this a sure fit kit . As always , thanks.....
.....John
. As always , thanks..........John
#2
02-27-2010, 10:09 PM

John, I�m going to be doing this in my �51 and so while we wait for someone to come along with pictures we are all here to help share your burden, so if your blood pressure can take it could you maybe give us a blow by blow of the difficulties with the install? What you have done, have not and what�s not working. Thanks. (Go Team Canada). 
#3
02-27-2010, 10:50 PM
I got a friend out west who did an install article. I have the magazine I cant remember which issue it is. Let me get a hold of him and I will let you know. Hang in there bud. New Flash. I just found a article done by Bobco and the photos are in color. PM me your address and I will you mail you a color copy of the article.
#4
02-28-2010, 08:53 AM

Posting Guru
Join Date: Jul 2006
Location: Westminster,Md
Posts: 1,276
Likes: 0
Received 0 Likes
on
0 Posts
John, the unit your installing, did you get it thru Mid 50? VintageAir "sure-fit" correct? Are your problems/ frustrations arising from the evap case install in particular? I may be able to offer some insight., I installed that kit a couple of years ago in my 55..it left a pretty good memory and I have less hair to prove it!! LoL! Let the questioning begin!
Chris
Chris
#5
02-28-2010, 09:06 AM
Join Date: Oct 2005
Location: northwestern Ontario
Posts: 263,397
Received 4,195 Likes
on
2,688 Posts
John, I�m going to be doing this in my �51 and so while we wait for someone to come along with pictures we are all here to help share your burden, so if your blood pressure can take it could you maybe give us a blow by blow of the difficulties with the install? What you have done, have not and what�s not working. Thanks. (Go Team Canada).
#6
02-28-2010, 11:42 AM
So would you say from your experience that it is or would have been better to temporary mount / install the behind dash equipment (A/C, stereo, wiper motor, etc.) before even starting to fill / refinish the firewall? 

I would have filled all the holes on firewall, body work, painted beforehand and started fresh making new holes but I think you are right, this would also be a good time to do any welding of brackets under dash (to avoid ugly screw/bolt heads on engine side of firewall) wouldn�t? Thanks for the tip!
I would have filled all the holes on firewall, body work, painted beforehand and started fresh making new holes but I think you are right, this would also be a good time to do any welding of brackets under dash (to avoid ugly screw/bolt heads on engine side of firewall) wouldn�t? Thanks for the tip!
#7
02-28-2010, 12:45 PM
Join Date: Oct 2005
Location: northwestern Ontario
Posts: 263,397
Received 4,195 Likes
on
2,688 Posts
So would you say from your experience that it is or would have been better to temporary mount / install the behind dash equipment (A/C, stereo, wiper motor, etc.) before even starting to fill / refinish the firewall?
I would have filled all the holes on firewall, body work, painted beforehand and started fresh making new holes but I think you are right, this would also be a good time to do any welding of brackets under dash (to avoid ugly screw/bolt heads on engine side of firewall) wouldn�t? Thanks for the tip!
I would have filled all the holes on firewall, body work, painted beforehand and started fresh making new holes but I think you are right, this would also be a good time to do any welding of brackets under dash (to avoid ugly screw/bolt heads on engine side of firewall) wouldn�t? Thanks for the tip!
Trending Topics
#8
02-28-2010, 12:56 PM
Join Date: Oct 2005
Location: northwestern Ontario
Posts: 263,397
Received 4,195 Likes
on
2,688 Posts
John, the unit your installing, did you get it thru Mid 50? VintageAir "sure-fit" correct? Are your problems/ frustrations arising from the evap case install in particular? I may be able to offer some insight., I installed that kit a couple of years ago in my 55..it left a pretty good memory and I have less hair to prove it!! LoL! Let the questioning begin!
Chris
Chris
#10
02-28-2010, 06:08 PM
Join Date: Oct 2005
Location: northwestern Ontario
Posts: 263,397
Received 4,195 Likes
on
2,688 Posts
#11
02-28-2010, 06:56 PM
John,
Not sure if this is gonna work but I scanned the two pages of the article you need. I found out my wife's printer in the kitchen has a scanner. Boy Im engaged and know what is going on dont I??
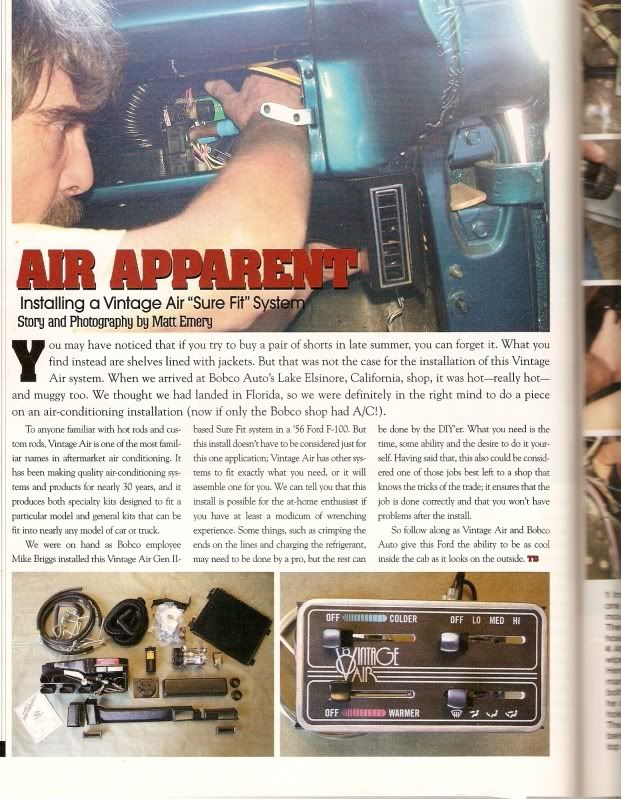
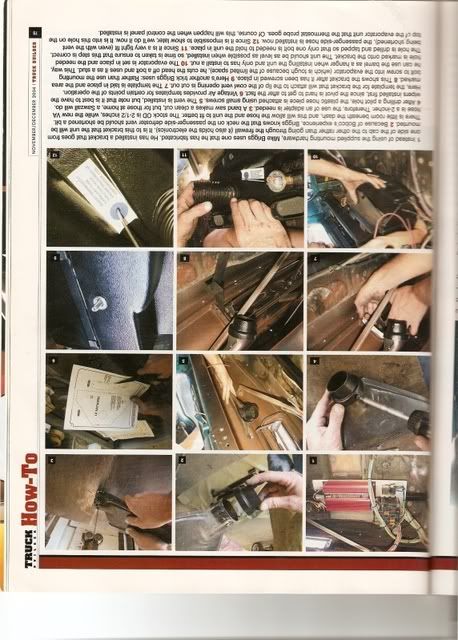
I will email you the second page. Seems like you may be at a disadvantage plus Mike Briggs, BOBCO's guy in the picture has his hand going thru the glovebox to aid in the installation
Not sure if this is gonna work but I scanned the two pages of the article you need. I found out my wife's printer in the kitchen has a scanner. Boy Im engaged and know what is going on dont I??
I will email you the second page. Seems like you may be at a disadvantage plus Mike Briggs, BOBCO's guy in the picture has his hand going thru the glovebox to aid in the installation

#14
02-28-2010, 08:51 PM
I put a unit in my '50 and made all the brackets and fought with it until I was really irritated. I looked around and found a better way. I put Hot Rod Air in my '49. They sell a sheet metal bracket for mounting the unit behind the dash. It is the real deal. I put 4 bolts through the firewall and spaced the bracket off the firewall with 2 washers on each bolt. I could have welded studs to the firewall and eliminated the bolts, but I used SS carriage bolts and they look pretty good. Once the bracket is bolted to the firewall, slide the unit into it and put on 3 nuts and your done. It's rock solid and super easy. I don't think VA has anything like it. Unfortunately, I don't have any pictures. You can see the bracket on Hot Rod Air web site,