


97 expy bad missfire!!

Thread Starter
|
Freshman User
Joined: Feb 2009
Posts: 30
Likes: 0
97 expy bad missfire!!
my check engine light has been on for some time and the code is for o2 sensor and was running fine for several months. Then the other day it started missing real bad and the check engine light would flash then stay steady on. it seems to miss more when under a load like going up hill and having to give a little gas. I limped home and u can hear it miss. soundls like one cylinder so today i took it to advanced and here are the codes they got p0133, p1131,p0307. the one code for o2 sensor has been on for a while so not concerned with that. its the miss fire on cylinder 7 that im sure is the culprit. it had the 5.4l engine and tune up was done last year by previous owner supposedly. What could it be and where would be the first place to start? Im figuring plug, wire, or injector.

Senior User
Joined: Feb 2009
Posts: 491
Likes: 4
From: Southern Illinois
You are on the right track by getting the codes checked and deciphering it. If it is cylinder number 7 as you suggest, I'd start by replacing the wire first. I had a miss on number 6 and the motor would shudder under a load. Simply replacing the wire fixed it. If that is not it, I'd look at the plug and make sure its not overly fouled up. If that does not do it, replace the Coil Over Plug (COP), or coil for short.
However, I experienced another shudder after replacing the wire on number 6. This was at highway speeds and the motor felt like it was starved for fuel upon acceleration. In this case, 3 of my injectors were cracked at the bottom and my fix for this issue was to replace all of my injectors with Bosch/Motorcraft remans off Ebay. They were the updated design, - or so I took it - with an open tip and no shudder problems what-so-ever.
However, I experienced another shudder after replacing the wire on number 6. This was at highway speeds and the motor felt like it was starved for fuel upon acceleration. In this case, 3 of my injectors were cracked at the bottom and my fix for this issue was to replace all of my injectors with Bosch/Motorcraft remans off Ebay. They were the updated design, - or so I took it - with an open tip and no shudder problems what-so-ever.
Thread Starter
|
Freshman User
Joined: Feb 2009
Posts: 30
Likes: 0
ok thanks. where is the number 7 wire. just a brief glance and i couldnt see a single plug wire. lol. and what is the easiest way to access it? Does anybody have a visual aid or how to on this matter? I do beleive i may have a bad injector just because of something i just thought of. when i first start the truck for the first time for the day after sitting all night it would shudder a little for just about 30 secs like it was overloaded with fuel. Im thinking that maybe it may have a injector that is leaking off while sitting and that may of fouled plug out. who know. lol.
Senior User
Joined: Feb 2009
Posts: 491
Likes: 4
From: Southern Illinois
Here is what an ignition coil looks like coupled to the rubber boot. The spring is inside the boot. Simply locate the number 7 cylinder, unscrew the 7mm bolt holding the coil pack in place, disconnect the wiring harness plug, and pull out. The boot simply pulls off the coil pack exposing the spring. Pull the spring off and replace. Reinstall and see if the problem goes away.

Here is the firing order of the 4.6 and 5.4 motors. 7 is a little difficult to access but NOT as bad as the passenger side. The pass side will drive you nuts the first time around.

Any questions just ask.
As for fuel injectors, I had a post on that. I'll try and find what I said.

New User
Joined: Nov 2009
Posts: 5
Likes: 0
Mine had a shutter like this and a code for a misfire on number 4 cyl. I replaced the coil and solved it. One thing it wasn't long before it did it again. Come to find out I had a small leak on a coolant hose for the heater that ran over the top and shorted the coil. I would try that if it were me. The ones in the back are a pain to get to so be patient.
Thread Starter
|
Freshman User
Joined: Feb 2009
Posts: 30
Likes: 0
ok thanks. may try to tinker with it this week. i had explorer with 5.0v8 in it and it was easier to get to plugs by going through the fender well. is it easier that way. i think i seen the coils now. they were right below the injector rail. i wished someone had a picture of the engine bay where number 7 is.
No problem. The modular motor does not have spark plug wires nor a distributor like the old pushrod motors. These vehicles are COP meaning there is a coil pack that delivers the spark through a wire (actually looks like your typical spring) to the plug. It is insulated by a rubber boot.
Here is what an ignition coil looks like coupled to the rubber boot. The spring is inside the boot. Simply locate the number 7 cylinder, unscrew the 7mm bolt holding the coil pack in place, disconnect the wiring harness plug, and pull out. The boot simply pulls off the coil pack exposing the spring. Pull the spring off and replace. Reinstall and see if the problem goes away.
Here is the firing order of the 4.6 and 5.4 motors. 7 is a little difficult to access but NOT as bad as the passenger side. The pass side will drive you nuts the first time around.
Any questions just ask.
As for fuel injectors, I had a post on that. I'll try and find what I said.
Here is what an ignition coil looks like coupled to the rubber boot. The spring is inside the boot. Simply locate the number 7 cylinder, unscrew the 7mm bolt holding the coil pack in place, disconnect the wiring harness plug, and pull out. The boot simply pulls off the coil pack exposing the spring. Pull the spring off and replace. Reinstall and see if the problem goes away.
Here is the firing order of the 4.6 and 5.4 motors. 7 is a little difficult to access but NOT as bad as the passenger side. The pass side will drive you nuts the first time around.
Any questions just ask.
As for fuel injectors, I had a post on that. I'll try and find what I said.
Senior User
Joined: Feb 2009
Posts: 491
Likes: 4
From: Southern Illinois
The COPs are somewhat hidden in all the wires and stuff so you will have to hunt for it. It's not difficult; I would say its more on the lines of training your eyes to see them. Once you remove the air cleaner assembly, the number 5 COP and injector is sitting below the the power steering reservoir. Starting with the number 5 COP, count two back. It may actually be easier to locate the number 7 fuel injector since it should be orange/yellow. Sitting right next to the injector will be the COP.
The coils sit in a valley between the valve covers and the aluminum intake. I don't have a picture myself but maybe these can help:
The coils are sitting underneath the stainless/chrome fuel rail - the thing circled in red is a part of the fuel rail. The fuel rail runs in parallel with the COPs and cylinders. The COPs in this picture look to have yellow paint marks on top of them and white lettering. The square black plug attached to the COP it is simply has a tab on the bottomside that you depress and it disconnects. Sounds confusing but its really not. You just gotta get in there and feel around.
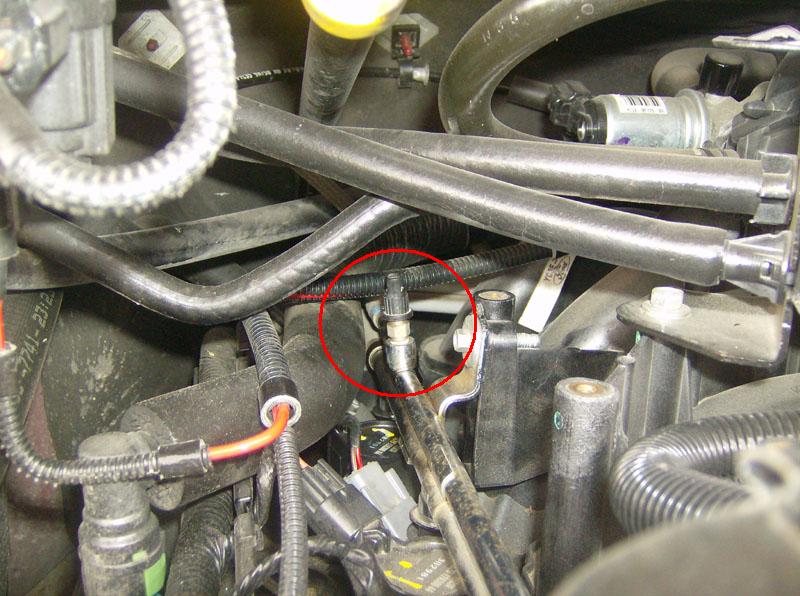
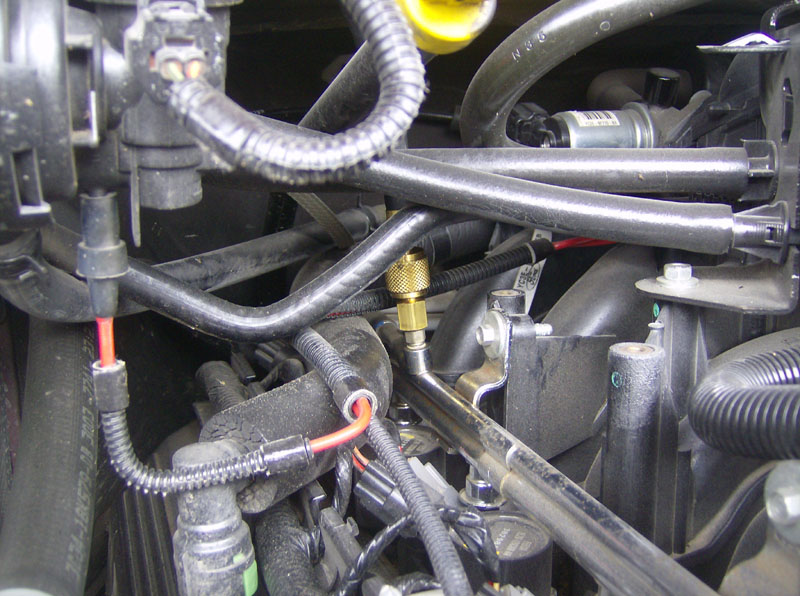
If I can find the photos I took, I will post it later tonight.
Trending Topics
Thread Starter
|
Freshman User
Joined: Feb 2009
Posts: 30
Likes: 0
thanks alot. where is a good place to get the cop. im going to go on and change the plug while im in there cause im sure it is fouled out after being thrown fuel. does just the coil come with it when you buy it or does the boot and all come with it.
FTE Stories
Ford Trucks for Ford Truck Enthusiasts

Top 10 Most Expensive Ford Trucks Ever Sold on Bring a Trailer
Joe Kucinski
2027 Ford Super Duty Buyer's Guide (Every Model, Engine, & Package)
Brett Foote
Top 10 Ford Truck Tragedies
Joe Kucinski
AEV FXL Super Duty - the Super Duty Raptor Ford Doesn't Make
Brett Foote
Lobo Vs Lobo: Proof the F-150 Lobo Should Be Even Lower!
Michael S. Palmer
Ford's 2001 Explorer Sportsman Concept Looks For a New Home
Verdad Gallardo
10 Best Ford Truck Engines We Miss the Most!
Joe Kucinski
2026 Shelby F-150 Off-Road: Better Than a Raptor R?
Brett Foote
2027 Super Duty Carhartt Package First Look: 12 Things You NEED to Know!
Michael S. Palmer
Senior User
Joined: Feb 2009
Posts: 491
Likes: 4
From: Southern Illinois
The two rear most plugs are difficult to access. Period. When I did my tune up, I had to remove the fuel rail on the driver's side to even access the coil and plug because there is some round thing (forgive I don't know what it exactly is) attached to the fuel rail kept me from getting to it. Some members have stated they can remove the coil and boot without removing the rail, but for my 97, I had to. (It may be that Ford revised the design in later years but I don't know).
Essentially, this is why I wanted you to check the spring first, followed by the coil before cracking the plug...and here's why:
The actual plug sits 3-4 inches down in the head thus the reason the boot is long. Before you crack the plug, I recommend doing two things: spraying the hole out with compressed air followed by spraying a little penetrating oil and letting it sit for an hour or so. (I actually let mine sit over night)
Note: Only remove and reinstall plugs when the heads are cold. Aluminum expands and contracts with heat and cold.
Next, you are going to need various extensions, swivels, 6 inches of 3/8ths 'ID' fuel line, and a 3/8 torque wrench. The plug does sit slightly angled in the hole so you will need those to even gain access to it. Once removed, take your new Motorcraft stock replacement plug, gap it to .054 and put a good amount of anti-seize on the threads.
Since its difficult to feel the new plug being threaded back in the hole, put the end of the plug in the fuel line (it will stay trust me) and using this method start the plug in the threads till it becomes tight. Pull up and remove the fuel line. Check to make sure the plug is sitting correctly in the heads and threaded right using a mirror. You do not want to cross-thread your plug. Then, using your extensions, swivels, and plug socket and TORQUE wrench, torque the plug to 12 ft lbs. It essentially the equivalent to hand tight plus a little more 'oomph'. DO NOT OVER-TIGHTEN THE PLUG IN THE HEAD. The heads are aluminum and you risk, in my opinion, stripping the head or worse yet, increasing your chances of a plug blow out which is a whole other situation in itself.
I know this sounds difficult but it's not. If you need pictures, I would be happy to take some if need be.
Tom
Thread Starter
|
Freshman User
Joined: Feb 2009
Posts: 30
Likes: 0
the pictures would be awesome. i just plan on replaceing the one that is bad. can u post a link to the kits on ebay. i cant find them for the life of me and when i see them on parts train. they are 54 dollars apiece.

Thread
Thread Starter
Forum
Replies
Last Post
