





Rotted Sill Plate

Thread Starter
|
Postmaster
Joined: Aug 2004
Posts: 4,004
Likes: 1
From: North of Boston MA

Rotted Sill Plate
I have a 24'x24' garage attached to my house by a 16' breezeway. Recently I began a window replacement project and in the process found that I have about 30' of rotted sill plate in the rear wall, mostly in the area under the windows that have probably been leaking since they went in based on how they were installed.
I've already partially demolished the rear wall to try to get a better idea on what is happening and it looks like the 4x6 non-pressure treated plate has been attacked from the bottom up by both water and termites or carpenter ants. I've found no active insects but did find that the house had been treated by the prior owner.
So, I'm planning to repair the damaged plate by supporting the roof structure with strong-backs, removing the shingles and some sheathing and lap-jointing in some new pressure treated lumber. I've estimated the materials to do the job will cost me $600-$700 plus a whole ton of my time. The couple contractors that have looked at it won't even give me a price but I've got a $5000 number in my head based on just a wild-assed guess.
Does anyone have any better ideas on fixing this? I'm sure there must be an epoxy injection system to do this type of repair.
Any thoughts?
Thanks
I've already partially demolished the rear wall to try to get a better idea on what is happening and it looks like the 4x6 non-pressure treated plate has been attacked from the bottom up by both water and termites or carpenter ants. I've found no active insects but did find that the house had been treated by the prior owner.
So, I'm planning to repair the damaged plate by supporting the roof structure with strong-backs, removing the shingles and some sheathing and lap-jointing in some new pressure treated lumber. I've estimated the materials to do the job will cost me $600-$700 plus a whole ton of my time. The couple contractors that have looked at it won't even give me a price but I've got a $5000 number in my head based on just a wild-assed guess.
Does anyone have any better ideas on fixing this? I'm sure there must be an epoxy injection system to do this type of repair.
Any thoughts?
Thanks

Super Moderator


Joined: Jan 2008
Posts: 40,046
Likes: 1,524
From: Maine, Virginia

I don't think that apoxy is going to give you the structural integrity that you'll need in the suds and load bearing surfaces.
I think you're on the right track with supporting your roof with strong backs. Make it strong enough so you can completely abate the affected area, lay a new sill plate and sister in new studs as needed. This is a great opportunity to upgrade insulation and sheathing.
Tim
I think you're on the right track with supporting your roof with strong backs. Make it strong enough so you can completely abate the affected area, lay a new sill plate and sister in new studs as needed. This is a great opportunity to upgrade insulation and sheathing.
Tim
Thread Starter
|
Postmaster
Joined: Aug 2004
Posts: 4,004
Likes: 1
From: North of Boston MA
I don't think that apoxy is going to give you the structural integrity that you'll need in the suds and load bearing surfaces.
I think you're on the right track with supporting your roof with strong backs. Make it strong enough so you can completely abate the affected area, lay a new sill plate and sister in new studs as needed. This is a great opportunity to upgrade insulation and sheathing.
Tim
I think you're on the right track with supporting your roof with strong backs. Make it strong enough so you can completely abate the affected area, lay a new sill plate and sister in new studs as needed. This is a great opportunity to upgrade insulation and sheathing.
Tim
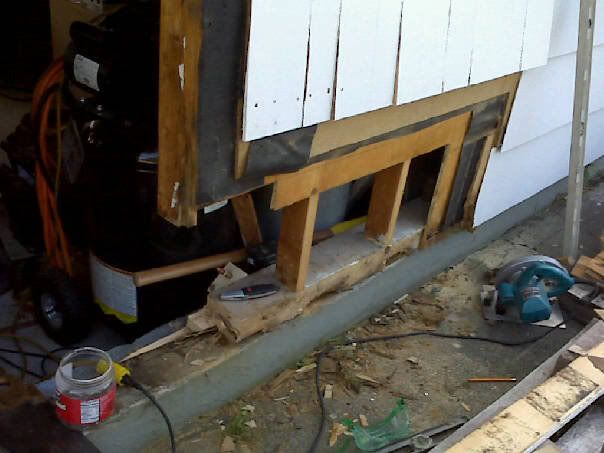
Somewhere there is an epoxy system that will properly repair this. It is just a matter of at what cost.
As you can see, I have to remove the bottom two courses of shingles and cut back the sheathing along the bottom to even get to the plate. At least I never finished the interior of my garage. And right after I cut this out I put a temp stud in there where the window stud was.
Going to be a SOB if I have to do this myself the old-fashioned way.....I can't even find anyone worth a darn to help me out.....
Super Moderator
Joined: Jan 2008
Posts: 40,046
Likes: 1,524
From: Maine, Virginia
Try this web site or try www.thisoldhouse.com
http://www.woodworking.org/WC/GArchi...gordepoxy.html
On this old house they have featured the use of apoxy fillers a few times where dry rot and vermin have taken thier toll. At least your working with a slab and not a crawl space.
You could probably build a temp wall inside the structure to carry the weight long enough for you to effect your repairs.
Please be very careful my friend.
Tim
http://www.woodworking.org/WC/GArchi...gordepoxy.html
On this old house they have featured the use of apoxy fillers a few times where dry rot and vermin have taken thier toll. At least your working with a slab and not a crawl space.
You could probably build a temp wall inside the structure to carry the weight long enough for you to effect your repairs.
Please be very careful my friend.
Tim

Postmaster
Joined: Dec 2007
Posts: 4,151
Likes: 0
From: Moonlight Moose Enclosure
I think FTE needs to have old fashioned barn raising type things. Peeps in rays neck of the woods and maybe those from beyond would help him and he would help someone else out. Hint hint

pedant
Joined: Jan 2008
Posts: 23,576
Likes: 40
From: EXTREME southwest CT
I think what you're looking for is Abatron:
http://www.abatron.com/cms/
You're right it is going to be expensive....
Is this an eave or gable wall?
Often you can just lag a ledger to the studs and use strongbacked studs to jack this by forcing their base in towards the wall w/ a sledgehammer.
Just replace the entire sill. Don't do it half assed.
Be sure to add a termite shield and proper flashing to your repair.
If you have problems re attaching the studs or their sisters, hurricane ties and some connector called a multi-use angle from Simpson can help a lot.
Just my 2c..
Edit: seeing Ken's post it's probably only 3 hours away for me...
http://www.abatron.com/cms/
You're right it is going to be expensive....
Is this an eave or gable wall?
Often you can just lag a ledger to the studs and use strongbacked studs to jack this by forcing their base in towards the wall w/ a sledgehammer.
Just replace the entire sill. Don't do it half assed.
Be sure to add a termite shield and proper flashing to your repair.
If you have problems re attaching the studs or their sisters, hurricane ties and some connector called a multi-use angle from Simpson can help a lot.
Just my 2c..
Edit: seeing Ken's post it's probably only 3 hours away for me...
Trending Topics

Hotshot
Joined: Aug 2006
Posts: 10,764
Likes: 39
After the roof is braced , remove what is rotted ,, replace the sill plate with treated , the next plate with treated as well ,,cut off the rotted studs after measuring how long the replacement studs should be , sister the studs with new ,glue and nail them together . Lower the wall back down ,,reside ....
FTE Stories
Ford Trucks for Ford Truck Enthusiasts

Top 6 Best Deals Available on New Fords & Lincolns Right Now
Brett Foote
This Hennessey Takes the Expedition Tremor's Off-Roading Capability to the Next Level
Verdad Gallardo
Top 10 Fords at 2026 Carlisle Ford Nationals
Joe Kucinski
3 Best / 3 Worst Parts of Modern Ford Ownership
Brett Foote
10 Amazing Upgrades That Solve Common Ford Truck Owner Headaches
Pouria Savadkouei
Every 2026 Ford Engine Explained
Brett Foote
10 Ugly Ford Trucks That We Still Kinda Love
Joe Kucinski
10 Things Every Truck Owner NEEDS (2026 Edition)
Michael S. Palmer
Rezvani's Latest Post-Apocalyptic Monster Is a Ford F-150 Raptor Underneath
Verdad Gallardo
Thread Starter
|
Postmaster
Joined: Aug 2004
Posts: 4,004
Likes: 1
From: North of Boston MA
Is this an eave or gable wall?
Often you can just lag a ledger to the studs and use strongbacked studs to jack this by forcing their base in towards the wall w/ a sledgehammer.
Just replace the entire sill. Don't do it half assed.
Be sure to add a termite shield and proper flashing to your repair.
Often you can just lag a ledger to the studs and use strongbacked studs to jack this by forcing their base in towards the wall w/ a sledgehammer.
Just replace the entire sill. Don't do it half assed.
Be sure to add a termite shield and proper flashing to your repair.
After the roof is braced , remove what is rotted ,, replace the sill plate with treated , the next plate with treated as well ,,cut off the rotted studs after measuring how long the replacement studs should be , sister the studs with new ,glue and nail them together . Lower the wall back down ,,reside ....
My plan is to do about 12' or so at a time. I have about 4' from the rear corner that has no sill damage at all so I am going to lap joint into that so I don't have to deal with stripping the corners out. I know that sounds a little half-assed but I can live with that. I will be using PT 4x6 for the plate and will be installing insulation strip on the foundation. There is nothing there now. I will also be drilling in some anchor bolts since the original doesn't have any on this wall. I have to check the code to see if I need to add a second plate on top of the sill plate. Presently there is nothing and the studs are toe-nailed into the sill plate. I can't toe nail to save my life so I will probably use the Simpson angles for both the existing and any new studs I decide to add. The existing studs don't show any rot anyway.
I have a lot of work ahead of me but I think if I do a five or six hours a day on it while I am on nights and then a few hours each afternoon once I go back on days, I can have this done by the end of July, maybe mid August. That doesn't include the new windows I still have to put in......
Ken - a GTG sounds like fun and I'd love the help but nobody deserves this mess but me. I would be willing to pay for assistance if anyone around me is looking for work. Most of it I can do alone but some of it will require a second set of hands.
Thanks for the advice so far.....
Cargo Master

Joined: Jan 2008
Posts: 2,566
Likes: 18
From: The Great White North!
When you are putting it all together def use some flashing material down there, that way the water will run off instead of back in. (not much of a lap over the concrete from the photo)
When you go to toe nail, you can use decking screws instead. They are easier to put in and they are less likely to cause splitting on the studs. (an old trick is to spit on them before you screw them in) They are ok to use because there is no shear force on them.
To anchor the sill plate down you can also go rent a powder actuated hammer and drive concrete nails thru.
I see this almost everyday, as I am a window installer. We see lots of rot usually under windows because of very poor previous installs. We can usually take off the siding(be it whatever) fix the rot, and replace and usually can not tell we were even in there.
When you go to toe nail, you can use decking screws instead. They are easier to put in and they are less likely to cause splitting on the studs. (an old trick is to spit on them before you screw them in) They are ok to use because there is no shear force on them.
To anchor the sill plate down you can also go rent a powder actuated hammer and drive concrete nails thru.
I see this almost everyday, as I am a window installer. We see lots of rot usually under windows because of very poor previous installs. We can usually take off the siding(be it whatever) fix the rot, and replace and usually can not tell we were even in there.
Thread Starter
|
Postmaster
Joined: Aug 2004
Posts: 4,004
Likes: 1
From: North of Boston MA
How would you recommend flashing this?
Cargo Master
Joined: Jan 2008
Posts: 2,566
Likes: 18
From: The Great White North!
After you have replaced the sill and build things back to the sheeting, add a pc of flashing that will extend down from the sheeting below where you will have the bottom of the exterior finish. When you paper you paper onto the flashing, so if any water gets in anywhere above, it will always stay on top and run down, and then drip off the outer edge of the flashing. If you get in touch of your local building inspector, they know all the up to date codes for your area, and are usually very help full to provide basic drawings of what it should look like when done. Like very basic blue print stuff that even the beginner can understand.
Thread Starter
|
Postmaster
Joined: Aug 2004
Posts: 4,004
Likes: 1
From: North of Boston MA
After you have replaced the sill and build things back to the sheeting, add a pc of flashing that will extend down from the sheeting below where you will have the bottom of the exterior finish. When you paper you paper onto the flashing, so if any water gets in anywhere above, it will always stay on top and run down, and then drip off the outer edge of the flashing.
If you get in touch of your local building inspector, they know all the up to date codes for your area, and are usually very help full to provide basic drawings of what it should look like when done. Like very basic blue print stuff that even the beginner can understand.
If you get in touch of your local building inspector, they know all the up to date codes for your area, and are usually very help full to provide basic drawings of what it should look like when done. Like very basic blue print stuff that even the beginner can understand.
Contacting my building inspector would not be a good idea. Building inspectors here are merely agents of the tax collector. They would make me get a permit, hire a structural engineer and also get it inspected. This would then be seen as an improvement and my property taxes would go up. No kidding - they are that bad.
I have a copy of the building code at work anyway, I'll dig it out one of these days before I start reconstructing. I plan on doing it code-plus so some other poor ******* doesn't have to fix my mess one day like I am fixing the hack job I bought.
Oh yeah, today I found ground zero of the termite infestation. A little piece of the sheathing had been cut out and the rotted sill plate filled in with some granular stuff - probably the termite poison. Then they scabbed over the mess and reshingled.....

pedant
Joined: Jan 2008
Posts: 23,576
Likes: 40
From: EXTREME southwest CT
If you're looking for sections and details, might I recommend this:
http://www.amazon.com/gp/offer-listi...ef=ed_oe_o_olp
http://www.amazon.com/gp/offer-listi...ef=ed_oe_o_olp
Thread Starter
|
Postmaster
Joined: Aug 2004
Posts: 4,004
Likes: 1
From: North of Boston MA
Another question that one of you experts might now.....
As you can see in the photo above, the garage was shingled with about a 12" reveal and a shadow line - that is each course sits proud of the lower course by about 1/2". To make this, they used 1/2" thick homosote backer board which first of all does not like water and secondly, I can't find the stuff anyway.
So, I was wondering, is there any reason I can't or shouldn't use 1/2" thick foam insulation board? It is much easier to acquire and water (even if it did get back there) wouldn't hurt it. I'm using red cedar R&R shingles so the joints are tight and the insulation wouldn't show. Is this feasible?
Thanks as always.
As you can see in the photo above, the garage was shingled with about a 12" reveal and a shadow line - that is each course sits proud of the lower course by about 1/2". To make this, they used 1/2" thick homosote backer board which first of all does not like water and secondly, I can't find the stuff anyway.
So, I was wondering, is there any reason I can't or shouldn't use 1/2" thick foam insulation board? It is much easier to acquire and water (even if it did get back there) wouldn't hurt it. I'm using red cedar R&R shingles so the joints are tight and the insulation wouldn't show. Is this feasible?
Thanks as always.