


Aftermarket stereo installation

Thread Starter
|
Fleet Mechanic
Joined: Sep 2002
Posts: 1,388
Likes: 2
From: Greensboro, NC
Aftermarket stereo installation
Well - I've found my Ex and hope to finalize the deal tomorrow (6/17). If all goes well I'll have an 03 EB 4x4 V10. I have an existing Panasonic in-dash dual din DVD player I will move from my Mustang to the Ex. I'm curious on a few things and would love feedback:
My goal is to utilize the OEM speakers for now and eventually replace with different speakers along with separate subs in the rear doors. For now I mainly want the nicer headunit along with having the integrated XM capability and Ipod connectivity. So - fairly simple for now but will be upgraded along the way.
Question 1:
It has the factory DVD - I know there is a harness which provides RCA plugs for the system - but after searching quite a bit haven't found anyone who is actually using it. It appears to be audio only - along with 2 extra wires which most likely are the turn on (ASYSON) and the ground or drain wire. Link:
METRA 70-5520AV plugs into existing car wire harness to install a new car stereo 2002-2004 FORD FACTORY DVD RETENTION HARNESS;
Looking at the wiring diagram it does not appear to have a video input unless you use the original RCA video/audio inputs - is that correct?
Question 2:
For the steering wheel controls and the rear controls - has anyone use the PAC SWIX control? It plugs into the harness at the wheel and then you program it to send an IR signal to the new headunit. Seems like a cool item - question would be if it would work for the rear controls as well or has anyone come up with a solution for that? One option may be to run wires from the rear controls to the PAC unit and combine the steering wheel and rear control wires and use a single PAC unit. Ideas on this one? Pac-Audio.com Product Details | iPod Integration for your car and More by Pac-Audio - Connecting you to the future
Question 3:
I know the double din fits with a bit of trimming - does anyone have an install kit they recommend?
Thanks for any input and/or advice you all can provide.
Thread Starter
|
Fleet Mechanic
Joined: Sep 2002
Posts: 1,388
Likes: 2
From: Greensboro, NC
So - finally got my stereo installed and thought I'd share the results. I used my Panasonic CQ-VD6503 which is a double din DVD unit with XM, etc. I removed the original radio with the DIN tool and plan to put it in my Explorer which only has a single CD and no RDS capability. Removing the dash was simple - 2 screws and the rest were snap clips. The dash required a bit of trimming on the top and bottom in order for it to fit but wasn't too bad of a job. I used painters tape to mask off the opening to avoid any scrapes.

Behind the cover, the opening is fairly large and required no modifications.
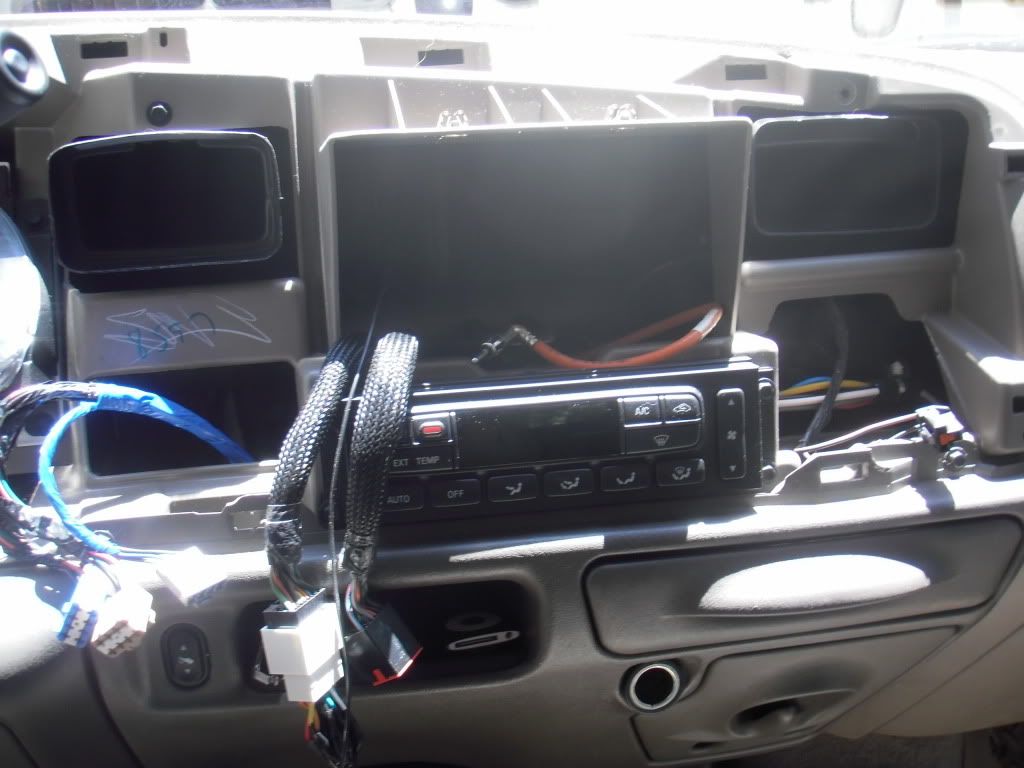
Now for the wiring..... I used a wiring harness so no wires would get cut. Easy enough job when you can do it right at the workbench.

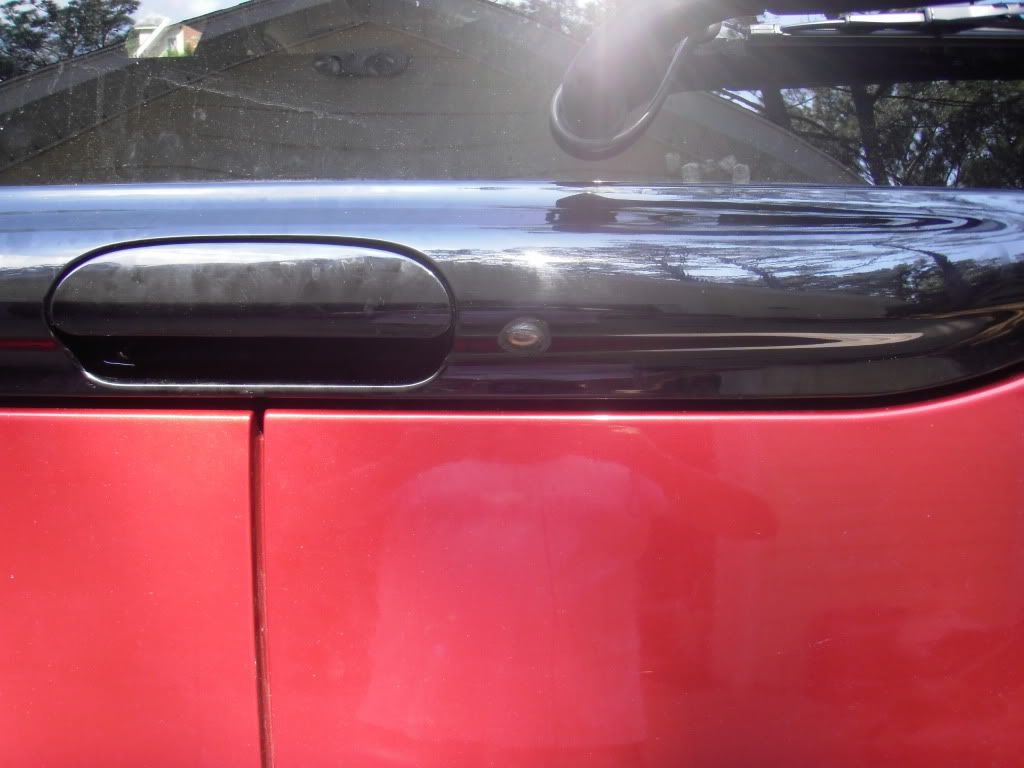
I installed my backup camera at the same time. I purchased one from Sheriff but didn't use it since I am able to hardwire the camera right into the headunit. I plan to use the 7" monitor from the wireless kit as an additional monitor for Xbox. I liked the install DJ (Soutthpaw) did and so I used the same location. My camera is a bit smaller and does not to appear to have as wide of a viewing angle as the wireless but I really only want it for hooking up the boat. Cutting the hole in that nice shiny black plastic was pretty easy - I used painters tape to mask off around it to avoid scratches and used a 7/8" hole saw. I then used a Dremel to finish shaping the hole and making sure the angle was correct.

I then removed the entire panel - 6 bolts and the key and handle rods and it came right out. I epoxied the camera in place and let it dry. I then turned it around so I could seal the hole around the camera itself. I have a bit more finishing to do to ensure it is perfectly smooth and shiny black like the rest of the panel.
I tapped into the reverse light lead - the harness is under the truck and easily accessible - especially if you take off the black trim panel at the bottom of the door opening. I ran the 12v input and RCA cables up to the headunit and finished wiring the camera. The hardest part was getting the wires up through the headliner and into the hatch.
It's basically done. Everything works - XM, camera, aux input for the ipod. I plan to add an amp and subs to the rear doors this fall but that can wait.

I think it came out pretty nice. My next project is to get the factory DVD to power up and function. I've done quite a bit of searching and the DVD Keeper appears to be the best way - but I may try a homemade solution. I'll post my findings back here as it seems to be a common question without a lot of answers.
Behind the cover, the opening is fairly large and required no modifications.
Now for the wiring..... I used a wiring harness so no wires would get cut. Easy enough job when you can do it right at the workbench.
I installed my backup camera at the same time. I purchased one from Sheriff but didn't use it since I am able to hardwire the camera right into the headunit. I plan to use the 7" monitor from the wireless kit as an additional monitor for Xbox. I liked the install DJ (Soutthpaw) did and so I used the same location. My camera is a bit smaller and does not to appear to have as wide of a viewing angle as the wireless but I really only want it for hooking up the boat. Cutting the hole in that nice shiny black plastic was pretty easy - I used painters tape to mask off around it to avoid scratches and used a 7/8" hole saw. I then used a Dremel to finish shaping the hole and making sure the angle was correct.
I then removed the entire panel - 6 bolts and the key and handle rods and it came right out. I epoxied the camera in place and let it dry. I then turned it around so I could seal the hole around the camera itself. I have a bit more finishing to do to ensure it is perfectly smooth and shiny black like the rest of the panel.
I tapped into the reverse light lead - the harness is under the truck and easily accessible - especially if you take off the black trim panel at the bottom of the door opening. I ran the 12v input and RCA cables up to the headunit and finished wiring the camera. The hardest part was getting the wires up through the headliner and into the hatch.
It's basically done. Everything works - XM, camera, aux input for the ipod. I plan to add an amp and subs to the rear doors this fall but that can wait.
I think it came out pretty nice. My next project is to get the factory DVD to power up and function. I've done quite a bit of searching and the DVD Keeper appears to be the best way - but I may try a homemade solution. I'll post my findings back here as it seems to be a common question without a lot of answers.
Thread Starter
|
Fleet Mechanic
Joined: Sep 2002
Posts: 1,388
Likes: 2
From: Greensboro, NC
Update: Got the subs installed in the rear barn doors. I used some JBL 10" subs I had which were small enough to fit into the depth of the doors. I used dynamat to line the inside of the doors and help with the rattling. I think the sound is good - I'm a bit beyond the annoying the neighbors stage so I actually have them turned down a bit. They can definitely rattle the mirror and make my wife look at me like I'm an idiot...  I have a bit of a rattle and think it is the tab and bracket which keeps the door from opening too far. Can't hear it from the inside but it's noticeable from the outside.
I'm currently using some grills which I got on eBay and painted to somewhat blend in. I think it looks good for now - my son was trying to talk me into the new 'spinner' ones... I think I'll pass on those. The amp is mounted under the passenger side rear captains seat - fits perfectly and gives good airflow on the bottom and top.
Next up is too actually complete the video portion - need my headrest monitors with headphone outputs so I don't have to listen to the kid's movies.


I have a bit of a rattle and think it is the tab and bracket which keeps the door from opening too far. Can't hear it from the inside but it's noticeable from the outside. I'm currently using some grills which I got on eBay and painted to somewhat blend in. I think it looks good for now - my son was trying to talk me into the new 'spinner' ones... I think I'll pass on those. The amp is mounted under the passenger side rear captains seat - fits perfectly and gives good airflow on the bottom and top.
Next up is too actually complete the video portion - need my headrest monitors with headphone outputs so I don't have to listen to the kid's movies.
Thread Starter
|
Fleet Mechanic
Joined: Sep 2002
Posts: 1,388
Likes: 2
From: Greensboro, NC
Thanks - it's been a fun project so far. I gave up on the factory video as I couldn't even get it to power on without it being connected to the factory radio. I put a 12v single DIN DVD player into the factory slot - fit with only minor tweaking. I'm using a 7" screen mounted where the factory screen was but will be going to headrest monitors shortly. It's currently setup so the front DVD can play on the front or rear screen or the rear DVD plays only on the rear screen. I need good monitors which have headphone jacks on them so I don't have to listen to their movies when I want to listen to music. So the search continues and has been a fun project so far. I hope to have the video portion done in the next couple of weeks.

Posting Guru
Joined: Dec 2007
Posts: 1,265
Likes: 0
From: Metro Detroit, MI.
After reading your posts, I to would have liked to use the factory DVD player and screen unit. When I talked to someone at Ford they had told me that once you replace the factory headunit then your overhead monitor was useless.
I didnt know what to say.
I went with new headrst monitors and had the installer play with the new radio so I am able to watch the front as well.
I didnt know what to say.
I went with new headrst monitors and had the installer play with the new radio so I am able to watch the front as well.
Trending Topics
Thread Starter
|
Fleet Mechanic
Joined: Sep 2002
Posts: 1,388
Likes: 2
From: Greensboro, NC
After reading your posts, I to would have liked to use the factory DVD player and screen unit. When I talked to someone at Ford they had told me that once you replace the factory headunit then your overhead monitor was useless.
I didnt know what to say.
I went with new headrst monitors and had the installer play with the new radio so I am able to watch the front as well.
I didnt know what to say.
I went with new headrst monitors and had the installer play with the new radio so I am able to watch the front as well.
I am going to order my headrest monitors tomorrow and will be able to finish my install. At least this phase! There is always new toys to add to the mix! My son wants his xbox to work so that will be done at some point - anything to keep them occupied and to not ask 'are we there yet....?" AGAIN...

FTE Stories
Ford Trucks for Ford Truck Enthusiasts

10 Things Every Truck Owner NEEDS (2026 Edition)
Michael S. Palmer
Rezvani's Latest Post-Apocalyptic Monster Is a Ford F-150 Raptor Underneath
Verdad Gallardo
Top 10 Most Expensive Ford Trucks Ever Sold on Bring a Trailer
Joe Kucinski
2027 Ford Super Duty Buyer's Guide (Every Model, Engine, & Package)
Brett Foote
Top 10 Ford Truck Tragedies
Joe Kucinski
AEV FXL Super Duty - the Super Duty Raptor Ford Doesn't Make
Brett Foote
Lobo Vs Lobo: Proof the F-150 Lobo Should Be Even Lower!
Michael S. Palmer
Ford's 2001 Explorer Sportsman Concept Looks For a New Home
Verdad Gallardo
10 Best Ford Truck Engines We Miss the Most!
Joe Kucinski
New User
Joined: Sep 2009
Posts: 10
Likes: 0
ok- you're my inspiration. I picked up a backup camera/GPS unit. I went to get a cheap camera and this combo unit was on clearance. Anyhow, I'm a bit intimidated tapping into the reverse light wire- but I'm going to give it a try! thx..
New User
Joined: Sep 2009
Posts: 10
Likes: 0
wire run..
one quick question- how difficult was it to run the wiring from the camera though the overhead to the front dash? Can you give me a quick layout of how you ran the wiring? I have a 2000 with the overhead console where my my temp, direction, etc display is located. It looks like yours in your dash (radio).
Posting Guru
Joined: Dec 2007
Posts: 1,265
Likes: 0
From: Metro Detroit, MI.
I have the Kenwood rear view camera.
1. I mounted the bracket to the third light lens first. (I think I screwed it in).
2 I then placed the lense back on and tightened it down.
3. I then placed the camera on the bracket and tightened it. This making it impossible for the bracket to come off.
4. I ran the wires through the top of the hatchdoor down and around the spare tire and along the side underneath the moldings.
Mine hooked up right to the radio.
Easy.
Thread Starter
|
Fleet Mechanic
Joined: Sep 2002
Posts: 1,388
Likes: 2
From: Greensboro, NC
My camera is mounted inside my upper door handle. It had a video output as well as power and ground. I ran those wires up through the rubber grommet at the top of the door into the headliner, then down the driver's side rear panel. I connected the power directly to the reverse lead from the taillight through a fuse. The ground connected nearby to an existing bolt. I then needed to run 12v from the reverse light which is used to trigger the headunit to switch to camera mode. I ran the 12v wire and the camera video output up the side of the truck using the plastic panels to hide the wires. I use a small flexible snake to tape wires to and then pull from the other side. I don't like to see any wires when I'm done and I want to make sure they are protected. The door sill plates pop up and then give you access to run the wires nicely. Once up at the dash, I ran the wires under the gauge cluster and over to where the headunit is.
If you are going to mount the GPS/monitor near the top of the windshield I would do the following: Instead of running the wires over to the center console where the radio is - pull the rubber weatherstripping at the front of the driver's door down and off the truck. This will give you access to be able to run wires up the pillar and then pull through so you can tuck them into the front of the headliner. Then feed them over to the where the center console is - leave a bit of slack so you can position the display where you would like it. Suggestion would be to wrap electrical tape around the exposed wires where they come out of the headliner and will go down to your display.
If you are going to mount the GPS/monitor near the top of the windshield I would do the following: Instead of running the wires over to the center console where the radio is - pull the rubber weatherstripping at the front of the driver's door down and off the truck. This will give you access to be able to run wires up the pillar and then pull through so you can tuck them into the front of the headliner. Then feed them over to the where the center console is - leave a bit of slack so you can position the display where you would like it. Suggestion would be to wrap electrical tape around the exposed wires where they come out of the headliner and will go down to your display.
Thread Starter
|
Fleet Mechanic
Joined: Sep 2002
Posts: 1,388
Likes: 2
From: Greensboro, NC
I got my headrest monitors in this past weekend and finally finished the install last night. I purchased the Legacy screens off eBay for a great price and chose them due to the resolution, they have 3 video inputs - 2 which can hardwired and 1 via the front panel. My other criteria was a headphone jack and also an IR transmitter in case I go with wireless headphones at some point. My kids prefer the ear bud type and don't really use the IR ones in the Expedition but still wanted the option.
After working up the courage.... the first cut was the hardest thing to do to a perfectly good seat!

With the edges tucked in so the seat frame and foam is visible:

Ran the wire for each inside the seat - extremely easy to do with these seats.

Wire run and mounting bracket installed - I drilled 4 holes and installed screws which came with the screens.

Monitor snapped into place and I just repeated the process for the other seat.
I removed the rear seat controls since they no longer control anything. The module still needs to be plugged in since the rear speakers are tied to it and will stop working if left out. I mounted the board to the inside of the console out of the way. I plan to mount a power inverter inside the console at some point to provide AC outlets for laptops, the xbox, etc - the outlets and switch will be mounted in the old rear seat control opening.

I ran the wires from the monitors inside the seat to an existing hole in the carpet - then ran from there to the opening under the console.

Console back in place and wires in the compartment under the rear cupholders. This is a great location as it gives you easy access to connections. There is a lot of room here - I also installed a video amplifier and splitter to drive the screens.

I installed a DVD player in the factory location - minor trimming required and it fits great.

Everything is done!

It is currently setup so if a DVD is played from the front head unit it will play on the front and rear screens and the audio will play out of the speakers. If a DVD is played from the rear player - it plays only on the rear screens and headphones are required. I'm using Video 1 on the screens for the DVD, Video 2 will be for an AUX input I'm making for the rear console - most likely used for the xbox. The monitors automatically power up when they sense a signal and each monitor can be switched separately - so one can be on DVD and the other could be on AV2 or 3 to play xbox or something else.
After working up the courage.... the first cut was the hardest thing to do to a perfectly good seat!
With the edges tucked in so the seat frame and foam is visible:
Ran the wire for each inside the seat - extremely easy to do with these seats.
Wire run and mounting bracket installed - I drilled 4 holes and installed screws which came with the screens.
Monitor snapped into place and I just repeated the process for the other seat.
I removed the rear seat controls since they no longer control anything. The module still needs to be plugged in since the rear speakers are tied to it and will stop working if left out. I mounted the board to the inside of the console out of the way. I plan to mount a power inverter inside the console at some point to provide AC outlets for laptops, the xbox, etc - the outlets and switch will be mounted in the old rear seat control opening.
I ran the wires from the monitors inside the seat to an existing hole in the carpet - then ran from there to the opening under the console.
Console back in place and wires in the compartment under the rear cupholders. This is a great location as it gives you easy access to connections. There is a lot of room here - I also installed a video amplifier and splitter to drive the screens.
I installed a DVD player in the factory location - minor trimming required and it fits great.
Everything is done!
It is currently setup so if a DVD is played from the front head unit it will play on the front and rear screens and the audio will play out of the speakers. If a DVD is played from the rear player - it plays only on the rear screens and headphones are required. I'm using Video 1 on the screens for the DVD, Video 2 will be for an AUX input I'm making for the rear console - most likely used for the xbox. The monitors automatically power up when they sense a signal and each monitor can be switched separately - so one can be on DVD and the other could be on AV2 or 3 to play xbox or something else.
Posting Guru
Joined: Dec 2007
Posts: 1,265
Likes: 0
From: Metro Detroit, MI.
http://inlinethumb08.webshots.com/20...600x600Q85.jpg[/IMG][/URL]
These are the ones that I went with. Not trying to steal any glory. That first cut is the most painful. I bet the rest just went fine.
These are the ones that I went with. Not trying to steal any glory. That first cut is the most painful. I bet the rest just went fine.