


Highboy Lift
Post Fiend
Joined: Jul 2006
Posts: 6,948
Likes: 44
For the front it only takes a little bit of work, and over the years I have streamlined this process, and worked out some of the small bugs.
The leaf spring bushings are slightly larger than the original hanger, so grinding the bushing down is a reasonable solution. This only has to be done to the front of the spring. For the rear, I relaced the pivot bushings, and used an off the shelp toyota poly bushing used in 80's era 4x4's. These bushings had to be modified a little to fit, but worked perfectly.
By taking a small torch to the old bushings, they popped right out, and left a small metal insert in the pivot itself. I was able to leave this in there and not fight it to remove. This can be tough to remove while the pivot is still in the truck.
By taking about 10 thousandths off of the bushing itself, it went in with little trouble. This is almost a perfrct fit. Then I lubed up the metal insert, and viola, it is the same width as the spring bushing, and a perfect fit.
Front end is done, and everything lines up.
Oh, if the leaf is equiped with a military wrap design, it may jave to be either cut or removed to fit the smaller hanger of the highboy. Later 78/9 bolt on hangers are larger and fit the military wrap leaf.
Longer front shackles will have to be made, and the new length should be right at the 5.75" mark. This will provide enough room for the spring to flex and keep the spring from hitting the frame. This has been a problem I have been working out over time. Quality material and thick steel has to be used here. Too small or thin and the shackle will flex.
For the rear, the popular thing to do is the shackle flip. SInce this requires the removal of the rear hanger anyway, half of the work is already done. Now since the perfect donor hanger is to use the fixed hanger found at the front of the rear spring,this means that another hanger needs to be installed where this one was removed.
Step by step:
Remove both hangers, and throw the inverted rear hangers in trash.
Purchase, a longer hanger for the front of the rear spring. 1/2 ton, or 2wd hangers are longer and will provide more lift. Make sure that the width is the same as the spring. Chebby hangers can be used here too.
Align the 64" rear spring so the axle is centered in the wheel openening.
Install the newly purchased hanger in the front of the spring and attach to the frame.
Install the original front hanger in the very rear of the spring and hang the shackle from this.
Bolt up and verify that all hangers are level. Use a quality fastener here.
This will net some prretty serious lift and much will depend on the rear spring that you use. This 64" spring is easy to find in the salvage yard, and will cost way less than new springs.
By performing this upgrade, the cost stays low, and you get new style springs that not only ride well, but does not sacrifice payload capacities.
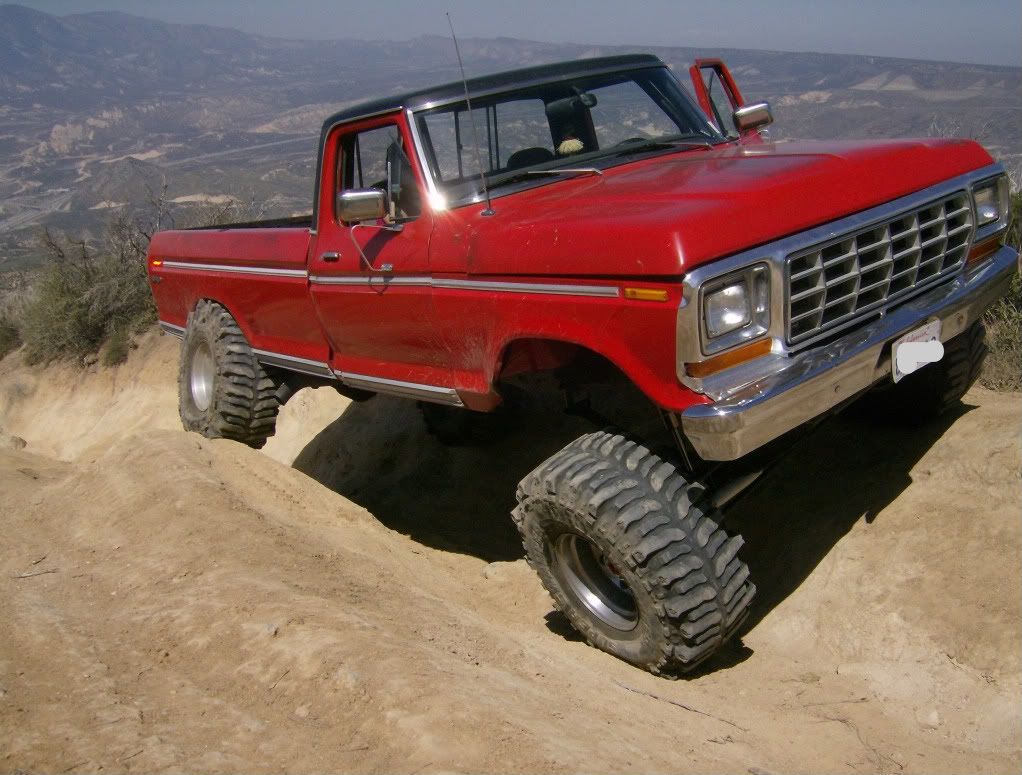
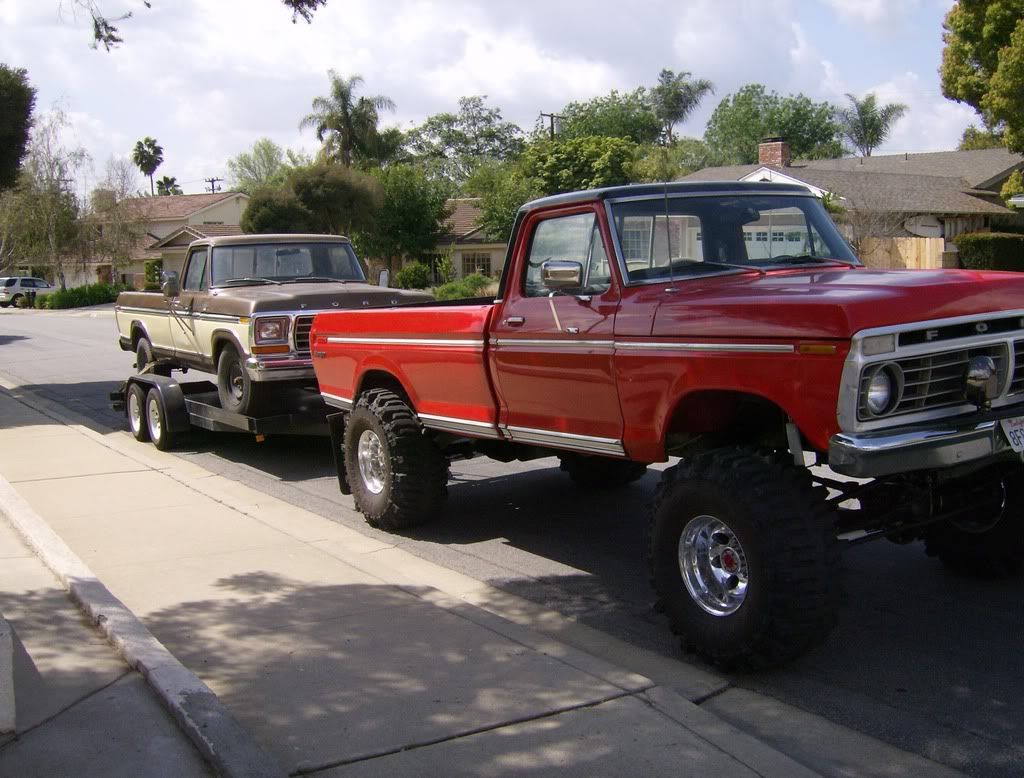
I am telling you, this system works and works well. Not expensive either. My front leafs ran about 500 bucks for the pair, a great friend gave me a set of leafs (thanks again ChaseTruck754) and my hangers ran about 40 bucks from the salvage yard. This clears 40"rubber, and flexes like crazy.
Rides well, I mean extremely well, and I still tow a car hauler with a rather large 1 ton truck with this truck.
Elder User
Joined: Jan 2004
Posts: 668
Likes: 3
From: NW Kans
where do you find 1/2 ton 2wd hangers that provide more drop? although i no longer have a highboy to compare to, the 1/2 ton 2wd hangers dont drop near as much as the front haners on my 74, 75, or 77 1/2 ton 4wd or my 79 1 ton 4wd.
the 64" leaves come from chevys. around 2000 model year from which ive heard. never measured any of them but have always heard good things.
the 64" leaves come from chevys. around 2000 model year from which ive heard. never measured any of them but have always heard good things.
Senior User
Joined: Aug 2008
Posts: 140
Likes: 0
From: Liberty Township OHIO
And to go with what 75F350 said you also have to take in to count the addvancments in the steel use for the later SD springs over a 70's made leaf. Today's leaf spring provide better ride, more flex, and sustain more years of the same arch rate than of early years do to the process of making the steel and what is added to the smelt.
Post Fiend
Joined: Jul 2006
Posts: 6,948
Likes: 44
When looking for spring hangers, dont limit yourself to just this era of ford trucks. They are limited in numbers at the salvage yards and just try to find a new one at a dealership. That being said, you can use a later model spring hanger, the ganger does not care. I suggested that one look into chabby hangers, Heak, if you are goint to remove the spring from a 2000 plus silverado, grab the front hanger too. Use this on the front of the spring, and then use the factory ford one on the very bcak of the spring for the shackle flip. This is a very inexpensive way to lift a vehicle and still use the comfort and versatility of the newer spring.
Postmaster
Joined: Apr 2003
Posts: 2,703
Likes: 4
From: Harrisburg, NE

For the rear, the popular thing to do is the shackle flip. SInce this requires the removal of the rear hanger anyway, half of the work is already done. Now since the perfect donor hanger is to use the fixed hanger found at the front of the rear spring,this means that another hanger needs to be installed where this one was removed.
Step by step:
Remove both hangers, and throw the inverted rear hangers in trash.
Purchase, a longer hanger for the front of the rear spring. 1/2 ton, or 2wd hangers are longer and will provide more lift. Make sure that the width is the same as the spring. Chebby hangers can be used here too.
Align the 64" rear spring so the axle is centered in the wheel openening.
Install the newly purchased hanger in the front of the spring and attach to the frame.
Install the original front hanger in the very rear of the spring and hang the shackle from this.
Bolt up and verify that all hangers are level. Use a quality fastener here.
I have read on here before that the shackle flip puts alot more strain on the shackles themselves and that welding a gusset to them is preffered if doing any towing, any comments on this?
also are you running any ladderbars of some kind?
Post Fiend
Joined: Jul 2006
Posts: 6,948
Likes: 44
I have heard of this problem with the shackle flip and have even seen a picture of a shackle that had failed. I believe that this is more of a nis-conception, making this problem an exception and not the rule.
I tow quite a bit with this truck, and I have a winch in the back. I have often doubled the shatchblocks, making a three line pull. This multiplies the line load by a serious amount. Unfortunately, the truck sees some severe side loads and stock shackles have yet to show a single sign of fatigue.
Running the shackles in compression has not been a problem for me.
This is back in the day when I ran 64" 1/2 ton springs on the back. A little too much sag when the truck was loaded, but still could tow a full size running F250. I towed this truck home almost 70 miles on the freeway at average highway speeds. This is California speeds, so I was moving pretty good.
No issues with the shackles. SInce then I have loaded the truck with even bigger loads.
Over 2,000 lbs in the bed alone, again, no signs of fatigue from stock shackles.
Elder User
Joined: Apr 2006
Posts: 600
Likes: 0
From: Cisco, TX pop: 2500
Hate to dig up an old thread, but is there any way you can get a complete parts list together f350?
FTE Stories
Ford Trucks for Ford Truck Enthusiasts

Rezvani's Latest Post-Apocalytic Monster Is a Ford F-150 Raptor Underneath
Verdad Gallardo
Top 10 Most Expensive Ford Trucks Ever Sold on Bring a Trailer
Joe Kucinski
2027 Ford Super Duty Buyer's Guide (Every Model, Engine, & Package)
Brett Foote
Top 10 Ford Truck Tragedies
Joe Kucinski
AEV FXL Super Duty - the Super Duty Raptor Ford Doesn't Make
Brett Foote
Lobo Vs Lobo: Proof the F-150 Lobo Should Be Even Lower!
Michael S. Palmer
Ford's 2001 Explorer Sportsman Concept Looks For a New Home
Verdad Gallardo
10 Best Ford Truck Engines We Miss the Most!
Joe Kucinski
2026 Shelby F-150 Off-Road: Better Than a Raptor R?
Brett FootePost Fiend
Joined: Jul 2006
Posts: 6,948
Likes: 44
Not sure where you are going with this???
Which Highboy concept are you refering to?
To me a Highboy is a Ford car with running boards and fenders removed. Thats a highboy.
These trucks are just trucks. The term highboy is something that someone stuck on a truck probably when the 77.5 truck came along, and in some pissing contest someone stated that he had a higher truck than the newer and lower truck.
See there had to be something to compare when the label was first used. In this case the difference between the lowboy truck, and the highboy truck, and this was a year difference for the dentside trucks. I dont believe that the bumpside trucks were or should be labeled as the same since all of the 4wd's (F250's) were the same heigth. Nothing to compare it to like the 77 and 77.5 trucks. See instead of stating the year, or production number it was easier for a couple of guys to just cal it a nickname, to determine whether it was an early dent or a late dent.
The bump guys just jumped on the bandwagon so they could have some cool factor too.
Thats all the highboy thing means to me.
Anyway, the 30 year old spring technology has more to do with 30 year old springs more than anything to do with a highboy.
More Turbo


Joined: Dec 2002
Posts: 705
Likes: 2
From: Halifax, NS
i appreciate the initial intended use, but I also submit that it's a useful term to separate married case / lower chassis trucks, from the original 4x4 style coming out of the late 50's early 60's, which were originally 2wd trucks subbed out to outside companies that lifted them, and installed a remote tcase to make them into 4 wheel drives.
Elder User
Joined: Apr 2006
Posts: 600
Likes: 0
From: Cisco, TX pop: 2500
Just everything that you had used on your conversion and the tire size you are running. I would like to perform the lift myself, and I am one of those people who wants all the parts and any special tools together befor I begin.
Post Fiend
Joined: Jul 2006
Posts: 6,948
Likes: 44
I used:
Front:
8" BDS front springs from a 99 to 04 "gas" Super Duty
Extended my front shackles, they now measure 6 inches from center to center
Custom front shock mounts (17" travel front shocks)
Stainless braided front brake lines
Crossover steering (Dana60F) and power steering conversion using saginaw 16:1 box
U bolt flip
Rear:
Stock 64" long 3500 series chebby silverado rear leaf
2001 chebby silverado 1500 series front spring hanger mounted lower to provide more lift
Stock Ford front spring hanger installed in the very rear to accomodate shackle flip
Relocated shock mount to accomodate 14" travel shocks
Stainless steel brake line
Thats it. Nothing really fancy here. What you see above is exactly this combo, and as you can see provides just enough articulation to be dangerous on the trail. Yes 39.5" tires rub on full stuff, but I do not run bump stops. I also run a fairly low truck. I like to keep the COG as low as possible. Keeps a stable platform when the trails get really very twisty.
Elder User
Joined: Feb 2008
Posts: 999
Likes: 1
From: Davison, Mi.
i appreciate the initial intended use, but I also submit that it's a useful term to separate married case / lower chassis trucks, from the original 4x4 style coming out of the late 50's early 60's, which were originally 2wd trucks subbed out to outside companies that lifted them, and installed a remote tcase to make them into 4 wheel drives.
And with all due respect 75F350, emphasis on respect, when refering to the fenderless hotrods as highboys, that is also an unofficial moniker, created exactly in the same way that the trucks nickname was.