Rear End Frame Cooty-Bob & Rear End Question
#1
 03-31-2009, 05:39 PM

Join Date: Jul 2005
Location: Morgantown, WV
Posts: 739
Likes: 0
Received 0 Likes
on
0 Posts
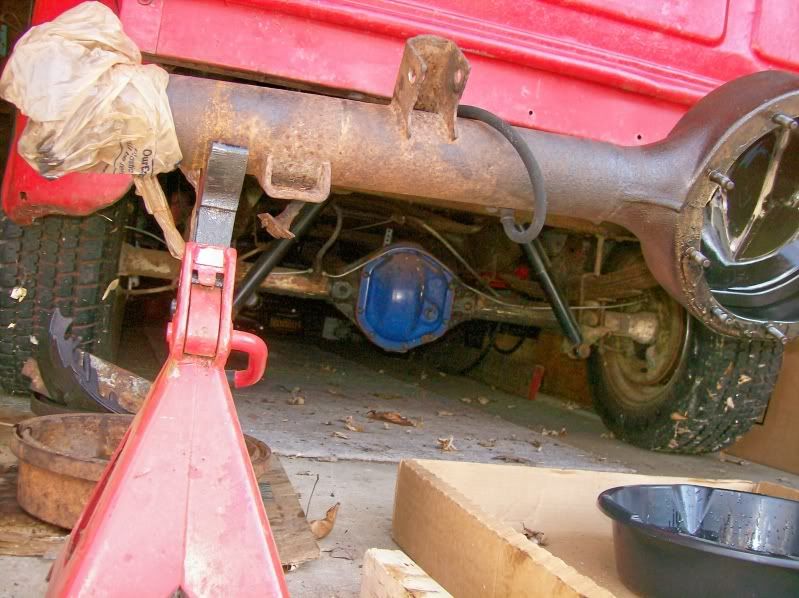
I have decided to start with the rear of the truck first on my restoration from the cab back. So I cleaned off all electronics, lights, brake lines, shocks, and any other random little parts. I will remove the rear end and rebuild the rear end and the brakes, seal, etc. However, I noticed a Cooty-Bob on the rear of the frame rails. It appears that the frame is still the correct length, but notice how a PO cut out part of the frame rail to mount the lights? Also, noticed how the PO drilled into the frame spar to mount lights as well. Also notice that the rear frame spar is tweaked. Also, look at those goofy 3" round pipe sections that somebody welded on. So I had a few questions:
1. Should I weld in some new metal to make the rear frame rail square once again, or just cut off the part that isn't total anymore to make it flush?
2. How do I get that tweak/bend out of the rear frame spar?
3. How do I fill in the holes in the rear frame spar?
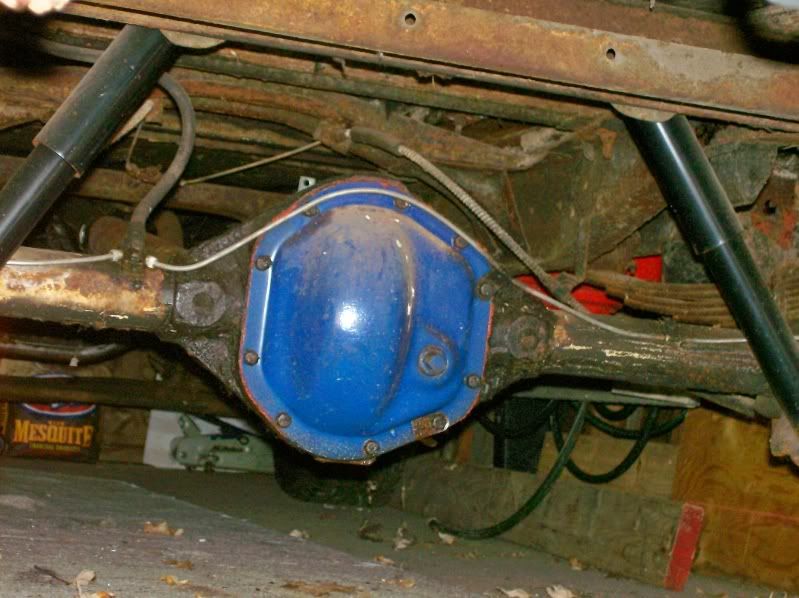
4. Also, what type of rear end do I have (i.e. what differential)?


1. Should I weld in some new metal to make the rear frame rail square once again, or just cut off the part that isn't total anymore to make it flush?
2. How do I get that tweak/bend out of the rear frame spar?
3. How do I fill in the holes in the rear frame spar?
4. Also, what type of rear end do I have (i.e. what differential)?


#2
03-31-2009, 06:50 PM
FTE Legend
Join Date: Oct 2005
Location: northwestern Ontario
Posts: 263,022
Received 4,135 Likes
on
2,657 Posts
It's easy enough to weld up the holes and add the pieces cut off the frame rails. Cut a patch from the same thickness material, likely 3/16" big enough to cover the botched up area and scribe cut out, bevel the patch to get good weld penetration and grind your welds flush and you'd never know it was messed up in the first place. If you can find a piece of frame rail you'd could get the material from it to do all the patching. To straighten the rear cross member insert a long pipe in the one that is welded there and pry it up, if it gives you trouble use heat and then pry. That's what I'd do, but I don't always do everything right.
#3
04-01-2009, 07:01 AM

New User
Join Date: Aug 2006
Location: Pequea,PA
Posts: 12
Likes: 0
Received 0 Likes
on
0 Posts
#4
04-01-2009, 10:51 AM
Join Date: Jul 2005
Location: Morgantown, WV
Posts: 739
Likes: 0
Received 0 Likes
on
0 Posts
So another easy question might be, what is the correct length of the frame supposed to be from the end of the fram cross memeber/spar to the end of the frame rail? Or what is the overall correct length of the frame suposed to be? I am sure my service manual tells me this or the sales brochures I have, but I don't have them in front of me at the moment. This is for a 1955 Ford F-250 not a Silverado. 
#5
04-01-2009, 11:28 AM
Elder User
Here is a shot of my '56 and it sure looks like your '55... ...
...
You guys were killin' me with the Silverado thing...almost fell over...
Here is one of the "old" and the "new"... ...
...
Silverado... ...forgot the date...nice one...
I seem to recall seeing either "Spicer/Dana44" or just "Dana 44"
stamped "somewhere" on the housing...
I'm sure someone will be along shortly to correct me...
...they usually do...
-
...You guys were killin' me with the Silverado thing...almost fell over...
Here is one of the "old" and the "new"...
...Silverado...
...forgot the date...nice one...I seem to recall seeing either "Spicer/Dana44" or just "Dana 44"
stamped "somewhere" on the housing...
I'm sure someone will be along shortly to correct me...
...they usually do...
-
#6
04-01-2009, 04:21 PM
Join Date: Jul 2005
Location: Morgantown, WV
Posts: 739
Likes: 0
Received 0 Likes
on
0 Posts
#7
04-01-2009, 08:36 PM
Trending Topics
#9
04-02-2009, 07:52 AM
I don't know for sure, but I'd bet that Dana has a pretty low gear ratio in it. Good for pulling stumps or drag racing, not too good for highway cruising or gas mileage. If you want to straighten/patch that rear crossmember (in my book for a first class job, I'd take it out and replace it with a straight used one or have some new metal bent up at a local fab shop and put it in. Note that crossmember is/was identical to the two in front of it, so a good one shouldn't be hard to find) I'd suggest: 1. do it cold, heat is likely to only make it worse. 2. as with any similar damage, analize what happened to cause the damage. In this case from the pictures I'd say welding in those tubes softened/weakend the steel, then some force on whatever was mounted in the left tube (I'd say some sort of hitch, the holes in the center look to be for a trailer light plug) tweaked it downwards (note that the left tube is not horizontal and the only the top flange is bent). 3. Reverse the force that caused the damage and release the creases holding the bends in place. To accomplish this: Pile all the weight you can find on top the frame to hold it down, likely to require several hundred #s (scour the neighborhood/friends/yardsales for all the freeweights they have gathering dust in the corner of the garage or under the bed) Be sure it's temporarily secured so it doesn't fall on you foot while you are working. Put a HEAVY bar into that left pipe (one of the weight set bars?) sticking out the back. Place a hydraulic or floor jack under the end of the bar and start lifting, watching carefully for what is happening to the crossmember. In the ideal world the pipe will start twisting back horizontal and the top flange will begin straightening. Stop if it starts to bow/bend in a new place or you are lifting the truck off the ground. Now it's time to start releasing the bends in the top flange. While the jack pressure is still pushing up against the bar, place a heavy rectangular or square steel bar long enough to span the damage and at least as wide as the flange that fits inside the crossmember (try your local metals recycling center or heavy metal fab shop for large steel bar, small I beam and block cut offs. Buy an assortment of sizes and lengths, they will come in very handy as anvils and dollys as you get deeper into your project.) Holding it tight against the vertical web and as high up as you can get it, look to see where the flange is raised up. TAP the high spots down with a small hand maul working evenly fron the vertical web out to the edge of the flange (note: You are NOT driving spikes or taking out your agressions!!! Use ONLY as heavy a TAP as necessary to move the metal a small amount!!!! Work slowly and repeatedly over the EDGES of the bend working towards the high point as the metal lays down against your dolly, resist the temptation to beat down the highest point immediately!) Work ALL the ruffles equally, don't just concentrate on one at a time, and stop hammering as soon as the flange touches the dolly! If the tapping sound changes from a dull thud to a sharp ring sound STOP! Keep checking the pressure being applied by the jack and add more as necessary as the bend straightens. Avoid kinking the face of the crossmember at the pipe with too much pressure. When all the raised ruffles are straightened it's likely you will have some small low spots/ripples. Used a pair of duckbill or sheetmetal shaping vise grip pliers (have ~ 3" wide smooth jaws, most big box DIY stores carry them with the other vise grips, or try Sears or Northern Tool. Put the jaws straight in as deep as possible over the flange, centered on the low spot. Lock in place and lift GENTLY to raise up the low spot. This will likely make some small hight spots to either side, but we already know how to fix those. Repeat until satisfied and finish with a sanding with a belt sander or long board to do the final smoothing.
NOW cut and grind off the pipes flush with the face, (and back if you are planning to smooth the inside as well) and carefully trace and cut a plug out of equal or slightly thicker sheet. Be a bit fussy trimming the plug, an absolutely perfect fit would be best, but as long as it fits flush and doesn't have any gaps around the edges >1/16" that's close enough. I would weld the plug in from the inside so you will have to do very little grinding on the face. Hold the plug in place and flush with a welder's magnet bridging the hole on the face of the crossmember. Tack both sides of the plug at 90* to the magnet (i.e. if the magnet is placed horizontally across the hole tack the plug at 12 and 6. DO NOT use welds >1/2" long! Remove the magnet and check that the plug is flush with the face, adjust if necessary with hammer and dolly.Make sure the bead has penetrated all the way thru the seam. When the tacks are cool enough to place and hold a bare hand on them, add two more tacks at 3 and 9. Allow each set of tacks to air cool until no more than warm to the touch (BE PATIENT it will pay off at the end, go work on another project between welds) and check the plug for a flush fit and adjust after each set. Continue this process, two tacks no more than 1/2" long, 180* apart, 1/2 way between the previous tacks, air cool, check and adjust fit, until you have welded the plug in solid all the way around. YES, THIS WILL TAKE SEVERAL HOURS!!! grind and sand the welds smooth, give the area a swipe of body putty and it will look better than new. If it doesn't, try to figure out what went wrong while you hunt for another crossmember chalking that one up to experience and saving it for practicing on.
NOW cut and grind off the pipes flush with the face, (and back if you are planning to smooth the inside as well) and carefully trace and cut a plug out of equal or slightly thicker sheet. Be a bit fussy trimming the plug, an absolutely perfect fit would be best, but as long as it fits flush and doesn't have any gaps around the edges >1/16" that's close enough. I would weld the plug in from the inside so you will have to do very little grinding on the face. Hold the plug in place and flush with a welder's magnet bridging the hole on the face of the crossmember. Tack both sides of the plug at 90* to the magnet (i.e. if the magnet is placed horizontally across the hole tack the plug at 12 and 6. DO NOT use welds >1/2" long! Remove the magnet and check that the plug is flush with the face, adjust if necessary with hammer and dolly.Make sure the bead has penetrated all the way thru the seam. When the tacks are cool enough to place and hold a bare hand on them, add two more tacks at 3 and 9. Allow each set of tacks to air cool until no more than warm to the touch (BE PATIENT it will pay off at the end, go work on another project between welds) and check the plug for a flush fit and adjust after each set. Continue this process, two tacks no more than 1/2" long, 180* apart, 1/2 way between the previous tacks, air cool, check and adjust fit, until you have welded the plug in solid all the way around. YES, THIS WILL TAKE SEVERAL HOURS!!! grind and sand the welds smooth, give the area a swipe of body putty and it will look better than new. If it doesn't, try to figure out what went wrong while you hunt for another crossmember chalking that one up to experience and saving it for practicing on.
#10
04-10-2009, 07:34 PM
Join Date: Jul 2005
Location: Morgantown, WV
Posts: 739
Likes: 0
Received 0 Likes
on
0 Posts
Ok I open up the hub assembly on my axle, and now I don't have a socket large enough to remove the lock nut (part # 4252) or the adjuster nut (part # 4225). They appear to be at least 2", and I put a 1 5/8" socket up to it, and it is easily 3-4 sizes larger than that. Does anybody know what size they are, and more importantly where could I get a socket that large?
Also, what is the correct torque on these nutz as the service manual doesn't tell me? Thanks.
Also, what is the correct torque on these nutz as the service manual doesn't tell me? Thanks.
#12
04-10-2009, 08:01 PM
Join Date: Jul 2005
Location: Morgantown, WV
Posts: 739
Likes: 0
Received 0 Likes
on
0 Posts
Oh come on Ross, you know I want to buy more tools.
I was just looking at the sockets from Craftsmen b/c that is all I will buy, and the darn little bugger are somewhere b/w $25-$35 a pop when they are that big.
I was just looking at the sockets from Craftsmen b/c that is all I will buy, and the darn little bugger are somewhere b/w $25-$35 a pop when they are that big.
#13
04-10-2009, 09:16 PM
#14
04-10-2009, 09:40 PM
Fleet Owner
When I had a Jeep with hubs and needed a similar large socket, for about $15 I bought a steel tube-type socket that had a plate welded across the drive end, with a 1/2"-square hole in it for a breakere bar. At least on the Jeep, the big nuts don't need to be torqued a lot, they are just large to clear the axle shaft. I still have it if you want a picture (and PS -- the Jeep was also a Dana 4x axle).
#15
04-11-2009, 04:18 AM
Join Date: Jul 2005
Location: Morgantown, WV
Posts: 739
Likes: 0
Received 0 Likes
on
0 Posts
Yea guys I already have a standard 3/4 drive and socket set, but it only goes up to 1 - 5/8. Luckily last night when I pulled the other side of the right axle out, I found that nut and lock washer to be loose. So I took off that nut and I will take that to the store today to find the correct socket.