


Coil problems... I think

Thread Starter
|
Posting Guru
Joined: Jan 2007
Posts: 1,233
Likes: 0
From: shawnee KS
Coil problems... I think
I have an '85 Bronco with a 300-6. About 4 or 5 months back I did the swap over from TFI to Duraspark ignition system, complete with the older style coil, as opposed to the TFI style. About a week and a half ago, truck would not start, no spark. I fried several ignition modules, and tested and retested all components from the truck's harness out, including coil, pick up, ICM, and related harness SEVERAL times and could not find the problem. The complete dash has now been removed and the harness of the truck completely checked out. I have deleted the remains of the TFI, and several other obsolete wires, in an effort to clean things up and make them easier to test and search through.
I really need this truck back. I found after searching, a link that was put up by JimsRebel called "Dirt cheap Ignition" for another fellow that was aking questions about the duraspark. The link explained how to use the GM 4 wire HEI ignition module. Now since I was considering just building my own system, this was just the inspiration (and instructions) to just do it. Pretty simple system to do, as much as I hate GM anything, it went well. Now I have exactly what I need where and when I need it on each wire, all 5 of them.
Now- everything is right, but no sparky spark out of the coil. I quickly grabbed the coil out of the wife's bronc (same coil) and got the same result when I know her coil is good. WTF? Could a bad ground to the body of the coil cause this? Also- can someone explain how to check out the primary resistance of the coil, and then how to check the secondary resistance of the coil? I am assuming this is how to check to see if a coil is good- correct?
Just to show what the system is that is in the truck now, let me try that link thing-
Dirt cheap Ignition
Thanks to all in advance for your input- this is killing me driving the 65 everyday.
Charles
Thread Starter
|
Posting Guru
Joined: Jan 2007
Posts: 1,233
Likes: 0
From: shawnee KS
Well since that link thing didn't work I wanted to show where my info came from.
Look for the post "duraspark questions again " and the fellow that posted it is eclypseballoons.
Look for the post "duraspark questions again " and the fellow that posted it is eclypseballoons.
Moderator


Joined: Jan 2001
Posts: 56,949
Likes: 2,718
From: Virginia

Well, there is no use checking the coil when the one from your wife's vehicle didn't work either correct?
Get a testlight and hook the ground clamp to the engine block, and hook the probe to the negative of the coil. If the testlight doesn't blink when the engine is cranked, then the coil will never work, since the module is not turning it on and off.
I don't know what you have now(I have seen those HEI conversions) but I bet the duraspark didn't last because a resistor was not used to the coil + wire.
Thread Starter
|
Posting Guru
Joined: Jan 2007
Posts: 1,233
Likes: 0
From: shawnee KS
Yes the ballast resistor wire is there and was doing it's job, that was the first suspicion originally. The test light blinks when it is cranking, I did do that test after building this new system. That's why this doesn't make any sense to me. My friend was not at the auto parts store when I went to go get the coil checked, and I don't believe those fellas checked it correctly. They said it was bad but they did not have another in stock- which led me to come home and try the one off of her truck.
Moderator
Joined: Jan 2001
Posts: 56,949
Likes: 2,718
From: Virginia
Well, if the coil wire is blinking, you should have spark. Take the dist end of the coil wire off, and leave the other end in the coil tower. Hold the dist end very close to the engine block, and get someone to crank it. You should see spark jump from the end to the block.
You also might want to install your coil in her truck, just to double check that it's good.
Sometimes when you mess around with an engine for a along time, you end up fouling the plugs with fuel. So when you do actually get it fixed, it won't fire because of the plugs.
You also might want to install your coil in her truck, just to double check that it's good.
Sometimes when you mess around with an engine for a along time, you end up fouling the plugs with fuel. So when you do actually get it fixed, it won't fire because of the plugs.
Cargo Master


Joined: Mar 2008
Posts: 2,560
Likes: 206
From: Washington
Here are my thoughts
If you are getting the blinking test light on the coil Negative you should be getting spark out of the coil. You can also connect a spark plug to the coil output to test. The spark plug must be grounded. You can use a spark plug wire if you think you might have a bad coil wire. This needs to be your starting point, to verify spark output from the coil. Then make sure the rotor is not lying on the ground under the bronco.
�Could a bad ground to the body of the coil cause this?� �. No, the coil does not need a case ground.
If the light is blinking then the 4 pin module is working and grounding out the coil which produces the spark, also the pick-up in the distributor is working also.
If the light is blinking then the primary side of the coil is most likely good as there is current flow to make the test light blink, but the secondary side of the coil is the part that produces the spark.
The DS2 module grounds back through the DS2 dissy using the black wire on the dissy. The 4 pin module MUST be grounded. I used one of the attachment screws on the 4 pin module (as a GRD point), the one next to the original ground tab that sticks out the side of the 4 pin module and ran this back to the black wire in the DS2 distributor to tie all the ground together. If you are not sure it is grounded properly just add some jumper wires to be sure.
In my 1986 F150 resistance wire only dropped the coil voltage to 11.5-11.9 volts with the ALT providing 14.8 volts. The round coil needs 6-7 volts to keep from overheating and burning out. It will be the primary side of the coil that will fail due to high current flow in the primary circuit.
To test a coil you need to check the resistance of the primary and the secondary windings. The coil negative post is the common point to both the primary and the secondary windings. You will hook up the black lead of your ohm meter to the coil negative. To test the primary touch the red lead to the coil positive post, to test the secondary windings touch the red lead to where the coil wire output connects. In an older round coil you will see about 1.5-2 ohms in the primary. In a newer style square coil you will have about .5 ohm in the primary windings. The secondary windings have high resistance due to more winding which is how the voltage is stepped up. Look for 7000-10,000 ohm in the secondary. The exact reading is not that important, just something close.
Good luck
Cargo Master
Joined: Mar 2008
Posts: 2,560
Likes: 206
From: Washington
Here is the link with info.
Dirt cheap Ignition
here are some photos.
http://i226.photobucket.com/albums/d...4/MVC-131F.jpg
http://i226.photobucket.com/albums/d...4/MVC-133F.jpg
Trending Topics
Cargo Master
Joined: Mar 2008
Posts: 2,560
Likes: 206
From: Washington
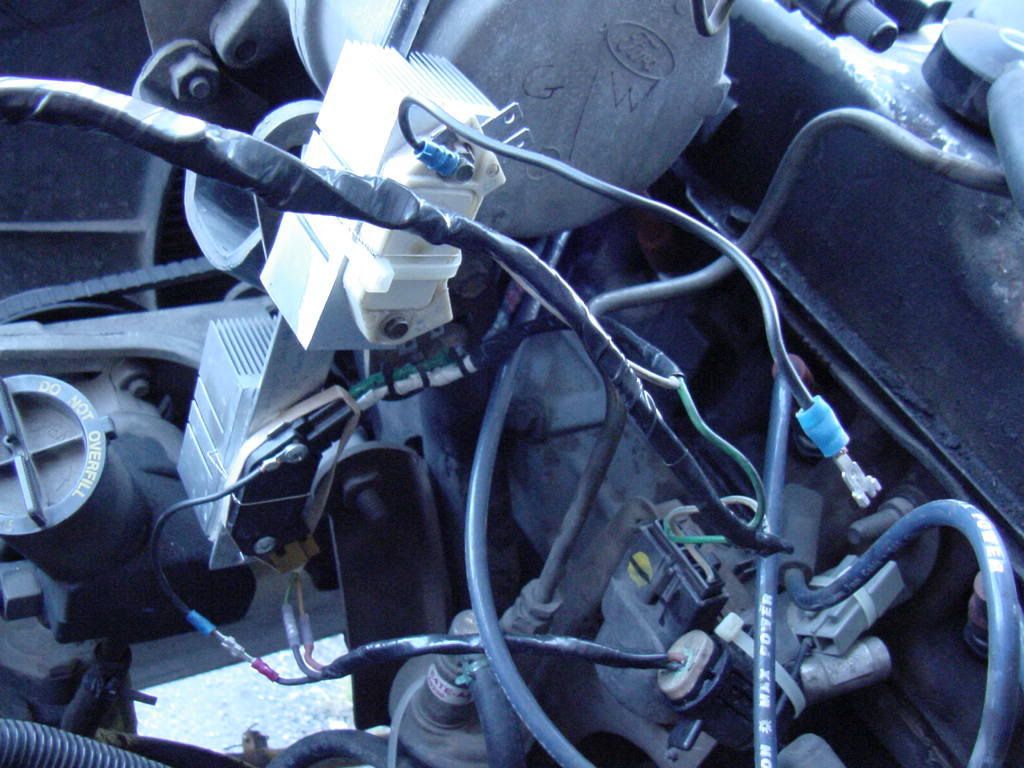
I added a photo showing how I mounted the 4 pin module on to the back side of the AC compressor. I used this spot to keep it away from the engine heat and also to get air flow across the heat sink.
You will notice a black ground wire attached to the top mount screw of the 4 pin module. I had considered this and EXTRA ground as the module is mounted and attached to engine ground. During initial testing I found the engine would not run without this ground wire attached to the black ground wire in the DS2 distributor harness.
Basically what I am trying to say is the 4-pin module needs a GOOD ground to work.
The white 4 pin module in the top part of the photo is my �ride along spare�. The more you learn about electronics the less you trust the little buggers.
FTE Stories
Ford Trucks for Ford Truck Enthusiasts

10 Best Ford Truck Engines We Miss the Most!
Joe Kucinski
2026 Shelby F-150 Off-Road: Better Than a Raptor R?
Brett Foote
2027 Super Duty Carhartt Package First Look: 12 Things You NEED to Know!
Michael S. Palmer
10 Most Surprising 2026 Ford Truck Features!
Joe Kucinski
Top 10 Ford Trucks Coming to Mecum Indy 2026
Brett Foote
5 Best / 5 Worst Ford Truck Wheels of All Time
Joe Kucinski
Ford Super Duty: 5 Things Owners LOVE, 5 Things They LOATHE!
Joe Kucinski
Every 2026 Ford Truck Engine RANKED from WORST to FIRST!
Michael S. Palmer
The Best F-150 Deal of Every Trim Level (XL through Raptor)
Joe Kucinski
Thread Starter
|
Posting Guru
Joined: Jan 2007
Posts: 1,233
Likes: 0
From: shawnee KS
Yes sir- just the info I was looking for. Turns out that the coil was good, but there was an extermely weak spot on the wire to the negative side of the coil. Good enough connection for a test light, not enough to throw a good spark. That is the info that I needed on testing stuff out too so thanks for all of that. It was in that link in another post that saved my @$$ on this one. Thanks a million to Franklin2 and JimsRebel for the info that got it to run again. Jim, can you email me a pic of the basic schematic for that GM setup? You should be able to do it through this site. I'm not too good with computers, and I don't want to print out 10 pages of stuff I don't need. Thanks again fellas. Don't know what I did before I had a computer and found this site. 
Cargo Master
Joined: Mar 2008
Posts: 2,560
Likes: 206
From: Washington
I really don�t have a schematic I just hooked up the 5 wires as shown in the �dirt cheap ignition� link.
I would recommend hooking it up temporally with jumper wires right after you install the distributor to make sure it runs. You really don�t even have to remove the old harness if you don�t want to as you can just tap into the coil POS and NEG connections. If you remove the old computer harness be careful not to cut the oil pressure and water temp sensor wires on the back of the block, one each side. If you have a tach the green wire will feed into one of the 3 connector on the left fender well.
My harness had 3 sources of power for the coil all tied together in the harness from two connectors on the left inner fender wheel well. The hard part was trying to figure out which one was the resistor wire which I used to feed the coil and power the 4 pin module.
Jim
Thread Starter
|
Posting Guru
Joined: Jan 2007
Posts: 1,233
Likes: 0
From: shawnee KS
I finished removing all of the TFI as I searched out my problem with my duraspark. All od the harness is now freshly rebuilt. I have had computer problems that's why no updates! Sorry. I does run and is driveable now, but has absolutely no dash in it whatsoever. Hope to cure that today! See ya'll and thanks again!
Thread Starter
|
Posting Guru
Joined: Jan 2007
Posts: 1,233
Likes: 0
From: shawnee KS
Just wanted to bring this post back up and ask if anyone has had any problems with this dirt cheap ignition. Mine on that straight six doesn't seem to have near the power the stock setup did. Has anyone else experienced this? My truck would bark the tires well into third gear, now, not even second. Thinking about going back to duraspark. Any thoughts?
Thread Starter
|
Posting Guru
Joined: Jan 2007
Posts: 1,233
Likes: 0
From: shawnee KS
Well in the two years I had that "dirt cheap ignition", it has been anything but! Nothin but headaches and money, Never a GM part on my truck again. I was actualy able to find all of my old Duraspark stuff, including box and plugs with wires so I put it all back the way it should go. Guess what- no fire. Where would you start looking? By the way, the dist. is brand new.
Moderator
Joined: Jan 2001
Posts: 56,949
Likes: 2,718
From: Virginia
Start again by seeing if the negative of the coil is blinking when the engine is cranked. No matter if it's points, GM, Ford, electronic, etc., this is what they all end up doing, turning the coil neg on and off.
Cargo Master
Joined: Mar 2008
Posts: 2,560
Likes: 206
From: Washington
I am still running the same setup as shown in photo in post #7. I haven�t had any trouble with the GM 4 pin ignition module.
I have since collected all the parts needed for a stock DS2 system but haven�t install them as it is working fine as is.
I have since collected all the parts needed for a stock DS2 system but haven�t install them as it is working fine as is.