


IWE clatter, such a racket!
Junior User
Joined: Aug 2008
Posts: 71
Likes: 0
Thanks for this post. I've had my F150 for just over a week.
You can imagine my worry when the thing started the grinding noise.
It did it with three short bursts. I have heard the "clunk" as well but thought it was something in the tool box.
Its been raining here off and on for three days.
Do you guys think I should try to get the stealership to replace the IWE
or if I dry and shield the thing will it usually cure it?
__________________________________________________ __________
05 F-150 Lariat 5.4L
76 F-100 360/C6
74 Bronco Sport 302
73 Ski Nautique 351

Elder User
Joined: Nov 2003
Posts: 987
Likes: 3
From: Bass Lake, CA
ok,
well i am going thru now...
ordered part # 6L34-9H465-BA
as this is the revised part to fix the problem for the TSB listed.
i received it today, so took 3 mins to go put it on. pulled the old one, SAME EXACT PART NUMBER! my truck was built BEFORE 4-24-06 btw...
no change at all. same clanking noise.
i had bypassed it while waiting for the part by only putting engine vacuum hose on the port, and capping the lower port, this locks you hubs, but left the 4x4 switch in 2wd. drove fine, no noise.
now i have to look further....
also, that part number does not include any bracket, and it is identicle to the part i removed, my IWE solenoid was not defective at all. $31.00 plus tax down the drain, electrical parts cannot be returned once installed. ($44.98 list price)
so, beware.... look dirst and foremost at the vacuum lines. thats what i will be doing now thatit is lunch time, as soon as my panda express is gone anyway
Elder User
Joined: Nov 2003
Posts: 987
Likes: 3
From: Bass Lake, CA
well, took a look at the passengers side. here is what i found
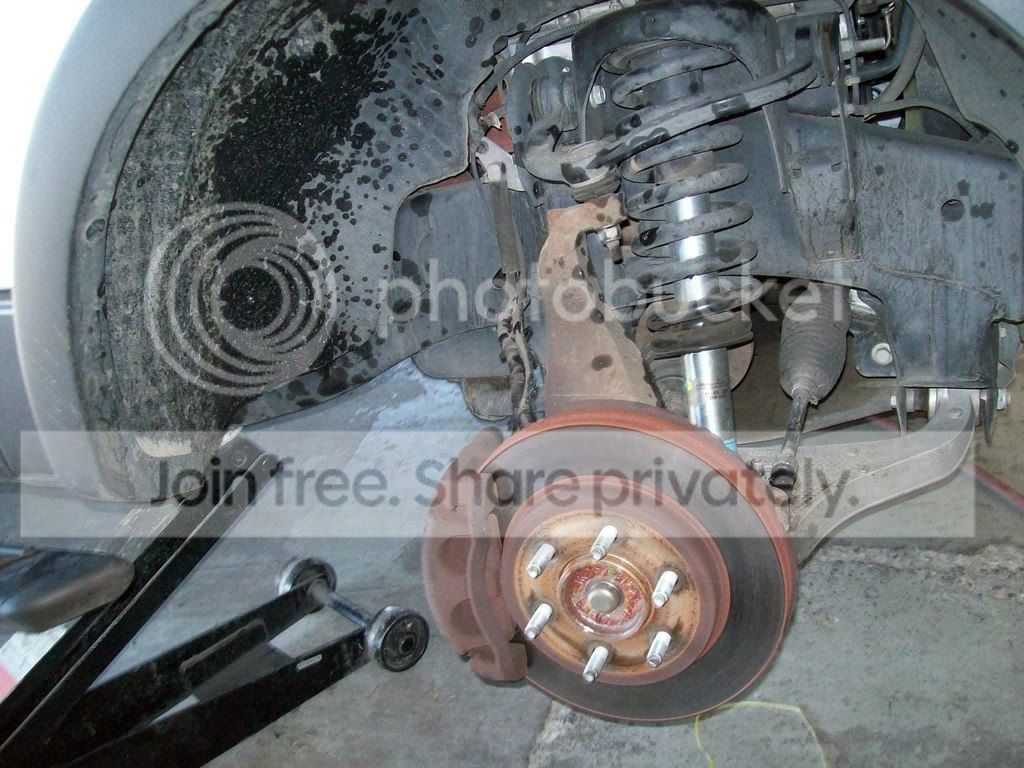
what sucks, this is likely nothing to do with my 4wd problem. just another chiwanese part that has failed, in under 2 years.
second nail in the coffin...
toyota??
what sucks, this is likely nothing to do with my 4wd problem. just another chiwanese part that has failed, in under 2 years.
second nail in the coffin...
toyota??

Freshman User
Joined: Aug 2008
Posts: 31
Likes: 0
From: Norwood, NJ
You will most likely have a shorted IWE solenoid located on the r/s of the firewall. The easiest way to determine that is to pull service codes from the 4x4 module. If there are no codes, check the vacuum lines to the actuators on the inside of the knuckles. If the vacuum lines are ok, then one or both of the actuators are bad.
Good luck.
Good luck.
Elder User
Joined: Nov 2003
Posts: 987
Likes: 3
From: Bass Lake, CA
thanks.
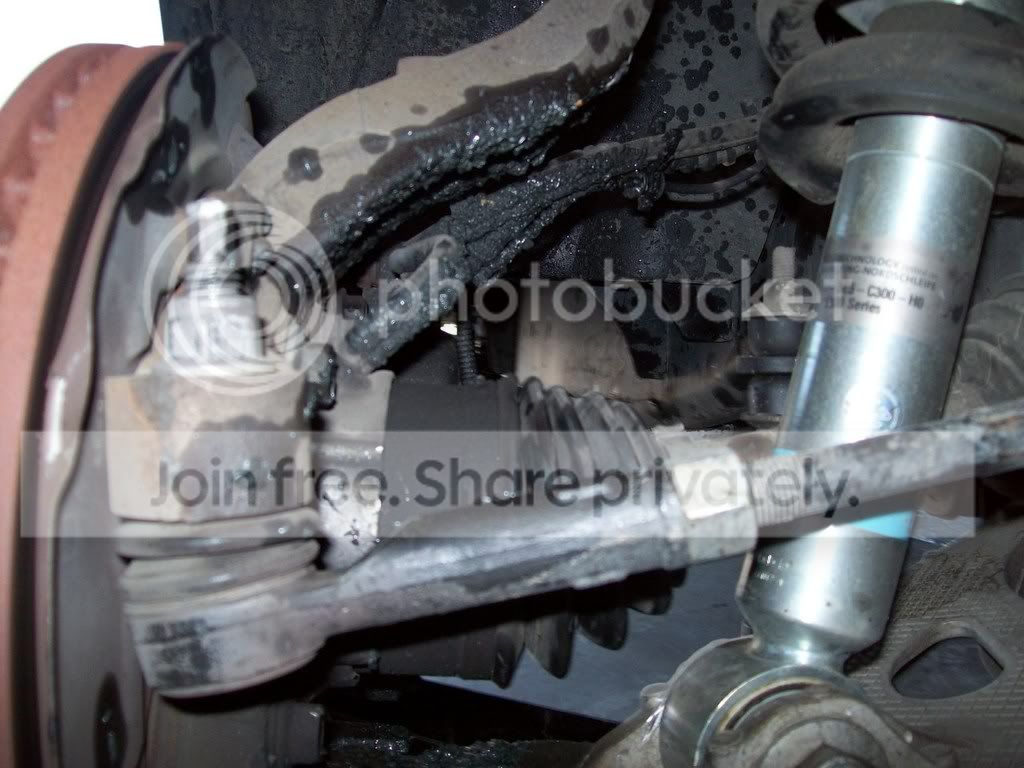
I did replace the IWE solenoid, the old one was not faulty... i was checking the vacuum when i found the ruptured boot.
Im sure the boot ruptured because it was never meant to spin with the wheel @ 80mph.... bummer i had to find it 60 miles from home (and my tools)
boot kit was $35, but the shop charged $180 in labor to put it all together, and found no vacuum leak on that side...
other bummer... my 15 year old mighty vac took a crap, so i cannot test the vacuum lines... lol
anyhoo, i should have kept my 03 f250, i was just worried about how much it was going to cost to keep on the road after 100k miles!
rofl.... would not have cost 9k a year im sure.
Elder User
Joined: Nov 2003
Posts: 987
Likes: 3
From: Bass Lake, CA
I finally fixed my IWE problem!!!!
After replacing the solenoid, and checking over and over for vacuum leaks, and being told i need two hubs, you know what the problem was?
I owned my 06 f150 from nov 06, till aug 09, and it is finally fixed forever!
traded that truck in on a 2010 mustang GT. Now i have all the power back i lost!

Ford seriously needs to rethink this setup for something bulletproof. my 94 bronco has 4x4 every time you want it. i am so glad they did not use IWE way back then!
anyhoo, good luck to those that can fix this problem, my solution for a year and a half was leave the vacuum line off, worked like a charm, except for the whistle noise, and the new axle boots needed from the constantly spinning when they were not designed to.
After replacing the solenoid, and checking over and over for vacuum leaks, and being told i need two hubs, you know what the problem was?
I owned my 06 f150 from nov 06, till aug 09, and it is finally fixed forever!
traded that truck in on a 2010 mustang GT. Now i have all the power back i lost!
Ford seriously needs to rethink this setup for something bulletproof. my 94 bronco has 4x4 every time you want it. i am so glad they did not use IWE way back then!
anyhoo, good luck to those that can fix this problem, my solution for a year and a half was leave the vacuum line off, worked like a charm, except for the whistle noise, and the new axle boots needed from the constantly spinning when they were not designed to.
FTE Stories
Ford Trucks for Ford Truck Enthusiasts

Rezvani's Latest Post-Apocalytic Monster Is a Ford F-150 Raptor Underneath
Verdad Gallardo
Top 10 Most Expensive Ford Trucks Ever Sold on Bring a Trailer
Joe Kucinski
2027 Ford Super Duty Buyer's Guide (Every Model, Engine, & Package)
Brett Foote
Top 10 Ford Truck Tragedies
Joe Kucinski
AEV FXL Super Duty - the Super Duty Raptor Ford Doesn't Make
Brett Foote
Lobo Vs Lobo: Proof the F-150 Lobo Should Be Even Lower!
Michael S. Palmer
Ford's 2001 Explorer Sportsman Concept Looks For a New Home
Verdad Gallardo
10 Best Ford Truck Engines We Miss the Most!
Joe Kucinski
2026 Shelby F-150 Off-Road: Better Than a Raptor R?
Brett Foote
New User
Joined: Apr 2010
Posts: 11
Likes: 0
Ok the wifey has a 05 Lariet 150 making that obvious grinding sound so called the dealer got quotes for solonoid/actuators <----bloody fkn rip off !!! $600 !
Anyway her vacuum lines dont go straight to the solonoid they go to maybe a reservoir..? Im not sure what this is & neither did the parts guy @ ford..lol figures..
Anyway anyone know what this is..?
Peace..!

Anyway her vacuum lines dont go straight to the solonoid they go to maybe a reservoir..? Im not sure what this is & neither did the parts guy @ ford..lol figures..
Anyway anyone know what this is..?
Peace..!


New User
Joined: Mar 2010
Posts: 14
Likes: 0
I have an 05 FX4 (55kmiles) and experienced the grinding / clattering noise from the right passenger side, but it only happened when put in reverse, gave a bit of gas, and let off. The noise was terrible! This was intermittent and luckily I captured on video and took into my local Dealer, showed the S/A and tech. They weren't able to reproduce the issue, so the initial fix: "reposition right front Backing Plate". No out of pocket expenses though, and they also addressed the "clunking" when accelerating from a stop: Reinsulated Driveshaft.
Sure enough, when I arrived home, the noise was still there. Did research on this forum and found the TSB for the Solenoid replacement, in addition to the "Everything you need to know about the IWE" write up. Printed them out and took the truck back the next day. The fix, 2 things:
1. IWE Solenoid Replaced (new design with the cover)
2. Right front Vacuum Hub replaced
Total cost: $370
It's sad, I had to point the "experts" in right "direction"; feel like if it wasn't for the TSB & additional information, the issue may have never been addressed and fixed. Thank God for the folks on this forum!
There is a slight "click" heard when I put truck in reverse and back into drive again, but the grinding / clattering is gone.....hopefully for good.
Laughing Gas


Joined: Dec 2009
Posts: 799
Likes: 13
From: East L.A.
Solenoid $23, actuators $73 each. Shop online for parts or tell the guy at the parts window the price you find online and see if he'll match it. My local dealer said $130 each for the actuators so I got them from a dealer in AZ at the above price. Later I mentioned the above when I went to get the solenoid, and the local dealer guy dropped the initial price from $32 to $23. "We don't want you to have to go on the internet". I would rather keep the money in the community, if they will be reasonable.
If you have average mechanical skills, and research the different forums online, these IWE repairs are not hard to do at home. I did both actuators, the solenoid, and all four wheels brakes a couple weeks ago and saved about $1200 in labor (local dealer quote).
If you have average mechanical skills, and research the different forums online, these IWE repairs are not hard to do at home. I did both actuators, the solenoid, and all four wheels brakes a couple weeks ago and saved about $1200 in labor (local dealer quote).
Laughing Gas
Joined: Dec 2009
Posts: 799
Likes: 13
From: East L.A.
I haven't had a problem with my shift motor, so I don't know about that. My nearly useless Haynes manual implies the shift motor is only for the electronic/push-button 4x4 system. (so maybe I don't have that!) It says the SM is held onto the transfer case with 3 bolts and does have an electrical connection/plug.
I stole this from XJcamaro and edited/added to it with some stuff I also stole from other forums. Make sure you check all this stuff...
<HR style="COLOR: #d1d1e1" align=center width="100%" noShade SIZE=1>
<TABLE class=MsoNormalTable style="WIDTH: 100%; mso-cellspacing: 1.5pt; mso-yfti-tbllook: 1184" cellPadding=0 width="100%" border=0><TBODY><TR style="mso-yfti-irow: 0; mso-yfti-firstrow: yes; mso-yfti-lastrow: yes"><TD style="BORDER-RIGHT: #f0f0f0; PADDING-RIGHT: 0.75pt; BORDER-TOP: #f0f0f0; PADDING-LEFT: 0.75pt; PADDING-BOTTOM: 0.75pt; BORDER-LEFT: #f0f0f0; WIDTH: 100%; PADDING-TOP: 0.75pt; BORDER-BOTTOM: #f0f0f0; BACKGROUND-COLOR: transparent" vAlign=top width="100%">This is all being said assuming your shift motor on the side of the transfer case is working properly.
When the engine is started and running, vacuum is exerted through a solenoid to the IWE/4x4 system. When the engine is turned off or 4WD is engaged (either by floor shifter of dial selector) vacuum is released by the IWE solenoid to the actuators at the wheels. Vacuum to the actuators at the wheel unlocks the hubs for 2WD and release of vacuum by the solenoid locks them for 4WD. A vacuum leak at any part of the system, or solenoid malfunction, can cause failure.
The vacuum builds when the engine is started. The vacuum (from the intake manifold on 4.6L) via a vacuum line exerts vacuum on the entire IWE system all the way to the actuators. There are two check valves and a vacuum box/reservoir that regulate a constant vacuum pressure in the system. The first check valve locks the vacuum at the highest vacuum that is exerted from the engine from that check valve down. The vacuum box/reservoir holds that highest vacuum exerted. The second check valve located right before the IWE solenoid holds the highest vacuum to the actuators from what has been exerted from the engine.
As you start to understand the vacuum system, you will see that the vacuum box that is located between the two check valves does in fact act as a reservoir. When you engage the 4WD, vacuum is released by the solenoid and locks the line from draining back. This process allows the lines and vacuum box between the two check valves to hold the current highest vacuum even though the engine vacuum is constantly changing and the vacuum from the second check valve to the actuators has been lost. When 4WD is disengaged, the solenoid is opened back up, the vacuum reserve from the vacuum box is then used to exert vacuum on the lines to the actuators, unlocking the actuators no matter what the vacuum from the engine is. The vacuum box/reservoir maintains a constant vacuum pressure as long as the engine is running.<O
If you try to shift into/out of 4WD and it will not engage or disengage, it’s possible your solenoid is not working and releasing the vacuum to the actuators and engaging the hubs. This might happen because of the early design of the IWE solenoid lets water run from the cowl onto the top of the solenoid causing damage. The new style solenoids have a shroud on them to prevent this. Replace the solenoid (Ford only part).
After saying all of that and you think about what the manual says about turning the 4WD on and off, you notice that you are supposed to activate and deactivate the 4WD while under a certain speed and not while accelerating. This ensures two things. First, high speed engaging and disengaging of the gears in the hubs which can cause mechanical damage does not happen. Second, it allows a quick window of no load and low RPMs from the engine, providing high vacuum from the engine, which will quickly replenish the high vacuum to the entire system and “locks” that vacuum between the two check valves and reservoir box, as well as from the second check valve to the actuators. This, when working correctly without any leaks ensures a high enough vacuum to keep the actuators unlocked when you’re in 2WD, or unlocking quickly when shifting from 4WD to 2WD.
<O
A leak in one of the lines, the reserve box, an actuator, or a faulty check valve(s) can allow a leak in the system that will allow the actuators to possibly try to engage or partially engage while driving. If you hear a grinding or whining of gears at certain speeds or loads you may have leak in your IWE vacuum system, allowing the vacuum to drop to or below the 5 lbs of vacuum needed to keep the actuators unlocked. That is the grinding or whining noise of the gears/actuators trying to mesh together. Some say it sounds like ice in a blender or sheet metal being dragged under the front of the vehicle.
To test the vacuum system, get a good vacuum pump with a gauge on it, about $60 (or cheaper) at a lot of parts stores.
<O</O
Troubleshooting:
1. If you can put the truck on jack-stands, you’ll be better able to check for engagement/disengagement of the actuators. One wheel at a time, unplug the double vacuum hoses from the actuators at the wheel (located behind the steering knuckle). Put your vacuum pump on the big hose fitting and apply vacuum. If it is working correctly you will be able to build up vacuum and it will hold. In this case the wheel should rotate and the front drive axle should not turn with the wheel (actuator disengaged by vacuum pressure). A vacuum loss of 1 lb over 1 minute is acceptable. If you cannot build vacuum or it leaks down very fast, the seals on the actuator are shot and the actuator needs to be replaced. In this case, when the wheel is rotated the drive axle will turn with the wheel (actuator not being disengaged by vacuum).<O</O
2. Next check your lines from the solenoid to the actuators at the wheel. Pull the double vacuum line off the solenoid. Pull the double vacuum line off of both actuators at the wheels. Plug the hoses at the wheels. You only need to plug the big hose at the wheel (the smaller line is the vent), and make sure you have a good plug that seals 100%. At the double hose that you took off the solenoid, trace the lines; you want the line that goes down to the wheels (should be the lower line), not the one that goes to the intake. Take your pump and connect it to the line end from the solenoid that goes to the wheels. Apply vacuum and see if the vacuum on the gauge holds. If it does not and leaks down, you have a leak in your lines between the solenoid and the actuators. Check the lines thoroughly from the solenoid to the wheels. It’s hard to get to some of the lines, but they all need to be checked. Look for cracks or breaks. Replace the lines with factory ones from Ford or make your own, with bulk vacuum hose and some fittings. If the vacuum you create with the pump holds, your lines are good but still look them over for obvious faults. You might also check to ensure no moisture or debris is in the lines. Drain and/or gently blow though the lines. Do NOT use high pressure air on any of this system unless you want to buy more new parts.<O</O
3. The vacuum reserve box is mounted behind the battery. You will have to remove the battery and battery tray to access and test it. Once removed and the vacuum line disconnected from it, connect your vacuum pump to the fitting on the box and apply vacuum, if it holds vacuum, it is OK. If it doesn’t build vacuum from the pump or leaks down, the box is leaking and needs to be replaced (Ford only part).
4. Now plug the line you removed from the vacuum box, this line runs to the intake with a "T" in it. The line from the "T" goes to the solenoid. Plug the end that goes to the solenoid also. Unplug the same line at the check valve that is close to the intake. Connect your pump to that end of the line and apply vacuum. If it pumps up vacuum and holds, that line is ok. If it won’t hold vacuum or leaks down, there is a leak in that line. Replace, repair, or make a new line.
5. There are two small check valves in the line coming off the intake. One close to the intake and one in the same line close to the solenoid. Pull those check valves off and check them. An easy way to check them is to blow (with your mouth, not compressed air-that will damage the valve) You should be able to blow air through one end and not the other. Or you can check the valves with the vacuum pump. One side of the valve will say "VAC" connect your pump to that end and apply vacuum. It should pump and hold without any leak down. If it does not then replace the valve. If it holds vacuum, the valve is good. If one or both of these fail, the high constant vacuum will not be held correctly in the system and while driving, the vacuum could drop too low and try to engage the actuators.
6. If all of this checks out OK, check the vacuum straight from the engine. Connect your pump to the line coming from the engine and start the engine. Watch what vacuum level shows on your gauge (you will not have to pump it). It should be anywhere from about 17 to 22. I’ve read that 20-22 is normal but mine likes to hover around 18-19 at idle. If this reading is too low you might have another vacuum leak somewhere else on the engine.
If you suspect that your system is malfunctioning and you are not able to test it right away or want to drive and not damage anything, disconnect the line coming off the intake at the check valve and plug both ends of the line. This will not allow any vacuum to reach the system and leave your hubs locked in all the time. This is fine and shouldn’t cause any damage as long as the hubs lock correctly. The half shafts and front driveshaft with the front differential will turn but the 4WD will not be engaged. You might notice a drop in MPG, but it is now safe to drive for a short term, until repairs can be completed.
Tools:<O</O
<O</O
10mm socket or wrench, to change the solenoid<O</O
<O</O
5/16” socket or wrench, to remove the IWE actuators from the wheel hubs<O</O
<O</O
21mm deep-well socket or wrench, to remove steering arm and control rod nuts (getting to the actuators)<O</O
<O</O
Vacuum pump with gauge, for testing/troubleshooting vacuum system<O</O
</TD><TD style="BORDER-RIGHT: #f0f0f0; PADDING-RIGHT: 0.75pt; BORDER-TOP: #f0f0f0; PADDING-LEFT: 0.75pt; PADDING-BOTTOM: 0.75pt; BORDER-LEFT: #f0f0f0; PADDING-TOP: 0.75pt; BORDER-BOTTOM: #f0f0f0; BACKGROUND-COLOR: transparent"><?xml:namespace prefix = v ns = "urn:schemas-microsoft-com:vml" /><v:shape id=Picture_x0020_3 style="VISIBILITY: visible; WIDTH: 3.75pt; HEIGHT: 3.75pt; mso-wrap-style: square" alt="http://ui.ibsrv.net/ibsrv/res/src:www.ford-trucks.com/get/forums/clear.gif" type="#_x0000_t75" o:spid="_x0000_i1026"><v:imagedata src="file:///C:\Users\JEANET~1\AppData\Local\Temp\msohtmlclip1\ 01\clip_image002.gif" o:title="clear"></v:imagedata></v:shape><O</O</TD><TD style="BORDER-RIGHT: #f0f0f0; PADDING-RIGHT: 0.75pt; BORDER-TOP: #f0f0f0; PADDING-LEFT: 0.75pt; PADDING-BOTTOM: 0.75pt; BORDER-LEFT: #f0f0f0; PADDING-TOP: 0.75pt; BORDER-BOTTOM: #f0f0f0; BACKGROUND-COLOR: transparent" vAlign=top></TD></TR></TBODY></TABLE>
I stole this from XJcamaro and edited/added to it with some stuff I also stole from other forums. Make sure you check all this stuff...
<HR style="COLOR: #d1d1e1" align=center width="100%" noShade SIZE=1>
<TABLE class=MsoNormalTable style="WIDTH: 100%; mso-cellspacing: 1.5pt; mso-yfti-tbllook: 1184" cellPadding=0 width="100%" border=0><TBODY><TR style="mso-yfti-irow: 0; mso-yfti-firstrow: yes; mso-yfti-lastrow: yes"><TD style="BORDER-RIGHT: #f0f0f0; PADDING-RIGHT: 0.75pt; BORDER-TOP: #f0f0f0; PADDING-LEFT: 0.75pt; PADDING-BOTTOM: 0.75pt; BORDER-LEFT: #f0f0f0; WIDTH: 100%; PADDING-TOP: 0.75pt; BORDER-BOTTOM: #f0f0f0; BACKGROUND-COLOR: transparent" vAlign=top width="100%">This is all being said assuming your shift motor on the side of the transfer case is working properly.
When the engine is started and running, vacuum is exerted through a solenoid to the IWE/4x4 system. When the engine is turned off or 4WD is engaged (either by floor shifter of dial selector) vacuum is released by the IWE solenoid to the actuators at the wheels. Vacuum to the actuators at the wheel unlocks the hubs for 2WD and release of vacuum by the solenoid locks them for 4WD. A vacuum leak at any part of the system, or solenoid malfunction, can cause failure.
The vacuum builds when the engine is started. The vacuum (from the intake manifold on 4.6L) via a vacuum line exerts vacuum on the entire IWE system all the way to the actuators. There are two check valves and a vacuum box/reservoir that regulate a constant vacuum pressure in the system. The first check valve locks the vacuum at the highest vacuum that is exerted from the engine from that check valve down. The vacuum box/reservoir holds that highest vacuum exerted. The second check valve located right before the IWE solenoid holds the highest vacuum to the actuators from what has been exerted from the engine.
As you start to understand the vacuum system, you will see that the vacuum box that is located between the two check valves does in fact act as a reservoir. When you engage the 4WD, vacuum is released by the solenoid and locks the line from draining back. This process allows the lines and vacuum box between the two check valves to hold the current highest vacuum even though the engine vacuum is constantly changing and the vacuum from the second check valve to the actuators has been lost. When 4WD is disengaged, the solenoid is opened back up, the vacuum reserve from the vacuum box is then used to exert vacuum on the lines to the actuators, unlocking the actuators no matter what the vacuum from the engine is. The vacuum box/reservoir maintains a constant vacuum pressure as long as the engine is running.<O
If you try to shift into/out of 4WD and it will not engage or disengage, it’s possible your solenoid is not working and releasing the vacuum to the actuators and engaging the hubs. This might happen because of the early design of the IWE solenoid lets water run from the cowl onto the top of the solenoid causing damage. The new style solenoids have a shroud on them to prevent this. Replace the solenoid (Ford only part).
After saying all of that and you think about what the manual says about turning the 4WD on and off, you notice that you are supposed to activate and deactivate the 4WD while under a certain speed and not while accelerating. This ensures two things. First, high speed engaging and disengaging of the gears in the hubs which can cause mechanical damage does not happen. Second, it allows a quick window of no load and low RPMs from the engine, providing high vacuum from the engine, which will quickly replenish the high vacuum to the entire system and “locks” that vacuum between the two check valves and reservoir box, as well as from the second check valve to the actuators. This, when working correctly without any leaks ensures a high enough vacuum to keep the actuators unlocked when you’re in 2WD, or unlocking quickly when shifting from 4WD to 2WD.
<O
A leak in one of the lines, the reserve box, an actuator, or a faulty check valve(s) can allow a leak in the system that will allow the actuators to possibly try to engage or partially engage while driving. If you hear a grinding or whining of gears at certain speeds or loads you may have leak in your IWE vacuum system, allowing the vacuum to drop to or below the 5 lbs of vacuum needed to keep the actuators unlocked. That is the grinding or whining noise of the gears/actuators trying to mesh together. Some say it sounds like ice in a blender or sheet metal being dragged under the front of the vehicle.
To test the vacuum system, get a good vacuum pump with a gauge on it, about $60 (or cheaper) at a lot of parts stores.
<O
</OTroubleshooting:
1. If you can put the truck on jack-stands, you’ll be better able to check for engagement/disengagement of the actuators. One wheel at a time, unplug the double vacuum hoses from the actuators at the wheel (located behind the steering knuckle). Put your vacuum pump on the big hose fitting and apply vacuum. If it is working correctly you will be able to build up vacuum and it will hold. In this case the wheel should rotate and the front drive axle should not turn with the wheel (actuator disengaged by vacuum pressure). A vacuum loss of 1 lb over 1 minute is acceptable. If you cannot build vacuum or it leaks down very fast, the seals on the actuator are shot and the actuator needs to be replaced. In this case, when the wheel is rotated the drive axle will turn with the wheel (actuator not being disengaged by vacuum).<O
</O2. Next check your lines from the solenoid to the actuators at the wheel. Pull the double vacuum line off the solenoid. Pull the double vacuum line off of both actuators at the wheels. Plug the hoses at the wheels. You only need to plug the big hose at the wheel (the smaller line is the vent), and make sure you have a good plug that seals 100%. At the double hose that you took off the solenoid, trace the lines; you want the line that goes down to the wheels (should be the lower line), not the one that goes to the intake. Take your pump and connect it to the line end from the solenoid that goes to the wheels. Apply vacuum and see if the vacuum on the gauge holds. If it does not and leaks down, you have a leak in your lines between the solenoid and the actuators. Check the lines thoroughly from the solenoid to the wheels. It’s hard to get to some of the lines, but they all need to be checked. Look for cracks or breaks. Replace the lines with factory ones from Ford or make your own, with bulk vacuum hose and some fittings. If the vacuum you create with the pump holds, your lines are good but still look them over for obvious faults. You might also check to ensure no moisture or debris is in the lines. Drain and/or gently blow though the lines. Do NOT use high pressure air on any of this system unless you want to buy more new parts.<O
</O3. The vacuum reserve box is mounted behind the battery. You will have to remove the battery and battery tray to access and test it. Once removed and the vacuum line disconnected from it, connect your vacuum pump to the fitting on the box and apply vacuum, if it holds vacuum, it is OK. If it doesn’t build vacuum from the pump or leaks down, the box is leaking and needs to be replaced (Ford only part).
4. Now plug the line you removed from the vacuum box, this line runs to the intake with a "T" in it. The line from the "T" goes to the solenoid. Plug the end that goes to the solenoid also. Unplug the same line at the check valve that is close to the intake. Connect your pump to that end of the line and apply vacuum. If it pumps up vacuum and holds, that line is ok. If it won’t hold vacuum or leaks down, there is a leak in that line. Replace, repair, or make a new line.
5. There are two small check valves in the line coming off the intake. One close to the intake and one in the same line close to the solenoid. Pull those check valves off and check them. An easy way to check them is to blow (with your mouth, not compressed air-that will damage the valve) You should be able to blow air through one end and not the other. Or you can check the valves with the vacuum pump. One side of the valve will say "VAC" connect your pump to that end and apply vacuum. It should pump and hold without any leak down. If it does not then replace the valve. If it holds vacuum, the valve is good. If one or both of these fail, the high constant vacuum will not be held correctly in the system and while driving, the vacuum could drop too low and try to engage the actuators.
6. If all of this checks out OK, check the vacuum straight from the engine. Connect your pump to the line coming from the engine and start the engine. Watch what vacuum level shows on your gauge (you will not have to pump it). It should be anywhere from about 17 to 22. I’ve read that 20-22 is normal but mine likes to hover around 18-19 at idle. If this reading is too low you might have another vacuum leak somewhere else on the engine.
If you suspect that your system is malfunctioning and you are not able to test it right away or want to drive and not damage anything, disconnect the line coming off the intake at the check valve and plug both ends of the line. This will not allow any vacuum to reach the system and leave your hubs locked in all the time. This is fine and shouldn’t cause any damage as long as the hubs lock correctly. The half shafts and front driveshaft with the front differential will turn but the 4WD will not be engaged. You might notice a drop in MPG, but it is now safe to drive for a short term, until repairs can be completed.
Tools:<O
</O<O
</O10mm socket or wrench, to change the solenoid<O
</O<O
</O5/16” socket or wrench, to remove the IWE actuators from the wheel hubs<O
</O<O
</O21mm deep-well socket or wrench, to remove steering arm and control rod nuts (getting to the actuators)<O
</O<O
</OVacuum pump with gauge, for testing/troubleshooting vacuum system<O
</O</TD><TD style="BORDER-RIGHT: #f0f0f0; PADDING-RIGHT: 0.75pt; BORDER-TOP: #f0f0f0; PADDING-LEFT: 0.75pt; PADDING-BOTTOM: 0.75pt; BORDER-LEFT: #f0f0f0; PADDING-TOP: 0.75pt; BORDER-BOTTOM: #f0f0f0; BACKGROUND-COLOR: transparent"><?xml:namespace prefix = v ns = "urn:schemas-microsoft-com:vml" /><v:shape id=Picture_x0020_3 style="VISIBILITY: visible; WIDTH: 3.75pt; HEIGHT: 3.75pt; mso-wrap-style: square" alt="http://ui.ibsrv.net/ibsrv/res/src:www.ford-trucks.com/get/forums/clear.gif" type="#_x0000_t75" o:spid="_x0000_i1026"><v:imagedata src="file:///C:\Users\JEANET~1\AppData\Local\Temp\msohtmlclip1\ 01\clip_image002.gif" o:title="clear"></v:imagedata></v:shape><O
</O</TD><TD style="BORDER-RIGHT: #f0f0f0; PADDING-RIGHT: 0.75pt; BORDER-TOP: #f0f0f0; PADDING-LEFT: 0.75pt; PADDING-BOTTOM: 0.75pt; BORDER-LEFT: #f0f0f0; PADDING-TOP: 0.75pt; BORDER-BOTTOM: #f0f0f0; BACKGROUND-COLOR: transparent" vAlign=top></TD></TR></TBODY></TABLE>