


Overhead DVD

Postmaster
Joined: Jul 2006
Posts: 2,632
Likes: 4
Originally Posted by azmeeks
Has anyone installed overhead dvd? My 04 limited did not come with one and wanted to know if it is hard. And a recommened brand that is a good fit.
The OEM factory system is way too expensive in my opinion, combined with the fact you have to order a new mounting bracket that goes above the headliner.
Senior User
Joined: May 2005
Posts: 315
Likes: 0
From: SW Kansas
I have an indash unit and installed my own 8",but it was not easy with the rear a/c vents and controls.What I ended up doing is remove the center a/c vent,put up a spacer made of a short piece of 2x4,mount the bracket for the monitor to it.Got 12v from passenger side map light.You have to cut out a piece of the inner headliner above the vent to do this.Turned out nice,but was kinda scary as I did not want to replace the headliner due to a rookie mistake.
Mountain Pass

Joined: Sep 2006
Posts: 148
Likes: 0
I recently did mine myself. I removed the rear A/C controls, so now they have to be controlled from the front. I moved the control from the rear that doesn't have the "rear" setting to the front, so now the front controls just have off, low, med, high, and don't have "rear" anymore. Works great.
I then mounted the DVD over the hole in the headliner that the removed A/C controls made. Seems like the perfect place. I got 12V from the far slide out windows, as it is on a relay that shuts down when the truck is turned off.
I ran audio down to the front and use a casette adaptor to get the sound into the stock radio.
Feel free to ask more questions if you want.

Junior User
Joined: Aug 2006
Posts: 71
Likes: 0
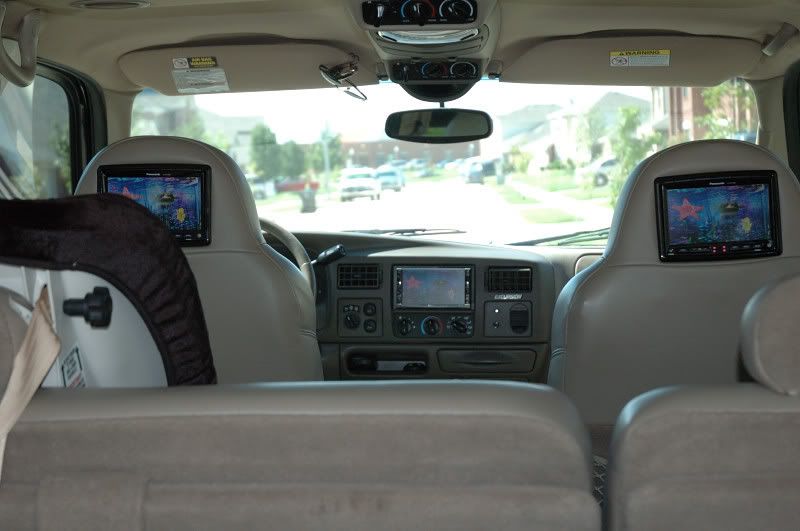
While not the overhead variety, I installed a monitor into each headrest and LOVE the setup. They were very easy to install...10 minutes per side max.
Trending Topics

Junior User
Joined: Dec 2006
Posts: 93
Likes: 0
Awsome setup... I think I like that better than overhead. What system is it and how are the headrest monitors installed?
Thanks for the picture!
Thanks for the picture!
FTE Stories
Ford Trucks for Ford Truck Enthusiasts

3 Best / 3 Worst Parts of Modern Ford Ownership
Brett Foote
10 Amazing Upgrades That Solve Common Ford Truck Owner Headaches
Pouria Savadkouei
Every 2026 Ford Engine Explained
Brett Foote
10 Ugly Ford Trucks That We Still Kinda Love
Joe Kucinski
10 Things Every Truck Owner NEEDS (2026 Edition)
Michael S. Palmer
Rezvani's Latest Post-Apocalyptic Monster Is a Ford F-150 Raptor Underneath
Verdad Gallardo
Top 10 Most Expensive Ford Trucks Ever Sold on Bring a Trailer
Joe Kucinski
2027 Ford Super Duty Buyer's Guide (Every Model, Engine, & Package)
Brett Foote
Top 10 Ford Truck Tragedies
Joe Kucinski
Junior User
Joined: Aug 2006
Posts: 71
Likes: 0
I don't have time to do the detailed explaination now as I'm on my wait out the door. I'll post up later today with better detail.
In a nut shell:
The monitors and head unit are Panasonic.
To mount the headrest monitors, you put the monitor frame to the seat and trace the border. Then draw an "X" from corner to corner. With a razor, cut along the "X" stopping about 1/4" short from the corners.
You should now have 4 triangular flaps that can be folded inwards in to the seat (I cut off the top and bottom one and left the sides due to lack of material in the seat) Remove the nessary foam to fit the monitor. Hold the mounting plate in the cut out section, mark your mounting holes and drill your pilots. Mount the mounting plate, feed the wire down the back of the seat (there is a small exit hole at the bottom of the seat back), screw and snap in the monitor into the mounting bracket and snap on the frame.
DONE!
(and yes, I did get a slight queazy feeling when pushing a razor blase throught the factory leather )
)
In a nut shell:
The monitors and head unit are Panasonic.
To mount the headrest monitors, you put the monitor frame to the seat and trace the border. Then draw an "X" from corner to corner. With a razor, cut along the "X" stopping about 1/4" short from the corners.
You should now have 4 triangular flaps that can be folded inwards in to the seat (I cut off the top and bottom one and left the sides due to lack of material in the seat) Remove the nessary foam to fit the monitor. Hold the mounting plate in the cut out section, mark your mounting holes and drill your pilots. Mount the mounting plate, feed the wire down the back of the seat (there is a small exit hole at the bottom of the seat back), screw and snap in the monitor into the mounting bracket and snap on the frame.
DONE!
(and yes, I did get a slight queazy feeling when pushing a razor blase throught the factory leather
)
Junior User
Joined: Aug 2006
Posts: 71
Likes: 0
To add:
If you decide to go the headrest monitor route, DO NOT try and level the monitor in the seat using the stitched seam across the seat as a guide. I did and got lucky with the driver's side. The passenger side was actually sewn slightly "uphill". You can kind of see it in the picture above. Instead, use a level and your eye ball (or even someone elses).
Each monitor came with its own little control box that provides: power, 2 A/V inputs, and an A/V output (to send the A/V signal to multiple monitors).
I was going to do the overhead video too untill I really started looking in to it and saw how much trouble it was going to be.
The monitors are Panasonic CY-V7100U
The headunit is a Panasonic CQ-VD6503U
Junior User
Joined: Dec 2006
Posts: 93
Likes: 0
Ok L8RG8R you inspired me! I bought a system and plan to do the installation tomorrow. Any last words of advise? What type of hardware did you use to install the headrest monitors... I think I felt a metal plate in the headrest do you simply drill holes into that and if so what type of screws did you use that threaded into it?


Mountain Pass
Joined: Nov 2005
Posts: 239
Likes: 9
From: moreno valley calif
i put in headrest monitors and had a hard time with drilling holes in the frame.. i saw on a truck show on tv..that guy installed the monitor brackets with zip ties..took him 5 minutes.. wish i thought of it.. just a suggestion.
Junior User
Joined: Aug 2006
Posts: 71
Likes: 0
Originally Posted by 3KIDDAD
Ok L8RG8R you inspired me! I bought a system and plan to do the installation tomorrow. Any last words of advise? What type of hardware did you use to install the headrest monitors... I think I felt a metal plate in the headrest do you simply drill holes into that and if so what type of screws did you use that threaded into it?