


1986 Headlight Switch
Moderator


Joined: Jan 2001
Posts: 57,005
Likes: 2,750
From: Virginia

I thought you were working on it that way. From beneath is terrible.
On the 1986 switch you have two choices to get the **** off.
1. Feel the switch on the side opposite where the wires plug in. There should be a little button. You can go out and take the battery cable off, and then come back in, pull the headlight switch **** out all the way, and then push down on that button and pull the **** again and the **** and the rod the **** is mounted on will come out. I suppose you might have already done some of this if you are working on it from below.
2. Look at the headlight switch ****. On the back side near the shaft there should be a notch with a metal tang in it. Take a hook tool of some sort and lift up on the tang, and the **** should slide off the shaft.
Then take the wiper **** off. Use method #2 for this ****.
Take the short shroud off the steering column near the cluster. When you take this shroud off, you should see a plastic tube with a string in it. This is if you have a automatic. BE CAREFUL WITH THIS TUBE AND STRING. It goes to the PRND21 indicator in the cluster. It's very easy to break. Take it loose from the column, the string and then the tube.
Take the screws out of the cluster and pull it forward as much as you can. Reach back in there and take the wiring plug loose. Pull on it some more, the speedometer cable will still have it though. Reach back in there and you will feel a plastic piece on the speedometer at the end of the cable. Push this plastic piece sideways, it should release from the speedometer, and the cluster will then come out.
Now is the time to replace any lights. If you can't hardly see the speedometer and your gauges, you can take the lights out, and take a small screwdriver or pencil, and stick down where the lights went and poke out the lenses. They get old and cloud up and don't let any light through. After this the lights will be nice and bright, but the cluster will have a yellow tint. I don't mind this, but some people do and buy colored lights instead.
Check the copper circuits where the plug went in. If any of them are loose or wrinkled, you can smooth them out, and a careful dab of superglue on the back of them will glue them back to the plastic.
Thread Starter
|
New User
Joined: May 2018
Posts: 23
Likes: 0
AFTER you get the original setup going again, you can buy this relay kit for the headlights.
https://www.lmctruck.com/1980-96-for...dlight-harness
https://www.lmctruck.com/1980-96-for...dlight-harness
Moderator
Joined: Jan 2001
Posts: 57,005
Likes: 2,750
From: Virginia
Did you plan on retro-fitting that switch? I always wondered if you could.
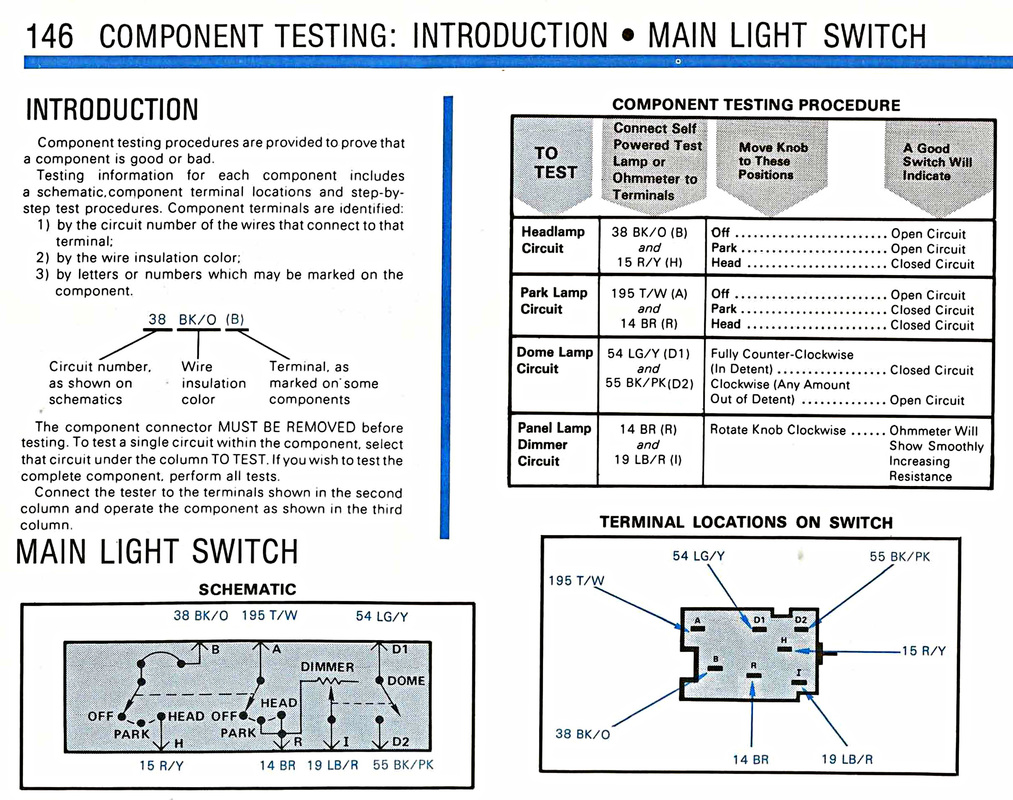
Ok, I just did some research. The switches are basically the same except the later model switch has an extra set of contacts and wires because the later models had digital radios, and they used this extra set of wires to dim the display when the headlights were switched on. They have the terminals labeled in my diagram, look to see if your switch terminals are labeled the same.
Terminal letter----------------wire designation and color
B---------------------------------Headlight power coming in, Black/orange wire
A---------------------------------Marker light power coming in, Tan/white wire
DN------------------------------Dim the display power on new switch, do not use.
D1-------------------------------Domelight power coming in, lightgreen/yellow wire
D2-------------------------------Domelight power going out, black/pink wire
IGN------------------------------Power coming in for the Dim the display, do not use
I----------------------------------Power going out to the cluster and dash lights, lightblue/red wire
R---------------------------------Power going out for the marker lights, brown wire
H--------------------------------Power going out to the high/low beam switch for the headlights, red/yellow wire.
i ain't rite
Joined: Mar 2005
Posts: 65,585
Likes: 5,615
From: Marlboro Mental Hospital.
that is exactly why i said to take the old switch to the auto parts store. this way you would get the proper part.
Thread Starter
|
New User
Joined: May 2018
Posts: 23
Likes: 0
I got the proper switch, the problem is there isn�t a pigtail available that fits the switch. Both of mine are toast.
Thread Starter
|
New User
Joined: May 2018
Posts: 23
Likes: 0
Thanks bud
FTE Stories
Ford Trucks for Ford Truck Enthusiasts

Top 10 Fords at 2026 Carlisle Ford Nationals
Joe Kucinski
3 Best / 3 Worst Parts of Modern Ford Ownership
Brett Foote
10 Amazing Upgrades That Solve Common Ford Truck Owner Headaches
Pouria Savadkouei
Every 2026 Ford Engine Explained
Brett Foote
10 Ugly Ford Trucks That We Still Kinda Love
Joe Kucinski
10 Things Every Truck Owner NEEDS (2026 Edition)
Michael S. Palmer
Rezvani's Latest Post-Apocalyptic Monster Is a Ford F-150 Raptor Underneath
Verdad Gallardo
Top 10 Most Expensive Ford Trucks Ever Sold on Bring a Trailer
Joe Kucinski
2027 Ford Super Duty Buyer's Guide (Every Model, Engine, & Package)
Brett Foote
Thread
Thread Starter
Forum
Replies
Last Post
duphofff
1973 - 1979 F-100 & Larger F-Series Trucks
4
Sep 6, 2015 05:43 AM
vettman
1973 - 1979 F-100 & Larger F-Series Trucks
2
Jan 24, 2015 10:16 PM
johnmel59
1961 - 1966 F-100 & Larger F-Series Trucks
5
Jun 30, 2013 06:48 PM