
Backup camera, installation notes

Thread Starter
|
Tuned


Joined: Aug 2009
Posts: 402
Likes: 16
Backup camera, installation notes
This is an add-on option to some older navigation displays by Garmin. Shown here coupled to a Nuvi 2597.
It works but would be considered low-res and crude by contemporary standards.
The concept is that of a remote camera doing a wireless transmission of video to a receiver attached to the display head.
A typical use is a temporary installation on the back of a trailer or RV.
Note that for all other uses, Garmin's choice of wireless technology (rather than wired) is a bit dubious, since we still have to route cables, from camera to transmitter and to patch into a switched power supply.
In the example here, the headliner and left interior panel were first removed to enable cable routing and power source patching.
At that level of inconvenience, we might as well have routed a cable, camera to display, ala PoE technology.
This system allows up to 4 video feeds. Unfortunately, the BC-30 only transmits a mirrored (reverse) view so it is less useful as a general purpose monitor.
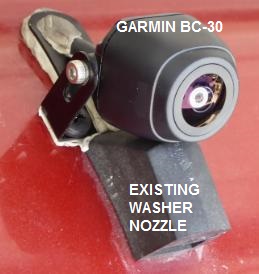
Top of rear hatch, above washer nozzle.
Weatherstrip putty used as gasket.
**** Camera / transmitter install *****
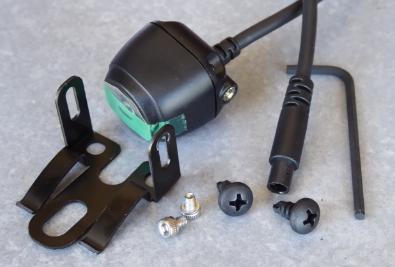
Camera cable, bracket.
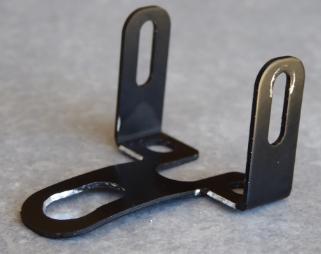
Bracket mod. Side tabs removed, center slot enlarged to pass cable end, slight curve to match hatch profile.
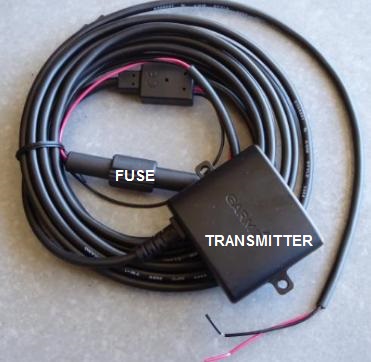
Transmitter cable
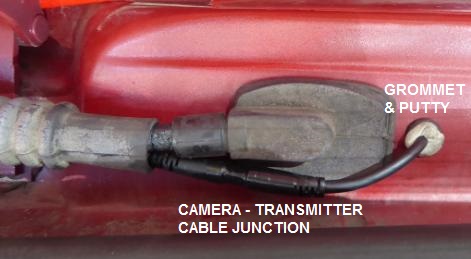
Junction at top of hatch.
Cable routes thru left cable sheath, new hole & grommet, filled with weatherstrip putty.
Unfortunately, you'll need to remove the hatch trim to route from the camera to the existing cable bundle and also remove the left side interior paneling and headliner to get into the cable channel at top rear of the Aerostar chassis.
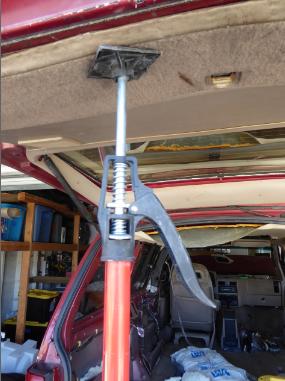
Tip of the day, these expandable poles come from the home construction world, hold up the hatch while disconnecting pressurized struts.
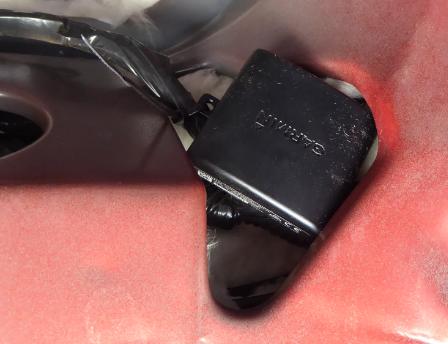
Transmitter placement, inside upper left corner. Will then be concealed by interior paneling & headliner.
Power lines continue down to jack area.
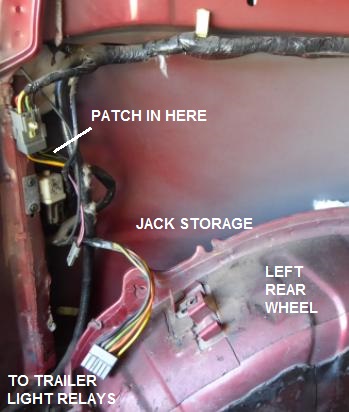
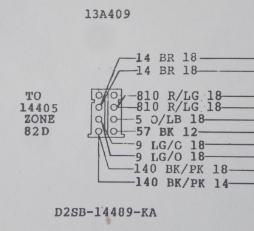
Patch into reverse light feed (Black with pink stripe aka 140 BK/PK 18) and ground (Black).
Fyi #1, the larger gauge 140 BK/PK 14 goes to the trailer connector under the rear bumper.
Fyi #2, the always-hot trailer power (thick yellow wire) does not show in the factory pinout.

******* Display head power cable mod ****
Original power cable for the display, with the DC-DC converter sporting a cigarette style plug.
Rojostar DOES NOT do cigarette style plugs.
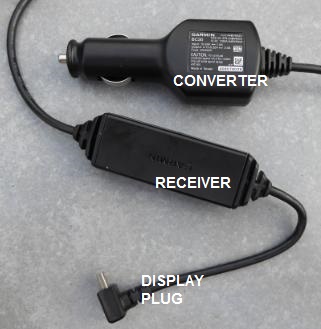
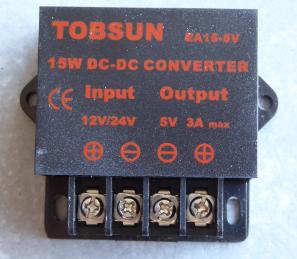
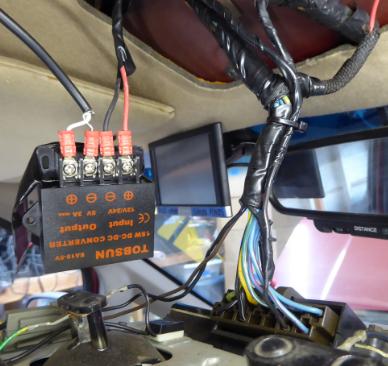
Instead, a new DC-DC converter is hardwired in, patched into the switched circuit at the overhead console (aka trip computer).
Top side of overhead console.
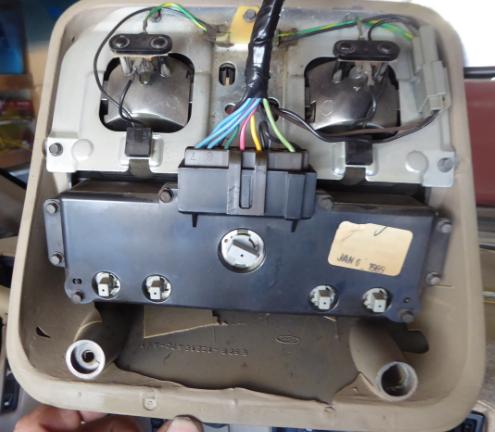
Patching into switched power (pink with black stripe, aka 489 PK/BK 18) and ground (black aka 57 BK 20).
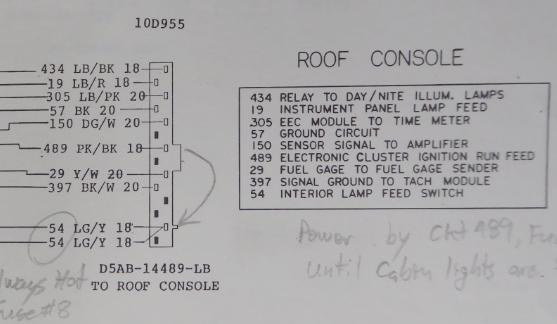

12V input from overhead console, 5V 3A output onto center lead of original coax cable.
Note: check local vehicle code for allowed placement of navigation displays.
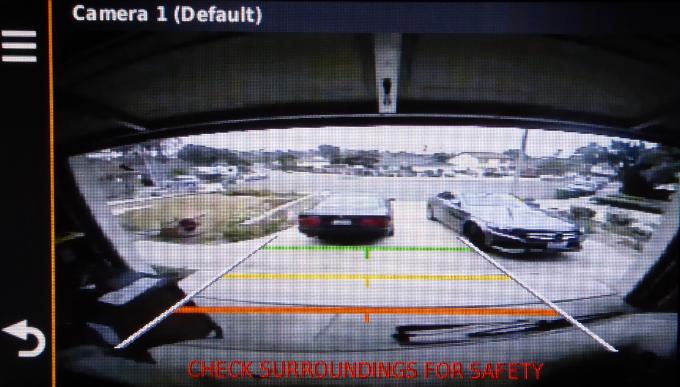
Placing the transmission shifter into reverse energizes the backup light circuit that the camera is patched into, thus powering up the camera at that time.
The display recognizes the resulting signal transmission and switches from navigation to the live video.
It works but would be considered low-res and crude by contemporary standards.
The concept is that of a remote camera doing a wireless transmission of video to a receiver attached to the display head.
A typical use is a temporary installation on the back of a trailer or RV.
Note that for all other uses, Garmin's choice of wireless technology (rather than wired) is a bit dubious, since we still have to route cables, from camera to transmitter and to patch into a switched power supply.
In the example here, the headliner and left interior panel were first removed to enable cable routing and power source patching.
At that level of inconvenience, we might as well have routed a cable, camera to display, ala PoE technology.
This system allows up to 4 video feeds. Unfortunately, the BC-30 only transmits a mirrored (reverse) view so it is less useful as a general purpose monitor.
Top of rear hatch, above washer nozzle.
Weatherstrip putty used as gasket.
**** Camera / transmitter install *****
Camera cable, bracket.
Bracket mod. Side tabs removed, center slot enlarged to pass cable end, slight curve to match hatch profile.
Transmitter cable
Junction at top of hatch.
Cable routes thru left cable sheath, new hole & grommet, filled with weatherstrip putty.
Unfortunately, you'll need to remove the hatch trim to route from the camera to the existing cable bundle and also remove the left side interior paneling and headliner to get into the cable channel at top rear of the Aerostar chassis.
Tip of the day, these expandable poles come from the home construction world, hold up the hatch while disconnecting pressurized struts.
Transmitter placement, inside upper left corner. Will then be concealed by interior paneling & headliner.
Power lines continue down to jack area.
Patch into reverse light feed (Black with pink stripe aka 140 BK/PK 18) and ground (Black).
Fyi #1, the larger gauge 140 BK/PK 14 goes to the trailer connector under the rear bumper.
Fyi #2, the always-hot trailer power (thick yellow wire) does not show in the factory pinout.
******* Display head power cable mod ****
Original power cable for the display, with the DC-DC converter sporting a cigarette style plug.
Rojostar DOES NOT do cigarette style plugs.
Instead, a new DC-DC converter is hardwired in, patched into the switched circuit at the overhead console (aka trip computer).
Top side of overhead console.
Patching into switched power (pink with black stripe, aka 489 PK/BK 18) and ground (black aka 57 BK 20).
12V input from overhead console, 5V 3A output onto center lead of original coax cable.
Note: check local vehicle code for allowed placement of navigation displays.
Placing the transmission shifter into reverse energizes the backup light circuit that the camera is patched into, thus powering up the camera at that time.
The display recognizes the resulting signal transmission and switches from navigation to the live video.
Fleet Mechanic


Joined: Apr 2003
Posts: 1,460
Likes: 6
From: Florida
I use a ladder to hold the rear hatch open when disconnecting the struts. That hatch is heavy, I'm surprised those 2 struts can actually lift and hold it open.
the two front cutouts I did to the roof a/c rear vents duct have proven themselves very effective. There is a lot of air pressure coming out both front and back. It cools the front cabin a lot faster than without them.
.
the two front cutouts I did to the roof a/c rear vents duct have proven themselves very effective. There is a lot of air pressure coming out both front and back. It cools the front cabin a lot faster than without them.
.

Thread
Thread Starter
Forum
Replies
Last Post
Jesser02EX
1999 - 2003 7.3L Power Stroke Diesel
88
Nov 5, 2021 08:38 PM
TRENT310
1999 - 2016 Super Duty
13
Oct 26, 2014 02:46 AM
Sian_Sam
Excursion - King of SUVs
24
Sep 24, 2013 09:11 PM
explorer5.0
Audio & Video Systems, Navigation, Satellite Radio & Mobile Electronics
13
Mar 10, 2013 03:20 AM


