When you click on links to various merchants on this site and make a purchase, this can result in this site earning a commission. Affiliate programs and affiliations include, but are not limited to, the eBay Partner Network.
I had a classic ticking/clicking noise on my 05 F150 5.4L 3V when I bought the truck a little over 1/2 year ago. I didn't think the noise was too much of an issue cause I heard the same noise from pretty much all F150s I looked at. A big mistake. Should have researched about this issue before buying the truck.
I heard it runs many miles without a issue other than the noise. So, I just drove it as is then suddenly I heard something dragging against the chain or gears a month ago. Sounded something like ta da da da da.. for few sec then stopped. This happened twice. When I heard the noise I decided I have waited enough.
I figured the chain guide has broken and the chain is dragging against it.
Been looking into this issue and saw few videos on how to repair, so I was confident enough to try myself.
I highly recommend watching FordTechMakuloco's 4 parts video before working on the chain.
Part 1
Luckily I have a cousin who owns the mechanic shop and I was able to get a space to work on the truck and borrow some air tools.
All of this can be done with hand tools except for crank shaft bolt which will be near impossible to remove without a impact wrench. There is no good way to hold the pulley.
In my case, removing fan clutch was also challenging because it was over tightened by the mechanic worked on the truck before. Got it off after several tries with air hammer tool.
It is recommended to disconnect AC lines and remove radiator hose, but I was able to do it without removing them. But this does make things much harder.
Upper radiator hose gets in the way when removing the fan shroud, and AC lines gets in the way working on the right side.
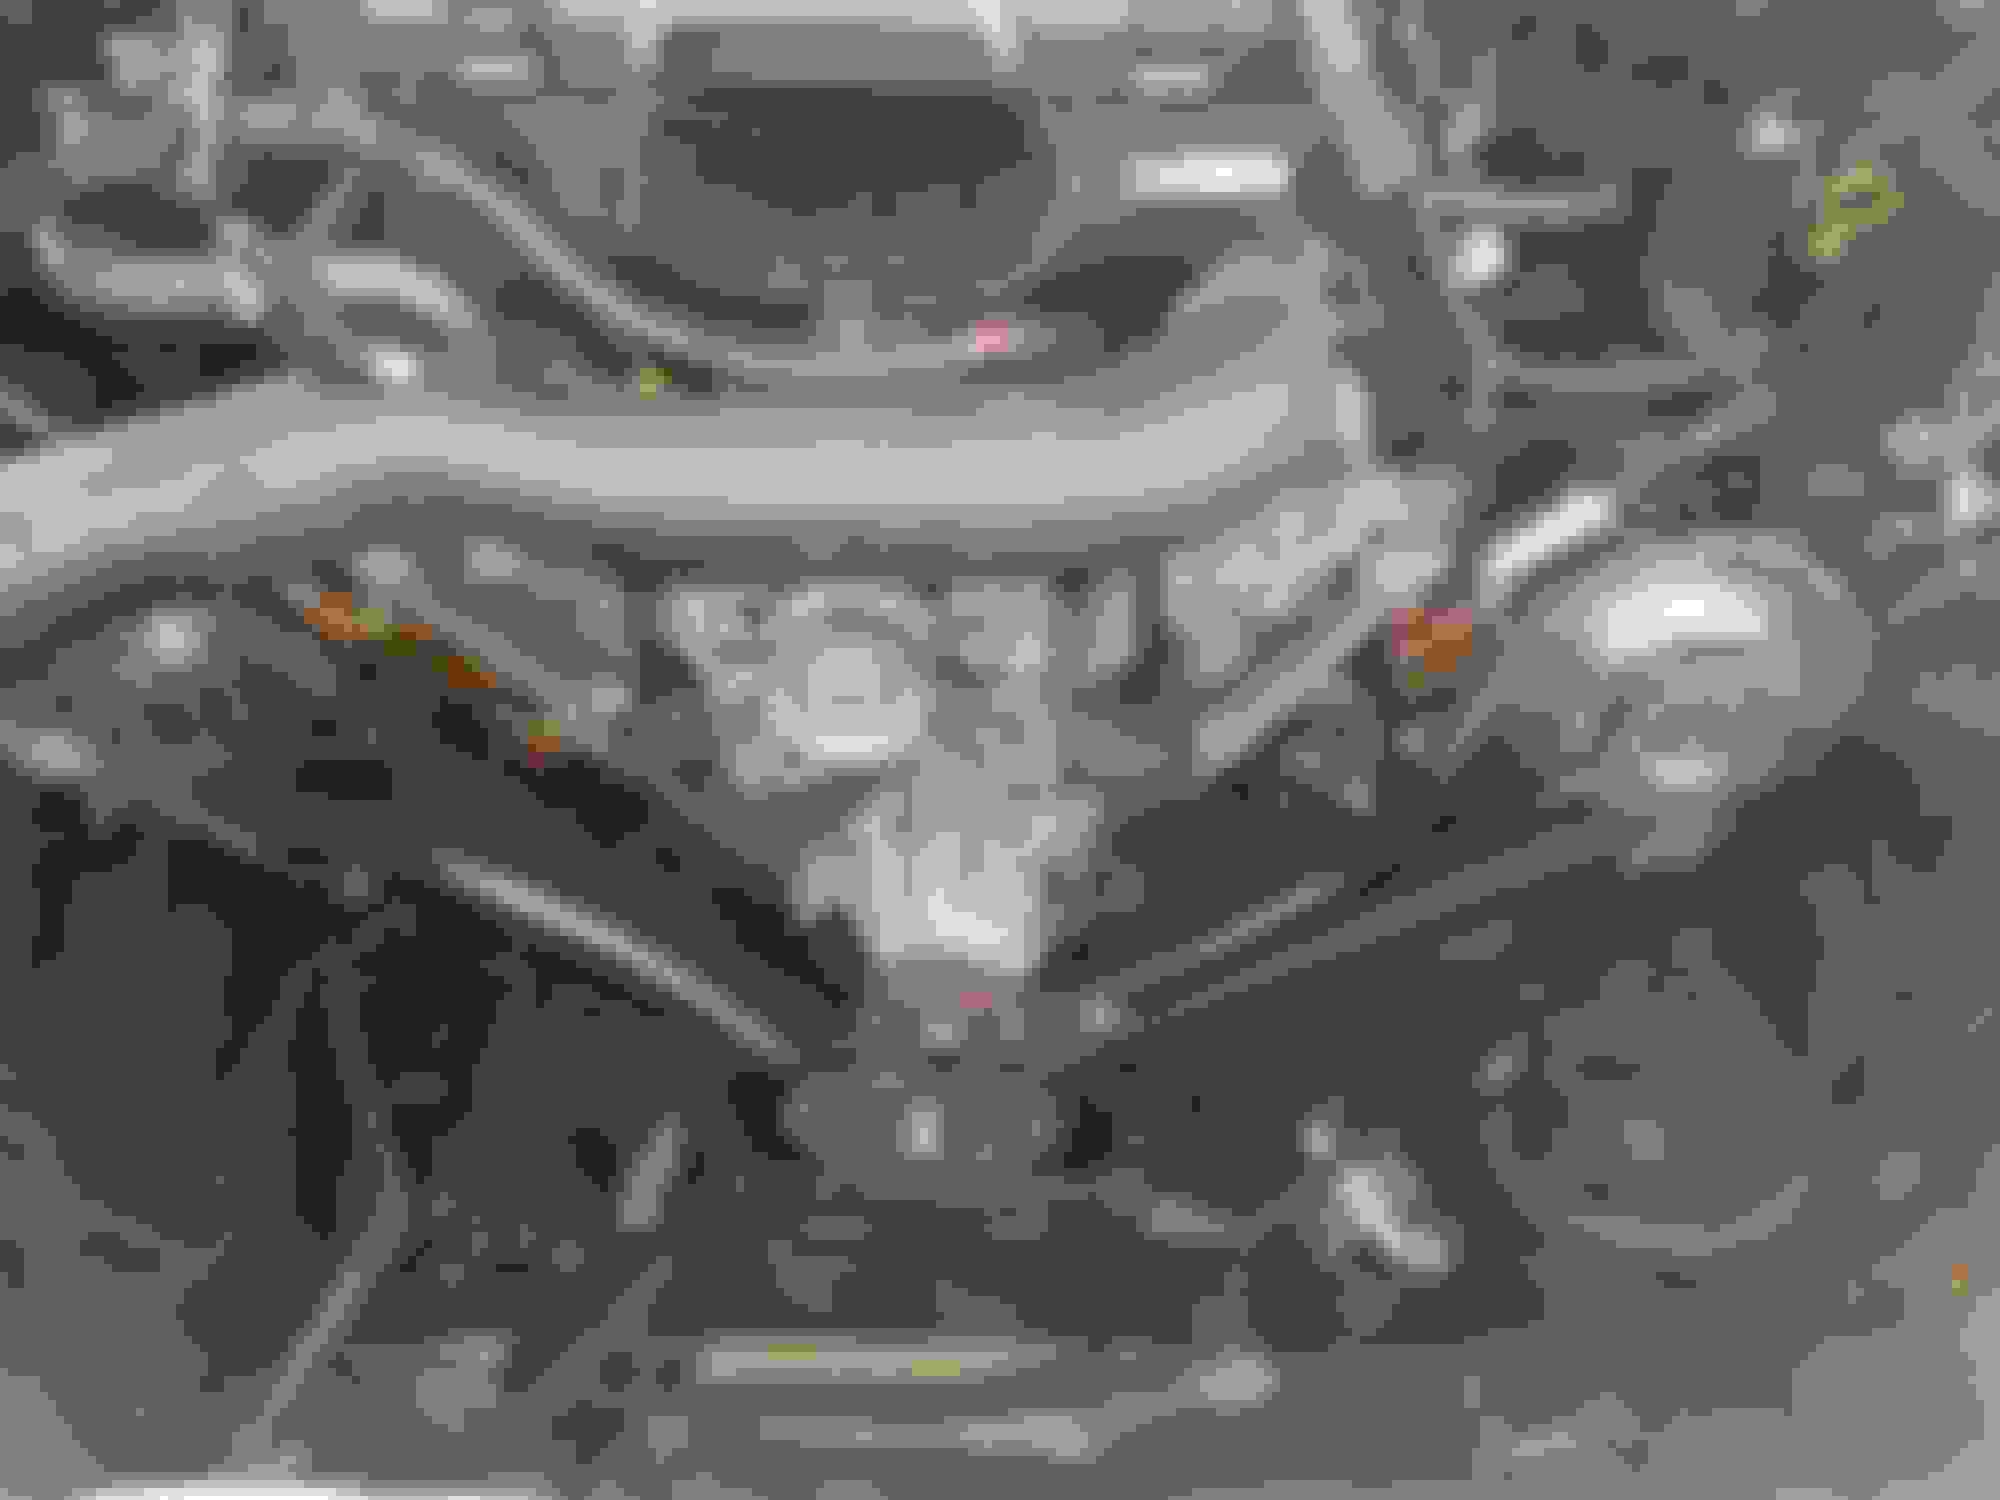
AC line and transmission dipstick was in the way which made removing right side valve cover very difficult.
After fishing the cover several times, I managed to get it out.
Upon removal of the cover, I checked for slack in the chain and the right side chain did not have any tension. Very loose chain.
Left side was pretty easy. There are plenty of room and the only thing that gets in the way is vacuum supply line, which is a steel tube, which you cannot install without removing intake plenum if removed by accident. But this can be rotated out of the way. Just don't push it toward back of the engine.
Right side chain was tight without any slack.
Some roller followers has to be removed with crank shaft key at 6 o'clock position to release tension on the shaft. Detailed instruction is available in a service manual or just watch FordTechMakuloco's videos.
Right side chain has been hitting the valve cover. Luckily my chain did not jump at least not enough to cause check engine light to come on or have driveablity issues.
Heavy build up on the front cover. Took me over an hour cleaning both front cover and valve covers. Forgot to take pictures after cleaning, but I managed to clean it pretty good using a oven cleaner (suggested by my cousin). Only down side with a oven cleaner is that it is acidic and it will oxidize aluminum pretty fast. Not too big of a deal, but will leave dull gray finish instead of shiny aluminum. It will look like an old aluminum part.
The chain has been dragging against front cover as well.
The chain was dragging against crank shaft position tone ring as well. Not enough damage to cause any issue, so using it as is.
Right side upper chain guide is missing a big chunk at the lower section around the bolt. Upper bolt was the only thing that was holding this guide. I found the broken piece between the oil pan and the oil pump. Small pieces are still missing, but did not want to through to trouble of removing oil pan and I figured that are not enough pieces missing to clog pick up screen. The missing pieces are small enough to come out through the drain plug and may already have come out during oil change.
Left side guide was also broken, but was only missing small pieces around upper mounting bolt hole. Big piece was still in the place.
Both left and right side tensioner's seal was flattened and lost elasticity. Right side actually blew out in one corner. From what I have heard, this blown tensioner seal is what causes oil pressure issue, which leads to cam phaser failure.
The timing chain kit I bought was from Cloyes and it was made in China. Included tensioner was better design than the original. It has rubber gasket on a below molded sealing surface. Still a little worried about the tensioner failing since it was made in China.
Installed new Ford genuine cam pahsors and cloyes timing components per instruction. Also replaced oil pump with Melling M340. While M340 is the OE replacement, higher pressure M360 is recommended, but I figured M340 will do just fine and it has steel backing plate instead of OE aluminum backing plate which is known to flex and leak at high RPM. Another reason for my choice was Amazon had a open box M340 for only $62.25, which is almost half the price of NIB M340 or M360. If getting new in the box pump, M360 is the same price so, go for M360 or better yet go for M360HV (high volume).
Removing and installing requires cam phaser locking tool and it is just a bar with gear tooth to hold cam phaser in place. The tool is OTC 567614 or OTC 6681, which is a tool set. This is way over priced at $60 for just a piece of metal. I found cheaper copy of the tool on eBay for $30. I did not find any quality issue.
My truck had right side VCT solenoid already replaced by previous owner and it had Dorman part. Left side still had the original VCT solenoid, but the upper screen had separated. I think they are still in a good working order, but replaced them with Ford genuine parts anyway.
New VCT solenoids installed.
Removing and installing roller followers requires a valve spring compressor specifically made for this engine. OTC 6684 is the tool, but it is way over priced. Cheapest one I found was $117. I got the exact same copy of the tool made by OEMTools for $60. I have never actually seen OTC tool myself, so I don't know if the quality is the same, but worked fine for me.
A magnetic pick-up tool is very helpful while removing/installing roller followers because there aren't much room under the cam to hold roller followers with finger.
I replaced lash adjusters and roller followers as well. You can get them individually, but the whole set is cheaper if replacing all of them. Part number is M-6529-3V and the set cost me $256 on eBay. Sellers on Amazon was charging that much for just roller followers (aka rocker arm) without lash adjusters. It is not necessary to replace them, but I ordered a set because I cannot know their condition until removing the valve cover and getting them from a local dealer will probably cost me at least twice as much. All roller followers and lash adjusters I removed were is good condition, but replaced them anyway since I got the parts and all of them has to come out in order to time the engine. If reinstalling old roller followers, they must go back to the same place they came out from.
Installing a roller follower for #4 cylinder exhaust on the right inside wasn't easy. AC accumulator was so close, I did not have enough room for to valve spring compressor tool. Had remove accumulator off the mounting studs and push up and back to again 1/4" which was just enough room for the tool.
Rest of the roller followers are easy to install, but very tedious process. Make sure to hold valve stem down while compressing the spring. Some valves will stick and if the spring compresses with valve stuck, keepers will fall off and the valve will fall into the cylinder. Then you have to pull the head. I did have few valves sticking as well, I pushed them down before the keepers fall off.
I changed motor oil to replace contaminated oil during the timing chain replacement.
Everything put back together except for the crank position sensor. This will prevent engine from starting and allows you to prime the oil pump and other oil passages. Crank the engine until oil pressure gauge comes up then crank a little more. It will take a while if you replaced oil pump like I did.
Connect crank position sensor back then start engine before putting the fan back on. Easier to check for any possible leaks this way. Just don't run it too long since you don't have a fan.
I also had to replace a idler pulley and a tensioner pulley because their bearing has failed.
Everything put back together. If you broke any trim clips while removing, they are available at Autozone or Advance Auto Parts. The hole size is 1/4"
Took me 2.5 days to complete the job. Probably would been able to do it in 2 days if I was working inside garage, but I was out in the sun.
The engine runs quiet except for the fuel injector noises. Has better low end torque now.
Hopefully the repair will last at least another 100k.
In the end, I replaced Timing chain, timing chain tensioners and guides, cam phasers, VCT solenoids, oil pump, lash adjusters, roller followers, and spark plugs.
All of the parts cost me about $1300 and about $90 worth of special tools.
Could have gotten away with $1000 if I did not replace unnecessary parts.
Service manual showing timing chain replacement procedure is attached.
Intake manifold removal procedure is also attached and this manual shows location of electrical connections.
I am looking to do this same job on my '04 5.4L 3V. Like you I did find FordTechMakuloco's 4 part video series to be very informative. I am very interested that you did your job with mostly hand tools. I just purchased a small compressor in preparation for starting the first task which will be the attempt at removing plugs without breaking them. My truck only has 75K miles on it. But I bought it used (I know now that the Fact Check report was bogus) and I am quite sure it was run hard. It runs good enough for now, but does make noises that I presume indicates some of the causes that you found. FordTechMakuloco's video's also make it clear and show that chain tensioners, especially in the earlier model years, are a problem area. Therefore the chain guides among other parts do sustain damage. After the plug and coil change, I will clean the MAS and Throttle Body. Soon after I will start on the Timing job to include VCT Solenoids and an upgrade to the Oil Pump. New Cam Phasers, chains, guides and of course Chain Tensors. I will certainly inspect the roller rockers and cams while setting up the timing. Hopefully, there will not be any unusual cam wear due to bad rollers. But even if this is the case, like you, I will probably throw in a new set while I'm already in there. One less thing to be concerned about.
Thanks for the information and insights Byoung Oh.
With 04, I believe you have to remove AC lines because the accumulator is closer to the valve cover.
Will be much easier to work on if you remove AC condenser and the radiator, which I kinda regret not doing. Make sure to buy a 8mm flex head gear wrench if you will be replacing oil pump without dropping the pan. I did not have one and had a hack of time removing and tightening one of the bolt. What I did was use 8mm nut driver bit for a impact driver and then turn it with 1/4" flex head gear wrench which I had.
A week after timing chain job was done, my transmission failed. Lost 1st and 2nd gear. Ended up putting a re-manufactured transmission. Not sure if it is related to what I may have done during timing chain job without knowing.
I still have a ticking noise after everything was done, but have not been able to figure out source of the noise. I think it might be exhaust manifold leaking cause I heard it louder under the driver side wheel well toward rear. However, I was not able to find any cracks or evidence of gasket leaking. For now, I have decided to just live with it.
For the ticking noise, make sure all of your spark plugs are tight. If they are, its probably the manifold gasket
I'm sure spark plugs are tight and I don't really hear much noise on top other than fuel injectors, which also makes ticking noise. But the noise I am concerned about is much deeper lower frequency ticking that I can even hear inside.
None of the manifold studs are broken or rusted because previous owner replaced the engine probably few years ago. But, then their mechanic may not have done such a good job installing it in the first place.
This noise was there before I worked on the engine and there is no change in noise even after the engine gets hot.
Did you remove all of the roller followers when doing the chain just like in FordTechMacaloo's video or is it possible to do the timing job without that? Did you remove the entire camshaft? Was there any special procedure to replacing your lash adjusters or did you just put them in?
Its not necessary to remove the followers but if you leave them in the cam will be under spring pressure from the valves and will move. Just got to make sure its in time
With 04, I believe you have to remove AC lines because the accumulator is closer to the valve cover.
Will be much easier to work on if you remove AC condenser and the radiator, which I kinda regret not doing. Make sure to buy a 8mm flex head gear wrench if you will be replacing oil pump without dropping the pan. I did not have one and had a hack of time removing and tightening one of the bolt. What I did was use 8mm nut driver bit for a impact driver and then turn it with 1/4" flex head gear wrench which I had.
A week after timing chain job was done, my transmission failed. Lost 1st and 2nd gear. Ended up putting a re-manufactured transmission. Not sure if it is related to what I may have done during timing chain job without knowing.
I still have a ticking noise after everything was done, but have not been able to figure out source of the noise. I think it might be exhaust manifold leaking cause I heard it louder under the driver side wheel well toward rear. However, I was not able to find any cracks or evidence of gasket leaking. For now, I have decided to just live with it.
Yes Byoung Oh. I have not started the timing job yet. But I did complete the dreaded Plug change. As I mentioned previously, this engine has at least 75,000 miles on it. After reading what a mess getting the old style plugs could be, I was very serious about changing them because I knew they should be the old plug style that could break off during removal. Long story short, they came out, but since the truck was bought used the plugs had obviously been changed once already. Some cylinders had the new plugs and even had anti-seize compound on the threads. One cylinder had an old style plug. I had followed the suggested method of using Sea Foam just before and then with a warm engine I filled the plug bores with the suggested Carb Cleaner. Allowed that to sit for at least 15 min hoping that would penetrate the threads. They all came out just fine with no issues, probably due more to the fact that they had already been changed once previously. I'm just happy they came out! Replaced the coils. Removed and cleaned the Throttle Body and the MAF sensor. The truck is running good for now. But that timing job is next
A point you brought up about the AC has been a concern. I know the AC system should be evacuated of the coolant and oil, and left sealed under vacuum. I do not have the equipment for that so I am considering taking it to a shop for that part of the job.
What did you do?
A point you brought up about the AC has been a concern. I know the AC system should be evacuated of the coolant and oil, and left sealed under vacuum. I do not have the equipment for that so I am considering taking it to a shop for that part of the job.
What did you do?
My truck is 05, so I did not have to disconnect AC lines. They are in the way, but can be done without disconnecting. I heard with 04 AC lines are closer and has to be disconnected to remove right side valve cover.
To disconnect AC lines, you should have a shop evacuate and recover the refrigerant.Disconnected lines cannot be sealed under vacuum. Just tape it or plug it to keep derbies and excess moisture getting inside. Ideally you should replace filter/dryer as well when the line is disconnected, but usually works fine without replacing them. In case of our trucks, that is part of the accumulator and whole accumulator has to be changed.
Replace any O-rings at the disconnects with new one to make sure you don't have a leak. Pull vacuum and recharge the system. It might be cheaper to do this yourself. Harborfreight has a descent vacuum pump for $85 and manifold gauge for $60. You could sell them back on eBay or craigslist when done.
3 cans of 12oz R134a is $20 on eBay.
I heard with 04 AC lines are closer and has to be disconnected to remove right side valve cover.
You can remove the RH valve cover without opening the AC system. It is tight, but you can remove the nuts from the studs on the firewall and inner fender that mount the receiver/dryer and it can be moved a little without opening the system. I also removed the bolt that holds the transmission dipstick to the head. It takes some takes some maneuvering, but you can get the cover off.
You can remove the RH valve cover without opening the AC system. It is tight, but you can remove the nuts from the studs on the firewall and inner fender that mount the receiver/dryer and it can be moved a little without opening the system. I also removed the bolt that holds the transmission dipstick to the head. It takes some takes some maneuvering, but you can get the cover off.
Hey thanks Shadow351. That seems to be the way to try it from what I can see. Thanks buddy.
Yeah Byoung Oh, the AC would need to be pumped down by a pro shop as I am not wanting to disassemble sealed systems. That never seems to go well later.
I finally had some time to test exhaust leaks. As suspected, there was a bad leak on right side. But, to my surprise, it was leaking on left side as well.
The leak is at the flange between exhaust manifold and catalytic converters. There are no gasket or any other sealing material for this joint. I have tried cleaning and tightening the joint several times with no luck. Any idea on how to fix this leak?
I'm thinking replacing studs on the manifold with ones that has threads all the way will make it possible to tighten the joint more and might fix the problem. But, I'm also worried that it may actually damage the flange from over tightening.
Leaks are toward bottom of the flange. I did not even need soapy water as it was blowing like air gun.
I am not so sure if ticking noise I'm hearing is from the leak. There were no change in noise when I put a rag on the joint. But, then I could not really cover the whole joint without burning myself. It is tight in there.
Im working on my 04 F150 5.4L 3V. I followed the 4 part video series by FordTechMakuloco, posted above (and used my Hayes Manual to double check myself) to install new Cam Phasers, chains, guides, and tensioners. All parts were Ford. I just finished timing the engine and according to the Hayes manual, the last step before getting the RTV out and installing the front cover is to rotate the crankshaft with a socket for a few revolutions, making sure there is no interference. There is no interference, but I am hearing a clicking / ticking noise coming from my brand new Cam Phaser Sprockets. Upon closer inspection, there is also a slight movement when the tick occurs. The movement is backwards to the direction of rotation, and the chain will go slack slightly. I thought that these phasers were supposed to be locked, unless there is enough oil pressure to unlock the pin inside them and allow the variable timing to take effect. So I am really wondering if these new Ford phasers are faulty / defective. I don't want to put everything back together unless I know forsure if this behavior is normal or not!
The same behavior can be seen in another video by FordTechMakuloco, around 4:00 minute mark:
My new Ford phasers are making the same noise! Are they defective? I know that I don't want to put the truck back together and then have the phaser come apart, that could cause serious engine damage!