When you click on links to various merchants on this site and make a purchase, this can result in this site earning a commission. Affiliate programs and affiliations include, but are not limited to, the eBay Partner Network.
I have a 1989 E150 with the 302. Low miles, and looking to get the AC working after the rig has been sitting for a while.
Couple facts:
1. System looked all there and intact, so I tried to recharge via R134a. Used the dye indicator, and the standard refrigerant cans. Van running and as soon as the system filled up, the compressor kicked on and started to compress. It never stayed on, just cycled on-off-on-off, in 3 second intervals.
2. Disconnected the can and let the van run. Then I heard a hissing sound.
3. All the refrigerant leaked out.
4. Couldn't pinpoint the leak until I pulled the compressor out, thinking I needed to replace it. I found a high pressure relief valve attached to the in/out line on the back of the compressor.
5. >>>>Could this valve have failed causing the leak? There is no other real place I can see the leak could be coming from.
Then I got to thinking; well, something must have been causing the valve to open.
I'm not really familiar with A/C systems..what could be causing this valve to open? A clog in the line...?
I went to the parts shop and they are not able to get a new valve, though I found one on ebay for $15.
I'm about to drop the compressor back in and let a Repair Shop go at it, but before I drop the $$ I thought I'd ask here.
A few questions first.
How long had the van sat?
Do you know what type of refirdgerent was in the system before you started? Factory was R12.
Do you have a set of gauges?
Did you vacuum out the system first?
The pressure relief valve is a safety valve. I forgot what the limit is and would need to look in my manual to find out. Either it was bad before or you have a problem that caused it to blow. I couldn’t guess because I don’t know the history of your van.
I believe that the valve you are looking for is part number F1CZ-19D644-A and also Known as YF-49.
There are a few things that can cause high pressure. The simplest cause would be a blockage. The orifice tube often gets clogged up and should always be replaced when the system has sat for a while.
The stock one was probably orange. 1989 FORD E-150 5.0L 302cid V8 A/C Orifice Tube | RockAuto
You can use compressor oil to lube the O-rings before you install them but a much better product is called Nylog and can be found at most local HVAC supply stores. Red for R12 and blue for R134a. It will help seal and will not dry out.
You should really flush the system or have a shop to do it for you. If you have a air compressor, you can do it yourself. They sell little cans of pressurized flush but they are expensive and don’t last long. I have no experience but there are many sites from professional AC guys who claim to use different cheaper chemicals but make sure it is compatible with aluminum and will not harm rubber lines. DO NOT flush the compressor. Drain the oil out of the compressor and flush it with new compressor oil a couple of times.
Compressor oil, you will need the correct oil for they type of freon you plan to use.
When clean and back together get a loaner vacuum pump from a parts store and vacuum the system for 12 hours. minimum 4 most people say. after the time, turn the pump off and check to see if they system holds a vacuum for a couple of hours. If it does then you are good to go. recharge the system with gauges attached. HF sells cheap gauge sets that will work and have adapters for R12 or R134a.
Look at the oil that comes out of the compressor real good. look for signs of tiny metal particles or really black oil. if you have either one, you might think about changing your compressor. I think the black oil applies to newer models though that used a different type piston.
i am far from a professional but did replace my entire system on my 88 e150 last year and did extensive research first. There is a AC section in FTE.
You can replace the entire system yourself cheaper then a AC shop would charge you for a quality job.
The van has 44k original miles, and looks to be stored in a garage. Not sure on how long exactly is sat, but was gently used, and is in overall pretty good shape.
Looks like the previous owner converted it to R134a refrigerant, but this is based on the fittings being for R134a...otherwise I can't tell. Is this a huge issue? How do I tell that it has been converted...? There is no sticker anywhere I can find.
I don't have gauges (I'm assuming proper AC pressure gauges).
I did not vacuum out the system. I was hoping that a simple recharge would do the trick since everything looked together in there, but this might be a bigger project than I expected.
My girl and I are going on a road trip end of the month, and I was trying to get the AC working before then.
Just called a shop and they said they won't even touch it because I have been poking around. hmm. great.
Thanks for all of the great info! much appreciated!
Where is the orifice tube exactly? how can I tell I get the correct one...?
I ordered another YF-49; thank you! It was unavailable at 3 shops I called, so I went the ebay route. Should be here in a couple days.
How often do the high pressure valves go bad? It seems like just a spring and valve in there...I'm starting to think there is a clog somewhere...any other ideas?
If I really wnated to do a quick and dirty job, could I replace the high pressure valve, orifice tube and drier and recharge with the DIY can 134a? Seems like the shops won't touch my van now which sucks.
Congratulations on your find, You will have to post some pics for us. While the paint is still in good shape, wash and wax it really good to protect the older paint...
I think I forgot to ask, do you have front and rear air?
Look at the pics on RA and see if you can identify which compressor you have. Mine is the E6DH which is almost the same as the FS6
If it has the R134a fittings then I would assume it has been converted over to R134a. The problem is that we don�t know the condition of the system or quality of work done when it was converted. Normally a shop would put a sticker under the hood somewhere.. You cant�t mix R12 and R134a nor the different oils each one requires.
The pressure valve, I am not sure if it is reusable or not. It would be best to replace it. If it does reset itself, it might have some dirt or something inside it and not seal back correctly. I don�t know how often they go bad. I have personally blown one years ago adding too much freon without gauges attached! It closed after the pressure dropped back down and all was good.
You are going to need a set of proper gauges. If you had had them to start with,,, perhaps you might have seen the high side pressure going up too high... If, in fact there is a problem and not simply a bad valve... And yes,, simply putting in some gas is a good start to see what is going on.. IF everything is fine, then the can with the gauge works fine..
Do you think it had any freon in the system before you recharged it?
If it was empty then it is probably full of air and moisture. While you have the compressor off, use a flashlight and look up inside the ac lines and see if you see any rust or oxidation in them.
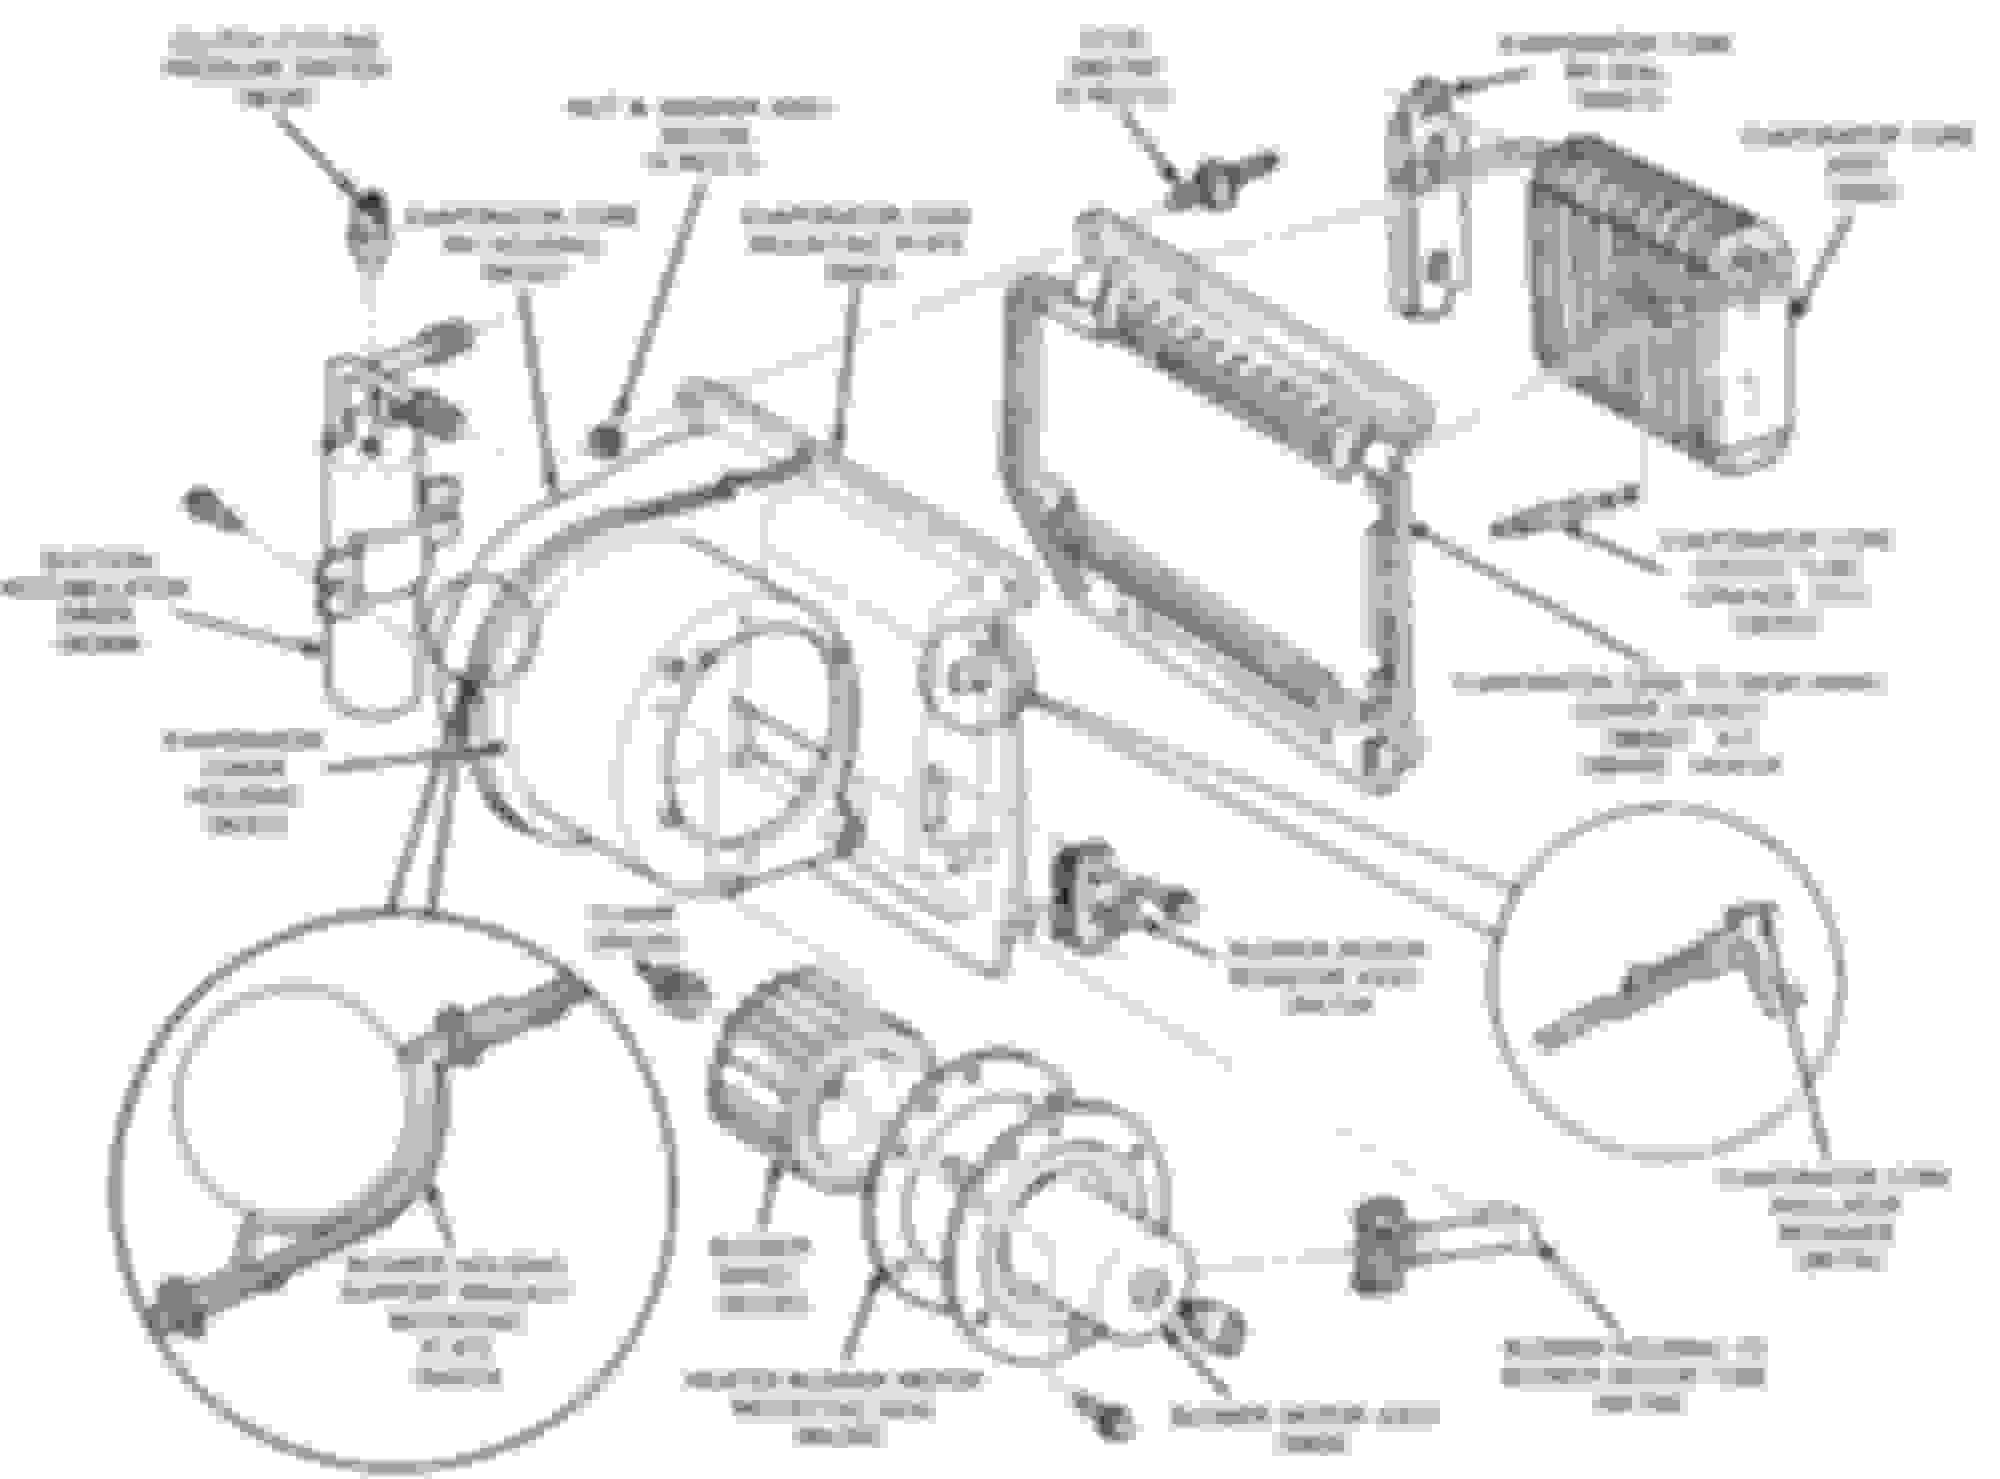
Where is the orifice tube? It is inside the evaporator. The small line that runs from the condenser to the evaporator, where that line connects to the evaporator, if you take that connection apart, you will be able to see the orifice tube inside the tube of the evaporator. There is a special tool for removing it but I was able to use a small pair of needle nose pliers and pull it out.
I had allot of trouble getting the spring lock (they are called) connectors loose. I later read that they will sometimes corrode and you need to use some penetrating oil spray of some kind to help out. I also had problems getting some of the lines connections to break loose once I got the spring lock loose. My van had sat for at least 15 years and I believe the system was empty when they parked it because it had a bad compressor on it when I bought the van. The O-rings along with the oils and dirt had sealed the connections. I had replacement lines so I wound up cutting a couple. Be sure and check inside each line for dirt and rust. If you see rust inside, best to replace them as you cant remove the rust.
Later this evening when I have more time I will post some helpful info for you. Some videos and technical info..
Here is a video using the proper orifice tube tool. The orifice tube has 2 tabs on each side that lock into the slots on the tool. The tool can usually be acquired as a loaner tool at the parts store. These are different cars but the principle is the same.
Notice the orifice tube is on the right side of the evaporator This is side 1 of the tag that came with my new compressor. I used R12 so you need to follow the directions for R134a side 2
Yesterday I pulled on the drier as I have purchased a new one; on it's way. You were right, those spring locks are not fun . My friend and I cut a bit of plastic up and made a tool, which made it much easier.
Everything looked clean in there; no rust, just green coolant in the lines.
One question I had is where did the bottle of the RED DYE (2 oz?) disappear to? I didn't see a trace of it at all in the lines, compressor...etc.
I've ordered an orifice tube / filter and an o-ring kit; thank you for the links above they are very helpful.
Where did you get the diagram of the system? That looks almost exactly like mine.
I'm not sure what compressor I have; it's remanufactured (tag on it) and is painted black, so I imagine they took off any indication of make and model.
Its a Sportsmobile conversion, so I believe it has a 120VAC air conditioner system for when you are plugged in camping (haven't tried it yet), but looks complete underneath the van.
It also has the motor-mounted AC which is what I'm working on. Unfortunately it looks like someone spliced out what could have been a line connected to the rear AC (?), but I'm not sure. Looks like the front AC is a closed system at least, hence me trying to get it all working.
Hmmm...so I'm also trying to figure out what the few inline items are directly after the compressor (high pressure side) and before the condenser / radiator up front. There are three black cylinders / canisters that look like in-line filters, but are about 2'' in diameter, maybe 4'' long. Any ideas? I know, I need to snap a few photos.
How do I check that the clutch cycling pressure switch is functioning correctly? Aside from the hissing from what I am hoping was the high pressure valve on the compressor, my original issue included the compressor cycling on/off/on/off/off in 3 second intervals...was that due to low coolant / pressure? Or could it have to do with this switch?
Thank you again for all the info!
My general plan is wait for the orifice tube, drier, high pressure valve and o-ring kit to get here and install those...then either rent or buy a vacuum and see if it holds for a few hours. If so, charge it again with R134a. and cross my fingers. <<<(two cans? I found a sticker on the blower that said it originally had R-12 in it, but that doesn't really help considering the fittings are R134a..does the mass / quantity still valid...?)>>>
Do I need to and how do I check for oil in the compressor? It seems like there is stuff in the lines...green and a little brown / black oil maybe...?
I don’t know where the red dye went to... About the green stuff,, you probably have a mix of moisture, different oils, the original mineral oil as well as pag or ester oil depending on what the last person did when they converted it. You also have the dye you added as well as possibly some the other person added. So you may have quite a mix. I would recommend flushing out the evaporator, condenser, and lines, except for the ones with the mufflers or filter on them.. Yes take a pic so I can see what you are talking about. I have seen suction lines with 2 mufflers on them.. The third could be a filter.. You don’t want to put your system back together with crap flowing around inside of it that you don’t know what it is. IF your compressor is still good, you want to keep it that way..
Don’t add dye back to it when you charge it... The dye also takes up space in the system like oil does. You want to put the system back together clean and make sure you don’t have any leaks by pulling the vacuum and then waiting to see if the gauges show a loss of vacuum and then go from there. There are other ways to find leaks besides dye..
The one part we have not talked about and often leaks is the front compressor shaft seal. They will wear or dry out over time and leak. I bought a brand new motorcraft compressor but since they don’t make them any more, it had sat on the shelf for a few years. I was gong to change out the shaft seal and then thought, well we will see, its probably ok.. That is the one leak that I had....
The CD service manual says it has the EVTM in it but if it dont..
You will eventually need this one too.. EVTM,, electrical and vacuum trouble shooting manual.
You may be able to shop around and find one a bit cheaper, if someone else has them.. The price also depends on how good of shape it is in. 1989 Ford Econoline van E150 E250 EVAC electrical wiring shop service manual | eBay
A third you might want to get, I have on ebut never had to use it yet, is
1989 Ford Econoline Van E150 E250 wiring diagram schematic SHEET service manual.
These are ORIGINAL dealer sheets, NOT reprints or aftermarket manuals.
You can also shop around for prices on this too. 1989 Ford Econoline Van E150 E250 wiring diagram schematic SHEET service manual | eBay
Between those manuals you should have everything you will need to keep your van going for years to come. You can occasionally find a owners manual which also has some info that is useful such as towing specs ect.
-
Back to your ac..
The clutch pressure cycle switch,, I wold replace it. They make one for R12 and R134a. I think the only difference is in the factory pressure setting though. There is an adjustment screw down inside the connector itself. But I would just replace it to make sure your system will work correctly. It can be adjusted once the system is charged and you have gauges hooked up..
Mine showed signs of the connector overheating and that is common. i changed my pressure switch along with the pigtail connector from the harness going to the pressure switch. I also changed the pigtail connector to the compressor clutch. The connectors have a high load on them along with getting moisture and corroding. They are only a couple of dollars and may save problems later on. You can get them at any auto parts store.
how should the system cycle? There is a chart in the service manual that shows all that.. Allot of factors come into play.. Outside temperature, temperature inside the van, humidity. On a cool morning it may cycle quite a bit. On a hot afternoon, it may not seem to cycle at all..
The chart in the manual is for R12.. R134a has different pressures.
i will look in my manual later on and find the amount of compressor oil and freon your system needs... Your van had a Rear AC in it at one time?
Post some more pics so we can see more of what you have there! Over time most of our vans become customized and reflects each persons personality!
Again do not flush the compressor with anything but compressor oil.. I would work on that while you are waiting for the parts to come in.. I turned mine upside down over pan overnight and let it drain. You also need to turn the compressor by hand a few times now and then while it is draining to get all the oil out. Fill it back up and do this a couple of times..
Flush the system and you wont have to worry about what oil or freon was in it before! You will be putting new oil and R134a in and it will be nice and clean..
OH one more thing.. you probably want to change the shrader valves out.. they get old and the seals dry out too.. Make sure you match them up because there are a few different sizes. There is only 2
Don't worry about the specs he gives, this is just a how to drain the oil.. I like to let it sit and drain for a while. He is just draining out fresh oil.. Notice how he turns the compressor by the front clutch plate, not the pulley.. That is probably not your compressor either but the same applies.. Instead of a cap, you will probably have 2 holes on the top of the compressor where the lines bolt on..
Thank you annaleigh!! I really appreciate all the help.
From the link you sent my compressor is FOUR SEASONS 58124. Looks also to be the one in the video below.
>>How much oil should I put in there before I mount it back in place? 7 oz per the video?
I have the Chilton manual, but yeah, it doesn't have the AC specs. Not helpful at all. I will work on getting a proper manual; I usually do for my other vehicles, this AC issue is just pressing at the moment and a lot of stuff is going on at once.
I"ll work on flushing out the compressor ASAP.
I'll head over to the auto parts store and see what I can get for Shrader valve replacements and compressor oil (type again...probably PAG?).
Also I try to order the cycling switch and clutch pigtail
Thanks again, and happy Thursday
Here's our van Homer 'Tallboy'. Needs some love, but it's gonna be great! In a way, thanks to you guys too!
Oh, one more thing; what's the best way to flush the entire system now that I have most of it disconnected? I don't really want to remove the evaporator/blower if I don't have to...but I will if necessary.
You have several options for a flush. I am not experienced with them as I replaced every part on my system. Other cars I owned, I just recharged but they weren’t empty.
What ever you use make sure it is compatible with R12 and R134a oils and drys with no residue.
1- You can ask a local shop to flush it. how much i don’t know but mechanic labor is not cheap.
4- There are many AC forums where they talk about using different chemicals and methods. if you go this rout, make sure the chemical is compatible with all the different materials in your system and will not leave a residue behind. Rubber, aluminum, solder, ect..
Be sure and use something to catch the flush chemical as some can damage paint.
While flushing watch the chemicals coming out and repeat till it comes out clean.
Remember do not flush the compressor or the lines with the mufflers on it.
It woudl be a god idea to install a in-line filter on the suction line. That may be what one of the round metal canisters is if it has hose clamps on each end.
You can remove the grill and then the condenser, on my 88 I did not have to remove the radiator.
The evaparotor should be removed but if you don’t wont to, if you have a compressor you can blow out the flushing agent. You should have a dryer on the compressor so it doesn’t blow water into the system.
good video here, your type condenser can be flushed if it is the original
BTW, I just saw your pics today for some reason.. Looks GREAT.. You are going to have a lot of fun in that van.. I like the pop up top and they did a good job with the trim...
Was just thinking about flushing or replacing... did you check with a couple of ac shops and see what they would charge for flushing the evaporator and condenser if you took them out and brought them to them? If you do,, make sure they use a flush machine, not a canister.. The machine will do a much better job.
With the 2 parts out of the van you can also flush out the cleaner much easier because you can turn them around and pour it out as well as blow it out with air.
My 1988 manual says to use R12 to flush the system! That is when they dumped into the air... People still do that with R134a as well as use it when checking for leaks...
Your compressor,, the lines connect on the rear of the compressor?
also let me get this clear.. Your van used to have a factory rear AC or just the front unit?
Some pictures of the lines would be great.. I have the Freon charge specs as well as the oil specs for each part but there is a difference between single or duel units.
""Yes PAG oil if you are flushing everything out and going back with R134a""
Ester oil is recommended if you are doing a conversion from R12 to R134a because the ester oil will mix with the residue from the R12 and mineral oil used in R12 systems.
Mineral oil was used in R12 systems.
PAG oil and Mineral oil will gum up when mixed together.. So that was a concern I had with your system not knowing how the previous conversion was done. IT can cause a restriction in the condenser and evaporator. A clogged condenser can cause high side pressure so make sure you clean the 2 parts good and that you have good air flow through them. Your condenser should be the old style tube/fin meaning it is one long set of tubing that goes back and forth across and covered with fins... They will clean out fairly well.. The newer condensers use a flat tubing and is much harder to clean. most shops replace them.
Actually,,, Instead of Rock Auto.. Here is your condenser and it is Motorcraft/Ford brand that came on your van. I know it says E350 but it is also for a E150..
I have bought from these guys and they have fast shipping
$75 includes shipping.
I know a lot depends on your budget and the parts might flush right out and be ok.. I would think about the compressor shaft seal but it can be done later.. you would need to recharge the system though. The reason for doing it now is that once you flush or replace the parts, the system is clean and new. It will have the correct amount of compressor oil and freon in it when finished. After that you will never know the exact amounts unless you flush it and start over again.
The only major part we are not sure of is the compressor. Lets cross our fingers and hope it is good!
Here is a video for the seal on your compressor, Replacing FS10 Compressor Shaft Seals. Takes him 10 minutes.. HE also mentions setting the AIR GAP for the clutch which you will need to do. There are other videos just on that. IF you need help with that then let me know.
IF you do change the seal, I don't believe you have to remove the whole clutch unless the clutch pulley in in the way of removing the 4 bolts that hold the compressor together. IF not, then only the front clutch plate and the compressor will come apart..
But here is a good video about that and setting the air gap.
Rezvani's Latest Post-Apocalyptic Monster Is a Ford F-150 Raptor Underneath
Slideshow: Called the Fortress, the 850-horsepower pickup combines Raptor underpinnings with military-inspired features, survival equipment, and a starting price of $285,000.


 . My friend and I cut a bit of plastic up and made a tool, which made it much easier.