


Making "Big Ugly" Pretty Again
Thread Starter
|
MMNC (SS)(Ret)


Joined: Mar 2004
Posts: 11,606
Likes: 149
From: SE Georgia

Making "Big Ugly" Pretty Again
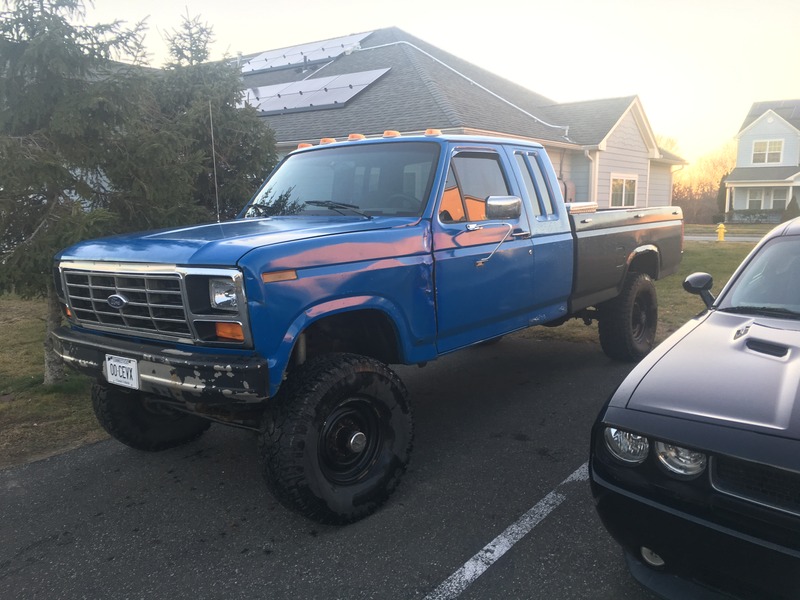
Honestly not bad for a $400 truck. But the wife hates it and wants gone. So I gotta pretty her up so the Real Estate value goes back up
Agenda:

Agenda:
Rust
That's it for now. Once I've done all the hard work, I'm going to paint a dark purple. Lots of body prep to do first. Going to do best to make it look nice.
1. Bed wheel arches
2. Cab corners
3. Driver fender crunched up
4. Misc small pocket rust spots before paint
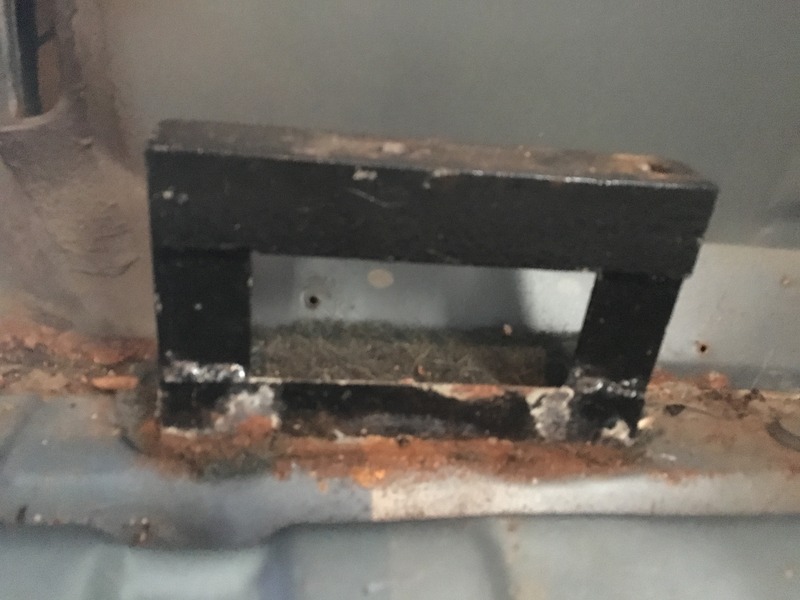
5. Drivers front cab mount rusted out
6. Pass door is bent/tweaked. Either straighten or replace
7. Install rear gas tank door ('89 frame with 2 tanks)
Bumpers2. Cab corners
3. Driver fender crunched up
4. Misc small pocket rust spots before paint
5. Drivers front cab mount rusted out
6. Pass door is bent/tweaked. Either straighten or replace
7. Install rear gas tank door ('89 frame with 2 tanks)
1. Front shackles
2. Build rear bumper from diamond plate
Exhaust2. Build rear bumper from diamond plate
Currently has a 4" diesel exhaust with 12" glasspack muffler. And longtube headers. Loud doesn't describe. Also has exhaust leak at EGR pickup on passenger header.
Get an actual muffler and fix that leak
Get an actual muffler and fix that leak
Last edited by Tylus; Jun 9, 2017 at 10:23 PM. Reason: make title make more sense
Moderator


Joined: Jan 2001
Posts: 56,984
Likes: 2,738
From: Virginia

Is this your first try at replacing body panels? I have done a few, but still not that experienced yet.
What I have been experimenting with is the amount to cut out, with a eye toward making it easy to finish off with the body filler. In your case I think I would have cut further away from the complex body indent around the wheel well.
On one panel I did on a lower door, I replaced the metal up the door till I got to a body line that was proud to the side of the body. In your case it would have been way up the side to the first body line where it goes into the indent up high.
Like I said I am still trying this out, and messing with a body line like that it has to be kept straight. But I found it's very easy to grind and sand the bondo when it sticks out like that.
Thread Starter
|
MMNC (SS)(Ret)
Joined: Mar 2004
Posts: 11,606
Likes: 149
From: SE Georgia
Last time I did this on a '95 F-250 I did exact fitment replacements. That ended up making me do butt welds. Those suckers suck. Lol
But I was able to grind it smooth and ultimately almost invisible before bondo. These panels are super thin and easy to blow through. So I decided to not butt Weld this time. Save me hours of welding and grinding
But I was able to grind it smooth and ultimately almost invisible before bondo. These panels are super thin and easy to blow through. So I decided to not butt Weld this time. Save me hours of welding and grinding
Thread Starter
|
MMNC (SS)(Ret)
Joined: Mar 2004
Posts: 11,606
Likes: 149
From: SE Georgia
Initially the thought had been to hide the Weld in body line. The arch would have been perfect. But the more I excised rot, the higher I had to cut. Finally got solid (virgin) metal 2" above that seam.
It's hard to see here, but there is only a tiny seam left after I got it tacked. I did a tack every 1/4" to 3/8". Again due to the metal being so thin. Even with speed and heat on lowest settings I'm blowing through easily. I ground the tacks smooth and was pretty happy with result.
I think a 1/8" layer or so of bondo will cover the seam. Or at least blend enough that casual looks won't show it. I don't have patience or time to give her the attention a seamless look would require
But she'll be a nice 5 footer

FTE Legend


Joined: Nov 2015
Posts: 30,917
Likes: 4,123
From: Angier, NC
A little at a time and before you know it it will be done.
When I do patch panels I place the new one over the old panel and line it up the best I can then make the outer edge of the patch on the truck/car.
This way when you remove it you know how far you can go cutting out the rust with out running out of "patch panel".
Because I am not doing a museum restore on my truck I also did over lapping panel welds but I punched holes about an inch apart in the panel and welded thru them like spot welds.
If I felt I needed a little more weld I then spot welded on the edge.
I did butt weld where the 2 halves of the fire wall met as I did not want anyone to see this seam if they looked. The others they would have to pull the truck apart to see the over lap lips.
Before any welding I used weld thru primer to help protect the metal from rusting.
Where I could I also used seam sealer on both edges like the floors top and bottom edges, inside cab corners (before bed liner went on) and the inside lip of the drivers door.
You can see the "spot welds" and seam sealer before the bed liner. The silver around the patch is the weld thru primer.

Dave ----
When I do patch panels I place the new one over the old panel and line it up the best I can then make the outer edge of the patch on the truck/car.
This way when you remove it you know how far you can go cutting out the rust with out running out of "patch panel".
Because I am not doing a museum restore on my truck I also did over lapping panel welds but I punched holes about an inch apart in the panel and welded thru them like spot welds.
If I felt I needed a little more weld I then spot welded on the edge.
I did butt weld where the 2 halves of the fire wall met as I did not want anyone to see this seam if they looked. The others they would have to pull the truck apart to see the over lap lips.
Before any welding I used weld thru primer to help protect the metal from rusting.
Where I could I also used seam sealer on both edges like the floors top and bottom edges, inside cab corners (before bed liner went on) and the inside lip of the drivers door.
You can see the "spot welds" and seam sealer before the bed liner. The silver around the patch is the weld thru primer.
Dave ----
Trending Topics
Thread Starter
|
MMNC (SS)(Ret)
Joined: Mar 2004
Posts: 11,606
Likes: 149
From: SE Georgia
If you look closely at the pre-cut pictures there is a squared off outline. That's the outside size of the patch panel. Great idea. I mistakenly cut too much out on my '95 and had to scab pieces to makeup the difference
I tried spot welding on my '95 also. Had issues with not burning through. I'm a poor welder, so I try to minimize the holes I create. I burn enough as is lol
Will look at getting some of that Weld-through primer. Good idea, forgot that stuff existed
Here is the floor pan on my '95. I learned a lot of lessons there. The beads are ugly, but very solid.

FTE Stories
Ford Trucks for Ford Truck Enthusiasts

10 Things Every Truck Owner NEEDS (2026 Edition)
Michael S. Palmer
Rezvani's Latest Post-Apocalyptic Monster Is a Ford F-150 Raptor Underneath
Verdad Gallardo
Top 10 Most Expensive Ford Trucks Ever Sold on Bring a Trailer
Joe Kucinski
2027 Ford Super Duty Buyer's Guide (Every Model, Engine, & Package)
Brett Foote
Top 10 Ford Truck Tragedies
Joe Kucinski
AEV FXL Super Duty - the Super Duty Raptor Ford Doesn't Make
Brett Foote
Lobo Vs Lobo: Proof the F-150 Lobo Should Be Even Lower!
Michael S. Palmer
Ford's 2001 Explorer Sportsman Concept Looks For a New Home
Verdad Gallardo
10 Best Ford Truck Engines We Miss the Most!
Joe KucinskiModerator
Joined: Jan 2001
Posts: 56,984
Likes: 2,738
From: Virginia
I have lapped the panels before like you did on the bed. What I have found out though, the tacking and lapping technique is not waterproof, and the bondo loves to absorb water. And then it doesn't take too long for it to start rusting around the edges of your repair.
What I have found that will give you a few more years is to use fiberglass. It's waterproof. I am talking about the stuff in the can that looks like bondo, no fabric or hairs, but it's fiberglass. The last I used was a green color, the car parts store had it. It's very hard to sand and you can't use it to finish it off, but it makes a good first layer to seal behind the bondo. Put it on there and then rough grind it after it dries and then put your bondo on top of that.
What I have found that will give you a few more years is to use fiberglass. It's waterproof. I am talking about the stuff in the can that looks like bondo, no fabric or hairs, but it's fiberglass. The last I used was a green color, the car parts store had it. It's very hard to sand and you can't use it to finish it off, but it makes a good first layer to seal behind the bondo. Put it on there and then rough grind it after it dries and then put your bondo on top of that.

Moderator
Joined: Jan 2001
Posts: 56,984
Likes: 2,738
From: Virginia
That has fibers in it doesn't it? If you can use it go ahead, but the stuff I used had a fine texture with no fibers in it. Whatever works though.
Thread Starter
|
MMNC (SS)(Ret)
Joined: Mar 2004
Posts: 11,606
Likes: 149
From: SE Georgia
There are fibers. I watched a ton of videos showing this stuff. It looks to sand relatively smooth and then everyone uses the skim coat of bondo for final smoothing
It waterproof. And sticks to damn near everything. So I think that's the best quality to prevent quick rust return
It waterproof. And sticks to damn near everything. So I think that's the best quality to prevent quick rust return
Thread Starter
|
MMNC (SS)(Ret)
Joined: Mar 2004
Posts: 11,606
Likes: 149
From: SE Georgia
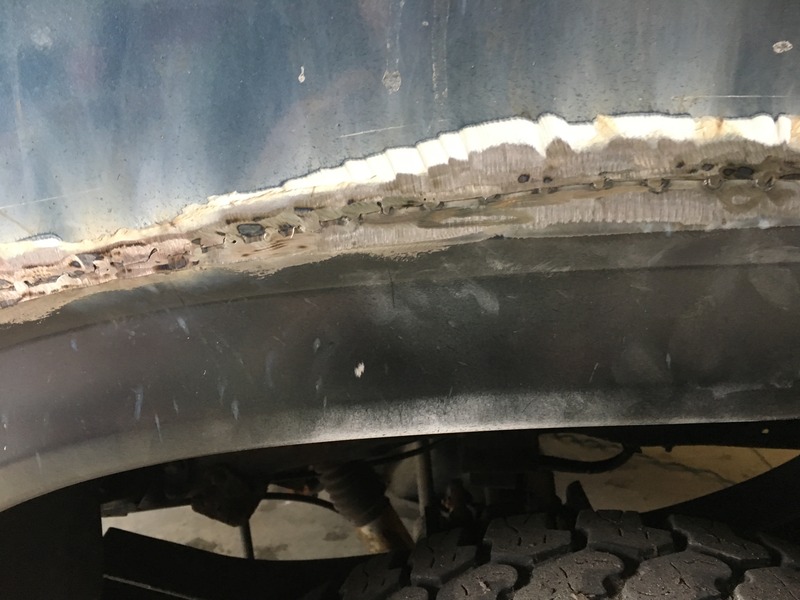
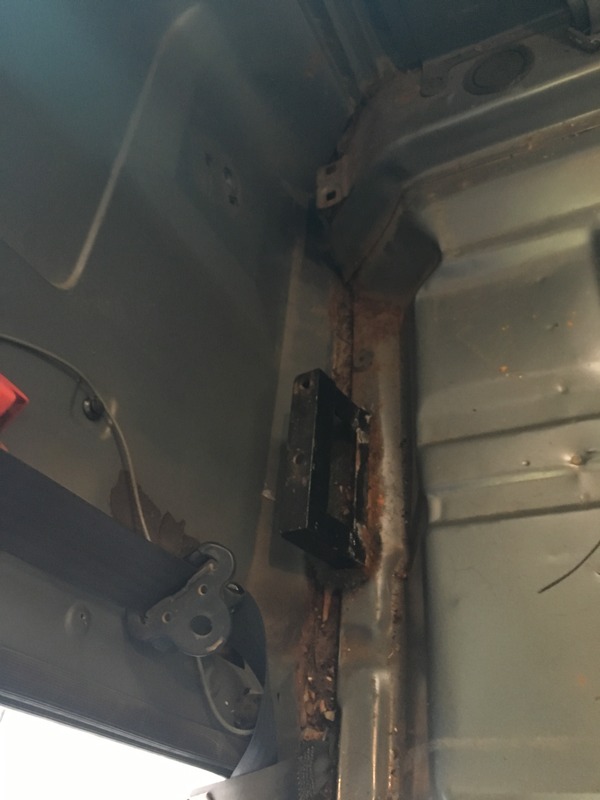
did some cab repair today. stripped the interior to check level of rot spread, and then made sure it wouldn't catch fire while welding. Wasn't aware the cab was double walled. makes getting access to the skin a pain to repair the big dent.
worst I found inside. directly adjacent to the exterior rot, so makes sense.
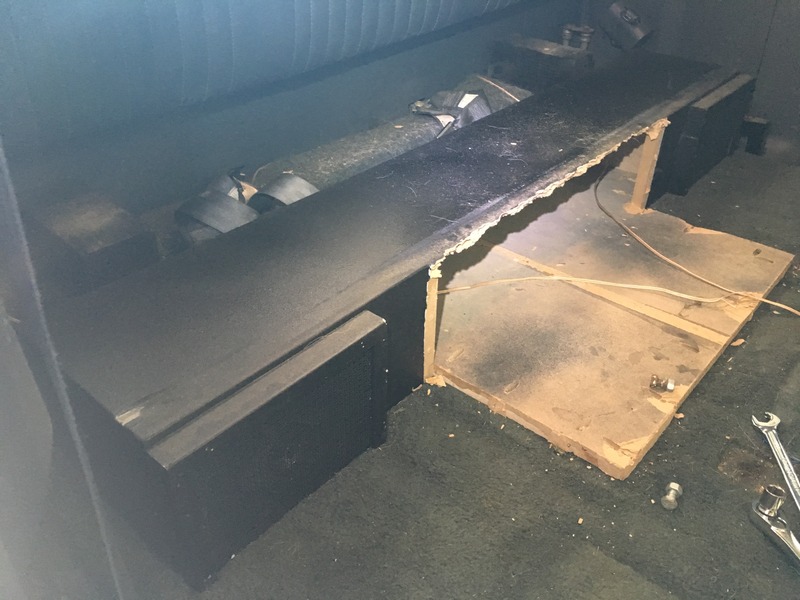
and removed that stupid speaker box. originally had 2 13" subs and 2 9" speakers. glad it's gone
while excising the rot, I found out the underside of cab was crumpled from a collision the previous owner did. Had to go old school and use a jack to straighten up a touch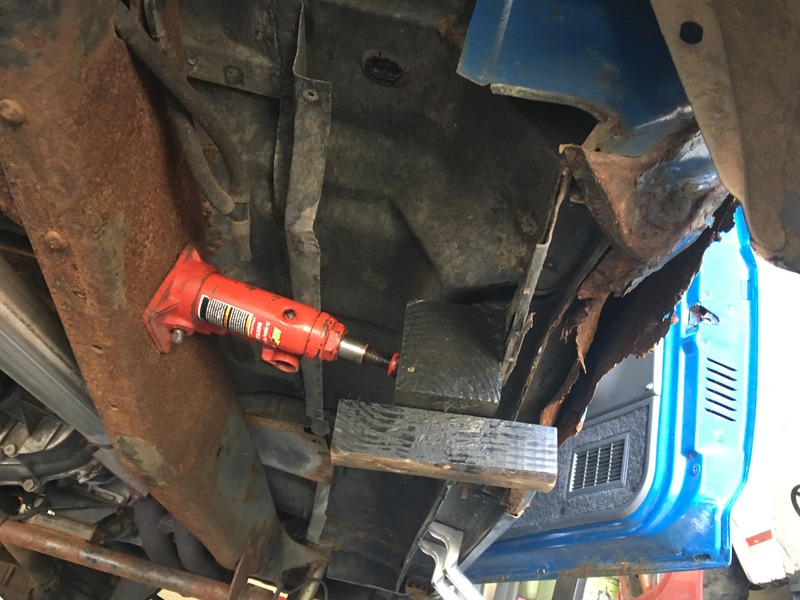
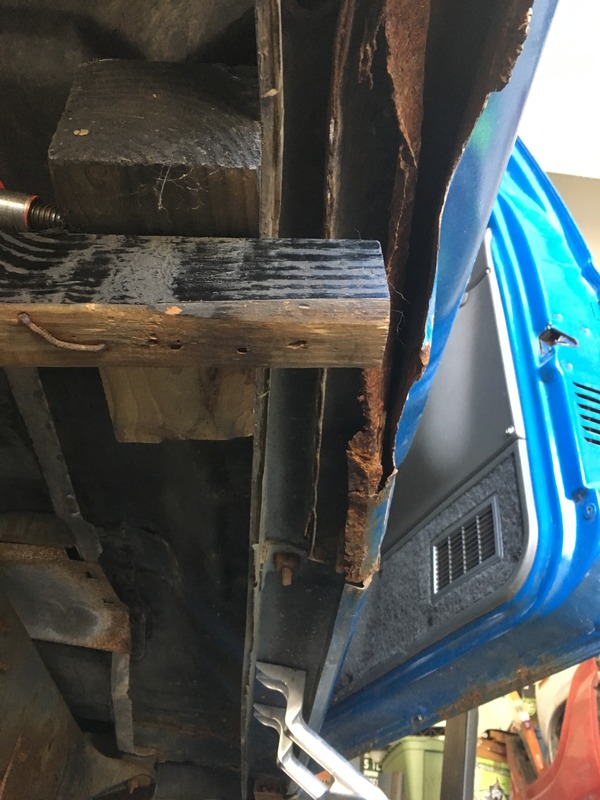
all new metal and some Tiger Hair applied. interested to see what it looks like after sanding tomorrow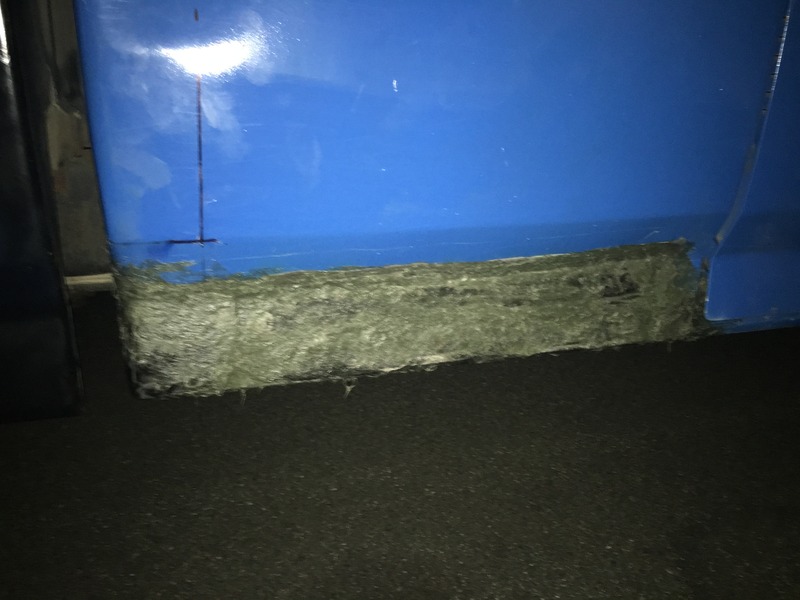
worst I found inside. directly adjacent to the exterior rot, so makes sense.
and removed that stupid speaker box. originally had 2 13" subs and 2 9" speakers. glad it's gone
FTE Legend
Joined: Nov 2015
Posts: 30,917
Likes: 4,123
From: Angier, NC
So it was the cab corner & body extension you had to replace because of damage & rust?
I forgot about tiger hair filler, dad would use that at times also.
Looking good - keep going!
Dave ----
I forgot about tiger hair filler, dad would use that at times also.
Looking good - keep going!
Dave ----