
1975 F-250 crew cab 4x4 build thread
#1
 03-14-2017, 02:19 AM


1975 F-250 crew cab 4x4 build thread
Since I sold my 75 2wd F-350 CCLB about 4 years ago I've had a hunkering for another crew. Whenever I'm out on the road/traveling for any reason I keep an eye out for crew cabs. In December I checked out a 75 4x4 CCSB in Phoenix that was a bit too rough for my liking. In January I found a 1976 2wd CCLB in So Cal for a good price but the problem was I'd have to deal with passing SMOG, so I passed on that truck.
Ideally, I've been looking for a 75 crew cab short bed 4x4 with an automatic transmission and AC that isn't a basket case or already restored. Of course, there aren't a lot of those around so I've also been open to earlier years. Within the last few years I almost pulled the trigger on a 69 4x4/auto CCSB or a 78 4x4/auto CCSB that were both within 5 miles of my house.
Late last year there was a 75 4x4 CCSB for sale in Northern CA with front disc brakes that I thought about checking out, but it had a flat bed on it and I didn't want to hassle with locating a bed and doing that swap. There was also a 75 4x4/auto CCSB for sale in Montana but I did't really want to drive or fly up there and then do the (~24 hour) drive home or pay to have it shipped from an atypical route which would drive up the overall costs.
I came home late one night, opened up my saved "crew" search query and to my amazement there was a 1975 4x4 CCSB for sale in LA. It had only been posted for a few hours and there were only about 2 pictures, but the truck looked solid so I fired off an email to the owner. In the morning I called around 8:45am after I'd wrapped up a business call with folks on the east coast. I was really glad when the owner answered the phone and said my call was the first one he had answered that morning. Even though it had been raining and the roads were a mess (lots of folks in LA can't drive well in the rain) I told him I'd be over at his place in about an hour. The seller said one person wanted to wire money into his account to buy it sight unseen and would drive down from SF the next day to pick it up and also said that he had plenty of other voicemails and emails to check and respond to. I didn't doubt it. Certainly there were other folks chomping at the bit since this is the last year of no SMOG checks required in CA and it was a 4x4.
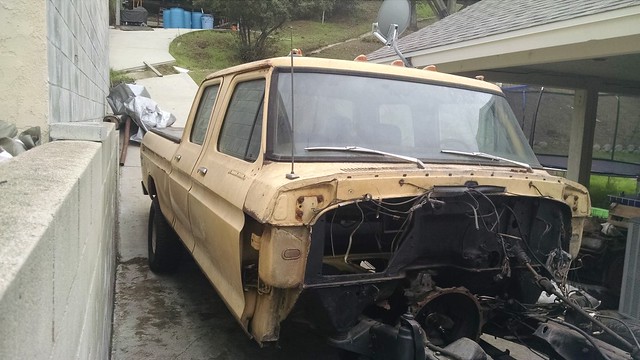
I got there, looked the truck over and decided it was in fantastic shape, so despite it being a manual transmission, I made it mine. I told myself my next truck would be purchased fully roadworthy, but this was too good a deal to pass up. The motor had been "rebuilt" but sitting out in the elements for the better part of about 1.5 years wasn't kind to it.

I worked it out to have the truck towed over to my house the next day. The seller grabbed some various extra parts he had acquired and put them in the bed of the truck with the front end that was already removed and loaded it up the next day to come to my place.
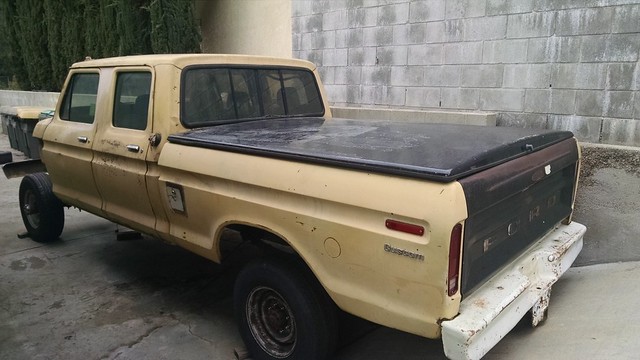
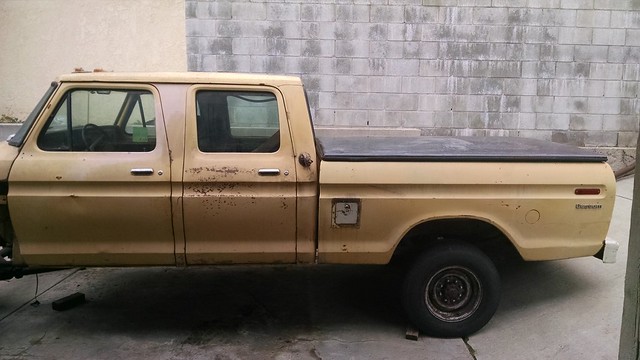
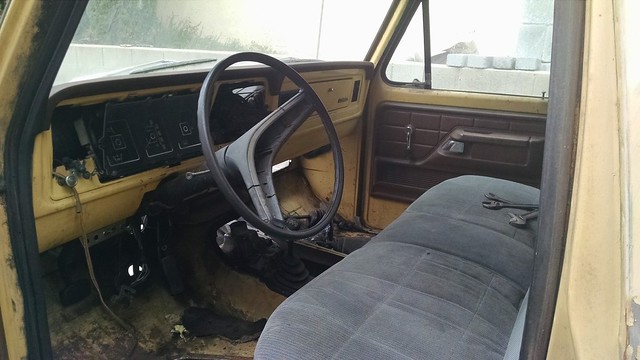
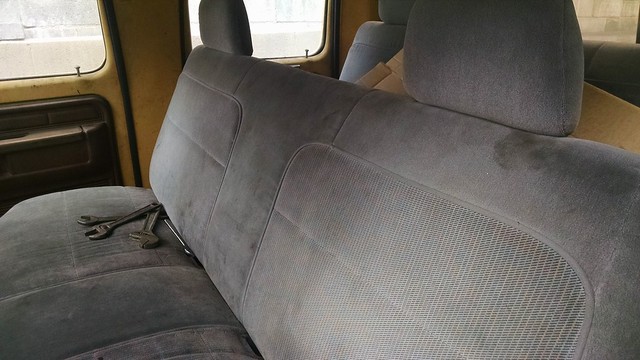
The truck has bench seats out of a 1994 or so crew cab that are mounted on the original frames.
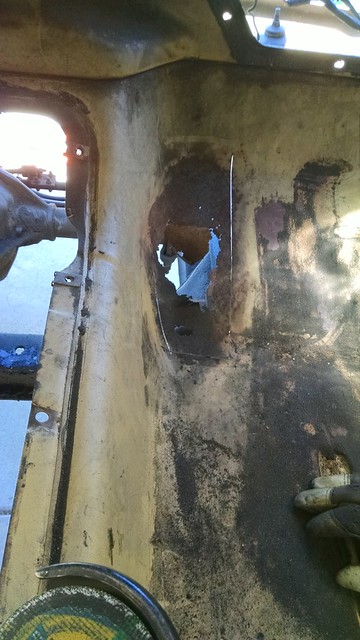
In terms of rust there's only two problem areas. The passenger side floor board, where the exhaust burned thru and some small holes that are starting to rust thru on the drivers side floorboard on the outside of the frame rail. The truck came with a patch panel for the passenger side that had been cut out of a dent.
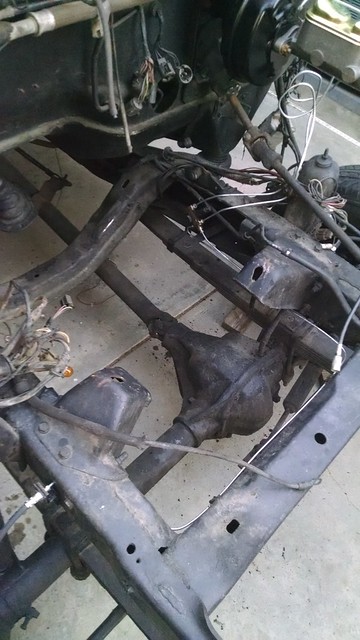
I pulled the motor.
I've also dropped the transmission out, cleaned it up and painted it so it can go back in. The motor is currently getting rebuilt.
Plans are for a rebuild of the 360/390 by a well known local shop to give it some new life and to make sure the brake system is completely redone. Nothing else major planned as of right now. I've got my eye out for a cheap donor truck to scavenge off the little parts that could quickly add up. Last year I had a completely rust free and very straight 76 F-250 and rusty 79 F-250 that I had bought for the tidy sum of $100 plus an original 65 Mustang hood & 66 grill/foglight set. I sold those trucks and miscellaneous parts for a decent profit. That would have been a great setup to pilfer from. I've made a bit more progress that I'll post up as time allows.
Hopefully I'll locate an aftermarket saddle tank that I can install behind the riveted aluminum door to give me a second tank. That'll be easier to install than a rear between the frame rail tank but will certainly take longer to source.
Ideally, I've been looking for a 75 crew cab short bed 4x4 with an automatic transmission and AC that isn't a basket case or already restored. Of course, there aren't a lot of those around so I've also been open to earlier years. Within the last few years I almost pulled the trigger on a 69 4x4/auto CCSB or a 78 4x4/auto CCSB that were both within 5 miles of my house.
Late last year there was a 75 4x4 CCSB for sale in Northern CA with front disc brakes that I thought about checking out, but it had a flat bed on it and I didn't want to hassle with locating a bed and doing that swap. There was also a 75 4x4/auto CCSB for sale in Montana but I did't really want to drive or fly up there and then do the (~24 hour) drive home or pay to have it shipped from an atypical route which would drive up the overall costs.
I came home late one night, opened up my saved "crew" search query and to my amazement there was a 1975 4x4 CCSB for sale in LA. It had only been posted for a few hours and there were only about 2 pictures, but the truck looked solid so I fired off an email to the owner. In the morning I called around 8:45am after I'd wrapped up a business call with folks on the east coast. I was really glad when the owner answered the phone and said my call was the first one he had answered that morning. Even though it had been raining and the roads were a mess (lots of folks in LA can't drive well in the rain) I told him I'd be over at his place in about an hour. The seller said one person wanted to wire money into his account to buy it sight unseen and would drive down from SF the next day to pick it up and also said that he had plenty of other voicemails and emails to check and respond to. I didn't doubt it. Certainly there were other folks chomping at the bit since this is the last year of no SMOG checks required in CA and it was a 4x4.
I got there, looked the truck over and decided it was in fantastic shape, so despite it being a manual transmission, I made it mine. I told myself my next truck would be purchased fully roadworthy, but this was too good a deal to pass up. The motor had been "rebuilt" but sitting out in the elements for the better part of about 1.5 years wasn't kind to it.
I worked it out to have the truck towed over to my house the next day. The seller grabbed some various extra parts he had acquired and put them in the bed of the truck with the front end that was already removed and loaded it up the next day to come to my place.
The truck has bench seats out of a 1994 or so crew cab that are mounted on the original frames.
In terms of rust there's only two problem areas. The passenger side floor board, where the exhaust burned thru and some small holes that are starting to rust thru on the drivers side floorboard on the outside of the frame rail. The truck came with a patch panel for the passenger side that had been cut out of a dent.
I pulled the motor.
I've also dropped the transmission out, cleaned it up and painted it so it can go back in. The motor is currently getting rebuilt.
Plans are for a rebuild of the 360/390 by a well known local shop to give it some new life and to make sure the brake system is completely redone. Nothing else major planned as of right now. I've got my eye out for a cheap donor truck to scavenge off the little parts that could quickly add up. Last year I had a completely rust free and very straight 76 F-250 and rusty 79 F-250 that I had bought for the tidy sum of $100 plus an original 65 Mustang hood & 66 grill/foglight set. I sold those trucks and miscellaneous parts for a decent profit. That would have been a great setup to pilfer from. I've made a bit more progress that I'll post up as time allows.
Hopefully I'll locate an aftermarket saddle tank that I can install behind the riveted aluminum door to give me a second tank. That'll be easier to install than a rear between the frame rail tank but will certainly take longer to source.
Last edited by maddogjohnson; 07-20-2017 at 10:01 PM. Reason: Fixing images
#2
03-14-2017, 04:02 PM

Cool build. Looks like you've had your eye on a few trucks for quite some time!
Glad to hear you chose the dentside and not the bumpside. Not that there's anything wrong with bumps, there's just so many more dents out there to get parts off of.
In the end, I think you made the right decision. Keep the pics coming!
Glad to hear you chose the dentside and not the bumpside. Not that there's anything wrong with bumps, there's just so many more dents out there to get parts off of.
In the end, I think you made the right decision. Keep the pics coming!
#3
03-16-2017, 02:49 PM

#4
03-18-2017, 11:02 PM
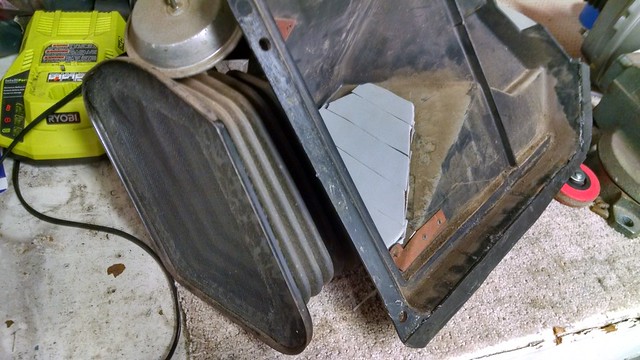
I took apart the heater box to replace the heater core and clean everything up.
The most helpful references to me were:
Trent's Heater page on North Country Specialties.
Mike Rowand's 1979FordF100 AC page.
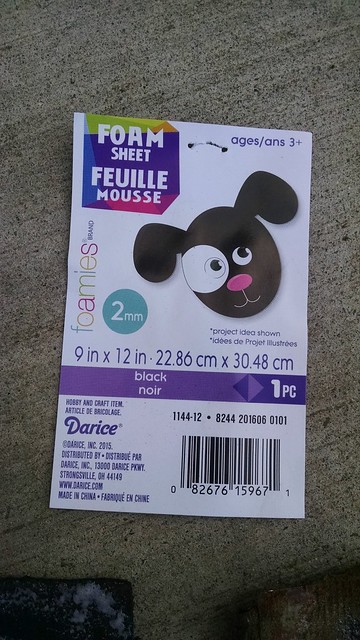
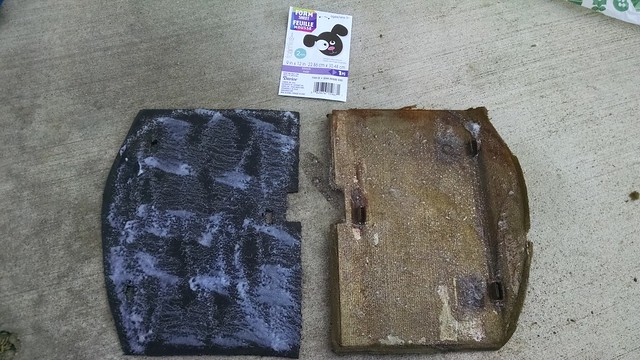
The foam on the doors was shot so I went to Jo-Ann Fabrics and Crafts and found a few sheets of black 2mm foam.
I used the 2mm foam on the door closest to the heater core. I also used the 2mm foam to create a seal around the edge of the two sides of the AC/heater unit that bolts together on the passenger side of the cab.
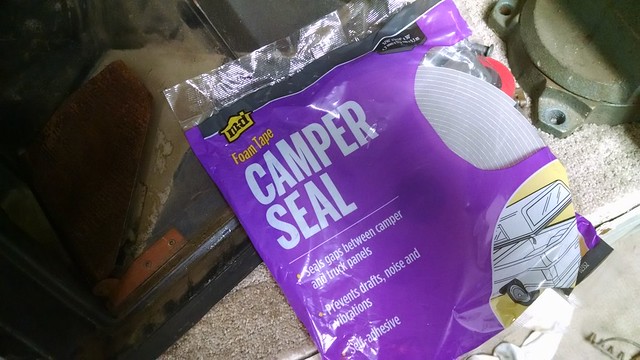
For the door inside the passenger compartment area I got a roll of camper seal from Home Depot. I like the thickness of that better than the 2mm foam.
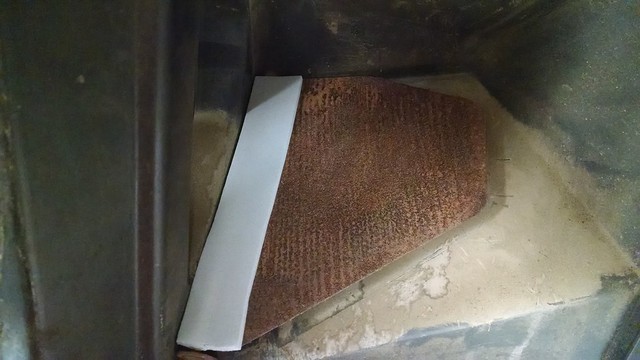
Here is how it looked with the first piece on.
I used the non-stick paper that separated the layers of camper seal as a template to help me know exactly how to cut the next piece.
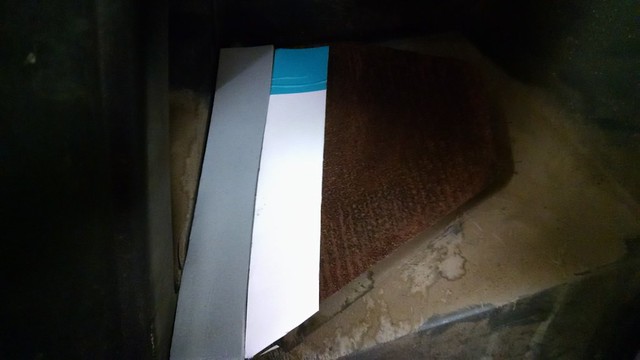
I would score the foam with a razor blade and cut it with a pair of scissors. This is what it looked like once I got the first side completed.
I had some screening material on hand so I cut a piece to fit the fresh air vent inlet and epoxyed it into place, as I found here.
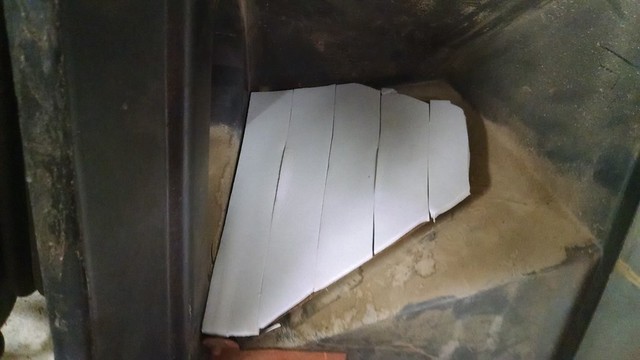
This was the end result, along with the camper seal.
Spring has sprung with a vengeance so I had to clean up the pieces before I reassembled them together since there's so much pollen and dirt in the air.
My A/C & heater box was already removed from the truck when I purchased it. There were no nicely labeled bags with all the screws and whatnot in it so the Mike Rowand page was a great reference for helping me identify what might be the right screws. I've never done this type of work on one of these trucks before, but I eventually figured it out. I actually had two mostly complete A/C boxes and I used the best components from each to create a fully functional one.
The most helpful references to me were:
Trent's Heater page on North Country Specialties.
Mike Rowand's 1979FordF100 AC page.
The foam on the doors was shot so I went to Jo-Ann Fabrics and Crafts and found a few sheets of black 2mm foam.
I used the 2mm foam on the door closest to the heater core. I also used the 2mm foam to create a seal around the edge of the two sides of the AC/heater unit that bolts together on the passenger side of the cab.
For the door inside the passenger compartment area I got a roll of camper seal from Home Depot. I like the thickness of that better than the 2mm foam.
Here is how it looked with the first piece on.
I used the non-stick paper that separated the layers of camper seal as a template to help me know exactly how to cut the next piece.
I would score the foam with a razor blade and cut it with a pair of scissors. This is what it looked like once I got the first side completed.
I had some screening material on hand so I cut a piece to fit the fresh air vent inlet and epoxyed it into place, as I found here.
This was the end result, along with the camper seal.
Spring has sprung with a vengeance so I had to clean up the pieces before I reassembled them together since there's so much pollen and dirt in the air.
My A/C & heater box was already removed from the truck when I purchased it. There were no nicely labeled bags with all the screws and whatnot in it so the Mike Rowand page was a great reference for helping me identify what might be the right screws. I've never done this type of work on one of these trucks before, but I eventually figured it out. I actually had two mostly complete A/C boxes and I used the best components from each to create a fully functional one.
#5
03-23-2017, 02:00 PM
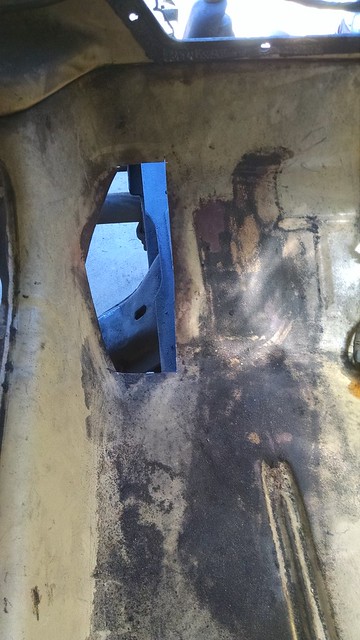
The passenger side floor board, where the exhaust burned thru has been repaired. The truck came with a patch panel for the passenger side that had been cut out of a similarly colored truck.
Here you can see the problem area as it looked after the the first few passes of the cut-off wheel.
* I didn't do the welding myself. I had someone I know come over and do it, while teaching me. I decided to go with with butt welding to keep the look nice and clean.
Cut out the rusty piece, making sure to cut as little as possible while ensuring there's good metal on all sides to weld to.
Used an abrasive disc on the air tool to grind down to bare metal inside and out for proper adhesion.
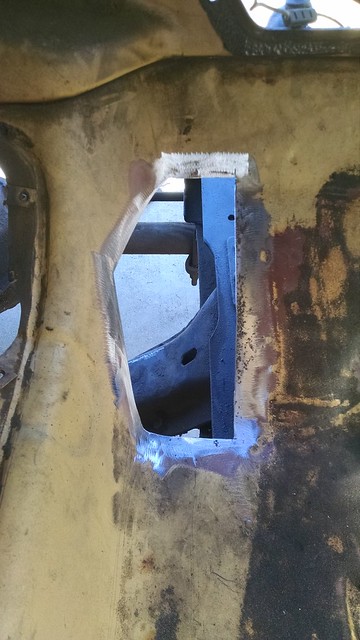
Here you can see a test fitting of the replacement piece, which has also been ground down to bare metal on the edges.

Here's how it looked after it was all cleaned up. It took a bit longer than it should have to clean up because my street lost power for a little while and the air compressor ran down pretty quickly.
Here's the replacement piece held in place with some magnets. The magnets are available at Harbor Freight. I think it's ~$10 for both of these. Up to this point there was a lot of sharpie use to do minor trimming to ensure a nice fit. Fortunately, we had a pair of tin snips to cut with while we were without power.

First couple of tack welds in place. You can see the general spacing used to make sure one area did not get too hot. Once we got the top left corner flush we were able to tack that area down. It was the only area that gave us a bit of trouble.
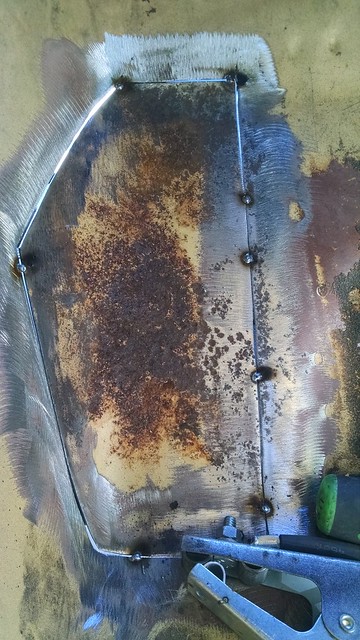
From there it was just moving around with consistent spacing, gradually reducing the spacing between the spots until it all came together.
A bit of grinding to level things off and this is the mostly finished product.
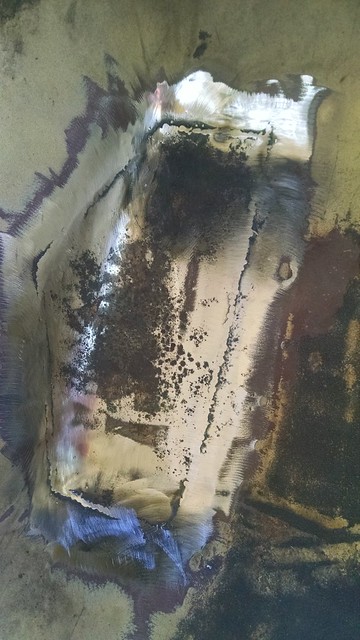
I cleaned it up with acetone and sprayed it with self etching white primer. I'm going to be putting GTMat on the floors, followed by jute and carpeting.
Here's an upside-down close up of what was cut out.

Next Saturday we'll be replacing the drivers side floor pan which has a bit of rust, nothing like what the passenger side had.
Here you can see the problem area as it looked after the the first few passes of the cut-off wheel.
* I didn't do the welding myself. I had someone I know come over and do it, while teaching me. I decided to go with with butt welding to keep the look nice and clean.
Cut out the rusty piece, making sure to cut as little as possible while ensuring there's good metal on all sides to weld to.
Used an abrasive disc on the air tool to grind down to bare metal inside and out for proper adhesion.
Here you can see a test fitting of the replacement piece, which has also been ground down to bare metal on the edges.
Here's how it looked after it was all cleaned up. It took a bit longer than it should have to clean up because my street lost power for a little while and the air compressor ran down pretty quickly.
Here's the replacement piece held in place with some magnets. The magnets are available at Harbor Freight. I think it's ~$10 for both of these. Up to this point there was a lot of sharpie use to do minor trimming to ensure a nice fit. Fortunately, we had a pair of tin snips to cut with while we were without power.
First couple of tack welds in place. You can see the general spacing used to make sure one area did not get too hot. Once we got the top left corner flush we were able to tack that area down. It was the only area that gave us a bit of trouble.
From there it was just moving around with consistent spacing, gradually reducing the spacing between the spots until it all came together.
A bit of grinding to level things off and this is the mostly finished product.
I cleaned it up with acetone and sprayed it with self etching white primer. I'm going to be putting GTMat on the floors, followed by jute and carpeting.
Here's an upside-down close up of what was cut out.
Next Saturday we'll be replacing the drivers side floor pan which has a bit of rust, nothing like what the passenger side had.
#6
03-25-2017, 03:30 AM
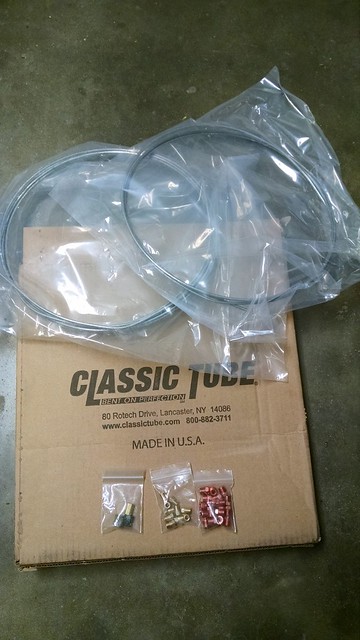
I ordered/bought a bunch of items to get the parts and tools I need to redo all the brakes. I bought 3/16" brake tubing and fittings from Classic Tube. The pricing for the brake line and fittings was not bad, but the cost of shipping was outrageously high considering the size of the box, the weight and the distance it had to ship.
I also bought a Mastercool hydraulic flaring set (p/n 71475). It's pretty darn nice to use. I found it for sale on Craigslist in Las Cruces, New Mexico about two weeks ago. Fortunately I had a friend driving thru Las Cruces for work last week, so he bought it in person and shipped it to me. It was practically brand new and after the purchase price, shipping and paying my friend for his time it still cost less than every other one I found for sale.

I got started on creating my first new brake line. I bought enough material and fittings to redo all the hard lines on the truck. I also have new rubber lines for the front and rear. I've been applying PB Blaster to the brake fittings every couple of days, but I still have some very stubborn fittings that I have yet to break free. I haven't applied heat yet. Tonight I was able the replace the front drivers side hard line from the junction block to the rubber hose. I was also able to replace the rubber hose on the front passenger side. After cutting, deburring, flaring and bending the tubing the first time, I went to install it on the truck. Only then, did I realize that I had used the wrong size tube fittings for that line. I cut that piece up so I could get the fittings off and made a new line with the correct size fittings.
It's started to rain so I had to clean up for the night. Hopefully things will clear up so I can do more later in the day after I take care of other needed chores.
I also bought a Mastercool hydraulic flaring set (p/n 71475). It's pretty darn nice to use. I found it for sale on Craigslist in Las Cruces, New Mexico about two weeks ago. Fortunately I had a friend driving thru Las Cruces for work last week, so he bought it in person and shipped it to me. It was practically brand new and after the purchase price, shipping and paying my friend for his time it still cost less than every other one I found for sale.
I got started on creating my first new brake line. I bought enough material and fittings to redo all the hard lines on the truck. I also have new rubber lines for the front and rear. I've been applying PB Blaster to the brake fittings every couple of days, but I still have some very stubborn fittings that I have yet to break free. I haven't applied heat yet. Tonight I was able the replace the front drivers side hard line from the junction block to the rubber hose. I was also able to replace the rubber hose on the front passenger side. After cutting, deburring, flaring and bending the tubing the first time, I went to install it on the truck. Only then, did I realize that I had used the wrong size tube fittings for that line. I cut that piece up so I could get the fittings off and made a new line with the correct size fittings.
It's started to rain so I had to clean up for the night. Hopefully things will clear up so I can do more later in the day after I take care of other needed chores.
#7
03-26-2017, 01:27 AM
I finished up plumbing new brake lines and installing them for the rest of the front end with the exception of the 2 short, hard lines from the wheel cylinder to the rubber hose. I didn't have enough time to get to those today.
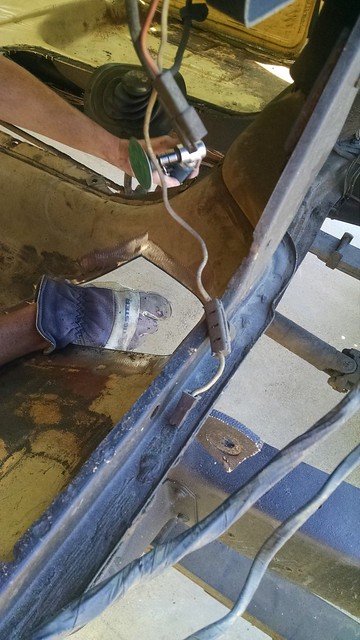
The new brake booster and master cylinder are also mounted, though I need to pull the master cylinder off again to paint it. I haven't done that yet and the little bit of rain last night was enough to get some rust to show up. This picture was before I had run the hard line over to the passenger side.
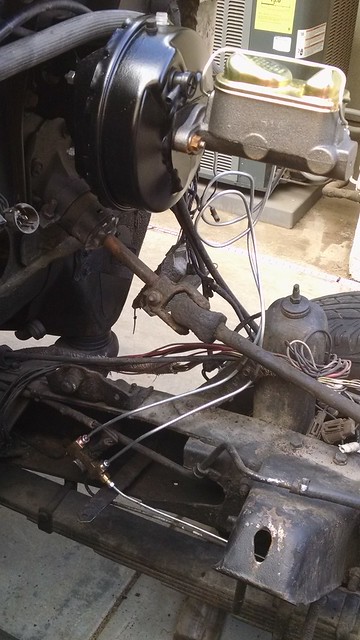
Some of the old fittings were very stubborn. I used my heat gun on the drivers side wheel cylinder to rubber hose connection. Even after I heated it up, I ended up having to use a pipe wrench to break it free. I used the pipe wrench a few more times. It sure came in handy today. This shows the brake plumbing upon completion today.
I also installed the A/C box.
When I went to install the A/C box, as I hopped inside the truck a little bird started flying around in it. It quickly found the open door and flew away to some nearby trees. A little later as I was putting parts of the dash back together, such as installing the ignition switch, I removed the instrument cluster and found the nest that the bird had built in the dash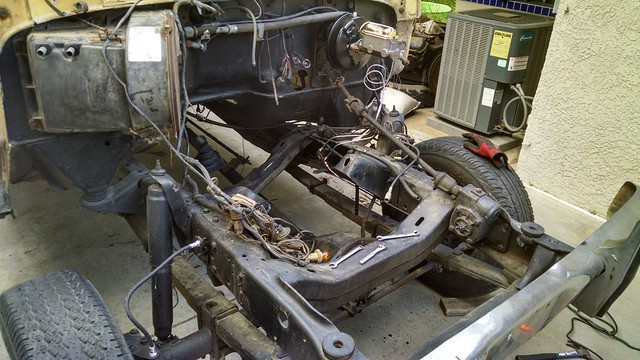
Decent enough progress.
Side note. Flare wrenches can still strip a nut pretty easily if the nut doesn't feel like moving.
The new brake booster and master cylinder are also mounted, though I need to pull the master cylinder off again to paint it. I haven't done that yet and the little bit of rain last night was enough to get some rust to show up. This picture was before I had run the hard line over to the passenger side.
Some of the old fittings were very stubborn. I used my heat gun on the drivers side wheel cylinder to rubber hose connection. Even after I heated it up, I ended up having to use a pipe wrench to break it free. I used the pipe wrench a few more times. It sure came in handy today. This shows the brake plumbing upon completion today.
I also installed the A/C box.
When I went to install the A/C box, as I hopped inside the truck a little bird started flying around in it. It quickly found the open door and flew away to some nearby trees. A little later as I was putting parts of the dash back together, such as installing the ignition switch, I removed the instrument cluster and found the nest that the bird had built in the dash
Decent enough progress.
Side note. Flare wrenches can still strip a nut pretty easily if the nut doesn't feel like moving.
Trending Topics
#8
03-26-2017, 10:55 AM

Cargo Master
I also bought a Mastercool hydraulic flaring set (p/n 71475). It's pretty darn nice to use. I found it for sale on Craigslist in Las Cruces, New Mexico about two weeks ago. Fortunately I had a friend driving thru Las Cruces for work last week, so he bought it in person and shipped it to me. It was practically brand new and after the purchase price, shipping and paying my friend for his time it still cost less than every other one I found for sale.


#9
03-26-2017, 11:07 PM
Regular steel lines. Just about everything I've bent up to this point has been by hand. The bender I have isn't anything spectacular and things seem to be easier to do freehand. I think I've got the hang of doing the flares properly, I guess I'll know for sure once I fill the brake system with fluid. I still have to replace the wheel cylinders in front too, then I'll start working my way to the back of the truck.
#10
04-11-2017, 02:48 PM
Things have been fairly quiet on my front because I went out of town and have a bathroom remodel I'm coordinating. Before I headed out of town I learned that one of my heads is cracked.  Last week I took the intake and heads off another FE block that I have. I've had this block sitting around for about a year out of another truck I bought and parted out. When I bought that truck I was told the motor smoked and maybe knocked. I never bothered to figure out why. Once I took the heads off I could see that the #1 & #4 cylinders had rust in them. I didn't take a super close look at the heads/gasket because it was dark, so I'm thinking it had a blown head gasket.
I dropped the heads off at the shop for inspection.
Last week I took the intake and heads off another FE block that I have. I've had this block sitting around for about a year out of another truck I bought and parted out. When I bought that truck I was told the motor smoked and maybe knocked. I never bothered to figure out why. Once I took the heads off I could see that the #1 & #4 cylinders had rust in them. I didn't take a super close look at the heads/gasket because it was dark, so I'm thinking it had a blown head gasket.I dropped the heads off at the shop for inspection.
#11
04-14-2017, 04:09 PM
I've finished replacing all the hard brake lines except the front caliper to rubber hoses. I was going to start with replacing the front caliper to rubber hose hard lines the other night, but there was a scorpion sitting on top of my tire. When I tried to knock it off to kill it, it dropped right into the front brake line area. Rather than try to hunt it down I just focused on replacing all the rear brake lines, including the frame rail run up to the junction box.
Heads are disassembled and cleaned, but not magnafluxed yet.
I also need to get going on cleaning and refinishing the motor accessories like the pulleys and brackets.
Heads are disassembled and cleaned, but not magnafluxed yet.
I also need to get going on cleaning and refinishing the motor accessories like the pulleys and brackets.
#12
04-25-2017, 12:57 AM
Work continues on redoing everything for the rear brakes.
When I originally made the rear hard lines I put 3/8-24 tube nuts on both ends. I made my lines a bit long for the applications so I had a bit of extra length in case I did something wrong. I couldn't get the 3/8-24 tube nuts to thread into the rear brake hose on the axle because I should have put 7/16-24 tube nuts on one end. No problem... I pulled off the lines, cut, deburred, put the 7/16-24 tube nuts on and re-flared those ends. Everything went back together nicely after that...
Until a couple of days later when my new, extended rear brake hose arrived from Bronco Graveyard (JBG). I ordered item # 52548, A 6 Extended Rear Axle Hose 1976-79 76-79 F250/350. When I went to put it on it seemed like the 7/16-24 tube nuts weren't threading into the rear brake hose. I double checked and sure enough, the extended rear brake hose from JBG required 3/8-24 tube nuts!
So now I'm at the point of having to pull off the hard lines to re-do the tube nuts that screw into the rear brake hose to have 3/8-24's. The passenger side is still long enough that I'll be able to use the same line. The driver side will need to be completely redone. I wasn't terribly satisfied with the length on the driver side anyway so this gives me a chance to correct it. It fit, but was just a tad too short for my liking. Fortunately, I have enough 3/16" brake line left to correct this.
#14
04-26-2017, 12:26 PM
Good question. Sometimes I wondered that myself but came up with the following logic:
None of the stores in my area had everything in stock. I was going to have to order the tubing and some of the fittings. Doing so on the classic tube website was easier than taking the time to stop at a parts store or do it over the phone with a parts store, where they don't really know brake HW. I was able to better control what I ordered and ensured I got the right fittings the first time, not after multiple trips to the parts store. Each trip to the parts store is about a 40-60 minute ordeal. This was probably the biggest reason.
I didn't want to go with pre-bent lines because that would definitely have been more expensive and best I can tell, no one actually sells a pre-bent crew cab brake line kit.
I didn't want to go with the commonly found Poly-Armour� soft steel simply because I don't like its coloring and the pre-made lengths would not be the right lengths for my applications.
Finally, I wanted to do the flaring and bending myself because it's an enjoyable part of the hobby.
#15
05-30-2017, 05:04 PM
I haven't posted anything lately because I've done very little to the crew cab due to my work/travel schedule over the last month.
On the motor rebuild front, I'm going with an EagleRod stroker kit that will work well with the new cam that came with the crew cab. Matching a $150 cam was not the driving factor, it just so happens I can save a few $ because the stroker kit I'm going with will work well with this particular camshaft.
I've finally finished the last bit of steel front lines from caliper to rubber hose. Still need to replace the front shoes, bearings, cylinders and get the drums turned, then the brake system will be completely redone.
Welding in the new drivers side floor pan to replace the rusty area hasn't happened yet due to schedules not matching up on weekends, but it looks like it will finally happen this weekend.
I've ordered the carpet that will go in from, 1A Auto, a vendor I found here on the site. They are by far the best price for ACC carpet.