
Installing Energy Suspension Body Mounts for Excursion DST DFM001
#1
 03-13-2017, 02:40 PM


Join Date: Sep 2015
Posts: 45
Likes: 0
Received 0 Likes
on
0 Posts
Installing Energy Suspension Body Mounts for Excursion DST DFM001
I am writing this supplemental guide to offer lessons learned to help others when installing the Energy Suspension DST DFM001 body mount kit by yourself. I did the whole job by myself over 2 weekends and took me about 16 – 20 hours of work. Truck is a 2000 XLT 4x4 PSD. It actually took longer, but I am only counting time spent removing the interior, remove old mounts, remove sleeves from old rubber and install in new mounts, install mounts in truck. I actually spent at least twice that to sandblast and paint the sleeves since they were so rusty.
This guide is not written in a step by step format, but just highlighting steps I found useful while installing the kit. Use it with the Energy Suspension install instructions. The Daystar F250 instructions came in handy as a supplemental guide during my install and may be useful for you too.
• Helpful Link: https://www.ford-trucks.com/forums/1...-shredded.html
• Energy Suspension DST body mount installation instructions: http://www.aftermarketsuspensionpart...structions.pdf
• Helpful supplemental instructions from the Daystar KF04050 bushing kit: http://www.daystarsuspensionparts.co...02_kf04050.pdf
Files also attached at the bottom of the post.
EDIT:
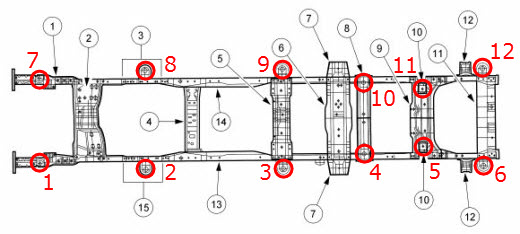
As requested, assigned numeric value of the Excursion body mounts:
My tips and tricks:
• My truck had super rusty mounts. This made some aspects of this install infinitely harder like separating mounts from the truck.
• Please save yourself headaches, use a good impact wrench. I tried removing with a breaker bar and that was painfully slow to the point I bought a Harbor Freight Earthquake XT. It is rated to 700lbs, but I ran it low on pressure due to issues with my compressor and it still worked very well. It’s a good one for under $100.
• I did not remove the center console, front carpet or rear carpet. I folded the middle section over the center console then folded the front foot well carpet back to reveal the access holes. The rear carpet I folded in half and just moved it fore / aft as I worked.
• Good place to lift the rear of EX. Will bend the sheet metal a bit but not too bad and gives some support with the body mount bracket and leaf shackle mount. Two lifts required, one for each side.
• Good place to lift body from front, just inside of the fender bolt holding the front of the wheel liner to the body. Two lifts required, one for each side.

• All mounts in the truck have two nesting sleeves that telescope and have capturing fingers inside to prevent the inside (lower) sleeve from falling out of the larger (upper) sleeve. Pounding on the sleeve is generally required to remove the lower sleeve to get it past the capturing fingers of the upper sleeve. All but the front sleeves are hex shaped to prevent twisting. The front sleeve is round and required capturing with a pipe wrench or other device to remove. Below / 1st picture shows the upper sleeve on #2 position (under driver / passenger foot). Look close you can see the capturing fingers inside. Below / 2nd picture shows a bottom sleeve.


• To remove the sleeves, you can do one of two things.
• Home made sleeve removal tool: make a driver with 3/8 or 7/16 threaded rod, 6” long with nut. Hole inside diameter is 11/16 (shown in the picture of the sleeve and ruler above). If nut too big to fit in hole, then shave down the flat spots on the nut until it is round and it slips down the hole of the sleeve. Heat and penetrating oil, then hit on it with a 5 lb sledge.

• Best way to remove rusty sleeves: heat, penetrating oil, few blows from hammer from below, hammer from above with driver, repeat.
• Note: Rear mount compatibility: Positions 4-5 from an f250 fits positions 3-6 on EX if you need to replace sleeves damaged during removal.
• Front mounts: remove nut from inside engine compartment. Use a 15mm short with 6” extension and breaker bar. Remove rubber from above mount by drilling it out from the side. Place medium size pipe wrench on the top sleeve and hold. Slide steel rod in frame to hold the pipe wrench from twisting so you can focus on the breaker bar from below. From below, penetrating oil, heat, turn.


• Removing position 5 & 11 lower mounts out of the frame without dropping the tank: The directions say to remove the fuel tank as part of the process. I was able to do otherwise. Start by liberal amounts of penetrating oil, then using the body mount bolt threaded into the body mount and driving it down with a 5lb sledge. If the body mount separation releases easily, with the body lifted to max height (~4”), slide some wood pieces between the frame and body to prevent accidental drop. If the mount will not separate, remove the tank. Along the frame by the front of the fuel tank, reach up and slide a hand between body and frame. You will feel the lower body mounts. Slide hand under frame rail where the lower mount is located and grab the lower mount while a helper unscrews the bolt from above. If either mount is dropped when removing, a 3lb magnetic pickup tool might be used to retrieve. Also, the passenger side has an access panel held with a 10mm bolt that can be removed to help with replacing the lower mount or retrieving a dropped mount. The driver side has a fuel lines running through the frame cross member, so no such access is available. If the driver side lower mount is dropped when installing or uninstalling, as well as the new mounts cannot be installed, the tank will need to be lowered. Full removal of the tank is not required.
• PSA: Concerning DST instructions for burning out the bushings. I do not believe this is the best way to remove the bushings. The smoke produced from burning halogenated (chlorinated) butyl rubbers contains highly toxic dioxins and has been linked to all kinds of health issues and can cause death in very small quantities. Dioxin is persistent due to the chemical nature of being lipid (fat) soluble and is highly stable, which means it can be incorporated and stored in the fat cells of our bodies and will not readily break down (half-life measured in years) or be easily metabolized. Let’s keep your truck running right and your health.
• The instructions state that the mounts should be removed from the rear to the front. I was only able to remove the rear 3 mounts when I lifted the rear. The front three came out when the front was lifted.
• After mounts off, remove any sticky rubber mounts from metal sleeves by drilling holes through the center section of the rubber / plastic (about 6 around center hole), then hammer off while holding rubber in a vice.

• For Mounts #2 under driver & passenger floor, remove any sticky rubber mounts from metal sleeves by drilling holes through the center section of the rubber / plastic, about six will do. Try jamming a flat head screw driver between the metal and rubber to pry off. This worked on one mount. The other was jammed bad. Try drill two opposing 180* holes into the sides of the rubber just above the steel sleeve. Slide a metal rod or screw drivers into each of the holes. Place on a vice, not tight on metal sleeve with screw drivers over vice clamps. Hammer off.


• Ratchet Straps are a good way to move the body into position to line up holes.

• Lower bushing goes on metal sleeve with relief facing up. It nests in the larger bushing when installed.
• Grease everything liberally before installation.
• Before installing sleeves to new bushings, take a small screw driver and lightly bend the internal tabs of the outer sleeve toward the center of the sleeve. They tend to get bent and won’t hold the mount together when installing. Not as big of an issue if working with a buddy.
• After much deliberation to decide proper installation order (instruction suck for this part), this is the order of the front bushing. Bolt, sleeve and smaller bushing on the right go in from inside the frame rail. Larger bushing and washer in the center go on top of frame rail. Nut and oblong washer on left go in from the engine compartment.

• From the engine compartment, use a screw driver to center the washer. Make sure the body is lifted.

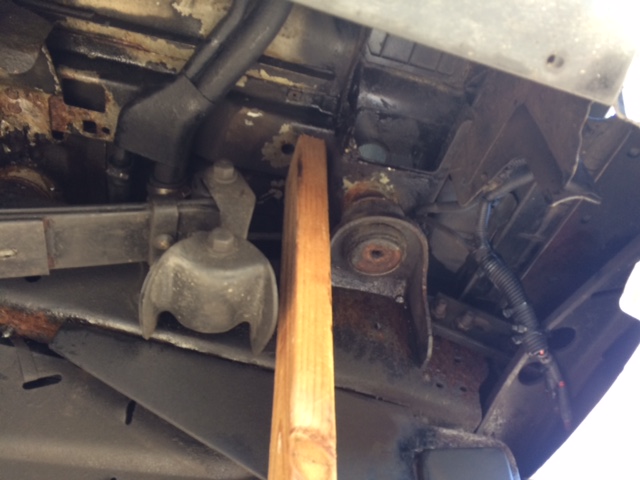
• Hold lower front bushing in place with a long piece of wood, metal or in my case a long screw driver and hang something heavy from the end


Good luck and hopefully this helps to make your install go smoothly.

This guide is not written in a step by step format, but just highlighting steps I found useful while installing the kit. Use it with the Energy Suspension install instructions. The Daystar F250 instructions came in handy as a supplemental guide during my install and may be useful for you too.
• Helpful Link: https://www.ford-trucks.com/forums/1...-shredded.html
• Energy Suspension DST body mount installation instructions: http://www.aftermarketsuspensionpart...structions.pdf
• Helpful supplemental instructions from the Daystar KF04050 bushing kit: http://www.daystarsuspensionparts.co...02_kf04050.pdf
Files also attached at the bottom of the post.
EDIT:
As requested, assigned numeric value of the Excursion body mounts:
My tips and tricks:
• My truck had super rusty mounts. This made some aspects of this install infinitely harder like separating mounts from the truck.
• Please save yourself headaches, use a good impact wrench. I tried removing with a breaker bar and that was painfully slow to the point I bought a Harbor Freight Earthquake XT. It is rated to 700lbs, but I ran it low on pressure due to issues with my compressor and it still worked very well. It’s a good one for under $100.
• I did not remove the center console, front carpet or rear carpet. I folded the middle section over the center console then folded the front foot well carpet back to reveal the access holes. The rear carpet I folded in half and just moved it fore / aft as I worked.
• Good place to lift the rear of EX. Will bend the sheet metal a bit but not too bad and gives some support with the body mount bracket and leaf shackle mount. Two lifts required, one for each side.
• Good place to lift body from front, just inside of the fender bolt holding the front of the wheel liner to the body. Two lifts required, one for each side.
• All mounts in the truck have two nesting sleeves that telescope and have capturing fingers inside to prevent the inside (lower) sleeve from falling out of the larger (upper) sleeve. Pounding on the sleeve is generally required to remove the lower sleeve to get it past the capturing fingers of the upper sleeve. All but the front sleeves are hex shaped to prevent twisting. The front sleeve is round and required capturing with a pipe wrench or other device to remove. Below / 1st picture shows the upper sleeve on #2 position (under driver / passenger foot). Look close you can see the capturing fingers inside. Below / 2nd picture shows a bottom sleeve.
• To remove the sleeves, you can do one of two things.
1. Partially thread the body mount bolt back into the sleeve and hit on it with a 5 lb sledge.
2. Make a sleeve removal tool and hit on it with a 5 lb sledge.
Number 1 may work and is required to remove the position 5 & 11 lower mounts if you don’t want to drop the fuel tank (more about this below). I had a problem with a seized mount on position 6 (driver, furthest rear). I pounded on the body mount bolt threaded for 15 minutes with heat and penetrating oil. The threads eventually stripped in the sleeve and I had to cut it out. The metal is soft. I ordered a like new used F250 mount off ebay for $35 to replace. After that I used the driver I made and no more issues. Lesson learned: do not pound on a threaded bolt until the sleeve strips, use the home made driver except on position 5 & 11 if you want to try and remove the lower mounts without removing the fuel tank.2. Make a sleeve removal tool and hit on it with a 5 lb sledge.
• Home made sleeve removal tool: make a driver with 3/8 or 7/16 threaded rod, 6” long with nut. Hole inside diameter is 11/16 (shown in the picture of the sleeve and ruler above). If nut too big to fit in hole, then shave down the flat spots on the nut until it is round and it slips down the hole of the sleeve. Heat and penetrating oil, then hit on it with a 5 lb sledge.
• Best way to remove rusty sleeves: heat, penetrating oil, few blows from hammer from below, hammer from above with driver, repeat.
• Note: Rear mount compatibility: Positions 4-5 from an f250 fits positions 3-6 on EX if you need to replace sleeves damaged during removal.
• Front mounts: remove nut from inside engine compartment. Use a 15mm short with 6” extension and breaker bar. Remove rubber from above mount by drilling it out from the side. Place medium size pipe wrench on the top sleeve and hold. Slide steel rod in frame to hold the pipe wrench from twisting so you can focus on the breaker bar from below. From below, penetrating oil, heat, turn.
• Removing position 5 & 11 lower mounts out of the frame without dropping the tank: The directions say to remove the fuel tank as part of the process. I was able to do otherwise. Start by liberal amounts of penetrating oil, then using the body mount bolt threaded into the body mount and driving it down with a 5lb sledge. If the body mount separation releases easily, with the body lifted to max height (~4”), slide some wood pieces between the frame and body to prevent accidental drop. If the mount will not separate, remove the tank. Along the frame by the front of the fuel tank, reach up and slide a hand between body and frame. You will feel the lower body mounts. Slide hand under frame rail where the lower mount is located and grab the lower mount while a helper unscrews the bolt from above. If either mount is dropped when removing, a 3lb magnetic pickup tool might be used to retrieve. Also, the passenger side has an access panel held with a 10mm bolt that can be removed to help with replacing the lower mount or retrieving a dropped mount. The driver side has a fuel lines running through the frame cross member, so no such access is available. If the driver side lower mount is dropped when installing or uninstalling, as well as the new mounts cannot be installed, the tank will need to be lowered. Full removal of the tank is not required.
• PSA: Concerning DST instructions for burning out the bushings. I do not believe this is the best way to remove the bushings. The smoke produced from burning halogenated (chlorinated) butyl rubbers contains highly toxic dioxins and has been linked to all kinds of health issues and can cause death in very small quantities. Dioxin is persistent due to the chemical nature of being lipid (fat) soluble and is highly stable, which means it can be incorporated and stored in the fat cells of our bodies and will not readily break down (half-life measured in years) or be easily metabolized. Let’s keep your truck running right and your health.
• The instructions state that the mounts should be removed from the rear to the front. I was only able to remove the rear 3 mounts when I lifted the rear. The front three came out when the front was lifted.
• After mounts off, remove any sticky rubber mounts from metal sleeves by drilling holes through the center section of the rubber / plastic (about 6 around center hole), then hammer off while holding rubber in a vice.
• For Mounts #2 under driver & passenger floor, remove any sticky rubber mounts from metal sleeves by drilling holes through the center section of the rubber / plastic, about six will do. Try jamming a flat head screw driver between the metal and rubber to pry off. This worked on one mount. The other was jammed bad. Try drill two opposing 180* holes into the sides of the rubber just above the steel sleeve. Slide a metal rod or screw drivers into each of the holes. Place on a vice, not tight on metal sleeve with screw drivers over vice clamps. Hammer off.
• Ratchet Straps are a good way to move the body into position to line up holes.
• Lower bushing goes on metal sleeve with relief facing up. It nests in the larger bushing when installed.
• Grease everything liberally before installation.
• Before installing sleeves to new bushings, take a small screw driver and lightly bend the internal tabs of the outer sleeve toward the center of the sleeve. They tend to get bent and won’t hold the mount together when installing. Not as big of an issue if working with a buddy.
• After much deliberation to decide proper installation order (instruction suck for this part), this is the order of the front bushing. Bolt, sleeve and smaller bushing on the right go in from inside the frame rail. Larger bushing and washer in the center go on top of frame rail. Nut and oblong washer on left go in from the engine compartment.
• From the engine compartment, use a screw driver to center the washer. Make sure the body is lifted.
• Hold lower front bushing in place with a long piece of wood, metal or in my case a long screw driver and hang something heavy from the end
Good luck and hopefully this helps to make your install go smoothly.


#4
03-13-2017, 04:53 PM
#5
03-13-2017, 05:25 PM
Join Date: Sep 2015
Posts: 45
Likes: 0
Received 0 Likes
on
0 Posts
Thanks for reps!
I'll give feedback on drivability later this week. I'm finishing up a few other things before it is road worthy.
#6
03-13-2017, 05:44 PM
Post Fiend
#7
03-14-2017, 03:55 AM

Trending Topics
#8
03-14-2017, 09:15 AM
Join Date: Sep 2015
Posts: 45
Likes: 0
Received 0 Likes
on
0 Posts
I was actually thinking of buying another set for down the road in a decade or more. I really want to keep mine indefinitely. They are not that expensive.
#10
03-14-2017, 10:04 AM
Join Date: Sep 2015
Posts: 45
Likes: 0
Received 0 Likes
on
0 Posts
I would expect the urethane body mounts to last at least 10 years in service on the truck.
#11
03-14-2017, 05:12 PM
Lead Driver
#12
03-16-2017, 09:31 AM
Join Date: Sep 2015
Posts: 45
Likes: 0
Received 0 Likes
on
0 Posts
Got it out last night and this morning, around town and highway. NVH noise change is hard for me to determine, I have no more creaks and pops, but I was curious if there would be engine noise transmitted to the cab. I can't be for sure on this one, I have a bunch of other mods I did also with the body mounts that more likely have made the truck louder (WW2 for example). Vibration really hasn't changed noticeably. Drives great!
#13
05-18-2017, 10:28 PM

#14
05-18-2017, 11:19 PM
Join Date: Sep 2015
Posts: 45
Likes: 0
Received 0 Likes
on
0 Posts
I will mention that when I pull a small trailer, I don't notice a change in noise coming through the frame and ito the body.
Concerning 2 & 10, that sounds like how mine were too.
#15
07-15-2018, 06:32 PM
Great post, and reps sent. I'm having a time getting my rusted mounts out. One that wasn't rusted came out with a single hammer blow to the tool, but I've wailed on the rest, to no avail. They've only had an hour, or so, of time with penetrating oil, but I'm not optimistic more time will help. Any ideas?
Mark
Mark