


TYC Starter

Thread Starter
|
Laughing Gas
Joined: May 2004
Posts: 1,062
Likes: 6
From: Dallas, TX, USA
They seem to have different plants where different applications are made, from all reports. This particular one... well, look at the photo.
Regardless of where it's made, common sense says that a new gear reduction starter that retails for $68 is going to have some compromises either in material or workmanship or both in order to make a profit at that price.
A good case in point is the firearms industry. Colt used to charge ridiculous sums for the AR-15 rifle, then a few other companies started making clones for less money. Quality was a bit variable with these others. However, new technology and techniques came to bear and soon AR-15 types were available at a fraction of the cost with better quality than what Colt was producing. Today you can get an AR-15 from any one of a number of manufacturers at about the $1000 price point that equals or more often exceeds the quality of what Colt was selling for $3000 not long ago.
One thing that's been noticed about the offset gear reduction starters of this type is that economies of scale can radically knock the cost down at times. Manufacturers can standardize on just a few actual motors and a few solenoids and the only thing that changes between a few broad models is the casting of the nose to mount those parts to the engine and the actual starter driven gear that interfaces with the flexplate or flywheel. This can bring costs way down by not having to manufacture hundreds of different diameter motors/solenoids, etc.
I've since found out that our stock starter is an early style planetary gear reduction starter made by Mitsu. Even though it looks like and acts like a direct drive, it is gear reduction, just not a very good one. Basically the above RockAuto entry is the TYC copy or whatever of that Mitsu design - which I will never be putting back on my truck if I have anything to say about it.
Thread Starter
|
Laughing Gas
Joined: May 2004
Posts: 1,062
Likes: 6
From: Dallas, TX, USA
Direct size and weight comparison between the stock Mitsu (who holds the dubious honor of being the only car manufacturer to make fire come out of the door panels and the air conditioning vents on the same car) starter and the TYC. The starters are oriented as they are installed on the truck - yup, that means the solenoid is towards the inside of the truck instead of towards the outside (and blocking the top bolt) like it is on the Mitsu:


Thread Starter
|
Laughing Gas
Joined: May 2004
Posts: 1,062
Likes: 6
From: Dallas, TX, USA
A few days later, some colder weather has arrived (39F, rainy, breezy, wind chill of an effective 32F) and here's another start with nothing but the 1.5A battery tender plugged in.
Postmaster
Joined: Dec 2012
Posts: 2,604
Likes: 3
From: Fort Polk Louisiana
Wow, that's just like looking at the key and it turns over!
Thread Starter
|
Laughing Gas
Joined: May 2004
Posts: 1,062
Likes: 6
From: Dallas, TX, USA
Keep in mind that this, as with all the videos in this thread, was done by my remote starter so as to keep it fair and consistent. My remote starter is set to switch the truck to on, then wait 45 seconds (to allow the glow plugs to have a chance), then attempt a start. The videos I've posted leave out most of the 45 second wait because who wants to sit and watch a truck do nothing for 45 seconds?
That said, I've never heard this truck crank anywhere near this fast in this kind of temperature with the remote starter.
That said, I've never heard this truck crank anywhere near this fast in this kind of temperature with the remote starter.
Postmaster
Joined: Dec 2012
Posts: 2,604
Likes: 3
From: Fort Polk Louisiana
Keep in mind that this, as with all the videos in this thread, was done by my remote starter so as to keep it fair and consistent. My remote starter is set to switch the truck to on, then wait 45 seconds (to allow the glow plugs to have a chance), then attempt a start. The videos I've posted leave out most of the 45 second wait because who wants to sit and watch a truck do nothing for 45 seconds?
That said, I've never heard this truck crank anywhere near this fast in this kind of temperature with the remote starter.
That said, I've never heard this truck crank anywhere near this fast in this kind of temperature with the remote starter.
Thread Starter
|
Laughing Gas
Joined: May 2004
Posts: 1,062
Likes: 6
From: Dallas, TX, USA
That remote start must be nice! I could fire my truck up being on the second story and not have to leave the warmth of my room! Yea, that 45 second GP run must be why it doesn't have that noticeable romp romp sound for a minute compared to most cold starts. I have seen a couple threads around on how to build a remote start kit, I was just curious if you used one of those or bought a universal type kit?
I also have a kill switch for the remote starter mounted in the cab - this is to lock it out when I'm working on the truck. Having the diesel suddenly start up might be bad, depending on what I'm doing...
Thread Starter
|
Laughing Gas
Joined: May 2004
Posts: 1,062
Likes: 6
From: Dallas, TX, USA
I just went and checked my records - my remote starter is an Avital 4111L. Still available on Amazon:
FTE Stories
Ford Trucks for Ford Truck Enthusiasts

Top 10 Fords at 2026 Carlisle Ford Nationals
Joe Kucinski
3 Best / 3 Worst Parts of Modern Ford Ownership
Brett Foote
10 Amazing Upgrades That Solve Common Ford Truck Owner Headaches
Pouria Savadkouei
Every 2026 Ford Engine Explained
Brett Foote
10 Ugly Ford Trucks That We Still Kinda Love
Joe Kucinski
10 Things Every Truck Owner NEEDS (2026 Edition)
Michael S. Palmer
Rezvani's Latest Post-Apocalyptic Monster Is a Ford F-150 Raptor Underneath
Verdad Gallardo
Top 10 Most Expensive Ford Trucks Ever Sold on Bring a Trailer
Joe Kucinski
2027 Ford Super Duty Buyer's Guide (Every Model, Engine, & Package)
Brett Foote
Thread Starter
|
Laughing Gas
Joined: May 2004
Posts: 1,062
Likes: 6
From: Dallas, TX, USA
Some more notes on getting the swap done:
First, disconnected the negatives on both batteries for obvious reasons. Then ducked under the truck to look at the $#))#*$&@(#$&#@)($ Mitsubishi starter:
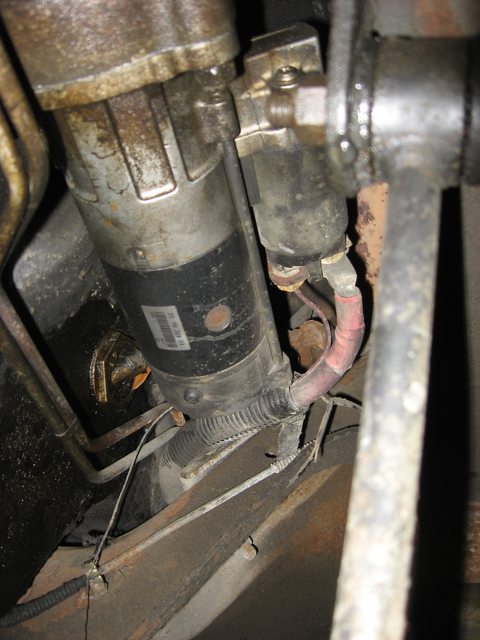
Sadly, it had not self-ejected or mysteriously disappeared, which meant I had to take it out myself. I assembled my tools:
One automatic wire stripper
One ratcheting crimper
Butane lighter (not shown)
Fire extinguisher (not shown)
Standard crimp connectors (not shown) - one female 1/4 spade connector, one insulated butt splice with heat shrink insulation, both 'blue' for 14-16 gauge wire.
14 gauge wire (not shown)
Heat shrink insulation (not shown)
3/8 inch ratchet with 17mm socket
1/4 inch ratchet with 8mm deep socket
One 6-inch extension bar for 3/8 inch ratchet (yes, there's two in the picture, you only need one)
One 3-inch extension bar for 3/8 inch ratchet
Standard universal joint/swivel for 3/8 inch ratchet

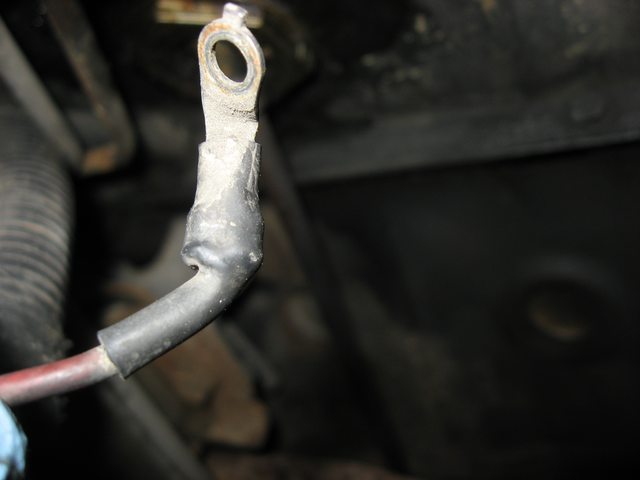
First, remove the main power cable from the front of the starter (17mm).

Then remove the solenoid cable (8mm) from the solenoid.

Pay attention to what nuts and washers came off from where and in what order. Push the cables out of the way.
There is a curved bit of the crossmember the cables will tuck over into.

Fit the 17mm socket to the end of the 6 inch extension, then run it up and through the 'valley' between the solenoid and the body of the starter. Fit the 3 inch extension on the 6 inch extension.
Using one hand wrapped around the solenoid to feel for the bolt head that's hidden there...

...guide the socket into place. Fit the swivel onto the end of the assembly, pivot the free end down and attach your ratchet. This will clear the starter and crossmember - barely.

Loosen the bolt until it starts skipping around in its hole to tell you it is out all the way; it will take a while since you won't have much room to arc the ratchet back and forth. Dismantle the rig of swivel and expansions and remove your tools. Remove the lower two bolts - arrange it so you can use the ratchet one handed to remove the last bolt while you support the weight of the starter with your other hand. Careful, the thing weighs 16 pounds! Save all three of your bolts even though you will only be putting two back in.
First, disconnected the negatives on both batteries for obvious reasons. Then ducked under the truck to look at the $#))#*$&@(#$&#@)($ Mitsubishi starter:
Sadly, it had not self-ejected or mysteriously disappeared, which meant I had to take it out myself. I assembled my tools:
One automatic wire stripper
One ratcheting crimper
Butane lighter (not shown)
Fire extinguisher (not shown)
Standard crimp connectors (not shown) - one female 1/4 spade connector, one insulated butt splice with heat shrink insulation, both 'blue' for 14-16 gauge wire.
14 gauge wire (not shown)
Heat shrink insulation (not shown)
3/8 inch ratchet with 17mm socket
1/4 inch ratchet with 8mm deep socket
One 6-inch extension bar for 3/8 inch ratchet (yes, there's two in the picture, you only need one)
One 3-inch extension bar for 3/8 inch ratchet
Standard universal joint/swivel for 3/8 inch ratchet
First, remove the main power cable from the front of the starter (17mm).
Then remove the solenoid cable (8mm) from the solenoid.
Pay attention to what nuts and washers came off from where and in what order. Push the cables out of the way.
There is a curved bit of the crossmember the cables will tuck over into.
Fit the 17mm socket to the end of the 6 inch extension, then run it up and through the 'valley' between the solenoid and the body of the starter. Fit the 3 inch extension on the 6 inch extension.
Using one hand wrapped around the solenoid to feel for the bolt head that's hidden there...
...guide the socket into place. Fit the swivel onto the end of the assembly, pivot the free end down and attach your ratchet. This will clear the starter and crossmember - barely.
Loosen the bolt until it starts skipping around in its hole to tell you it is out all the way; it will take a while since you won't have much room to arc the ratchet back and forth. Dismantle the rig of swivel and expansions and remove your tools. Remove the lower two bolts - arrange it so you can use the ratchet one handed to remove the last bolt while you support the weight of the starter with your other hand. Careful, the thing weighs 16 pounds! Save all three of your bolts even though you will only be putting two back in.
Thread Starter
|
Laughing Gas
Joined: May 2004
Posts: 1,062
Likes: 6
From: Dallas, TX, USA
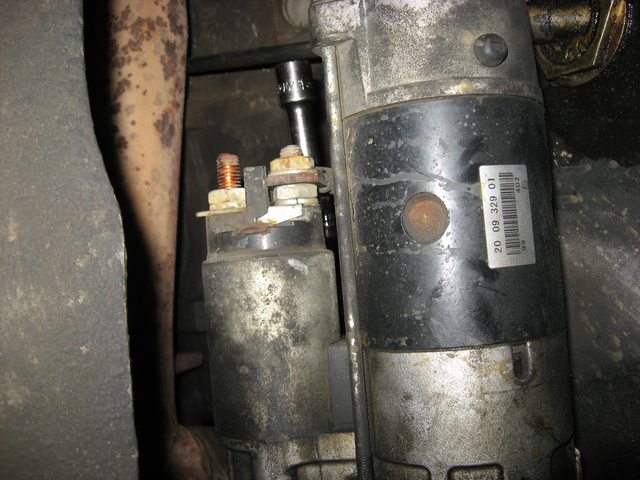
The SuperDuty type TYC starter has its solenoid/Bendix on the opposite side from what the original starter does. Access to the mounting bolts is therefore easier.

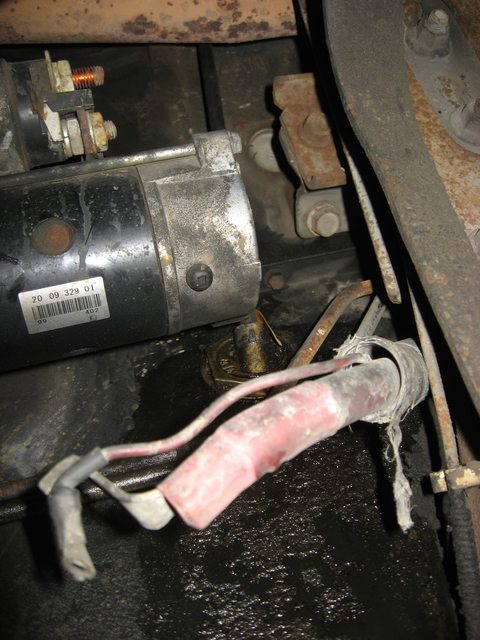
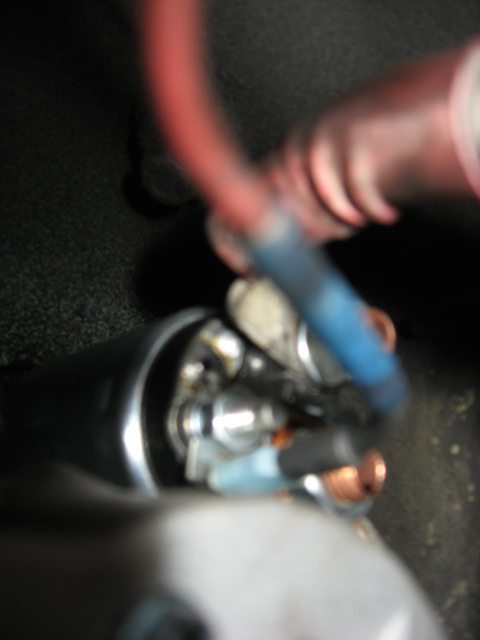
While the body of the starter motor does hide the top bolt from view, it is much easier to get to and you don't need this Rube Goldberg set of extensions and such to get the top bolt out any more. Also, if you look carefully, you'll notice that the little solenoid terminal has a approximately 1/4 inch thread and a 1/4" male spade terminal. The stock starter has an approximately 1/8 inch lug and corresponding ring; it will not directly connect to the SD type starter.
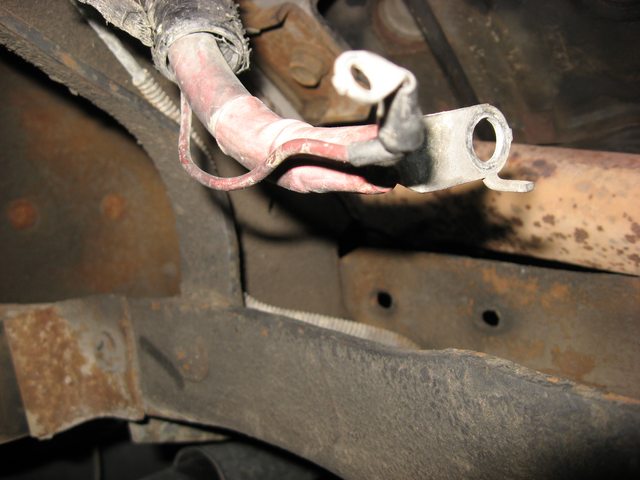
You will have to replace the original, tiny ring connector on the wiring harness with either a 1/4" ring terminal or a 1/4" female spade connector. I chose the latter, as it is easy to make an adapter back to a ring terminal using a short length of wire and a male spade terminal, plus starter replacement is faster with the spade type. I made this adapter with a short length of wire and some terminals to give it a bit extra length and crimped it to the original wire, sealing everything with heat shrink.

Use care - the fire extinguisher is in case you set the scunge under the truck on fire while heatshrinking, but you'd really have to be trying hard to get that to happen.
Once you've made this adaptation, you can now install the starter. Here's a pic of a test fitting I made before I did the wiring change.
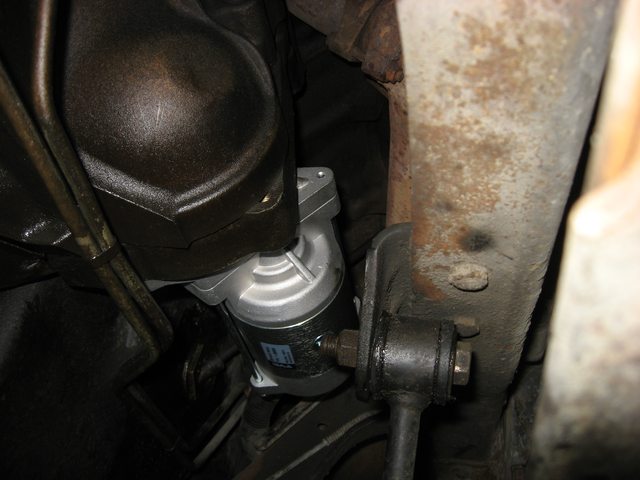
The starter will bolt to the truck using the upper bolt and inner lower bolt (the lower bolt closest to the engine) only. You only need the 6" extension and 17mm socket itself to install the bolts with the new starter. I recommend installing the lower bolt first, then going to the upper. The upper is immensely easier to get to now.
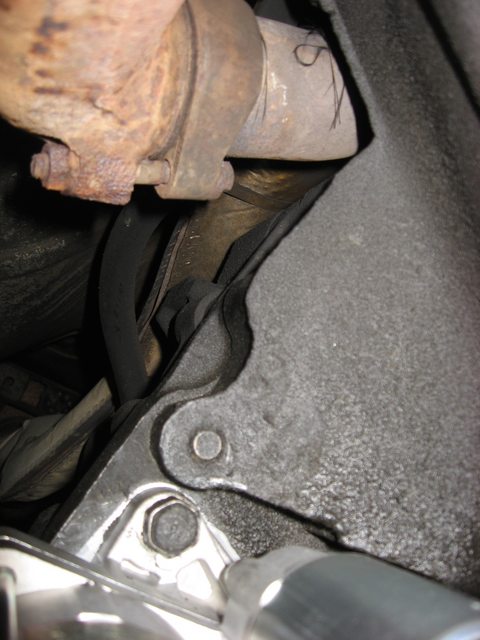
The remaining bolt hole is simply not used. Torque the bolts to the appropriate values.
Install the starter cable on the upper large terminal, being careful to route it so the big lug on the end doesn't contact or short against anything. You should also connect the smaller wire at this time.

Reconnect battery terminals and attempt a start - that's all it takes!
While the body of the starter motor does hide the top bolt from view, it is much easier to get to and you don't need this Rube Goldberg set of extensions and such to get the top bolt out any more. Also, if you look carefully, you'll notice that the little solenoid terminal has a approximately 1/4 inch thread and a 1/4" male spade terminal. The stock starter has an approximately 1/8 inch lug and corresponding ring; it will not directly connect to the SD type starter.
You will have to replace the original, tiny ring connector on the wiring harness with either a 1/4" ring terminal or a 1/4" female spade connector. I chose the latter, as it is easy to make an adapter back to a ring terminal using a short length of wire and a male spade terminal, plus starter replacement is faster with the spade type. I made this adapter with a short length of wire and some terminals to give it a bit extra length and crimped it to the original wire, sealing everything with heat shrink.
Use care - the fire extinguisher is in case you set the scunge under the truck on fire while heatshrinking, but you'd really have to be trying hard to get that to happen.
Once you've made this adaptation, you can now install the starter. Here's a pic of a test fitting I made before I did the wiring change.
The starter will bolt to the truck using the upper bolt and inner lower bolt (the lower bolt closest to the engine) only. You only need the 6" extension and 17mm socket itself to install the bolts with the new starter. I recommend installing the lower bolt first, then going to the upper. The upper is immensely easier to get to now.
The remaining bolt hole is simply not used. Torque the bolts to the appropriate values.
Install the starter cable on the upper large terminal, being careful to route it so the big lug on the end doesn't contact or short against anything. You should also connect the smaller wire at this time.
Reconnect battery terminals and attempt a start - that's all it takes!


Thread Starter
|
Laughing Gas
Joined: May 2004
Posts: 1,062
Likes: 6
From: Dallas, TX, USA
Thanks, when I was doing my research I noticed a distinct lack of good writeups for starter replacement let alone converting to the Late SuperDuty starter. Or, for that matter, pictures. For some reason nobody posts pictures of this stuff.
Since I was going to have to do it anyway and I have an older Canon digital camera I keep around specifically for taking pictures of stuff like this (though mostly it gets used to take pictures of stuff to diagnose or for others to help me figure out what I did wrong) I figured that if nobody else was going to do it, that must mean it's my turn.
Since I was going to have to do it anyway and I have an older Canon digital camera I keep around specifically for taking pictures of stuff like this (though mostly it gets used to take pictures of stuff to diagnose or for others to help me figure out what I did wrong) I figured that if nobody else was going to do it, that must mean it's my turn.
Postmaster
Joined: Dec 2012
Posts: 2,604
Likes: 3
From: Fort Polk Louisiana
I should probably find my digital camera. I have a nice helmet cam, that can take pictures, but for the ol' point and shoot, I have no idea where I put it. Probably got eaten by the truck, along with my flashlight, and my favorite 11mm socket.
