


A step backwards....A little progress....
Thread Starter
|
Roast em' if you got 'em


Joined: Mar 2005
Posts: 21,997
Likes: 9,885
From: Rio Rancho, NM

Made some more progress today. I don't have much to show for my efforts but I did make some progress.
A new rag joint from Flaming River is $206.97, a new rag joint from Rock Auto is $16. Thats a little bit of a mark up....sheesh. I went out to the wrecking yard to scrounge some pieces. I got a few rag joint pieces and I think I have enough to combine my Toyota box to my early GM column. More on this later.
I also had to fabricate a lower steering column bushing. My 64 Riviera column didn't have anything on the bottom end as the column went directly into the steering box on the Riviera. I was able to fabricate a lower bushing from PVC by necking down a 1 1/2" PVC coupling down to a 3/4" threaded bushing. I had to use a reamer to take a little material out of the 3/4" threaded fitting for a nice fit.
Hopefully tomorrow I can get the steering box bracket welded together, drill some holes, and bolt it down and then start working on steering column to dash mounting.
slowly its coming together
Bobby
Thread Starter
|
Roast em' if you got 'em
Joined: Mar 2005
Posts: 21,997
Likes: 9,885
From: Rio Rancho, NM
Finally, a step forward on this fiasco.
I got the bracket welded and holes drilled. I had a heck of time figuring out how to drill the 1/2" holes in the frame (ended up using a right angle drill head and a step bit). The first pic is everything bolted together.

The next pic shows the rough position of my Buick steering column

and the last is a shot where I'm trying to figure out steering column drop.

Bobby

Welder User


Joined: Feb 2009
Posts: 5,269
Likes: 50
From: northwest MT

Looking good Bobby. Little by little....
Hey, if you figure out how to wire up that turn signal switch, let me know! I made the mistake of taking mine apart to see how it worked. Tiny springs, contacts and other things went flying everywhere....hope I got it back together right.
Hey, if you figure out how to wire up that turn signal switch, let me know! I made the mistake of taking mine apart to see how it worked. Tiny springs, contacts and other things went flying everywhere....hope I got it back together right.
Thread Starter
|
Roast em' if you got 'em
Joined: Mar 2005
Posts: 21,997
Likes: 9,885
From: Rio Rancho, NM
Thanks guys!
I made some more progress this afternoon. I made a great start on fabricating my pitman arm. I also hacked apart my drag link. I had originally lengthened a Toyota drag link by cutting it and using pipe for a sleeve. No I have to cut it apart and add some more length to it. I was hoping to get everything done today so that I can take the pieces over to my buddy's shop and have him weld them (my little Millermatic 135 isn't up to the task and my buddy is a certified welder). I didn't get it all done though so I'll have to wait until next week....dang
Oh well, I have plenty of other pieces of this puzzle to work on.
Here's the early steps of making the pitman arm

The Toyota pieces fit into the flat bar (lots of hand filing....ugh)

Everything tacked together, just awaiting final welding and trimming

Still tons of work to do, but its nice to make a little bit of headway

Lead Driver
Joined: Jul 2011
Posts: 6,599
Likes: 34
From: Rockingham, VA
FTE Stories
Ford Trucks for Ford Truck Enthusiasts

Rezvani's Latest Post-Apocalytic Monster Is a Ford F-150 Raptor Underneath
Verdad Gallardo
Top 10 Most Expensive Ford Trucks Ever Sold on Bring a Trailer
Joe Kucinski
2027 Ford Super Duty Buyer's Guide (Every Model, Engine, & Package)
Brett Foote
Top 10 Ford Truck Tragedies
Joe Kucinski
AEV FXL Super Duty - the Super Duty Raptor Ford Doesn't Make
Brett Foote
Lobo Vs Lobo: Proof the F-150 Lobo Should Be Even Lower!
Michael S. Palmer
Ford's 2001 Explorer Sportsman Concept Looks For a New Home
Verdad Gallardo
10 Best Ford Truck Engines We Miss the Most!
Joe Kucinski
2026 Shelby F-150 Off-Road: Better Than a Raptor R?
Brett Foote
Thread Starter
|
Roast em' if you got 'em
Joined: Mar 2005
Posts: 21,997
Likes: 9,885
From: Rio Rancho, NM
More progress!! Wohooo! I'm getting pretty excited about this, its all coming together.
I was able to fiddle around with the pitman arm and locate the limits of travel so that I can start fabbing my drag link. I also had to fill some holes in the frame; the original steering box hole and the one I punched in front of the axle.


After that I determined the length I needed for the drag link and got it tacked together.


I'll weld (or I should say, my certified welder buddy will weld) around the ends of the sleeve and I'll also drill through the sleeve in several places and make some plug welds.
Tomorrow I'm hoping to make a start on the column mounting
It was a good day
Bobby
Cargo Master

Joined: Oct 2013
Posts: 2,580
Likes: 29
From: in a barn
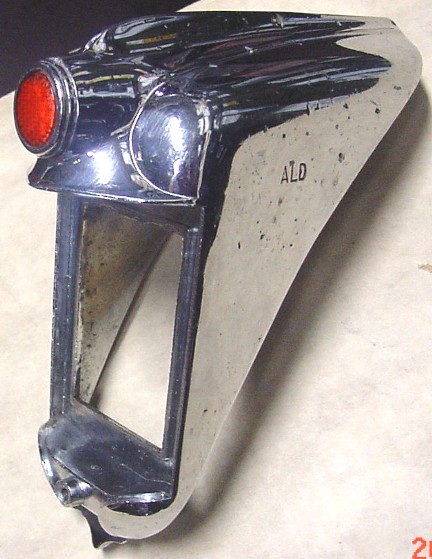
Hey Bobby,
What are those tail lights on your truck? I am considering making a flip up tail light to cover the gas filler on my truck (moving it to the rear fender), similar to what I have on my 47 cadillac. Those lights look like they may work for that project, any idea what they are from?
Good luck with the steering, I took the easy way and went with rack and pinion!
Thread Starter
|
Roast em' if you got 'em
Joined: Mar 2005
Posts: 21,997
Likes: 9,885
From: Rio Rancho, NM
The taillights are from a late 40's Chrysler. I think Chrysler used them from 46-48. I found this set on an old rusty hulk that was slowly being consumed by the desert. I was able to find the glass lenses at
www.tailightking.com
I replaced the small upper reflective lens with blue dots. I wired the blue dots into the parking light circuit. I did have to take a grinder to the back sides of the housings to tweak the curvature to fit my fenders.

Bobby
www.tailightking.com
I replaced the small upper reflective lens with blue dots. I wired the blue dots into the parking light circuit. I did have to take a grinder to the back sides of the housings to tweak the curvature to fit my fenders.
Bobby
Thread Starter
|
Roast em' if you got 'em
Joined: Mar 2005
Posts: 21,997
Likes: 9,885
From: Rio Rancho, NM
More progress, probably the last for a week since I'll be on the road most of the week for my job.
I got my rag joint issue sorted out. The Toyota uses a "U" joint with a connected rag joint at the steering box. I cut the intermediate shaft off of the rag joint, poked a square hole in so I could recess a square nut into the hole so that it would ride on the flat spot of the column.


I welded the nut in place, and its all good to go. I also drilled a small mating divot in the flat on the column for the set screw to mate with.
Now to start fabricating the floor plate and column mount. I'm liking this column

Bobby