Advice from those who have restored a Slick
#1
 07-07-2013, 08:44 PM


Join Date: Jul 2013
Location: Ranger, GA
Posts: 34
Likes: 0
Received 0 Likes
on
0 Posts
Advice from those who have restored a Slick
OK. Picked up my new Slick today. I bought it sight unseen, which I knew was a gamble but I felt like I got a good enough description from the owner and I did not think I was paying too much based on other trucks I have seen within 200 miles of my home. I would like some advice on what to do from here from those of you who have restored an F100.
Here is my goal:
I want to get the truck to usable condition. I own a small 40 acre hobby farm and we are expanding to a small, organic produce stand next year and I thought this would be a cool truck to have around the farm. I like old stuff. My house is an old farm house, white with a green tin roof and it looks like a Cracker Barrel inside. I have a 1953 Ford Jubilee tractor that I use around the farm and this would be the icing on the cake. This will not be a show truck, but I do want it nice and usable.
The good:
The truck has no bondo and is straight as an arrow. There are no waves in the body and on the exterior, the only rust is very minimal on the bottom of the doors. There is also some rust bubbles on the seams where the roof panel meets the sides and on the seams where the sheet metal meets at the rear and front clips.
The engine purrs like a kitten and cranks up easily. All of the electrics work such as the wipers and headlights with the exception of the brake lights. The tail lights work fine, just no brake lights.
The previous owner installed disc brakes. I had drums on my '65 and the difference is amazing. My concern here is that I am not sure the original wheels will fit with the disc brakes.
The bad:
The floor pans are perforated. There is crumbly rust under the rubber mat. It will need new floor panels. I have an LMC catalogue but they do not show floor pans for any trucks newer than 1960. This is probably third on my priority list.
The clutch lets up at the very top. Unless you are completely stopped, the truck will grind going into 1st (3 on the tree). This is probably my top priority.
The steering has about 6 inches of play. Not sure what causes this but I will research it. It's mechanical so it should be a fairly uncomplicated fix if I can find the parts. Any advice here would be appreciated.
The truck has some older, rusty Crager mags on it now. I want to install factory wheels but as I mentioned before, I am not sure they will fit over the disc brakes. Anyone who has any experience with this who would like to offer some advice, I would appreciate it.
There is a plastic bedliner in the truck at this time. I am almost afraid to pull it out because I don't want to find what I think I will find. My goal is to install a wood bed but that is a luxury, not a necessity. If the truck turns out as nice as I hope, I will do that.
The previous owner had the truck painted the original Wimbeldon White but whoever did the painting had no clue about how to mask a vehicle and there is overspray EVERYWHERE! Every seal and gasket has overspray on it. Also, he just sprayed the truck and never wet sanded it or cleared it so it looks like a white orange skin going down the road. This will drive me crazy.
I'm sure I left some things out but I will get to them soon enough. I want to thank you all in advance for your advice. If I ask too many questions and become a pest, please feel free to call me out. I am a little OCD and I am dealing with some demons and PTSD so this truck will be my therapy. I'm hoping my young ones will want to help and we can do this as a family.
Thanks again,
DB
#2
07-07-2013, 09:28 PM

I would pull the tranny and repair it and the clutch system first. The more you grind the syncronizers, the more damage you will have.
The play in the steering is also a high priority for me.
On the cheap, you can remove the rust in the floor, use phosphoric acid to kill the rust and do a temp patch with fiberglass to put off the real repairs.
Glad you have a new rusty money pit to tinker with. I have a Jubilee with remote and live pto (both in the factory book). Private message me for some pictures of the Jubilee options.
#3
07-07-2013, 11:17 PM
Thank you for your service, welcome to the forum, congratulations on the new truck, and glad you found a therapy project, although some of this stuff can be pretty stressful lol. I have an uncle that I'm really close with who served in Vietnam. When he first got back, his therapy project was a sailboat, and he told me once that his first year, he spent more time in the water than in the boat, and sometimes this truck project feels like that. There's been a lot of times I felt like I fell out of the boat, but lately I've been sailing more than swimming!
I have a 1964 as well, just got it about 3 months ago so I'm probably one of the least knowledgeable/experienced members here. But I've been dealing with some electrical issues, I can tell you that on the brake lights, there is a switch on the master cylinder which can clog or go bad. I think mine cost $7 or $8 at O'Reilly's. It's on the front of the master cylinder, with 2 wires going to it.
Wheels, I have drums all around, I put some probably late 80's stock F150 rims on mine and they fit fine. I would assume those would fit over disc brakes since the 80's F150's would have had them. I got a set of 4 from the junkyard here for I think $70.
I doubt anyone will give you a hard time about asking questions, this is the best online community I have ever been a part of. There are many very knowledgeable members on here who are willing to pass on what they have learned. I have only seen them members here be polite and respectful towards each other. I usually try to use the "search" function first, some questions have been asked and answered previously. If you can't find it, by all means post and someone will give you some guidance.
#4
07-08-2013, 12:53 AM
Laughing Gas
If the previous owner already did the disc brake conversion, and you are successfully driving the truck, then it would seem to me that the wheels that are on there are clearing the calipers. When I did my disc brake conversion (on a '66) the original '66 wheels would NOT clear the calipers. I had to hit the junk yard and find some wheels from a disc brake equipped truck. There were plenty to choose from so it shouldn't be a problem. Don't forget to get an additional one to serve for your spare wheel/tire. Should you decide to get some aftermarket wheels (I bought American Racing Torque Thrusts) be sure to enquire about whether they will clear disc brake calipers. I also agree with SDF about the brake light switch that screws into the master cylinder. Sometimes they can be removed and cleaned, but they are cheap to replace. They can get clogged by brake fluid that is in need of being changed (so you might want to have a look at and change out as necessary, all of your fluids). Good luck with your new truck!
#5
07-08-2013, 05:34 AM


#6
07-08-2013, 06:24 AM
Slightly newer steel wheels will clear the calipers. The old ones have rivets that hit the calipers. You won't be able to use original dog dish hub caps as the newer wheels won't have the clips to hold them on, but you can use 'full' wheel covers of your choice. My truck came with these: 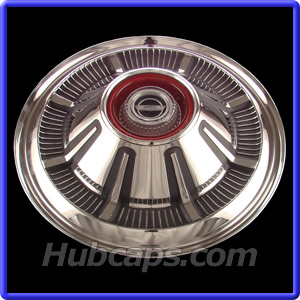 Or, as suggested, aluminum wheels from a newer truck with the same bolt pattern will also work and look nice.
Floor pans are available. Most of us aren't big fans of LMC and prefer Flashback F100s, Carolina Classics and Dennis Carpenter for parts that actually fit.
The clutch isn't difficult to do by pulling the trans. If you resurface the flywheel, you may find the linkage doesn't have quite enough adjustment and a hardware store modification to the pieces may be needed. Nothing difficult.
Steering rag joint is the first thing I'd check also. Linkage parts can wear, and a little visible slop can multiply to big slop as it travels up to the steering wheel.
Paint on the weatherstrip is not easy to clean up. The rubber is probably all old, so I'd plan on replacement, but this can be done over time.
Be sure to check the radiator support below the headlights for rust. Very common area. Reproductions are available and all reports say the quality is as good as original.
Or, as suggested, aluminum wheels from a newer truck with the same bolt pattern will also work and look nice. Floor pans are available. Most of us aren't big fans of LMC and prefer Flashback F100s, Carolina Classics and Dennis Carpenter for parts that actually fit.
The clutch isn't difficult to do by pulling the trans. If you resurface the flywheel, you may find the linkage doesn't have quite enough adjustment and a hardware store modification to the pieces may be needed. Nothing difficult.
Steering rag joint is the first thing I'd check also. Linkage parts can wear, and a little visible slop can multiply to big slop as it travels up to the steering wheel.
Paint on the weatherstrip is not easy to clean up. The rubber is probably all old, so I'd plan on replacement, but this can be done over time.
Be sure to check the radiator support below the headlights for rust. Very common area. Reproductions are available and all reports say the quality is as good as original.
#7
07-08-2013, 07:54 AM
Join Date: Jul 2013
Location: Ranger, GA
Posts: 34
Likes: 0
Received 0 Likes
on
0 Posts
Sorry for the lack of communication. My truck is a 1964 F100. It has the 223 with a 3 speed on the column. It is Wimbeldon white with blue interior but the original interior was red crush. I will restore it to the original interior. I will join the forums as a supporter today and post some pictures.
Trending Topics
#8
07-08-2013, 07:58 AM
Join Date: Jul 2013
Location: Ranger, GA
Posts: 34
Likes: 0
Received 0 Likes
on
0 Posts
Slightly newer steel wheels will clear the calipers. The old ones have rivets that hit the calipers. You won't be able to use original dog dish hub caps as the newer wheels won't have the clips to hold them on, but you can use 'full' wheel covers of your choice. My truck came with these: Or, as suggested, aluminum wheels from a newer truck with the same bolt pattern will also work and look nice.
Floor pans are available. Most of us aren't big fans of LMC and prefer Flashback F100s, Carolina Classics and Dennis Carpenter for parts that actually fit.
The clutch isn't difficult to do by pulling the trans. If you resurface the flywheel, you may find the linkage doesn't have quite enough adjustment and a hardware store modification to the pieces may be needed. Nothing difficult.
Steering rag joint is the first thing I'd check also. Linkage parts can wear, and a little visible slop can multiply to big slop as it travels up to the steering wheel.
Paint on the weatherstrip is not easy to clean up. The rubber is probably all old, so I'd plan on replacement, but this can be done over time.
Be sure to check the radiator support below the headlights for rust. Very common area. Reproductions are available and all reports say the quality is as good as original.
Or, as suggested, aluminum wheels from a newer truck with the same bolt pattern will also work and look nice. Floor pans are available. Most of us aren't big fans of LMC and prefer Flashback F100s, Carolina Classics and Dennis Carpenter for parts that actually fit.
The clutch isn't difficult to do by pulling the trans. If you resurface the flywheel, you may find the linkage doesn't have quite enough adjustment and a hardware store modification to the pieces may be needed. Nothing difficult.
Steering rag joint is the first thing I'd check also. Linkage parts can wear, and a little visible slop can multiply to big slop as it travels up to the steering wheel.
Paint on the weatherstrip is not easy to clean up. The rubber is probably all old, so I'd plan on replacement, but this can be done over time.
Be sure to check the radiator support below the headlights for rust. Very common area. Reproductions are available and all reports say the quality is as good as original.
I can't wait to dig in. First off, I need to find a good mechanic to work on my clutch and tranny. That is probably a little too technical for a novice.
#9
07-08-2013, 09:52 AM
Rag joint is simple to replace and is the likely culprit why your steering is loose. It is located on the end of the steering column where it connects to the steering box. If it is what I think it is, just go to a local parts store and you can pick up one for about $15. Anymore than that, and the price is wrong. Anything beyond that could be the steering box and or steering linkage.
Clutch is an afternoon job and is easy providing you have the tools and a good workspace.
Tools:
1/2" drive and sockets. Maybe a 3/8" set if you have tight quarters. Wrenches. Torque wrench, an old school beam one is probably fine. A floor jack with a trans pan if you cant benchpress the trans in and out by hand. Jack stands. Hammer, screwdrivers, etc. Other than a torque wrench and trans pan for jack, you might have all the tools needed.
To start with:
Get new pressure plate, clutch disk, throwout bearing, pilot bearing, lube for trans, gasket for inspection plate on trans and a couple of cans of Brake Clean. Also not a bad time to change your starter if you want or need to. Also check the U joints in the driveshaft while you have it apart as they may need replacement. May be a good time to change the fluids in the rear end as well.
You also will need to find out the torque numbers for flywheel and pressure plate as these are the most critical values.
To remove:
Block rear wheels. Jack up front of vehicle and put on jackstands. Drain transmission thru cheese cloth (more on this in a sec). Remove driveshaft. Remove or unhook clutch linkage. Remove starter. Remove or unhook shifter linkage. Put floor jack with transmission pan under transmission. Unbolt trans from engine. Pull off trans from rear (usually requires 4 letter words). Get trans out from under truck. Remove pressure plate and clutch disk. Remove flywheel for inspection and or resurfacing if it looks anything other than perfectly clean and smooth. Remove pilot bearing with puller, or if you dont have one, take a grease gun and fill the backside/inside of the pilot bearing with grease. Now take a round object that has the same diameter as the hole in the pilot bearing (normally a 1/2" drive extension or even the clutch disk alignment tool you get with a new clutch disk or even a piece of wood dowel) and place it in the hole and hit it once or twice with a hammer. This will pop out the pilot bearing.
Now that you have the trans out:
Take flywheel to machine shop to get resurfaced if needed. Remove clutch fork and throwout bearing. Remove inspection plate on trans. Check trans for any obvious signs of wear. Check bottom of trans case for large pieces of metal. Remember the cheesecloth? Take a look at it now for metal shavings. Some metal is to be expected, your looking for big pieces, size of pencil lead or bigger. If everything looks OK, flush trans with Brake Clean until clean. Replace gasket and close the trans up.
To reinstall:
Put the clutch fork and throwout bearing back on the trans. Make sure you lightly grease the shaft the throwout bearing rides on. Install new pilot bearing into flywheel. Install flywheel. Lightly(!) grease the pilot bearing. Install new clutch disk and pressure plate. Make sure you have the plastic guide with splines to get everything lined up. If you dont have the guide, you will not enjoy life. You can align the clutch plate by using 3/8" or 1/4" drive extension, but its a PITA. Roll trans back under truck on jack. Raise up and slide the trans into place. Providing the alignment on the trans to engine is correct, it should go back in with minimal 4 letter words. Once trans is in place, bolt it back up. Reinstall the trans linkage, clutch linkage, driveshaft, starter in any order. Fill the trans with the correct lube. Do not overfill. Grease your driveshaft. Lower vehicle down from jack stands.
Now that everything is back together, test the clutch. Does it feel like its working? You should be able to feel it working. Put trans in gear, and press clutch and check if the vehicle can be rolled, releasing clutch and you should stop. Now that the basic checks are done, put trans in neutral and start the vehicle. Check to see if you can shift into gear. Take vehicle for test drive. Done.
The moral of the story was not for me to write a book on how to change a clutch. The idea here is to foster a do it yourself attitude which in the long run will can save you alot of money in the end. You can take that money and put it into other things you want then. Too many guys restore a vehicle with nothing but a credit card. You have to know your limits. As an example, if you cant weld, dont drop $1k on a welder, and even if you can, its probably not worth the investment.
The rest of the stuff you may need to pay someone to do if your up to the task. I got my floor pans from Mac's, but I think Dennis Carpenter and BOTP have them in stock. The floor of the bed is probably screwed, and I would pull the bed liner ASAP to avoid anymore further damage to it. Bedliners will ruin a truck box. That repair you just have to see what you have, post some pics, and ask for advice.
Thats all I got. Ask questions. Alot of people around here are realy knowledgeable and will answer questions fairly quickly.
Last edited by C G B; 07-08-2013 at 10:01 AM. Reason: Because I had to fix a book!
#10
07-08-2013, 10:39 AM
Join Date: Jul 2013
Location: Ranger, GA
Posts: 34
Likes: 0
Received 0 Likes
on
0 Posts
Awesome walkthrough. Based on how you described it, I could absolutely do that. I have most every tool except for floor jacks and the transmission lift. Also, I don't have a torque wrench but all of that is not expensive and I do NOT need an excuse to buy tools....EVER!
Thanks and keep it coming!
Thanks and keep it coming!
#11
07-08-2013, 11:07 AM
This is what I was talking about:
http://www.summitracing.com/parts/tci-896500
Add in a cheap ratchet strap and maybe a couple of wood blocks and get it done.
Buying a full size trans lift is pretty pricey and you may only ever use it once.
As far as a floor jack, do yourself a favor and buy a slightly larger one. The small 2 1/4 ton jacks are not stable enough to lift a transmission as they are too narrow.
Craftsman 3 Ton Service Jack: Get the Lift You Need with Sears
This is an example, there are lots of different companies that make decent jacks.
Jack stands are easy. Pretty much anything like this:
Craftsman 3 Ton Professional Jack Stands: Find Tools Deals at Sears
Even buying a couple of tools, you will come in alot cheaper doing it yourself, than taking it to a shop.
#12
07-08-2013, 11:40 AM

Slightly newer (1973: first year for disc brakes for F100 2WD, 1976 for 4WD) steel wheels will clear the calipers. The old ones have rivets that hit the calipers.
You won't be able to use original "innie" dog dish hubcaps ("outies" will work) as the newer wheels won't have the clips to hold them on, but you can use 'full' wheel covers of your choice.
My truck came with these:
Or, as suggested, styled steel or aluminum wheels from a 1977/83 F100 - 1977/96 F150 - 1977/2014 E100/150 - 1978/96 Bronco with the 5 lug 5.50" bolt circle will also work and look nice.
"Innie" ~ So called because the hubcap snaps over tabs located on the inside of the wheels center section.
"Outie" ~ So called because the hubcap snaps over tabs located on the outside of the wheels center section.
--------------------------------------------------------------------------------------------------------------------------
Wheel cover is C6AZ-1130-G, has been reproduced. Optional: 1966 Galaxie, 1966/77 F100 2WD/4WD, 1975/77 F150 2WD/4WD. Standard equipment 1967/77 Bronco.
4WD front wheel cover, instead of emblem, has a red plastic ring to allow hub to poke thru.
-------------------------------------------------------------------------------------------------------
Styled steel/aluminum wheels introduced in 1977, have a plastic chrome or black hubcap (Ford: 'Ornament') that is retained to wheel with 3 screws & expandable anchors.
Bolt circle has 3 holes within to accept these parts. Nylon anchors with aluminum wheels, steel anchors with steel wheel. Both chrome and black screws were available.
Caveat Emptor ~ Let the buyer be aware. Some 1980/83 F100's have 4.50" bolt circle wheels.
Pic from 1973/79 car parts catalog (includes Bronco), 1973/79 truck catalog has no pics of wheels ~ Types 19 - 20 - 21 = E/F100/150 & Bronco.
Type 21: Painted white or yellow styled steel "wagon" wheel.
#13
07-08-2013, 02:44 PM
Join Date: Jul 2013
Location: Ranger, GA
Posts: 34
Likes: 0
Received 0 Likes
on
0 Posts
#14
07-08-2013, 04:47 PM
To remove:
Block rear wheels. Jack up front of vehicle and put on jackstands. Drain transmission thru cheese cloth (more on this in a sec). Remove driveshaft. Remove or unhook clutch linkage. Remove starter. Remove or unhook shifter linkage. Put floor jack with transmission pan under transmission. Unbolt trans from engine. Pull off trans from rear (usually requires 4 letter words). Get trans out from under truck. Remove pressure plate and clutch disk. Remove flywheel for inspection and or resurfacing if it looks anything other than perfectly clean and smooth. Remove pilot bearing with puller, or if you dont have one, take a grease gun and fill the backside/inside of the pilot bearing with grease. Now take a round object that has the same diameter as the hole in the pilot bearing (normally a 1/2" drive extension or even the clutch disk alignment tool you get with a new clutch disk or even a piece of wood dowel) and place it in the hole and hit it once or twice with a hammer. This will pop out the pilot bearing.
Also, I prefer these jack stands as the contact point is flat allowing me more choices for placement and have 4 of them.
Craftsman 2-1/4 ton Jack Stands, 2 pk. - Tools - Mechanics & Auto Tools - Lift Equipment & Jacks
#15
07-08-2013, 07:15 PM
TYPE 1 = 1961/66 F100 innie 9 1/2" dog dish (called a bottlecap), painted (Standard Cabs) and stainless (Custom Cabs/1965/66 Rangers), stainless reproduced.
TYPE 2 = 1965/66 F100 outie 10 1/4" dog dish, painted (Standard Cabs) and stainless (Custom Cabs/Rangers), stainless same as 1964 Galaxie. Obsolete, not reproduced.