


2011 F250 2" Leveling Kit PROBLEM
Thread Starter
|
Posting Guru
Joined: Jul 2011
Posts: 1,412
Likes: 1
From: Corpus Christi, TX
2011 F250 2" Leveling Kit PROBLEM
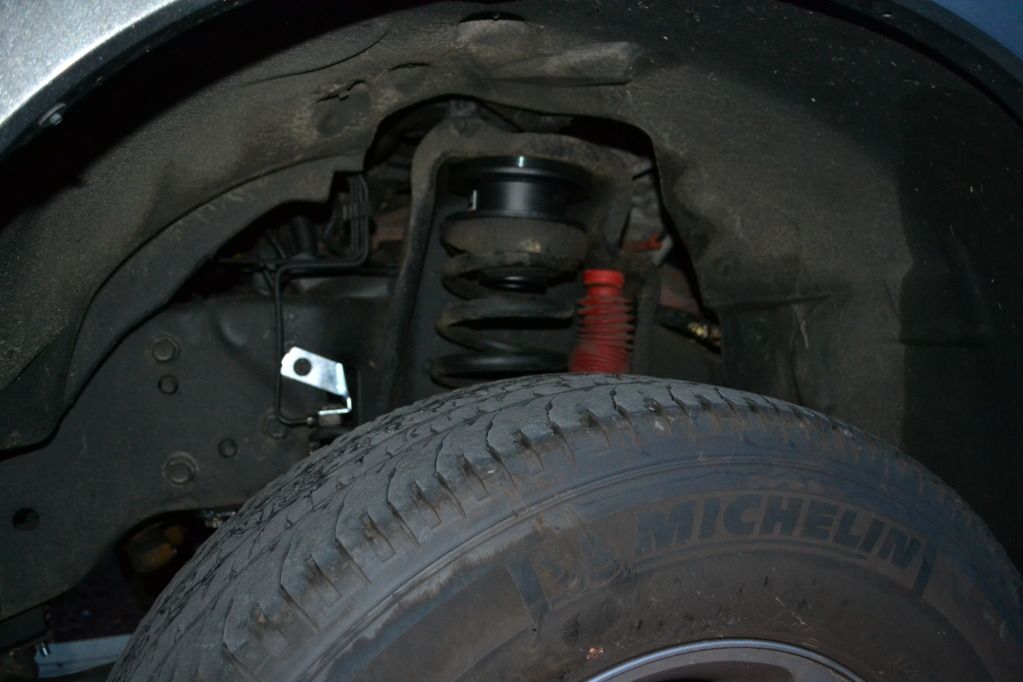
Hey everyone. I just had my 2" level installed yesterday and am having a strange issue. If you look at the picture it appears that it does not seat completely at the top of the sprint. I ordered these from Autospring Corporation, like several people have, and noticed it looks different that the ones I've seen on here. Mine looks just like the one on their website, but I've noticed that the one Epic installed looks like the Readylift spacer (equal size disks).
This is the kit: 2005-2013 FORD F-250/350/450 2 Leveling kit w/shock extensions [FD200S] - $117.95 : Auto Spring Corporation, Idaho's Largest Inventory of Auto and Truck Springs.
I contacted them via email and sent pictures. They say I need to go to a 2.5" spacer to fix this problem.
I'm confused and a little frustrated now.
I had the truck aligned and the caster reset and the truck drives perfectly. The assembly doesn't appear to be unstable at all.
Is this something that could cause some type of failure? If it's safe then I'm find with the gap. If not, then I need it replaced.
Please let me know what you guys think.
Thanks!


Oh, and here is a picture of the completed truck with new 295/65R20 Trail Grapplers

This is the kit: 2005-2013 FORD F-250/350/450 2 Leveling kit w/shock extensions [FD200S] - $117.95 : Auto Spring Corporation, Idaho's Largest Inventory of Auto and Truck Springs.
I contacted them via email and sent pictures. They say I need to go to a 2.5" spacer to fix this problem.
I'm confused and a little frustrated now.
I had the truck aligned and the caster reset and the truck drives perfectly. The assembly doesn't appear to be unstable at all.
Is this something that could cause some type of failure? If it's safe then I'm find with the gap. If not, then I need it replaced.
Please let me know what you guys think.
Thanks!
Oh, and here is a picture of the completed truck with new 295/65R20 Trail Grapplers
Fleet Owner


Joined: Mar 2012
Posts: 20,141
Likes: 15,901
From: Wisconsin
I can see why you would be frustrated with that. I wouldn't accept that either. I'd order the ready lift kit and be done. I haven't dealt with the company you mentioned, but I have used ready lift products on 6 different trucks now and have had GREAT results on all of them.
Junior User
Joined: Nov 2010
Posts: 88
Likes: 0
From: Hermitage, TN
Looks like the rubber spring spacer is installed backwards?? I think the taper would allow the spacer to sit flush if it were installed 180 degrees. I beleive that little flat point facing downwards on the rubber spacer sits against the flat part of the coil spring.(technical terms I know) lol! I can second Readylift's kits fit and function.
Thread Starter
|
Posting Guru
Joined: Jul 2011
Posts: 1,412
Likes: 1
From: Corpus Christi, TX
I checked several other installed. It looks like it is the same as mine in regards to the rubber sprint spacer.
The problem appears to be that the top sprint mount (where the spring rests around at the top) is too long for the spacer and is hitting the inside of the spacer (the bottom ring). It's so strange that nobody else seems to have this problem with the 2" kit and the seller is telling me that I need a 2.5" kit to fix the problem.
The problem appears to be that the top sprint mount (where the spring rests around at the top) is too long for the spacer and is hitting the inside of the spacer (the bottom ring). It's so strange that nobody else seems to have this problem with the 2" kit and the seller is telling me that I need a 2.5" kit to fix the problem.
Lead Driver


Joined: Apr 2011
Posts: 7,302
Likes: 1,153
From: Edmonton Alberta

I checked several other installed. It looks like it is the same as mine in regards to the rubber sprint spacer.
The problem appears to be that the top sprint mount (where the spring rests around at the top) is too long for the spacer and is hitting the inside of the spacer (the bottom ring). It's so strange that nobody else seems to have this problem with the 2" kit and the seller is telling me that I need a 2.5" kit to fix the problem.
The problem appears to be that the top sprint mount (where the spring rests around at the top) is too long for the spacer and is hitting the inside of the spacer (the bottom ring). It's so strange that nobody else seems to have this problem with the 2" kit and the seller is telling me that I need a 2.5" kit to fix the problem.
You would think they would have caught that.....
I guess you could just trim the bottom ring but it's a little late now

Trending Topics
Thread Starter
|
Posting Guru
Joined: Jul 2011
Posts: 1,412
Likes: 1
From: Corpus Christi, TX
The shop says I shouldn't have any problems since everything is the load bearing portion of the metal is the same 1/4" piece at the bottom. I'm still worried. I'm going to try and have them send me the 2.5" spacer instead. perhaps that will fix my problem.
FTE Stories
Ford Trucks for Ford Truck Enthusiasts

Top 10 Most Expensive Ford Trucks Ever Sold on Bring a Trailer
Joe Kucinski
2027 Ford Super Duty Buyer's Guide (Every Model, Engine, & Package)
Brett Foote
Top 10 Ford Truck Tragedies
Joe Kucinski
AEV FXL Super Duty - the Super Duty Raptor Ford Doesn't Make
Brett Foote
Lobo Vs Lobo: Proof the F-150 Lobo Should Be Even Lower!
Michael S. Palmer
Ford's 2001 Explorer Sportsman Concept Looks For a New Home
Verdad Gallardo
10 Best Ford Truck Engines We Miss the Most!
Joe Kucinski
2026 Shelby F-150 Off-Road: Better Than a Raptor R?
Brett Foote
2027 Super Duty Carhartt Package First Look: 12 Things You NEED to Know!
Michael S. PalmerThread Starter
|
Posting Guru
Joined: Jul 2011
Posts: 1,412
Likes: 1
From: Corpus Christi, TX
4Wheelsparts

Lead Driver
Joined: Aug 2004
Posts: 5,326
Likes: 18
From: Gilbert
I would not be driving it sitting like that. And honestly, screw 4wheelparts for telling you you "shouldn't" have any problems (easy for them to say when they're not driving it). It's not right, load bearing or not, you hit a bump just the right way, who knows what'll happen. My 2.5" kit from Readylift certainly doesn't sit like that.
I don't see how the 2.5" kit is going to help any but good luck, keep us posted.
EDIT - Looking at my spacers, it looks like my springs are spun around a little bit differently than yours. I don't recall having to do that during the install but that spacer may be tapered as mentioned. Looking online at ReadyLifts instructions, there's a step to make sure the spring butts up against the spring index on the bottom, wonder if 4WP did that during the install. Anyways, here's a pic of mine:
Thread Starter
|
Posting Guru
Joined: Jul 2011
Posts: 1,412
Likes: 1
From: Corpus Christi, TX
Do you have the heavy service front suspension on your package? I'm told that might be the reason mine looks different. I do have it. If you do, then I'm agreeing with you that the sprint might be mounting at the wrong perspective.
Lead Driver
Joined: Aug 2004
Posts: 5,326
Likes: 18
From: Gilbert
10chars

Senior User
Joined: Jul 2012
Posts: 115
Likes: 0
OP, can you post any pics of the bottom of the spring?
If its not aligned properly on the bottom this can happen too. The top rubber piece actually looks correct to me in relation to the spring. I agree that looks totally incorrect, as that spacer should be flush with the top spring mount.
I did my own 2" leveling kit on my 350, but I used spacers on the bottom that elevated the spring support 2" up...