Stump the Dummy - topic Bed Wood Install
#1
Join Date: Jul 1997
Location: Beautiful Hueytown Alabam
Posts: 5,668
Received 727 Likes
on
259 Posts
Stump the Dummy - topic Bed Wood Install
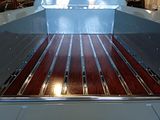
I've mocked up a temporary working frame so I can mock up the bed wood while the frame is being reprepped for paint. Rails are same 34" wide and I've set up the bed over them. The front and rear cross member are sitting on the frame and the middle two are installed with 3/4" spacers. The bed is square within 1/32" and level. I see no reason why I can't start the first cut/fit on the bed wood using this frame.... anyone see any obstacles I don't see ??? Of course the bed will have to be plumbed and squared on the rear frame at install time and it won't be this close cause the frame ain't. Shims and pads !!!
After we all agree on my plan I need some instruction on the path to take and the pitfalls awaiting me...
thanks
J
After we all agree on my plan I need some instruction on the path to take and the pitfalls awaiting me...
thanks
J
#3
#6
#7
Trending Topics
#8
Join Date: Jul 1997
Location: Beautiful Hueytown Alabam
Posts: 5,668
Received 727 Likes
on
259 Posts
Dan,
I've got some oak I bought at mid-50 about 15 years ago... so it's aged
still bound up in the original box... gonna pull it out tomorrow and see how it looks...
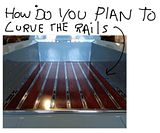
gotta think on the side rails some... might just trim them to match the curve of the wheel tubs...
Chris.... guess stock is the word.... gonna be light oak with lots of clear for depth... plain wood with SS strips and bolts... nothing custom or fancy, just a little SS bling.
right now I lusting for one of those trick Pro Picks Tonneau covers... but at 1700bucks... lust is the best I can do... might talk to a tin bender around here and see if he can form the top and me make the frame... lots of time to work on that...
later
john
I've got some oak I bought at mid-50 about 15 years ago... so it's aged

still bound up in the original box... gonna pull it out tomorrow and see how it looks...
gotta think on the side rails some... might just trim them to match the curve of the wheel tubs...
Chris.... guess stock is the word.... gonna be light oak with lots of clear for depth... plain wood with SS strips and bolts... nothing custom or fancy, just a little SS bling.
right now I lusting for one of those trick Pro Picks Tonneau covers... but at 1700bucks... lust is the best I can do... might talk to a tin bender around here and see if he can form the top and me make the frame... lots of time to work on that...
later
john

#13
Start from centre
John;
Hind sight being 20/20 I would mark centre of box ; layout all boards , determine what spacing will be with metal inserts , then start at outside edges and start laying in. Does Mar-K have a tutorial on-line ?
http://www.mar-k.com/Catalog/PDF/Ins...ood_Boards.pdf
Tom
Hind sight being 20/20 I would mark centre of box ; layout all boards , determine what spacing will be with metal inserts , then start at outside edges and start laying in. Does Mar-K have a tutorial on-line ?
http://www.mar-k.com/Catalog/PDF/Ins...ood_Boards.pdf
Tom
#14
John, I see no flaw in your logic. The bolting in of the boards isn't the hard part though. I found the 7 coats of spar varnish was the most time consuming and labor intensive. Apparently, they suggest that you put the same amount of varnish on all side of the wood to prevent the wood from warping.  I had to go 7 coats because my wife kept giving tours to friends and neighbors and the dust they stirred up kept ruining my perfect finish.
 Just a wood to the wise: don't fill up the little grooves in the wood with too much varnish. The SS rail edges need those groves fairly open to seat properly.
 Why am I bringing this up? How could I possibly know that this problem could arise?
 Don't ask.
Good luck, JAG

 I had to go 7 coats because my wife kept giving tours to friends and neighbors and the dust they stirred up kept ruining my perfect finish.
 Just a wood to the wise: don't fill up the little grooves in the wood with too much varnish. The SS rail edges need those groves fairly open to seat properly.
 Why am I bringing this up? How could I possibly know that this problem could arise?
 Don't ask.
 Good luck, JAG

#15
Join Date: Jul 1997
Location: Beautiful Hueytown Alabam
Posts: 5,668
Received 727 Likes
on
259 Posts
first fit..... lesson #1 don't read the instructions... especially reading two sets of instructions. none of them agree on gap or procedure... so here is my take...
board spacing worked out to 7/16" with 1-3/4" groove width... 1-1/2" strips and about 1/8" on each side of strip +/-.
tried several different board gaps using bolts for spacers till I landed on 7/16...this seems to do best... critique is appreciated
j
board spacing worked out to 7/16" with 1-3/4" groove width... 1-1/2" strips and about 1/8" on each side of strip +/-.
tried several different board gaps using bolts for spacers till I landed on 7/16...this seems to do best... critique is appreciated
j


