


Big Block 460 Emissions Removal
Thread Starter
|
Senior User
Joined: Jan 2012
Posts: 472
Likes: 5
From: Somewhere in the universe
Big Block 460 Emissions Removal
I have a bone stock 1985 F250 with a 460, c6, and Dana 60. I'm going to remove all emissions taking this 460 down to bare bones, however I do plan on keeping the PCV, and EGR systems. Try to stay with me. I'm not good on computers and even though I was a Ford mechanic from the late Nineties into the early two thousands, I'm not to familiar with these older ones. I'll do my best. This is going to be the start of a frame off resto. I'm taking this summer to make sure the drivetrain is bulletproof before its pulled because it will not be rebuilt. Just cleaned up when it's out.
So here we go..........
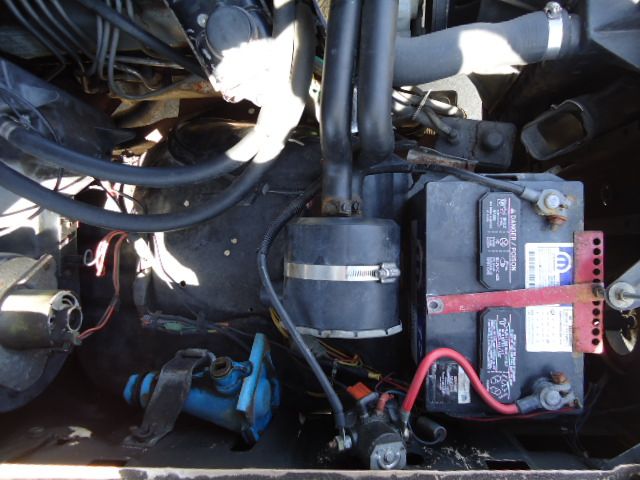
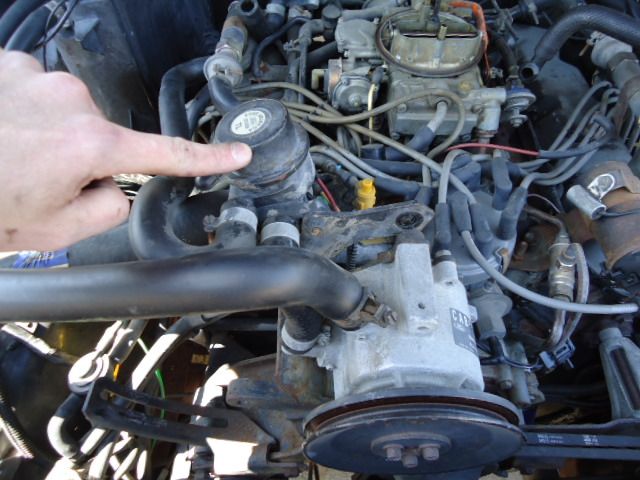
I decided to start with this canister.
It's mounted to the passenger side fender well with Three studs running through to the underside of the well.
I used a 7/16 socket to remove these bolts. In the pick I left the nuts loose on the studs so you can see which ones they are.
For those of you that are trying to sacrifice these parts like I am, be carefull to not snap these studs as time has taken a toll on the hardware. You can see I snapped one. Guess I should have worked the nut back and forth a little more.
Anyway........ Moving on........
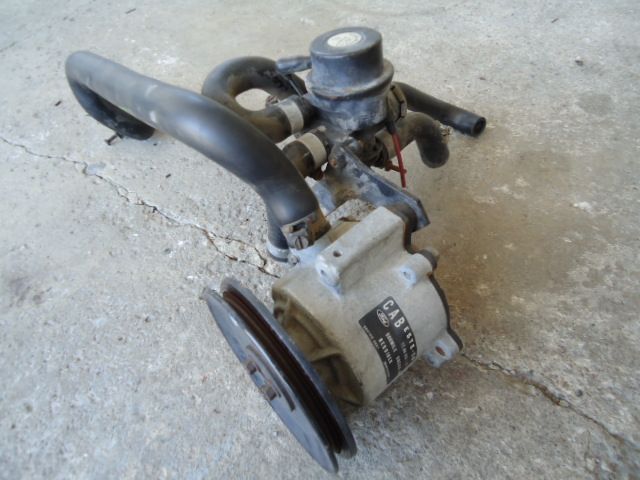
The air pumps were next.
After taking the belt off by removing the 9/16 adjustment bolt on the left lower side of the left air pump, there is one more longer 9/16 bolt in the rear of the same pump to remove. I then removed the hose that runs between this pump and the canister that I unbolted from the passenger inner fender well. To loosen the hose clamps, I used a 5/16 socket.
I could now remove the pump completely.
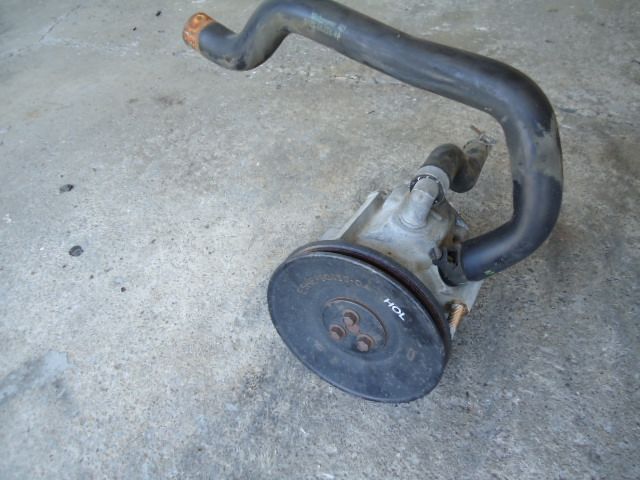
For the removal of the right side pump, you have to remove the pulley by removing the Three 10mm bolts. Then it's straight forward just like the last one.
I chose to leave this assemble mounted to the pump during removal. I traced the hoses back to what they were connected to, loosened the hose clamps, and disconnected the hoses there. This pump was now ready to be completely removed from the truck.
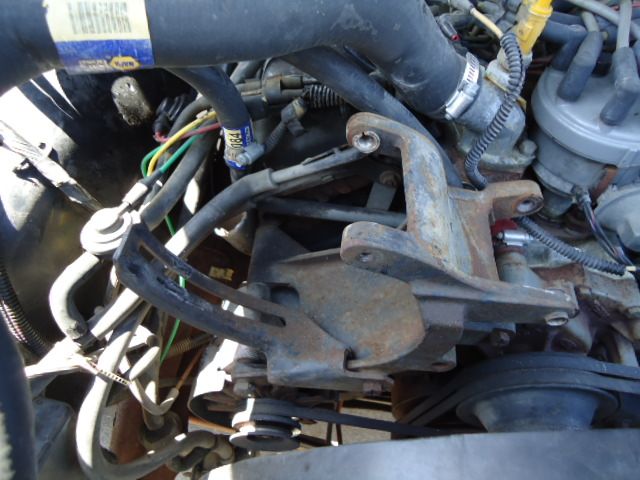
This is what's left after the pumps are removed. That's one heck of a bracket!
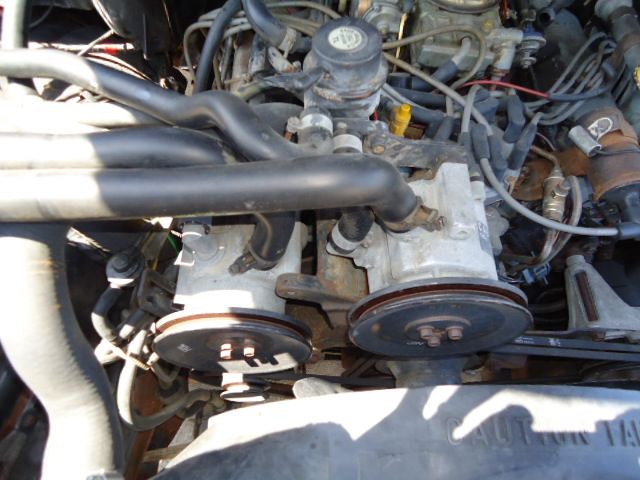
This mount also serves as an Alternator mount. I'm going to remove this mount and take the plasma to it cutting most of the material off except for what's going to serve as spacers for the alt just so I know that it will align perfectly with the other pullies. Here it is removed.....
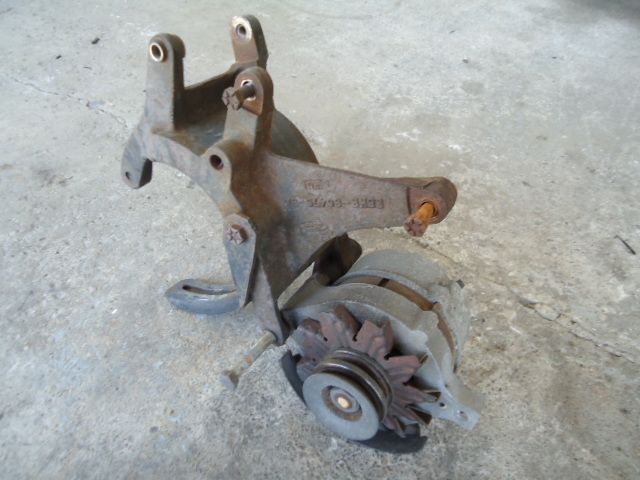
Ones again I left the mounting bolts in so we can see the location.
You can see with the Two bolts in the top ears of the mounting bracket that the top right threads into the top of the water pump on the opposite side of the crossover hose.
The left one threads directly into the passenger side head in the top left corner of my pic.
And the long bolt in the middle threads through the Alt, and through the water pump into the block to hold it in place on the block. I used a 9/16 socket to remove the bracket hardware and 11mm to remove the electrical from the back of the Alt.
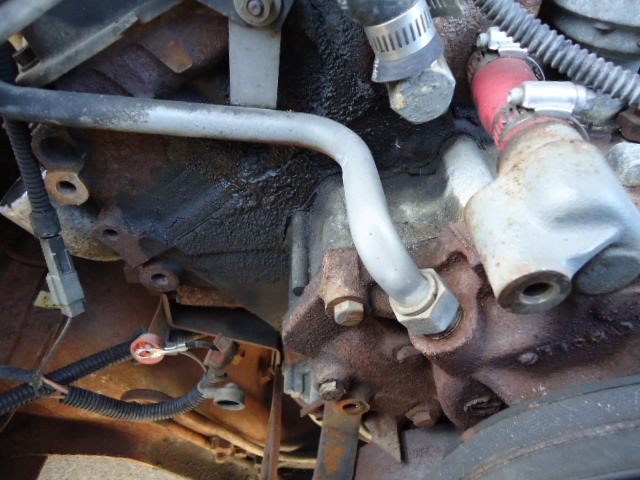
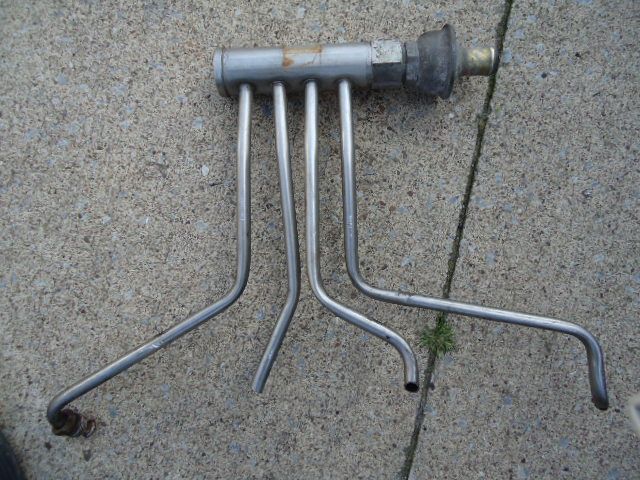
The next thing I did was move onto the plumbing that transports the air into the exhaust manifolds. Keep in mind, knowing that I was going to be doing this job, a couple weeks ago, literally every day, driving it or not, I'd spray the bolts down with PB Blaster. EVERY DAY! As much as I wanted to salvage these I was unable to do so. It was impossible to get a good enough grip on these with the open end of a wrench without rounding them. So I cut right above the nut, bent the tube above my cut out of the way enough to get the box end on them. Surprisingly I got no hard time out of these. They broke free fairly easily. After that, I removed the rubber air hose from what looks like an equalizer, or collector and removed them completely from the vehicle. I used the same process on both sides of the engine.
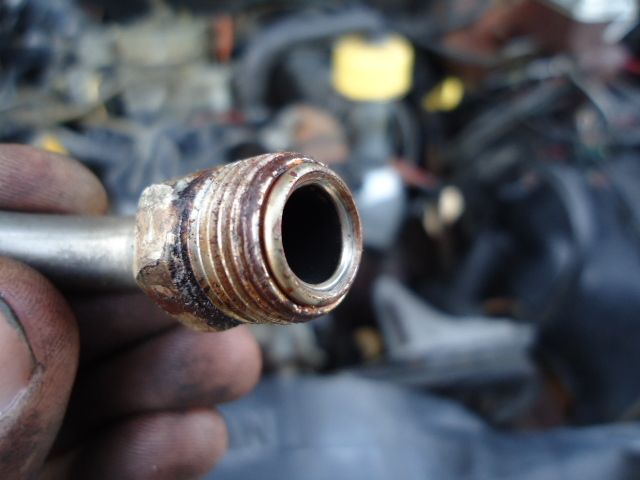
It looks like we're dealing with 5/8 inverted flares here. I'll find out the thread pitch and get some plugs ordered up. I know I won't be able to find these in the local parts store. I'll check tomorrow on the plugs and hopefully get my Alt bracket cut.
This is all I got done for the day. Weather prohibiting ill be back at it tomorrow.
I'll probably have some questions for you guys being that I've never done this before. There is a lot of crap under there!!!
Comments are welcome, and I'd love to hear suggestions.
Until tomorrow then.
So here we go..........

I decided to start with this canister.
It's mounted to the passenger side fender well with Three studs running through to the underside of the well.

I used a 7/16 socket to remove these bolts. In the pick I left the nuts loose on the studs so you can see which ones they are.
For those of you that are trying to sacrifice these parts like I am, be carefull to not snap these studs as time has taken a toll on the hardware. You can see I snapped one. Guess I should have worked the nut back and forth a little more.
Anyway........ Moving on........
The air pumps were next.

After taking the belt off by removing the 9/16 adjustment bolt on the left lower side of the left air pump, there is one more longer 9/16 bolt in the rear of the same pump to remove. I then removed the hose that runs between this pump and the canister that I unbolted from the passenger inner fender well. To loosen the hose clamps, I used a 5/16 socket.

I could now remove the pump completely.
For the removal of the right side pump, you have to remove the pulley by removing the Three 10mm bolts. Then it's straight forward just like the last one.

I chose to leave this assemble mounted to the pump during removal. I traced the hoses back to what they were connected to, loosened the hose clamps, and disconnected the hoses there. This pump was now ready to be completely removed from the truck.


This is what's left after the pumps are removed. That's one heck of a bracket!
This mount also serves as an Alternator mount. I'm going to remove this mount and take the plasma to it cutting most of the material off except for what's going to serve as spacers for the alt just so I know that it will align perfectly with the other pullies. Here it is removed.....

Ones again I left the mounting bolts in so we can see the location.

You can see with the Two bolts in the top ears of the mounting bracket that the top right threads into the top of the water pump on the opposite side of the crossover hose.
The left one threads directly into the passenger side head in the top left corner of my pic.
And the long bolt in the middle threads through the Alt, and through the water pump into the block to hold it in place on the block. I used a 9/16 socket to remove the bracket hardware and 11mm to remove the electrical from the back of the Alt.
The next thing I did was move onto the plumbing that transports the air into the exhaust manifolds. Keep in mind, knowing that I was going to be doing this job, a couple weeks ago, literally every day, driving it or not, I'd spray the bolts down with PB Blaster. EVERY DAY! As much as I wanted to salvage these I was unable to do so. It was impossible to get a good enough grip on these with the open end of a wrench without rounding them. So I cut right above the nut, bent the tube above my cut out of the way enough to get the box end on them. Surprisingly I got no hard time out of these. They broke free fairly easily. After that, I removed the rubber air hose from what looks like an equalizer, or collector and removed them completely from the vehicle. I used the same process on both sides of the engine.


It looks like we're dealing with 5/8 inverted flares here. I'll find out the thread pitch and get some plugs ordered up. I know I won't be able to find these in the local parts store. I'll check tomorrow on the plugs and hopefully get my Alt bracket cut.
This is all I got done for the day. Weather prohibiting ill be back at it tomorrow.
I'll probably have some questions for you guys being that I've never done this before. There is a lot of crap under there!!!
Comments are welcome, and I'd love to hear suggestions.
Until tomorrow then.
Thread Starter
|
Senior User
Joined: Jan 2012
Posts: 472
Likes: 5
From: Somewhere in the universe
Am I posting these picture correctly? I started a photobucket account, I go to the pictures in the library, copy the URL from the top search bar, then paste on this forum correct?

Super Moderator


Joined: Apr 2004
Posts: 34,499
Likes: 2,811

You should keep your evap system in place, otherwise you could have gas fumes venting in the engine compartment. If it is intact, it's a tidy way to prevent evaporation and fuel contamination compared to an open vent.
Thread Starter
|
Senior User
Joined: Jan 2012
Posts: 472
Likes: 5
From: Somewhere in the universe


Senior User
Joined: Jan 2013
Posts: 112
Likes: 0
From: Lancaster County, PA
The way to get the pictures to show up in the forum is when you're on the picture you want to insert (on the forum) in photobucket, copy the "Direct Link" that's found to the right of the page on image links, and then, when you're back on the FTE forums, hit the "Insert Image" button, and paste what you copied earlier. Atleast that's the way I do it.
Thread Starter
|
Senior User
Joined: Jan 2012
Posts: 472
Likes: 5
From: Somewhere in the universe
I'm keeping everything stock on this motor until it needs a rebuild down the road. Even after the resto. Though I have been thinking about bolt on's like carb, intake, MAYBE a mild cam, and heads. Not sure yet. Being that the drivetrain doesn't have that many miles on it, and runs flawlessly, I'd like to focus all money on everything else.
Trending Topics
Super Moderator
Joined: Apr 2004
Posts: 34,499
Likes: 2,811
Gas fumes and a spark = not such good memories.
Unlikely you'd have that happen, but it would be nice to make sure it doesn't.
Unlikely you'd have that happen, but it would be nice to make sure it doesn't.
FTE Stories
Ford Trucks for Ford Truck Enthusiasts

10 Things Every Truck Owner NEEDS (2026 Edition)
Michael S. Palmer
Rezvani's Latest Post-Apocalyptic Monster Is a Ford F-150 Raptor Underneath
Verdad Gallardo
Top 10 Most Expensive Ford Trucks Ever Sold on Bring a Trailer
Joe Kucinski
2027 Ford Super Duty Buyer's Guide (Every Model, Engine, & Package)
Brett Foote
Top 10 Ford Truck Tragedies
Joe Kucinski
AEV FXL Super Duty - the Super Duty Raptor Ford Doesn't Make
Brett Foote
Lobo Vs Lobo: Proof the F-150 Lobo Should Be Even Lower!
Michael S. Palmer
Ford's 2001 Explorer Sportsman Concept Looks For a New Home
Verdad Gallardo
10 Best Ford Truck Engines We Miss the Most!
Joe Kucinski
Super Moderator
Joined: Apr 2004
Posts: 34,499
Likes: 2,811
Yea, if it's damaged or otherwise fubar'd, just rig up your vents to be at the back of the vehicle. Rollover protection would be fairly easy to adapt, if you are in the habit of rolling your vehicles regularly. 
Thread Starter
|
Senior User
Joined: Jan 2012
Posts: 472
Likes: 5
From: Somewhere in the universe

Thread Starter
|
Senior User
Joined: Jan 2012
Posts: 472
Likes: 5
From: Somewhere in the universe
So it looks like I'm not gonna be working on the truck today. My sons sick so........ Looked around last night for some Double Inverted Flare Plugs for the Exhaust Manifolds. No luck, but I was talking to a guy from Fastenal. Said he should have something to plug those holes up the right way. So it could be a couple of days for those. I also didn't cut the Air/Alt bracket yet. Hopefully tomorrow, but today my son owns daddy 
Old School Hot Rodder


Joined: Feb 2006
Posts: 6,472
Likes: 11
From: Exmore, VA

If you simply remove the vent lines at the tanks, then they will vent under the truck. On the exhaust air tubes, if you can get the fittings out of the manifolds, they are a tapered pipe thread. There is also a pipe across the rear of the heads that the air system feeds into. If you simply remove the air check valve from it and either cap or plug the tube you will be OK on that one.
EGR, mine had a BB installed in the vacuum line from shortly after I bought it. Leave the thermal valve in the spark advance though.
EGR, mine had a BB installed in the vacuum line from shortly after I bought it. Leave the thermal valve in the spark advance though.


Super Moderator
Joined: Apr 2004
Posts: 34,499
Likes: 2,811
If you simply remove the vent lines at the tanks, then they will vent under the truck. On the exhaust air tubes, if you can get the fittings out of the manifolds, they are a tapered pipe thread. There is also a pipe across the rear of the heads that the air system feeds into. If you simply remove the air check valve from it and either cap or plug the tube you will be OK on that one.
EGR, mine had a BB installed in the vacuum line from shortly after I bought it. Leave the thermal valve in the spark advance though.
EGR, mine had a BB installed in the vacuum line from shortly after I bought it. Leave the thermal valve in the spark advance though.
Ford had a few cars blow up when evaps first were intro'd. A few people fueled up in a cold weather area and drove south, into a hot day. More fumes and liquid than the system could handle. Poof! Like I said, probably won't happen, but have you ever been involved in a gasoline fire?