


Manifold Stud Removal for dummies
Thread Starter
|
Postmaster
Joined: Aug 2012
Posts: 2,737
Likes: 23
From: Westfield, Indiana
Manifold Stud Removal for dummies
This is a walk through on my 2000 Ford Excursion, removing the manifold and stud extractions in preparation for the installation of Banks Headers and Exhaust.
Part 2 - installation of the headers and exhaust https://www.ford-trucks.com/forums/1...r-dummies.html
1. First thing I did was remove my wheel well liners for better clearance. There are several bolts and clips that need to be removed and honestly it's kind of a PITA but absolutely necessary to get the clearance you need. There a 5 small bolts with large washers that hold the liner around the edge.

2. There are 3 bolts that hold the vacuum canister above (those gave me grief) and ended up breaking the canister and having to install a new one. You can see the 3 bolts in this photo soaking in fluid film.
3. Then you have several wires to unclip and one small bolt that is very tight under the edge of the running board. Took a pry bar to get enough clearance to get that one out. Once the liners were out, shocks and mounts were up next. You can see how much they restrict your access so off they went.

4. Now I have a clean view of all my studs, which I had 5 already broken. I made the decision to cut all the remaining nuts off and take my chances with a stud extractor rather than trying to wrench on any of the rusted studs.

5. There was no removing my up pipes at the flanges they were frozen with rust, so to make it possible to remove my manifolds once I had the nuts cut off - I pre cut down the up pipes using my power dremel with HD metal discs.

6. I got 14 of 15 nut cut by using my dremel with a right angle attachment or the flexible wand attachment. I went through about 25 cutting wheels. The second from front on the bottom (driver's side) I could not reach from any location and get the dremel at the proper angle to cut the nut, but the only location I could actually see the bolt was from under the truck. So I got out my Scope Camera and fastened it under the truck up to my laptop and laid across the engine and cut that one off blind but watching what I was doing on the laptop screen - the second picture below is taken with the scope camera.


6. Now I have 20 studs to extract. I stuffed some rags up into the exhaust ports to protect them from carnage and started soaking all the bolts with Fluid Film


7. Then used a Titan Stud Extractor and was able to pull 15 studs out with just the extractor and a 1/2" ratchet. On one it broke the stud about 3 threads deep in to the head. Smacking Head against fender!!


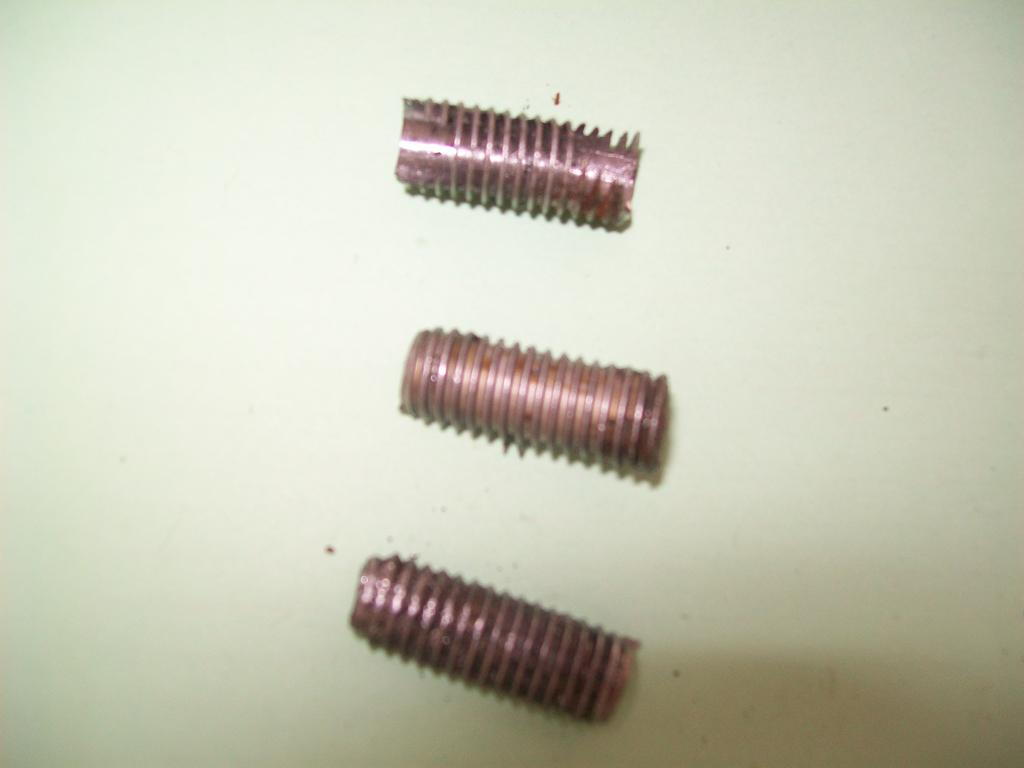
8. So now I have 5 studs remaining.
4 on drivers side
1st upper (this is full length)
1st lower (this is broken 3 threads out of the head)
5th upper (this is full length)
5th lower (this is the one broken down into the head)
1 on passener side
2nd lower (this is broken 3 threads out of the head)
Decide to tackle the in head stud on the driver's side first. Several attempts to drill a pilot hole and quickly realize staying on center is impossible. So took an old stud cut it down the right length and drilled a straight hole all the way through it. Then screwed it into the threads above the broken stud. Then drilled through that hole making a deep pilot hole using 1/8th bit, then drilled it again with a 5/32 bit. Then used a Grabbit Easy out and that one slide right out.

I'm holding the homeade centering bit in this picture

9. So....I think this won't be too hard. The others are all exposed so we can weld bolts on and just pull them out. Spent two days welding and watching the welds break before the stud have even a wiggle. So decided to go back to drilling pilot holes. So now I'm back to "how to center the drill problem" This time I took my homeade centering bit and screwed it into a nut then screwed that nut onto the stud and drilled centered pilot holes in all the studs.

10. Once I had them deep enough I decided to give the easy out another try (this was my biggest mistake and ended up adding 11 days and hundreds of dollars to my project). The easy out broke on the second turn. It took over $200 in diamond head dremel bits to drill it all out, those suckers are REALLY hard!
That idea abandoned I turned to drilling them out completely. This entailed starting at 1/8th COLBAT only bits and moving up 1 size at time until you get to 1/4". It is critically important that you start drilling straight. You need a right angle drill and a right angle dremel with a wand attachment, its much easier to do the pilot holes with the dremel then move the full sized RA drill.

11. To set the depth of the bits I stuck one down in an empty hole and marked the depth, then backed out how much stud was exposed for each one less 1/8' because there is a dead space above the stud. I did this for every single drill bit, I went through a total of 48 colbat drill bits over the 6 days of drilling. And finally removed the remaining 4 studs. About every 3rd bit I would use a reverse COLBAT bit and hope to get lucky and have it spin it out, but no love there. I ended up having to pic them out by hand once the majority of the metal was gone.
12. Why only 3 studs - when I said I drilled out 4? Well because by the time I got to #4 a week later, I was so darn good at it that I was able to drill it dead on straight, when I got to 1/4" I picked out the bottom flat part (where the flange part of the stud sits) took a look with my pen light to see where I need to start picking the rest out and realize the entire stud is gone and all that remains are perfect threads. I took a new bolt and it threaded right in.....wow finally some good luck.
Time to clean up the heads, test thread all 20 new bolts and then onto the torque tube install that will follow in another thread.
Part 2 - installation of the headers and exhaust https://www.ford-trucks.com/forums/1...r-dummies.html
1. First thing I did was remove my wheel well liners for better clearance. There are several bolts and clips that need to be removed and honestly it's kind of a PITA but absolutely necessary to get the clearance you need. There a 5 small bolts with large washers that hold the liner around the edge.
2. There are 3 bolts that hold the vacuum canister above (those gave me grief) and ended up breaking the canister and having to install a new one. You can see the 3 bolts in this photo soaking in fluid film.
3. Then you have several wires to unclip and one small bolt that is very tight under the edge of the running board. Took a pry bar to get enough clearance to get that one out. Once the liners were out, shocks and mounts were up next. You can see how much they restrict your access so off they went.
4. Now I have a clean view of all my studs, which I had 5 already broken. I made the decision to cut all the remaining nuts off and take my chances with a stud extractor rather than trying to wrench on any of the rusted studs.
5. There was no removing my up pipes at the flanges they were frozen with rust, so to make it possible to remove my manifolds once I had the nuts cut off - I pre cut down the up pipes using my power dremel with HD metal discs.
6. I got 14 of 15 nut cut by using my dremel with a right angle attachment or the flexible wand attachment. I went through about 25 cutting wheels. The second from front on the bottom (driver's side) I could not reach from any location and get the dremel at the proper angle to cut the nut, but the only location I could actually see the bolt was from under the truck. So I got out my Scope Camera and fastened it under the truck up to my laptop and laid across the engine and cut that one off blind but watching what I was doing on the laptop screen - the second picture below is taken with the scope camera.
6. Now I have 20 studs to extract. I stuffed some rags up into the exhaust ports to protect them from carnage and started soaking all the bolts with Fluid Film
7. Then used a Titan Stud Extractor and was able to pull 15 studs out with just the extractor and a 1/2" ratchet. On one it broke the stud about 3 threads deep in to the head. Smacking Head against fender!!
8. So now I have 5 studs remaining.
4 on drivers side
1st upper (this is full length)
1st lower (this is broken 3 threads out of the head)
5th upper (this is full length)
5th lower (this is the one broken down into the head)
1 on passener side
2nd lower (this is broken 3 threads out of the head)
Decide to tackle the in head stud on the driver's side first. Several attempts to drill a pilot hole and quickly realize staying on center is impossible. So took an old stud cut it down the right length and drilled a straight hole all the way through it. Then screwed it into the threads above the broken stud. Then drilled through that hole making a deep pilot hole using 1/8th bit, then drilled it again with a 5/32 bit. Then used a Grabbit Easy out and that one slide right out.
I'm holding the homeade centering bit in this picture
9. So....I think this won't be too hard. The others are all exposed so we can weld bolts on and just pull them out. Spent two days welding and watching the welds break before the stud have even a wiggle. So decided to go back to drilling pilot holes. So now I'm back to "how to center the drill problem" This time I took my homeade centering bit and screwed it into a nut then screwed that nut onto the stud and drilled centered pilot holes in all the studs.
10. Once I had them deep enough I decided to give the easy out another try (this was my biggest mistake and ended up adding 11 days and hundreds of dollars to my project). The easy out broke on the second turn. It took over $200 in diamond head dremel bits to drill it all out, those suckers are REALLY hard!
That idea abandoned I turned to drilling them out completely. This entailed starting at 1/8th COLBAT only bits and moving up 1 size at time until you get to 1/4". It is critically important that you start drilling straight. You need a right angle drill and a right angle dremel with a wand attachment, its much easier to do the pilot holes with the dremel then move the full sized RA drill.
11. To set the depth of the bits I stuck one down in an empty hole and marked the depth, then backed out how much stud was exposed for each one less 1/8' because there is a dead space above the stud. I did this for every single drill bit, I went through a total of 48 colbat drill bits over the 6 days of drilling. And finally removed the remaining 4 studs. About every 3rd bit I would use a reverse COLBAT bit and hope to get lucky and have it spin it out, but no love there. I ended up having to pic them out by hand once the majority of the metal was gone.
12. Why only 3 studs - when I said I drilled out 4? Well because by the time I got to #4 a week later, I was so darn good at it that I was able to drill it dead on straight, when I got to 1/4" I picked out the bottom flat part (where the flange part of the stud sits) took a look with my pen light to see where I need to start picking the rest out and realize the entire stud is gone and all that remains are perfect threads. I took a new bolt and it threaded right in.....wow finally some good luck.
Time to clean up the heads, test thread all 20 new bolts and then onto the torque tube install that will follow in another thread.
Thread Starter
|
Postmaster
Joined: Aug 2012
Posts: 2,737
Likes: 23
From: Westfield, Indiana
Then I have to pull my front hubs again and put my dust shields back on -----OOOPS
 and I even sanded and painted them and go and forget to put them back on. Oh well, need to check my driver's side caliper anyway getting a rub, rub sound when coming to a full stop.
 Thanks again for all the support and help from FTE, this was a solo project with a few family members pitching in to help, but the brotherhood at FTE is really what got me through.
Moderator


Joined: Jul 2010
Posts: 12,052
Likes: 1,550
From: Media PA

I went on vacation and was internet free for a week and when I came back you were still finishing up your stud battle, Holy Cow! Your saga makes me realize how lucky I was to only have to fight one broken stud on mine, and that one wasn't too bad, 3 drillings and it popped right out with an Easy-Out.
I hear you on how hard those Easy-Outs are, same as taps. I broke a big tap off in a seatbelt bolt hole on an older Chevy, drilling didn't even make a mark. Ended up using a carbon arc gouger to burn/blow it out (before plasma cutters became popular) and replaced the whole deal with a big grade 8 bolt, giant washer and lock nut. Not an option on a cylinder head!
You have amazing drive and determination.

Post Fiend
Joined: Mar 2009
Posts: 11,798
Likes: 14
From: Mt. Shasta California
Great write up but I don't see any marks on the threads from pliers placed near the head. Did that one that broke with the Titan deter you from proceeding with that method. Did you try the soaking overnight with little rags soaked in PB Blaster like I mentioned and then using pliers or vice grips? Did you use a center punch? I see you did use my sleeve method.

Elder User
Joined: Apr 2011
Posts: 627
Likes: 4
From: Orange County, CA
Wow, that is an unbelievable undertaking. Congratulations on finishing it and not giving up. You are an inspiration for sure.
Thanks for the awesome writeup too, I am in rep jail otherwise I'd get ya.
Sincerely,
Karl
Thanks for the awesome writeup too, I am in rep jail otherwise I'd get ya.
Sincerely,
Karl
Trending Topics
More Turbo

Joined: Apr 2012
Posts: 628
Likes: 10
From: Florence
That's a lotta work just to put the dust shields back on... I don't know that I'd call them essential... You could just roll without them. I guess it depends how much it bothers you... U could always just relax for now and just throw them back on next time u rotate your tires... That's what id do anyways... Again great job!
Thanks Ricks, FTE family gets the sheer joy of that first start up after a long project. Was so happy to have her under my feet again. Going to go out here shortly and give her good going over in the day light recheck all the bolts and hangers, some torque on my hubs and wheels and maybe put my liners back in if I can confirm I have no leaks. May try the water bottle spray method and see if I can find any bubbles.
Then I have to pull my front hubs again and put my dust shields back on -----OOOPS and I even sanded and painted them and go and forget to put them back on. Oh well, need to check my driver's side caliper anyway getting a rub, rub sound when coming to a full stop.
Thanks again for all the support and help from FTE, this was a solo project with a few family members pitching in to help, but the brotherhood at FTE is really what got me through.
Then I have to pull my front hubs again and put my dust shields back on -----OOOPS
and I even sanded and painted them and go and forget to put them back on. Oh well, need to check my driver's side caliper anyway getting a rub, rub sound when coming to a full stop. Thanks again for all the support and help from FTE, this was a solo project with a few family members pitching in to help, but the brotherhood at FTE is really what got me through.
FTE Stories
Ford Trucks for Ford Truck Enthusiasts

Rezvani's Latest Post-Apocalytic Monster Is a Ford F-150 Raptor Underneath
Verdad Gallardo
Top 10 Most Expensive Ford Trucks Ever Sold on Bring a Trailer
Joe Kucinski
2027 Ford Super Duty Buyer's Guide (Every Model, Engine, & Package)
Brett Foote
Top 10 Ford Truck Tragedies
Joe Kucinski
AEV FXL Super Duty - the Super Duty Raptor Ford Doesn't Make
Brett Foote
Lobo Vs Lobo: Proof the F-150 Lobo Should Be Even Lower!
Michael S. Palmer
Ford's 2001 Explorer Sportsman Concept Looks For a New Home
Verdad Gallardo
10 Best Ford Truck Engines We Miss the Most!
Joe Kucinski
2026 Shelby F-150 Off-Road: Better Than a Raptor R?
Brett Foote
Thread Starter
|
Postmaster
Joined: Aug 2012
Posts: 2,737
Likes: 23
From: Westfield, Indiana
Great write up but I don't see any marks on the threads from pliers placed near the head. Did that one that broke with the Titan deter you from proceeding with that method. Did you try the soaking overnight with little rags soaked in PB Blaster like I mentioned and then using pliers or vice grips? Did you use a center punch? I see you did use my sleeve method.
That's a lotta work just to put the dust shields back on... I don't know that I'd call them essential... You could just roll without them. I guess it depends how much it bothers you... U could always just relax for now and just throw them back on next time u rotate your tires... That's what id do anyways... Again great job!
More Turbo
Joined: Apr 2012
Posts: 628
Likes: 10
From: Florence
I just recently did a TON of work up top rebuilding everything on top of the engine and doing complete turbo back exhaust... I spent two weeks sitting on the radiator support leaning into the engine bay... It took me a good week and two trips to chiropractor to feel relatively normal... Note to self... Get a topside creeper!! :-)


Hotshot
Joined: Mar 2011
Posts: 11,950
Likes: 5,076
If I'd have been in this position, I think that I'd have grabbed my checkbook, called a mechanic friend, and just said, "fix it"! That would have wound up being far cheaper than the temper tantrum that I was about to throw.....
Note to self: If Sammie (Christina) ever decides that you need fixing, RUN!!!! She's going to win!!!!
Note to self: If Sammie (Christina) ever decides that you need fixing, RUN!!!! She's going to win!!!!