
The Official Candy Cane's Project Thread
#136
 03-01-2014, 10:17 AM


#137
03-01-2014, 03:57 PM


X2 here I just can't get enough of looking and drooling over that gorgeous truck. He** I think if I were NBC Steve I'd have that picture of his wife next to Candy Cane blown up to a poster hanging in the garage. You know as inspirational wall art.

#138
03-01-2014, 04:57 PM

#139
03-01-2014, 10:49 PM
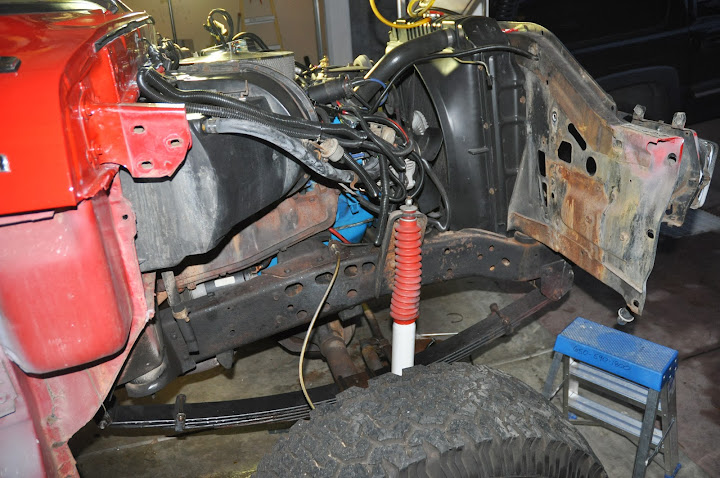
Progress today! I got all the panels removed and the steering gear box. Goal accomplished! Tomorrow I will give the engine compartment and frame a sponge bath and get everything cleaned up for paint.
Here's the not so pretty pictures but the end result will be great!
Getting the day started.

Table staged with most of the new stuff. Still waiting for some steering parts to come in.

Nice thing about TV work. Really nice lights to use for working on our trucks.

A little dirty but Zero rust! I'll get this cleaned up tomorrow.

Steering box removed.

Right side is a little cleaner. Not bad for a 35 year old truck.
Here's my inner panels ready to go to the powder coat guy (Once he returns my call) I found one small crack under the Main battery tray but since it's galvanized I'll make a small patch for it and rivet in place.

Here's my lower steering shaft bearing. It's toast. Replacement on it's way.

Main battery tray has some corrosion, I'll probably fix and paint it and call it good as I won't find one better at P&P.

Good safe place to store all the parts so they won't get damaged.

Bag and Tag.

A good days work. Time to chug a beer and relax. More to come tomorrow.
#141
03-02-2014, 12:36 PM
#142
03-02-2014, 07:27 PM
AMEN!
Beautiful truck... the more I see it the more I want it
It's funny, we all say that truck is a damn beaut, but have we ever said why? For me it's the paint and wheel/tire combination that makes it awesome.
-Jameson
Beautiful truck... the more I see it the more I want it
It's funny, we all say that truck is a damn beaut, but have we ever said why? For me it's the paint and wheel/tire combination that makes it awesome.
-Jameson
#143
03-02-2014, 10:25 PM
I see you have bedliner. What prep did you do underneath before having that sprayed in?
Beautiful truck... the more I see it the more I want it
It's funny, we all say that truck is a damn beaut, but have we ever said why? For me it's the paint and wheel/tire combination that makes it awesome.
It's funny, we all say that truck is a damn beaut, but have we ever said why? For me it's the paint and wheel/tire combination that makes it awesome.
Today was a little bit slower pace. I had some family stuff to take care of so that took some time. I got the fuel system done and the new Red Head bolted up and everything attached except the steering shaft. I still need the lower bearing. I also washed the radiator support and firewall. Cleaned up really nice. One thing I noticed was the paint color difference between the original Candy Apple Red and the new Candy Apple Red. I heard that Ford had changed the color sometime in the 80's and this seems to confirm this.


I still need to neaten up the hose routing with some brackets that I will fab at my shop.
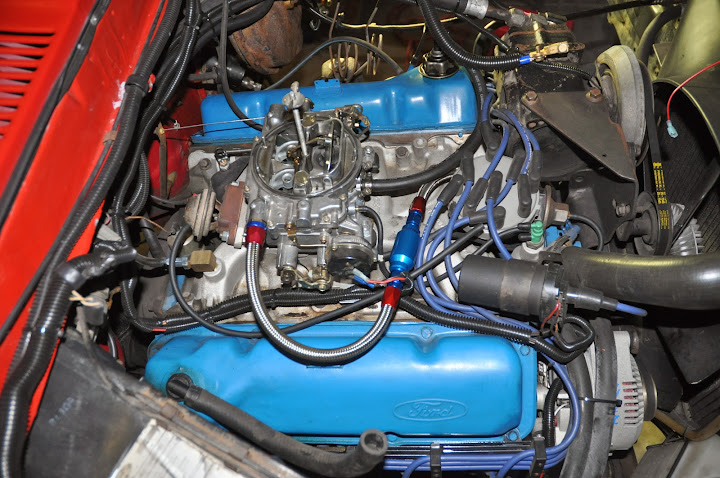
Cleaned up firewall. I think I'll use Turbohunter's idea and use blue heater hoses and a new air cleaner.


Here's my weak point. I don't know front ends and differentials very well and I would welcome input. Removing the top steering arm from the top of the king pin I got a lot of slop from the lower king pin. After looking at how the top one was designed I figured out that releaving the tension on the spring loosened up the lower tension as well. School me if I'm wrong. It kinda freaked me out at first having so much wobble but I would have noticed it last week when I drove it.

I haven't tried getting the bolts out yet (One came out with the nut) but I did soak them with PB Blaster and I'll give them a try later this week.
It's back to work this week, I hope to have some time off so I can do some little things before or after work. Despite looking rather naked I think Candy Cane is looking pretty good and will look real nice under the hood when completed. Time to put the tools away for the night and watch 60 Minutes.

#144
03-02-2014, 11:05 PM
Yes you are correct on the lower bearing. You should place a jack under the lower kingpin cap then remove the top bolts/studs. Same when going back together. Just make sure to place the steering at full lock in the tightening direction when torquing the studs/bolts. Good time to re grease everything as well.
#145
03-02-2014, 11:08 PM
Post Fiend
#146
03-03-2014, 08:05 AM
For at least as long as your truck is awesome looking (forever), this place will give you some info for the rest of your life to read up on.
BillaVista.com - Offroad & 4X4 Tech Articles by BillaVista
D60 smartness.
BillaVista.com-Dana 60 Front Axle Bible Tech Article by BillaVista
Why do I post the link, cause I am all about being as well informed as possible when it comes to working on my truck. And this is another place, like FTE to get great information.
Your truck is motivation to stay in the fight, and a lot of us only wish and dream....
#147
03-03-2014, 09:25 AM
#148
03-03-2014, 10:19 AM
Join Date: Oct 2010
Location: Northern and Southern Cal
Posts: 4,656
Likes: 0
Received 0 Likes
on
0 Posts
For at least as long as you truck is awesome looking (forever), this place will give you some info for the rest of your life to read up on.
Why do I post the link, cause I am all about being as well informed as possible when it comes to working on my truck. And this is another place, like FTE to get great information.
Your truck is motivation to stay in the fight, and a lot of us only wish and dream....
Why do I post the link, cause I am all about being as well informed as possible when it comes to working on my truck. And this is another place, like FTE to get great information.
Your truck is motivation to stay in the fight, and a lot of us only wish and dream....

He's correct Steve. Your truck, as well as a few others are great inspiration.
Really beautiful rig.
#150
03-04-2014, 11:03 PM
Yesterday I dropped off my inner fenders at the Powder Coat shop. What a great shop located in the low rent industrial district in a steel garage, those are the good places to go. Stay local and keep the economy close to home. I pick them up on Friday.
Today we did Science! Electrolysis to remove rust from my original battery tray. It's real easy.
One rusty part.

One tub of water mixed with washing soda with an old brake rotor as an anode. We placed the rotor on the bottom and used plastic spacers between the battery tray and the rotor. Tomorrow I will flip over the battery tray and do the other side.

A good friend to help stir the pot!

We added wires to the anode and the battery tray to keep the clip leads out of the solution and ensure a good contact.

Hook up the leads, plug it in and watch Science in action!

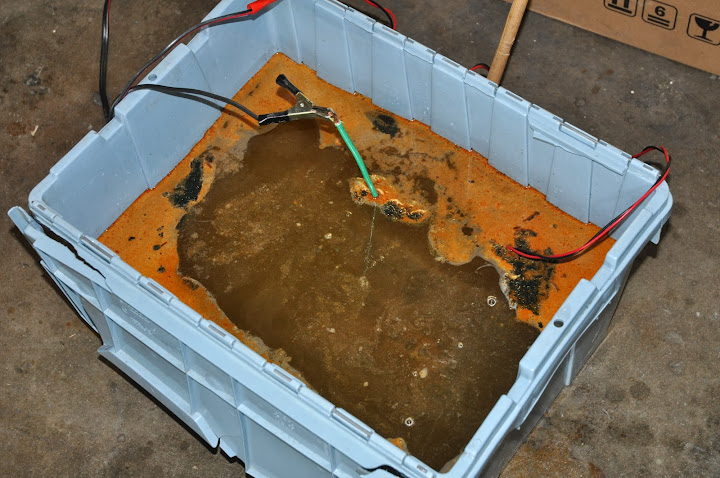
Since we have time to spare (Not really but we like to play) I hooked up a temporary web camera so I can monitor my soup and be at ease knowing I'm not blowing up the shop. Yes we have ventilation fans running all night for safety.


I know its a lot of photos for such a simple thing but the cool factor dictated a write up. More later guys (and gals)!
Today we did Science! Electrolysis to remove rust from my original battery tray. It's real easy.
One rusty part.
One tub of water mixed with washing soda with an old brake rotor as an anode. We placed the rotor on the bottom and used plastic spacers between the battery tray and the rotor. Tomorrow I will flip over the battery tray and do the other side.
A good friend to help stir the pot!
We added wires to the anode and the battery tray to keep the clip leads out of the solution and ensure a good contact.
Hook up the leads, plug it in and watch Science in action!
Since we have time to spare (Not really but we like to play) I hooked up a temporary web camera so I can monitor my soup and be at ease knowing I'm not blowing up the shop. Yes we have ventilation fans running all night for safety.
I know its a lot of photos for such a simple thing but the cool factor dictated a write up. More later guys (and gals)!