
Ugly Betty: Frame-Up Rebuild w/ a Donor
#121
 03-04-2013, 12:05 PM

Join Date: Dec 2010
Location: Carlisle
Posts: 221
Likes: 0
Received 0 Likes
on
0 Posts
I only have a little time to post some additional pics from yesterday, but I didn't want to hold it back or it would never get posted!
Once I fished the outer bearing out it was time to get the hub off- with the hub nut finally remove this should be easy, right? And it is if you do it the right way, which doesn�t involve simply grabbing it and pulling it off (which is the method I started with). After a minute or two I got my small pry-bar and popped the hub off. If you�re a first-timer like me, just be careful of the axle spindle inside the hub- it�s a machined surface that you don�t want to scratch or groove. Now that I�m typing this, I recall that the Haynes manual tells you to use a puller to get the hubs off (and I even bought one in anticipation for this little exercise), but I doubt you�ll need a puller for any hub that�s close to normal condition.
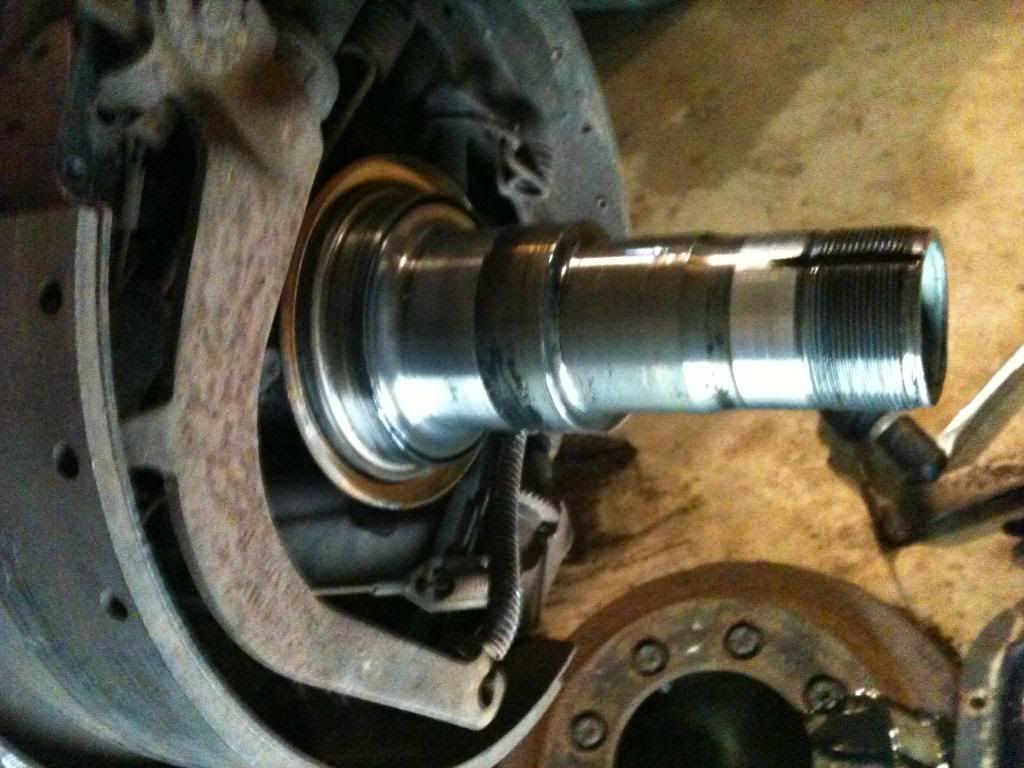
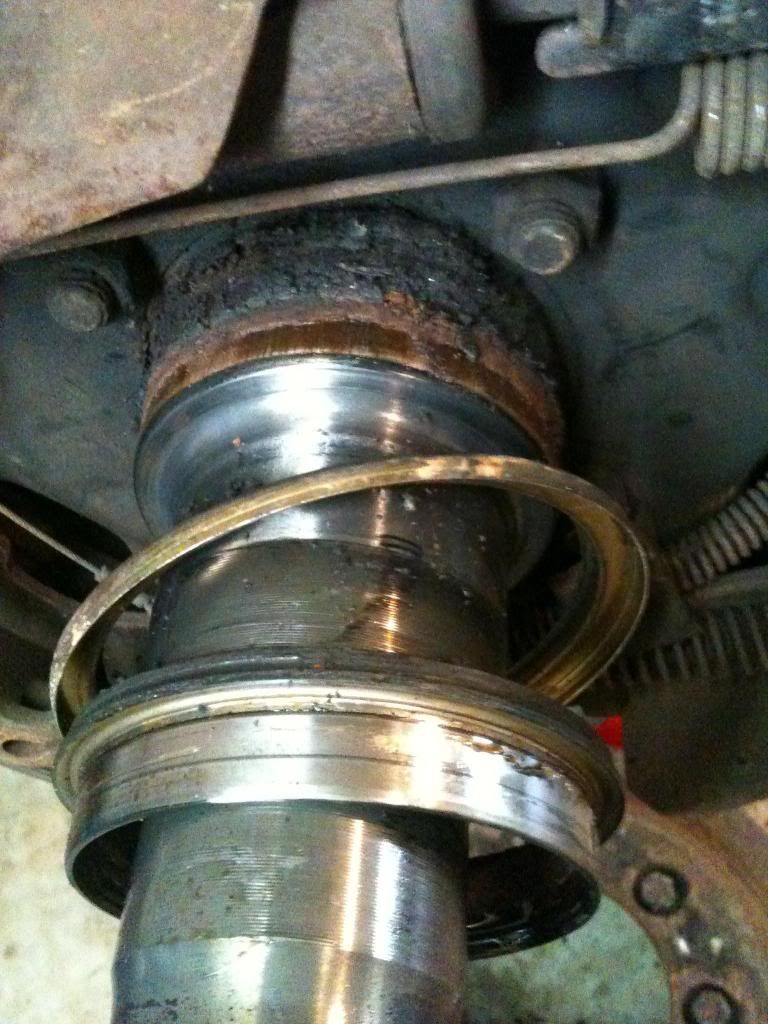
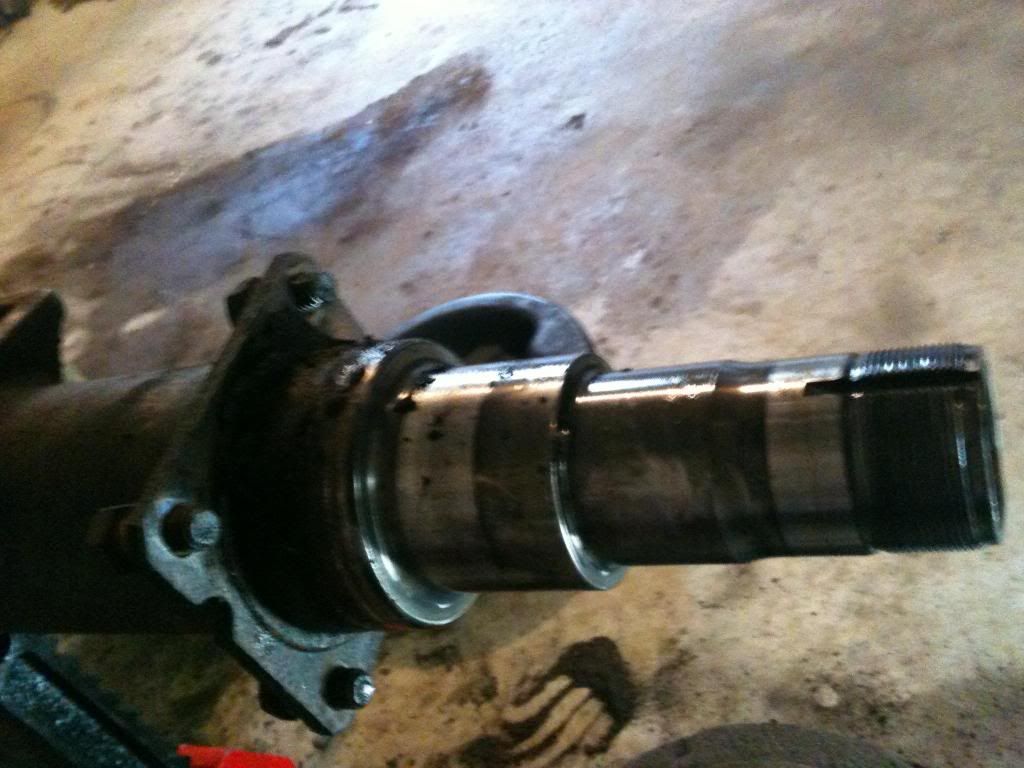
The passenger side hub is off! Once I got the hub off I noticed that the rear seal stayed on the axle. You can see it on the back of the spindle- the gold ring and the smaller gold ring in front of it closer to the axle shaft. These seals are pretty tight on the axle, but also somewhat delicate- careful prying them off� Here are a few pics of the seal.
Next up is getting the drum brake assembly off in one pass by taking the four bolts off...
Once I fished the outer bearing out it was time to get the hub off- with the hub nut finally remove this should be easy, right? And it is if you do it the right way, which doesn�t involve simply grabbing it and pulling it off (which is the method I started with). After a minute or two I got my small pry-bar and popped the hub off. If you�re a first-timer like me, just be careful of the axle spindle inside the hub- it�s a machined surface that you don�t want to scratch or groove. Now that I�m typing this, I recall that the Haynes manual tells you to use a puller to get the hubs off (and I even bought one in anticipation for this little exercise), but I doubt you�ll need a puller for any hub that�s close to normal condition.
The passenger side hub is off! Once I got the hub off I noticed that the rear seal stayed on the axle. You can see it on the back of the spindle- the gold ring and the smaller gold ring in front of it closer to the axle shaft. These seals are pretty tight on the axle, but also somewhat delicate- careful prying them off� Here are a few pics of the seal.
Next up is getting the drum brake assembly off in one pass by taking the four bolts off...
#122
03-04-2013, 09:56 PM

Hotshot
Sure glad I came accross your thread as I'm about to strip the clip and cab off my 89 f350 dually in order to put my 78 f350 cab and clip on it. I'm not doing as extensive a rebuild as you as I only need to get 3 years use out of it. Mine is going to be used as a 5th wheel R.V. puller. I found your thread via your 351w build up so I guess I'm getting 2 benefits from your build up. Thank you for making my life a whole lot easier. Sure am glad my trucks are'nt as rusty as yours, just to bad I have an open air work shop and have to shovel snow in order to work on trucks. Good luck and all success on your project as it will be nice to see it when it's done.
#123
03-06-2013, 03:22 AM
Join Date: Dec 2010
Location: Carlisle
Posts: 221
Likes: 0
Received 0 Likes
on
0 Posts
Sure glad I came accross your thread as I'm about to strip the clip and cab off my 89 f350 dually in order to put my 78 f350 cab and clip on it. I'm not doing as extensive a rebuild as you as I only need to get 3 years use out of it. Mine is going to be used as a 5th wheel R.V. puller. I found your thread via your 351w build up so I guess I'm getting 2 benefits from your build up. Thank you for making my life a whole lot easier. Sure am glad my trucks are'nt as rusty as yours, just to bad I have an open air work shop and have to shovel snow in order to work on trucks. Good luck and all success on your project as it will be nice to see it when it's done.

I'm glad the thread can help. I spent a ton of time on FTE just reading and browsing other peoples work- it's not only fun to see what other people are doing it made my build possible. The least I can do it return the favor! Cheers and thanks for reading!
#124
03-06-2013, 10:13 PM
Join Date: Dec 2010
Location: Carlisle
Posts: 221
Likes: 0
Received 0 Likes
on
0 Posts
It�s an understatement to say that the brakes come off super easy at this point- four bolts and done. Well except for the cables to the brakes, which I left attached because, well, I was lazy. The only point of note is that the bolts start spinning once you break them loose, so you�ll need another wrench to hold the bolt steady while the nut comes off.
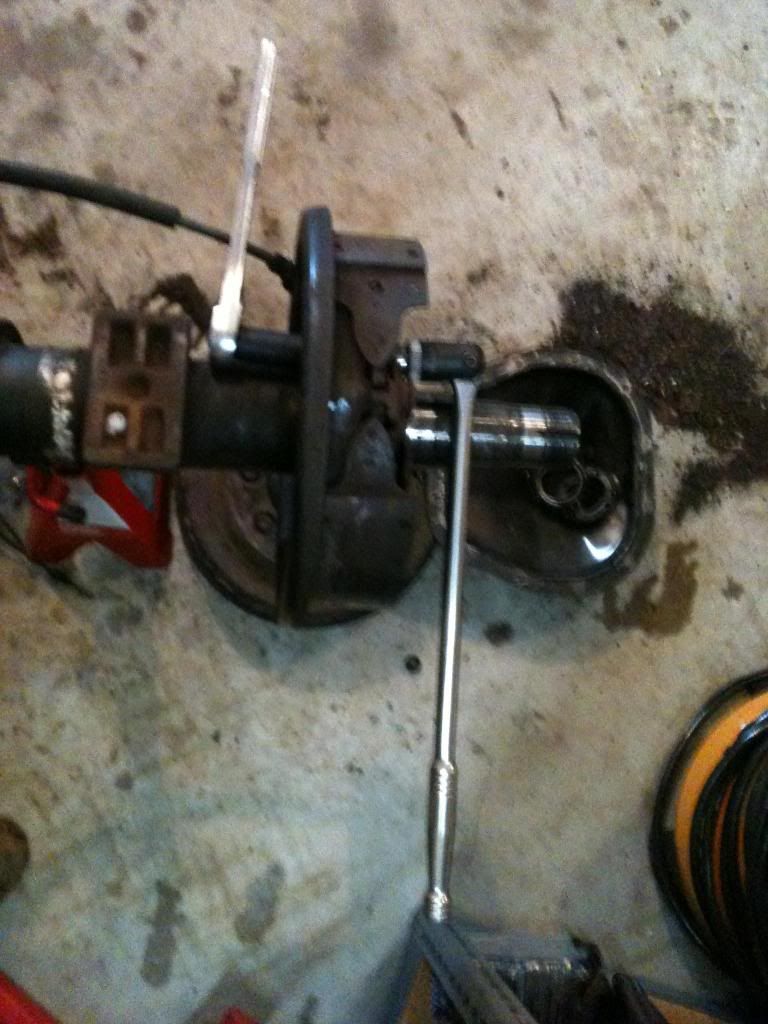
With the four nuts off, ready to come off the axle.
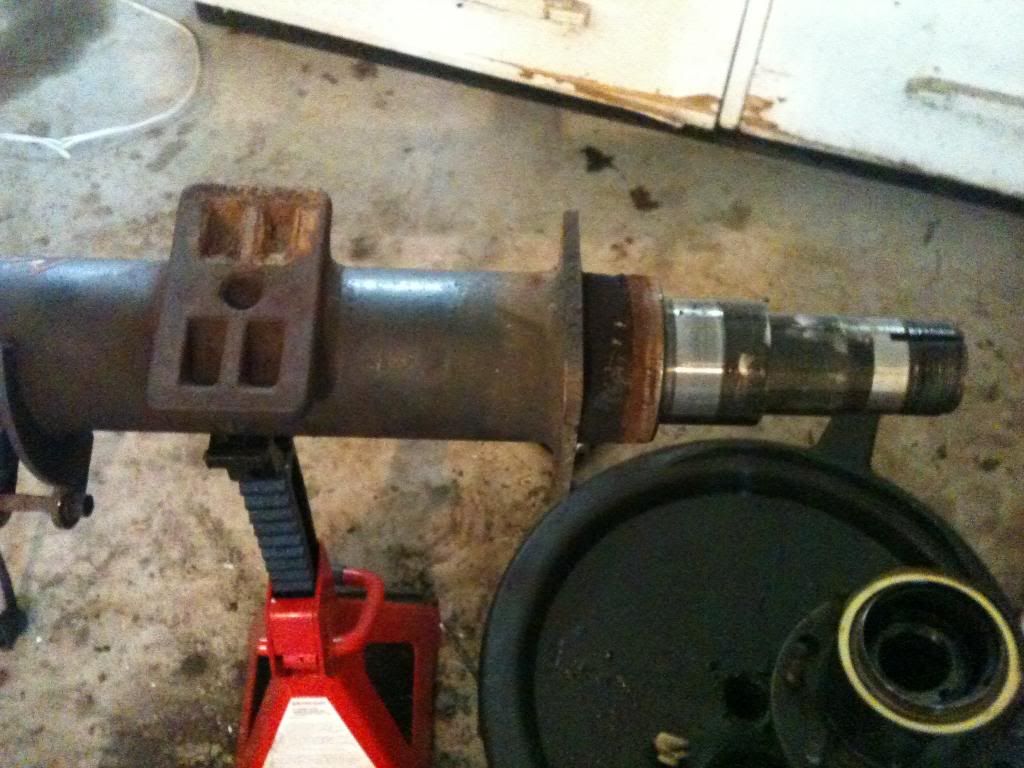
� and a bare axle.
The driver�s side was pretty much a repeat of the passenger�s side. The only difference of note is the hub nut threads being backwards as indicated earlier.
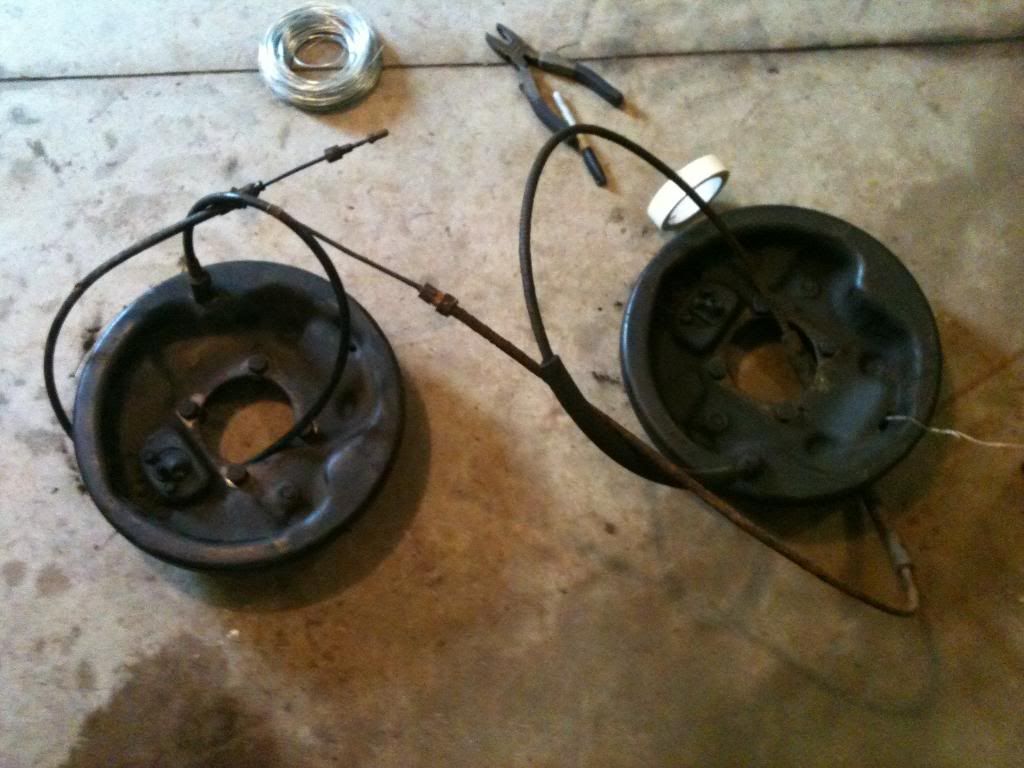
Both brake housings waiting for storage in my own personal bone pile.
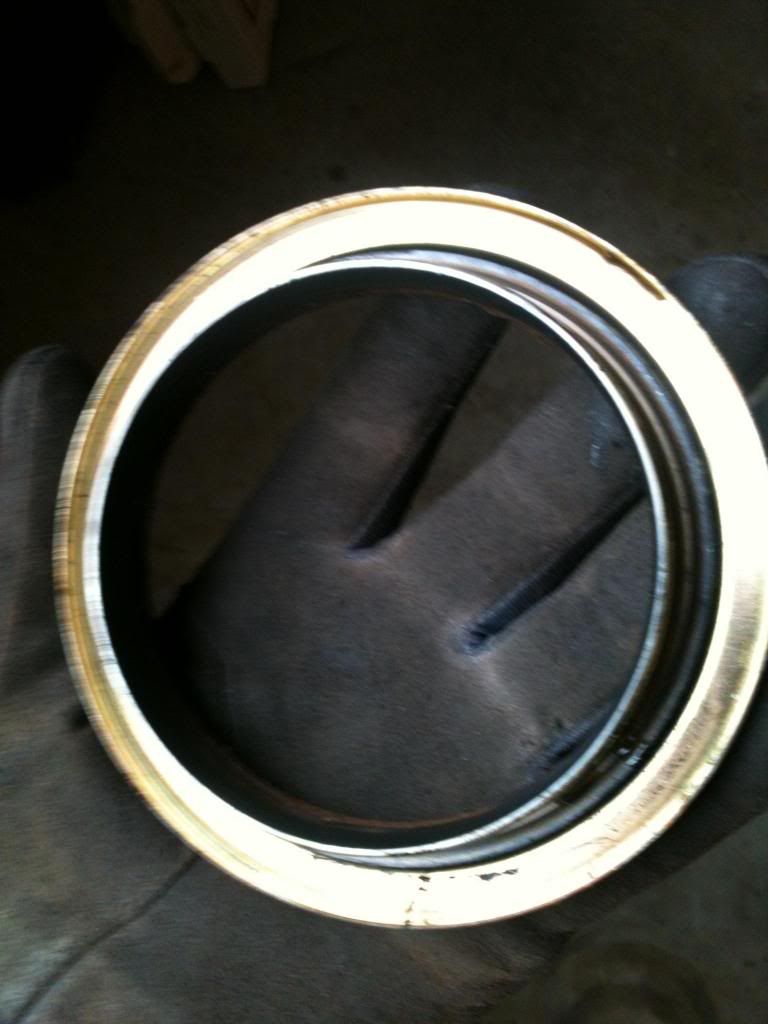
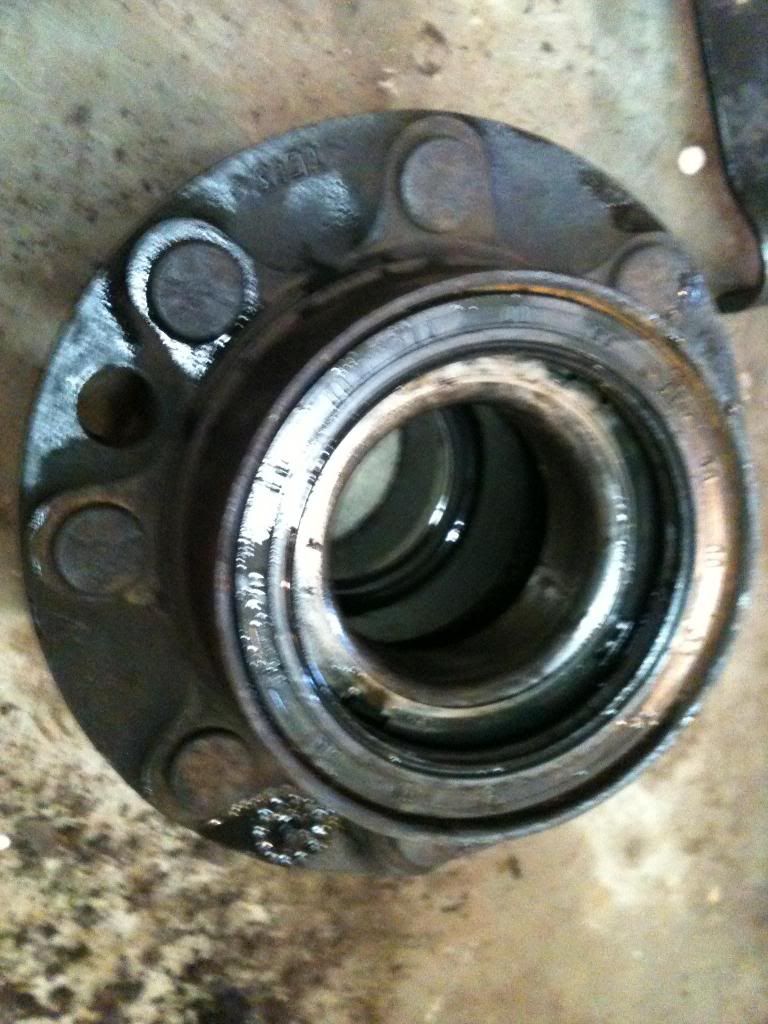
With everything disassembled I wanted to inspect the hub bearings a little closer. The outer bearings were pretty easy to get to since they�re, well, outer bearings. The inner bearings however are behind a seal that I couldn�t get off. I didn�t want to pry too hard and ruine the seal, and since it was time to wrap up for the day (soccer practice for Lou and some other stuff) I figured I�d pack it in. In the mean time, anyone have suggestions for getting the inner hub seal out (picture below).
With the four nuts off, ready to come off the axle.
� and a bare axle.
The driver�s side was pretty much a repeat of the passenger�s side. The only difference of note is the hub nut threads being backwards as indicated earlier.
Both brake housings waiting for storage in my own personal bone pile.
With everything disassembled I wanted to inspect the hub bearings a little closer. The outer bearings were pretty easy to get to since they�re, well, outer bearings. The inner bearings however are behind a seal that I couldn�t get off. I didn�t want to pry too hard and ruine the seal, and since it was time to wrap up for the day (soccer practice for Lou and some other stuff) I figured I�d pack it in. In the mean time, anyone have suggestions for getting the inner hub seal out (picture below).
#125
03-07-2013, 05:17 AM
Tuned
 Good luck with it.
#126
03-07-2013, 12:20 PM
Join Date: Dec 2010
Location: Carlisle
Posts: 221
Likes: 0
Received 0 Likes
on
0 Posts
Thanks man! Hopefully I'll get the axle back together soon, with the disk brakes if I'm going to do it... Should be an interesting write-up if I go that route!!
 Keep up the good work!
#128
03-10-2013, 11:56 AM
Join Date: Dec 2010
Location: Carlisle
Posts: 221
Likes: 0
Received 0 Likes
on
0 Posts
#129
03-10-2013, 01:05 PM
Join Date: Dec 2010
Location: Carlisle
Posts: 221
Likes: 0
Received 0 Likes
on
0 Posts
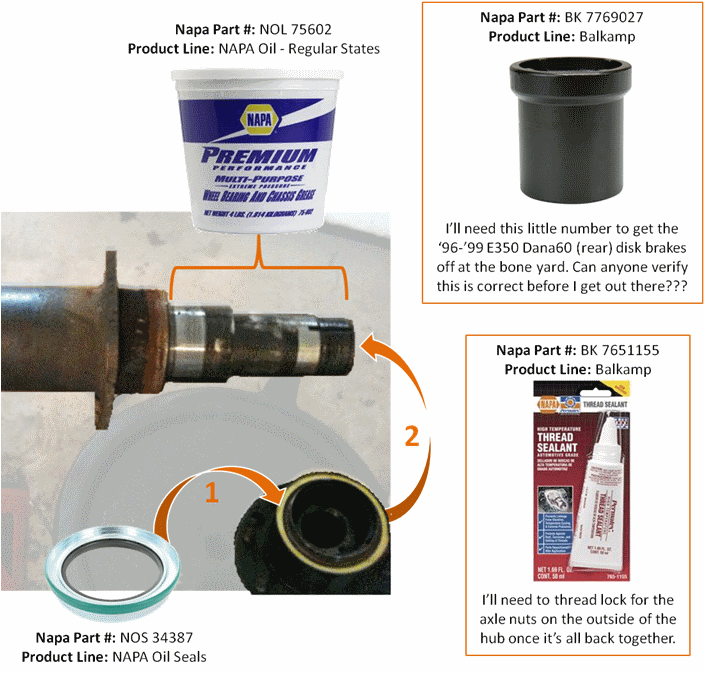
I spent most of the weekend reading up on the disk brake upgrade (and the MAF upgrade, but that�s the engine build). I should be ready next weekend to get the hubs rebuilt (not until after the brakes are done though) and to spend some time verifying that the differential is at spec. To get all that done I had to spend some time at my new favorite store to get all the part numbers and such. Turns out that Napa�s online search really blows- either that or I�m just missing something. They do seem to have everything for, well, any job, so it makes sense to use them as a one-stop-shop. It also really helps that they�ve got a big warehouse close by and can get anything in a matter of hours! Anyhow, here�s what I�m getting for the hubs�
#130
03-10-2013, 01:59 PM
#131
03-10-2013, 02:33 PM
Posting Guru
You DO NOT use grease in the rear axle. Those bearings are lubricated by the diff fluid. Proper way to fill axle:
-coat inner bearing w/ diff fluid.
-Install inner bearing and wheel seal into hub
-Install hub onto spindle
-fill hub cavity w/ diff fluid
-coat outer bearing w/ diff fluid
-install outer bearing, torque to spec
-install axle shaft (here i would recommend using rtv as well as the oring, they dont always like to reseal
-reinstall wheels/tires, set on level ground
-fill axle at fill plug. This will fill the fluid up in the diff, down the axle tube, and into both wheel ends. Will take time, the fluid needs to flow all the way down to the ends and seep into the bearings/cavity.
Again, DO NOT use grease in the rear axle
#132
03-10-2013, 05:40 PM
Join Date: Dec 2010
Location: Carlisle
Posts: 221
Likes: 0
Received 0 Likes
on
0 Posts

You DO NOT use grease in the rear axle. Those bearings are lubricated by the diff fluid. Proper way to fill axle:
-coat inner bearing w/ diff fluid.
-Install inner bearing and wheel seal into hub
-Install hub onto spindle
-fill hub cavity w/ diff fluid
-coat outer bearing w/ diff fluid
-install outer bearing, torque to spec
-install axle shaft (here i would recommend using rtv as well as the oring, they dont always like to reseal
-reinstall wheels/tires, set on level ground
-fill axle at fill plug. This will fill the fluid up in the diff, down the axle tube, and into both wheel ends. Will take time, the fluid needs to flow all the way down to the ends and seep into the bearings/cavity.
Again, DO NOT use grease in the rear axle
-coat inner bearing w/ diff fluid.
-Install inner bearing and wheel seal into hub
-Install hub onto spindle
-fill hub cavity w/ diff fluid
-coat outer bearing w/ diff fluid
-install outer bearing, torque to spec
-install axle shaft (here i would recommend using rtv as well as the oring, they dont always like to reseal
-reinstall wheels/tires, set on level ground
-fill axle at fill plug. This will fill the fluid up in the diff, down the axle tube, and into both wheel ends. Will take time, the fluid needs to flow all the way down to the ends and seep into the bearings/cavity.
Again, DO NOT use grease in the rear axle
#133
03-10-2013, 08:55 PM
Join Date: Dec 2010
Location: Carlisle
Posts: 221
Likes: 0
Received 0 Likes
on
0 Posts
After Blue_Rebel�s last comment about not using grease on the bearings I started thinking� �What�s with all this banter about grease and oil anyhow, and could the differential really �feed� oil down to the hubs. In order to do some checking I went out with a flashlight and looked down the axle tube to see. I also consulted the explosion diagrams for the 10.25. What I found was pretty definitive from my perspective:
1) There is no seal between the differential (�pumpkin�) and the axle tube, so gear oil can splash down over time
2) The axle tube empties into the outer area of the hub very close to, but not in contact with, the axle-shaft flange
3) Hence there is space for gear oil to flow from the differential, down the axle tube, and empty into the hub
The following hand-sketch and picture down the axle tube (with oil sitting there) should get the point across.
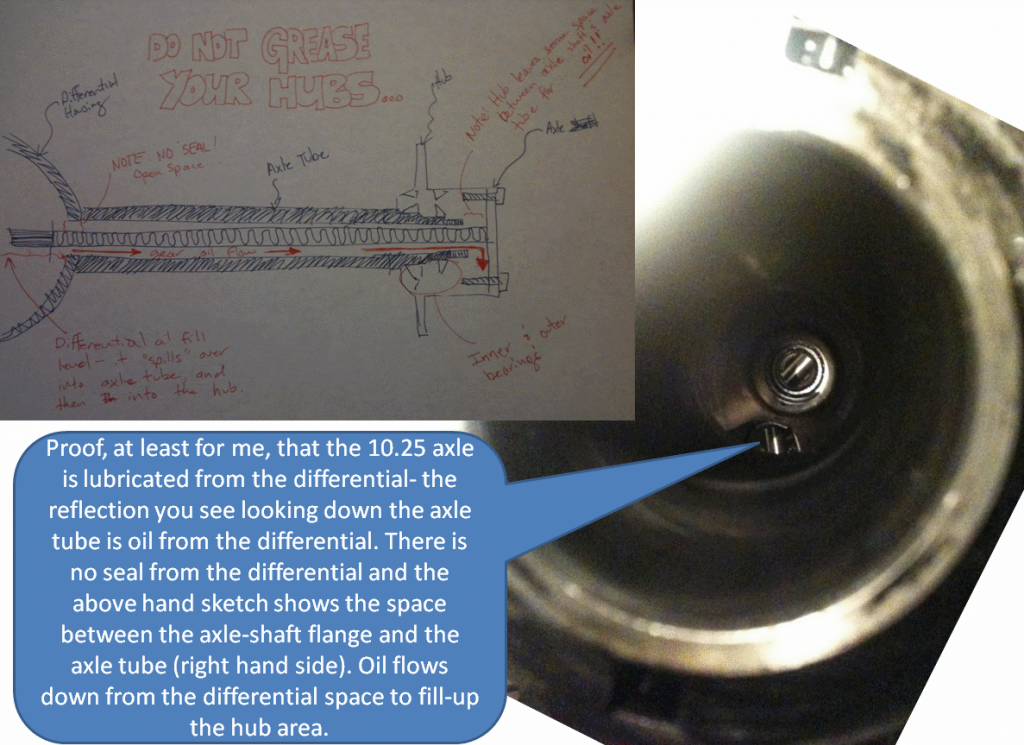
Now, I�m not a lubrication expert, but I suppose over time grease, mixed with gear oil, would amount to just about the same effect as just using gear oil. I guess for me, I�ll give the gear oil a try and let you know how it works out�
1) There is no seal between the differential (�pumpkin�) and the axle tube, so gear oil can splash down over time
2) The axle tube empties into the outer area of the hub very close to, but not in contact with, the axle-shaft flange
3) Hence there is space for gear oil to flow from the differential, down the axle tube, and empty into the hub
The following hand-sketch and picture down the axle tube (with oil sitting there) should get the point across.
Now, I�m not a lubrication expert, but I suppose over time grease, mixed with gear oil, would amount to just about the same effect as just using gear oil. I guess for me, I�ll give the gear oil a try and let you know how it works out�
#134
03-12-2013, 05:28 PM
Join Date: Dec 2010
Location: Carlisle
Posts: 221
Likes: 0
Received 0 Likes
on
0 Posts
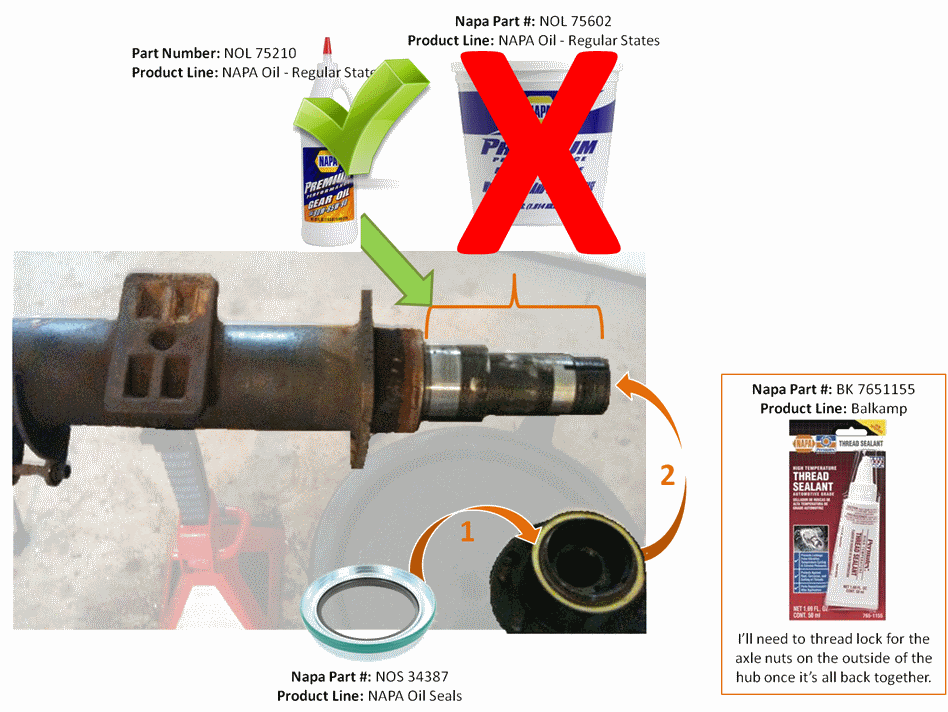
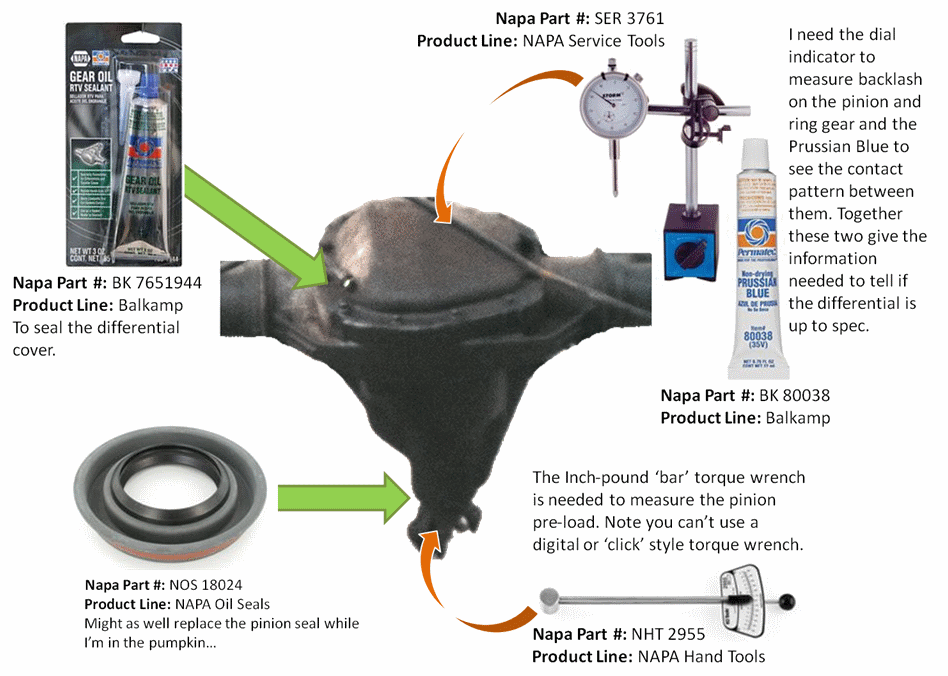
Just to make sure I’m presenting accurate pictures, here’s an updated copy of the ‘supplies’ from before with the grease removed and the Dana60 hub-nut socket gone. If anyone knows the Napa part number for a Dana60 rear axle on an E350 van from ’96 to ’98 let me know- I can’t seem to find it and guess I’ll have to go in to the store this Saturday if nothing else.
The second half of my purchase is all about the pumpkin. I don’t have a great deal of confidence that the ring and pinion are in the best of working order and I want to make sure everything is in spec before I get it all back together. The main tools for this exercise, per the video I posted a while back above in the thread, is an inch-pound torque wrench and a dial indicator with a magnetic base (which I need for the engine rebuild as well). While I’m in there I’m also going to change the pinion seal for good measure- let’s hope the pinion bearing, preload, backlash and depth are all good so I don’t have to mess with that!
Anyhow, it should be a fun weekend to play! Especially if I get some time to call the local junk yards for a ’93 Mustang (MAF conversion- see engine thread, https://www.ford-trucks.com/forums/1...me-mine-2.html) and ’99 E350 for the brakes!!!
#135
03-17-2013, 03:59 PM
Join Date: Dec 2010
Location: Carlisle
Posts: 221
Likes: 0
Received 0 Likes
on
0 Posts
I�ve been looking for a 1999 E350 in one of the area junk yards to get disk brake parts as well as trying to find a machine shop to make the flanges required for the �99 Dana60 disk brake swap. After a couple of weeks I haven�t been able to find the right setup and I can�t find a shop that would make 2 flanges for less than my left arm, so this weekend I regrouped a bit. I don�t want to be so stubborn about converting to disk brakes that I add 3 months to my build- I have more than enough to do just to get the truck back together and should be more than familiar enough with the axle and brake assembly to do it later if I�m so inclined. During the process of my regroup I spent some time trolling the net and FTE and came across the following thread with some of y�all fighting the good fight in the holy-war of disk vs. drum brakes.
https://www.ford-trucks.com/forums/1...od-ebrake.html
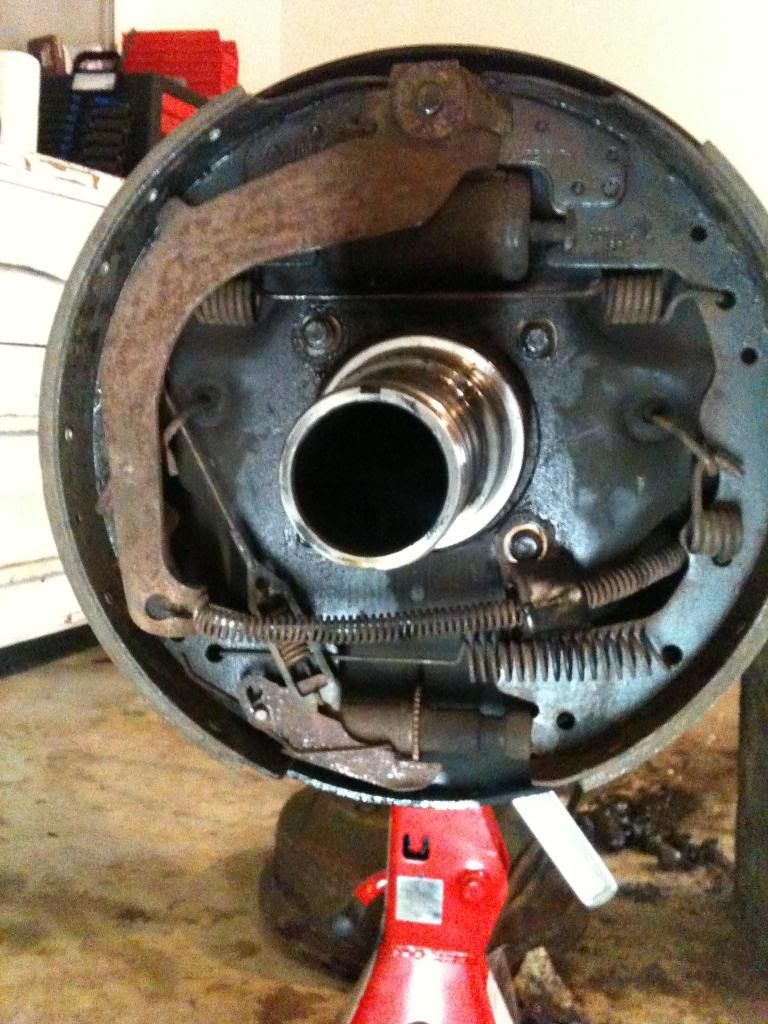
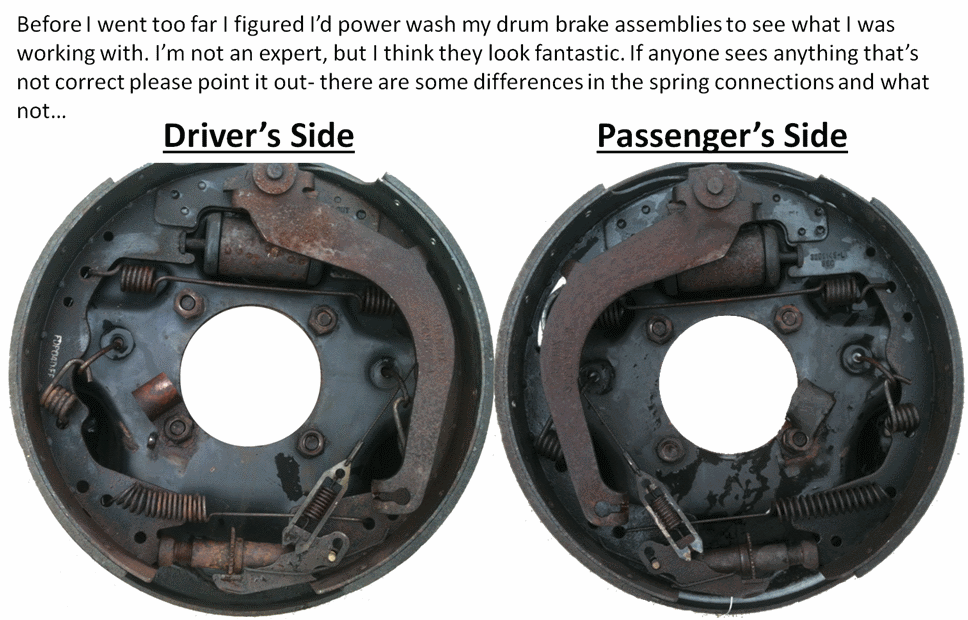
For the record, I would like disk brakes for the benefits mentioned (self cleaning, easier maintenance, no worries about self-adjusting ). BUT, I also want to go on the record with my perspective on issue- DRUM BRAKES WORK, if they didn�t Ford and the rest of the world would have abandoned them as soon as disk brakes were viable (which must have been well before 1950). Given that we�re only talking about 25% of the braking force on the back end, it would cost around $1,000 to convert, and the current brakes are in great shape (see pics below), I�m going to reinstall the drums for the rebuild.
If anyone has any comments, let me know. I don't mean to ignite the holy war on my thread, but I don't think anyone will argue that with my build the money will be better spent on other things than replacing something that works...
https://www.ford-trucks.com/forums/1...od-ebrake.html
For the record, I would like disk brakes for the benefits mentioned (self cleaning, easier maintenance, no worries about self-adjusting
). BUT, I also want to go on the record with my perspective on issue- DRUM BRAKES WORK, if they didn�t Ford and the rest of the world would have abandoned them as soon as disk brakes were viable (which must have been well before 1950). Given that we�re only talking about 25% of the braking force on the back end, it would cost around $1,000 to convert, and the current brakes are in great shape (see pics below), I�m going to reinstall the drums for the rebuild.If anyone has any comments, let me know. I don't mean to ignite the holy war on my thread, but I don't think anyone will argue that with my build the money will be better spent on other things than replacing something that works...