


Installing Interior Grab Handles
Thread Starter
|
Post Fiend
Joined: Dec 2010
Posts: 10,121
Likes: 3
From: Orrville, Ohio
Installing Interior Grab Handles
Well someone asked for it, so here is a brief writeup on installing interior grab handles on my F-350 CC. A lot of these ideas are copied form an "interior mods" post that I read on another forum, so I can't take credit for all the ideas. I got the handles at the local pull a part for cheap, cheap, cheap. Got all 4 of them and an armload of other misc parts for $20 on a hot hot day. I had my 6 year old son with me (he had a load of "treasures" of his own) so maybe that helped on the price...
The handles are out of a mid to late 90's Taurus with a grey interior and as you can see the color matches almost perfectly.

The ones in the back seat of the car had little hooks on them for hangers and such that I just removed before installing the handles because the hooks hung lower than the door opening and I didn't want to be banging my head on them. Once the hooks are removed, the hangers are identical. The handles also had a plastic "pin" that sticks out on the back of them and after fooling with the trim to try and get holes to line up to use that pin, I finally just cut the pin off flush and forgot about it.
The handles are under spring pressure and flip up against the roof when not in use. To use them you just grab on and pull. They make it a lot easier for people or shorter stature to climb into the truck, for sure. I don't use mine, I just kind of "hop" in, but my wife uses hers every time. She really had a hard time climbing into the truck before I installed the handles. She was always trying to grab onto something to help her pull herself up and int into the seat. Now she reaches up and grabs the handle every time she opens the door.
Down.

From outside:

To install the handles I removed the A pillar and rear Crew Cab trim piece above the door. I then found a spot where I liked the positioning of the handles and there was solid metal behind the trim for me to attach them to. Be careful here because there is a slot in the steel above the door that will interfere with the mounting of the handle if you aren't careful. I think the measurements I ended up using were 6" forward of the back of the A pillar trim for the back hole and 12 7/8" for the front hole. Double check that these measurements are right for your handles, but that is what I think worked for mine. I know it doesn't look right in this picture, but I think it is an optical illusion because of the camera angle. The rear one looks closer to these measurements and since the handles are identical I think that is the measurement I used. The bottom line is that the back hole was 6" from the back of the trim piece, and the front hole falls wherever it falls. I think all the holes were drilled 1 1/2" or 1 3/4" from the bottom edge of the trim to get everything up and out of the way.

For the back handles I think I used the same measurements.

I drilled the holes in the plastic trim first. I think the holes ended up being 7/8" or so. I used a step bit (Uni-bit) for the plastic trim. Then I reinstalled the plastic trim and drilled holes in the steel behind the trim. At this point I suppose I should explain that I didn't simply screw the handles to the steel. I have attached this kind of thing like this in the past and they always seem to work their way loose. The thin steel simply isn't enough to fasten to securely with a sheet metal screw for fastening something like this. So what I did (again this was recommended by the thread I read) was to use rubber "Well Nut". For those who don't know what I am talking about here is a link to something similar to what I used.
Monster Item Details - 1/4-20 x 1 Well Nut
And a picture:

The well nuts I used accepted a 1/4x20 thread and I used pan head screws to attach the handles. I did have to drill out the hole in the handles to accept the 1/4" bolt but the screw heads fit fine inside the handle and the cover snaps closed the way it should. The way the well nuts work, you drill a hole just barely big enough to fit the nut into, then push it in up to the collar on the back side. The opposite end has a steel insert that the bolt threads into and as you tighten the nut, it "squishes" and expands to hold tight to the thin material you're attaching to. It is kind of like using a toggle bolt to fasten something to drywall. I think they cost me a buck or two a piece.
I had to mess with shimming the handles out a little from the well nut in order to keep the bolts from pushing the plastic trim in too far when I tightened them down. I used 1/4" washers and a couple 3/8" nuts for this. I can't recall where I put each one or how many washers I used, but once you get started you will see what I mean. Just be careful when you're removing the bolts and such so you don't lose the well nut inside the roof. It's best to just loosen the bolt and leave the well nut on the end of the bolt and pull everything out at the same time. Don't ask me how I know that....
Once everything was installed and tightened down, I pulled HARD on the handles to make sure they were solid. I didn't want my sweetie or my kids taking a header out the door because the handle pulled loose. They are indeed stout.
All in all I am really pleased. They look like they could have been a factory option.
Outside the truck when they are folded up.

Outside when they're pulled down.

Rear door from inside.

These pictures aren't step by step because I didn't intend to do a write up at the time so all the pictures were taken after things were already done. Feel free to ask questions if you want. I will do my best to answer them.
Good luck!
The handles are out of a mid to late 90's Taurus with a grey interior and as you can see the color matches almost perfectly.
The ones in the back seat of the car had little hooks on them for hangers and such that I just removed before installing the handles because the hooks hung lower than the door opening and I didn't want to be banging my head on them. Once the hooks are removed, the hangers are identical. The handles also had a plastic "pin" that sticks out on the back of them and after fooling with the trim to try and get holes to line up to use that pin, I finally just cut the pin off flush and forgot about it.
The handles are under spring pressure and flip up against the roof when not in use. To use them you just grab on and pull. They make it a lot easier for people or shorter stature to climb into the truck, for sure. I don't use mine, I just kind of "hop" in, but my wife uses hers every time. She really had a hard time climbing into the truck before I installed the handles. She was always trying to grab onto something to help her pull herself up and int into the seat. Now she reaches up and grabs the handle every time she opens the door.
Down.
From outside:
To install the handles I removed the A pillar and rear Crew Cab trim piece above the door. I then found a spot where I liked the positioning of the handles and there was solid metal behind the trim for me to attach them to. Be careful here because there is a slot in the steel above the door that will interfere with the mounting of the handle if you aren't careful. I think the measurements I ended up using were 6" forward of the back of the A pillar trim for the back hole and 12 7/8" for the front hole. Double check that these measurements are right for your handles, but that is what I think worked for mine. I know it doesn't look right in this picture, but I think it is an optical illusion because of the camera angle. The rear one looks closer to these measurements and since the handles are identical I think that is the measurement I used. The bottom line is that the back hole was 6" from the back of the trim piece, and the front hole falls wherever it falls. I think all the holes were drilled 1 1/2" or 1 3/4" from the bottom edge of the trim to get everything up and out of the way.
For the back handles I think I used the same measurements.
I drilled the holes in the plastic trim first. I think the holes ended up being 7/8" or so. I used a step bit (Uni-bit) for the plastic trim. Then I reinstalled the plastic trim and drilled holes in the steel behind the trim. At this point I suppose I should explain that I didn't simply screw the handles to the steel. I have attached this kind of thing like this in the past and they always seem to work their way loose. The thin steel simply isn't enough to fasten to securely with a sheet metal screw for fastening something like this. So what I did (again this was recommended by the thread I read) was to use rubber "Well Nut". For those who don't know what I am talking about here is a link to something similar to what I used.
Monster Item Details - 1/4-20 x 1 Well Nut
And a picture:
The well nuts I used accepted a 1/4x20 thread and I used pan head screws to attach the handles. I did have to drill out the hole in the handles to accept the 1/4" bolt but the screw heads fit fine inside the handle and the cover snaps closed the way it should. The way the well nuts work, you drill a hole just barely big enough to fit the nut into, then push it in up to the collar on the back side. The opposite end has a steel insert that the bolt threads into and as you tighten the nut, it "squishes" and expands to hold tight to the thin material you're attaching to. It is kind of like using a toggle bolt to fasten something to drywall. I think they cost me a buck or two a piece.
I had to mess with shimming the handles out a little from the well nut in order to keep the bolts from pushing the plastic trim in too far when I tightened them down. I used 1/4" washers and a couple 3/8" nuts for this. I can't recall where I put each one or how many washers I used, but once you get started you will see what I mean. Just be careful when you're removing the bolts and such so you don't lose the well nut inside the roof. It's best to just loosen the bolt and leave the well nut on the end of the bolt and pull everything out at the same time. Don't ask me how I know that....
Once everything was installed and tightened down, I pulled HARD on the handles to make sure they were solid. I didn't want my sweetie or my kids taking a header out the door because the handle pulled loose. They are indeed stout.
All in all I am really pleased. They look like they could have been a factory option.
Outside the truck when they are folded up.
Outside when they're pulled down.
Rear door from inside.
These pictures aren't step by step because I didn't intend to do a write up at the time so all the pictures were taken after things were already done. Feel free to ask questions if you want. I will do my best to answer them.
Good luck!
Post Fiend
Joined: Dec 2009
Posts: 15,505
Likes: 18
From: Livoina,La
This is one that I'm doing sometime next year
This will be the home of my build. I believe it will be the first time it has been done. This started 3 weeks ago as a late night conversation and is now a complete project. The whole thing took 2 weeks to the day to complete.
I want to give a huge thank you to Zach (forddieseldoctor) for giving me the wiring information needed to complete this mod.
Thanks also to Garrett (weareweird69) for his support, and to Bill (alberta 7.3) for making sure the safety features were kept intact.
All pics and information for the build will be posted in this first post for ease of understanding.
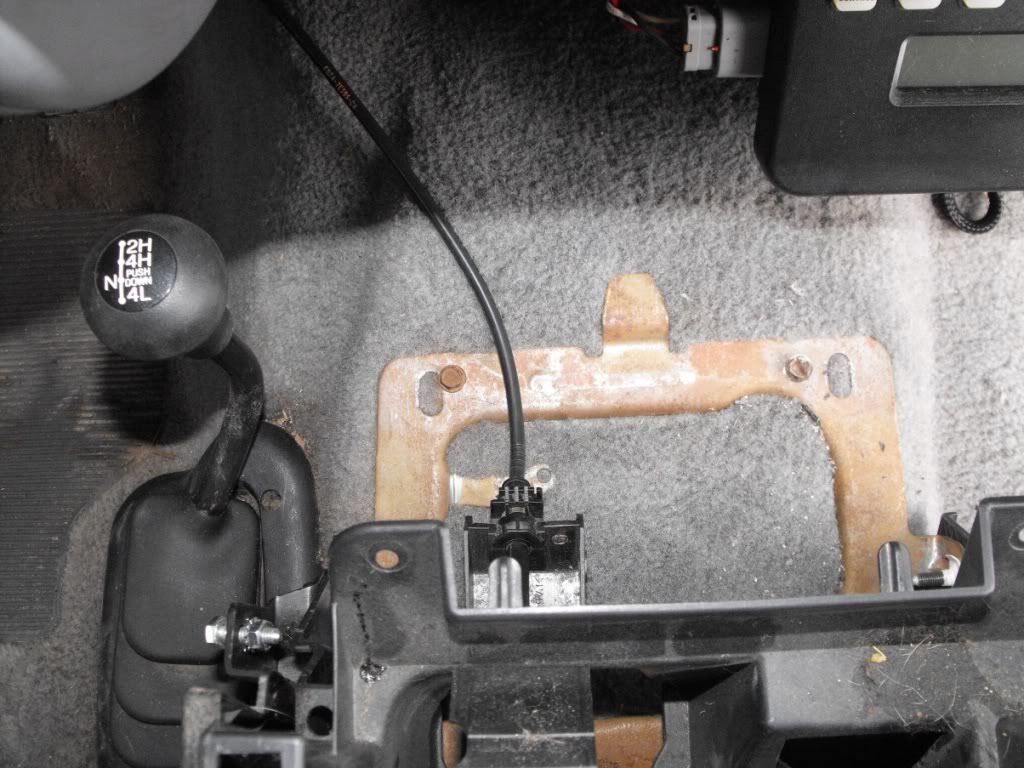
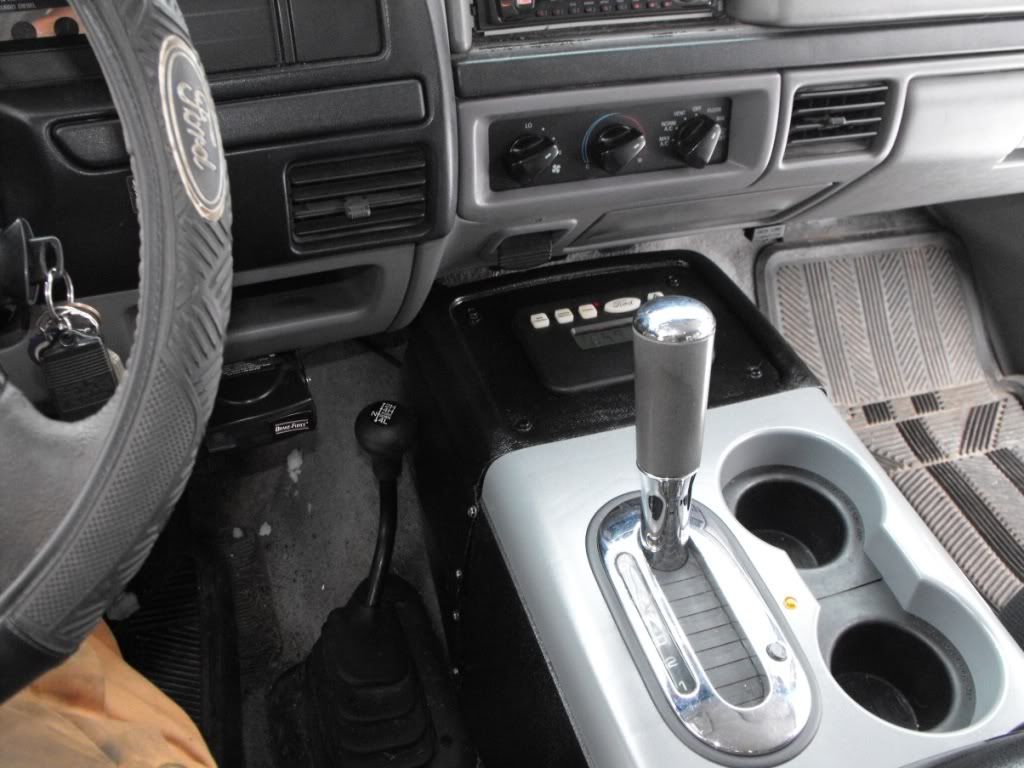
Console arrived today, for anyone wondering exactly what I am doing....
The console and shifter I used are from an 06 F150 FX4
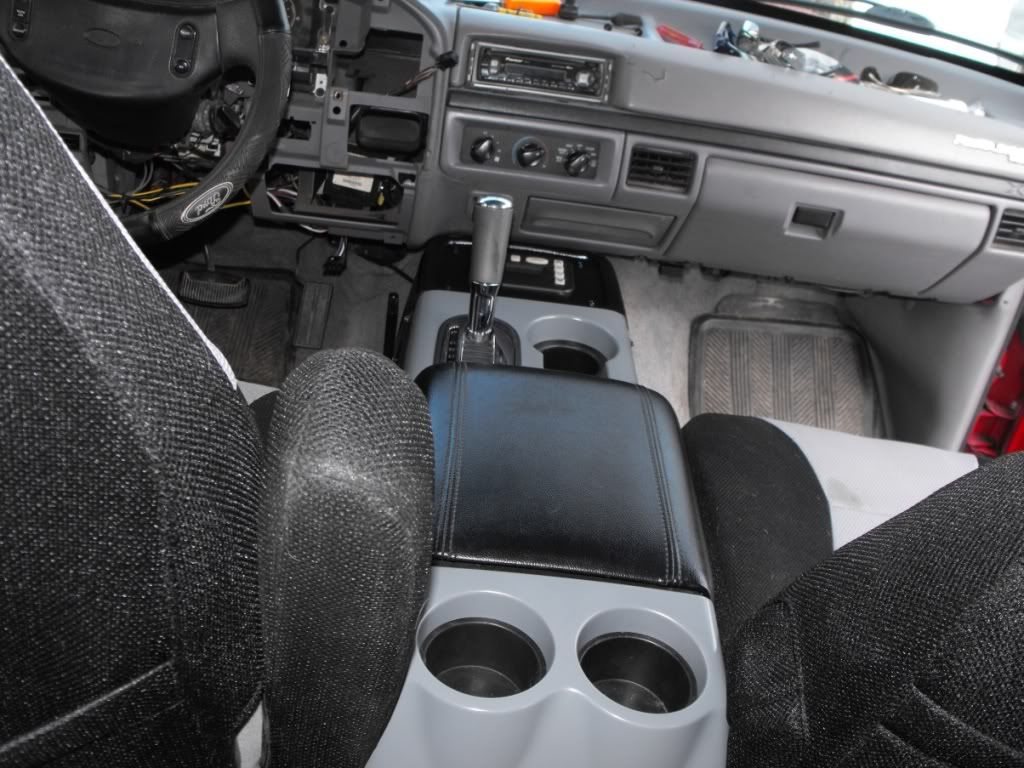
In position
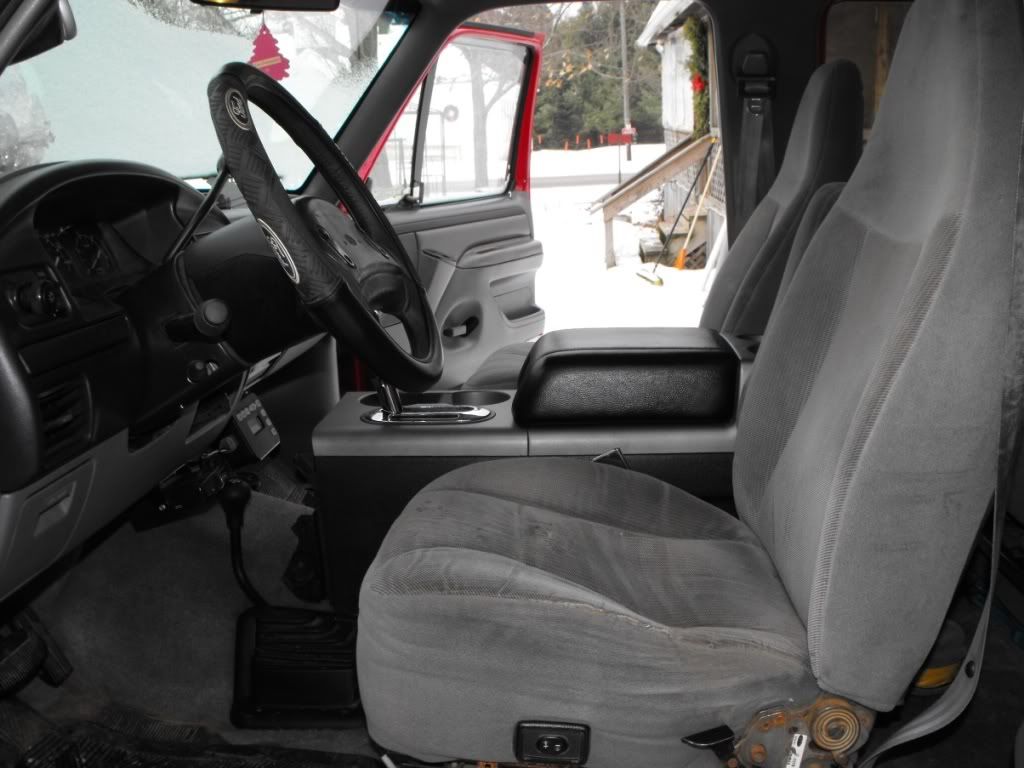
I got the console to sit lower and in the correct position by taking out the heat tube under it, as that wont be used.
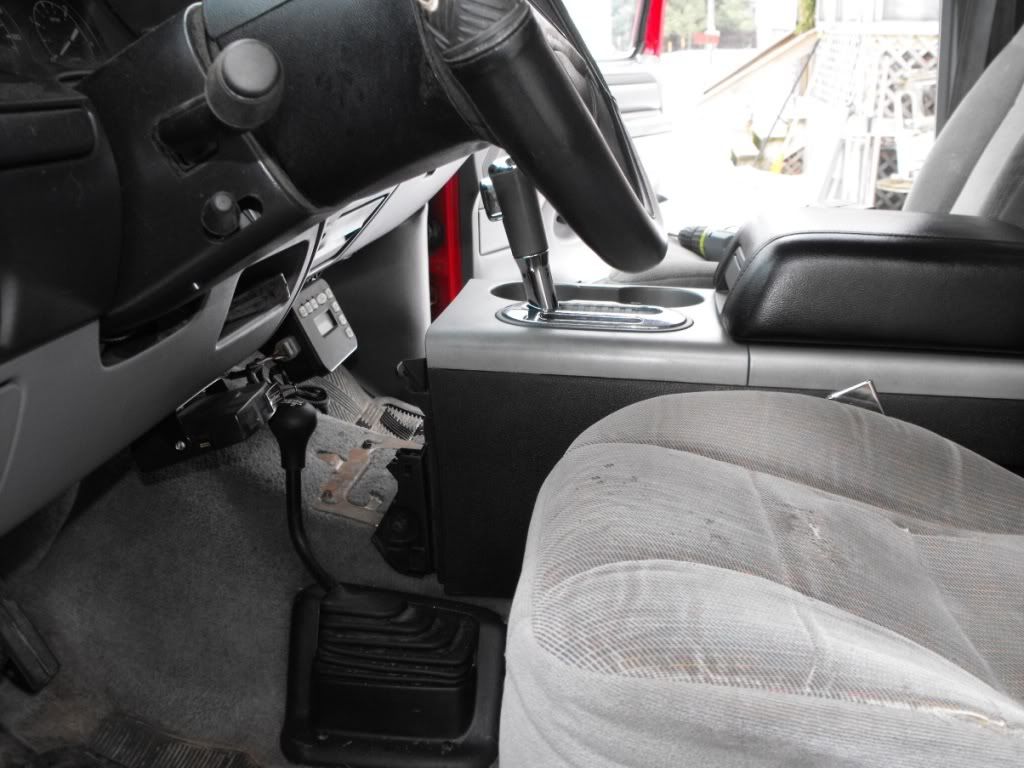
Console mount
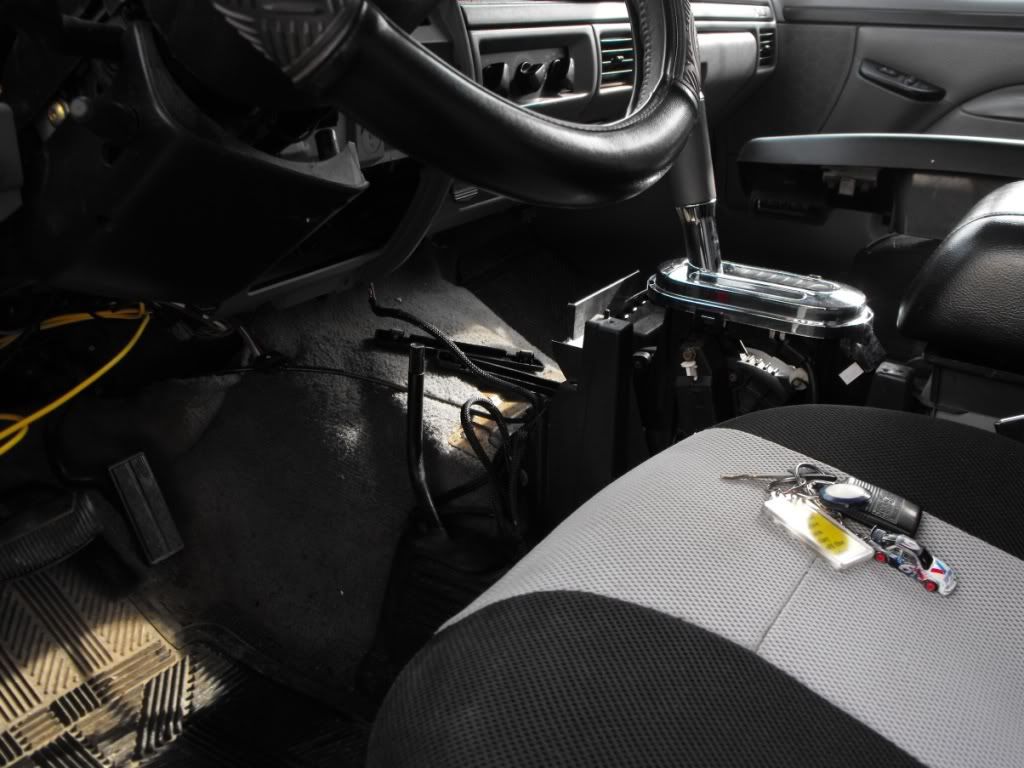
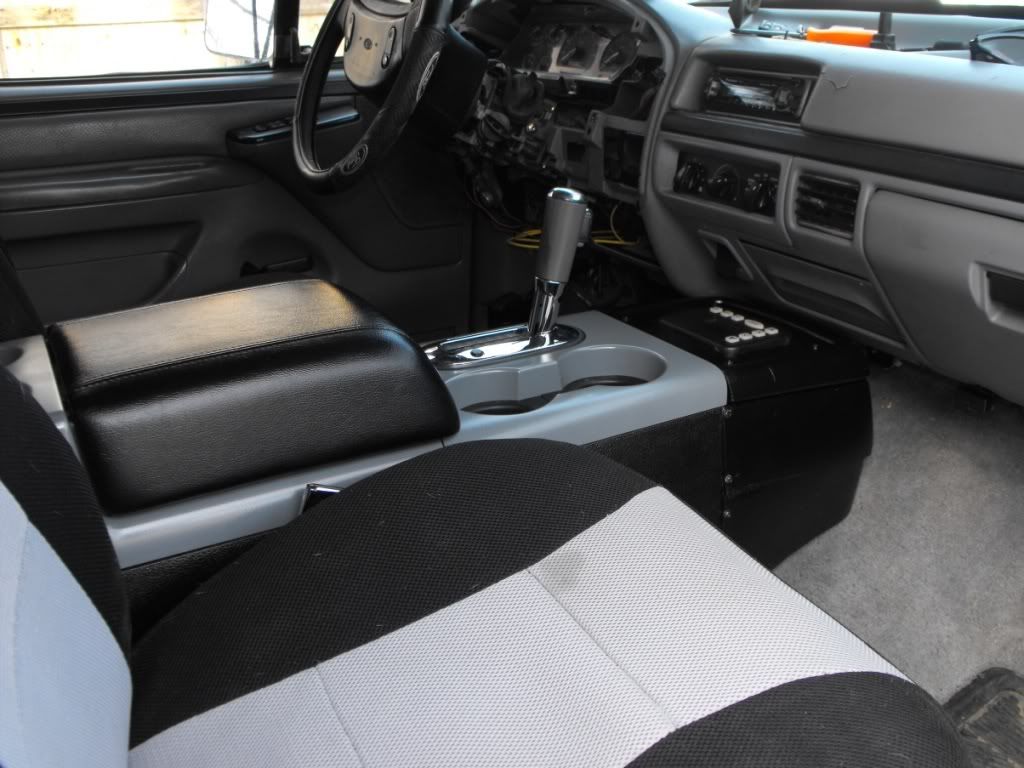
Console mounted
Dash wings installed
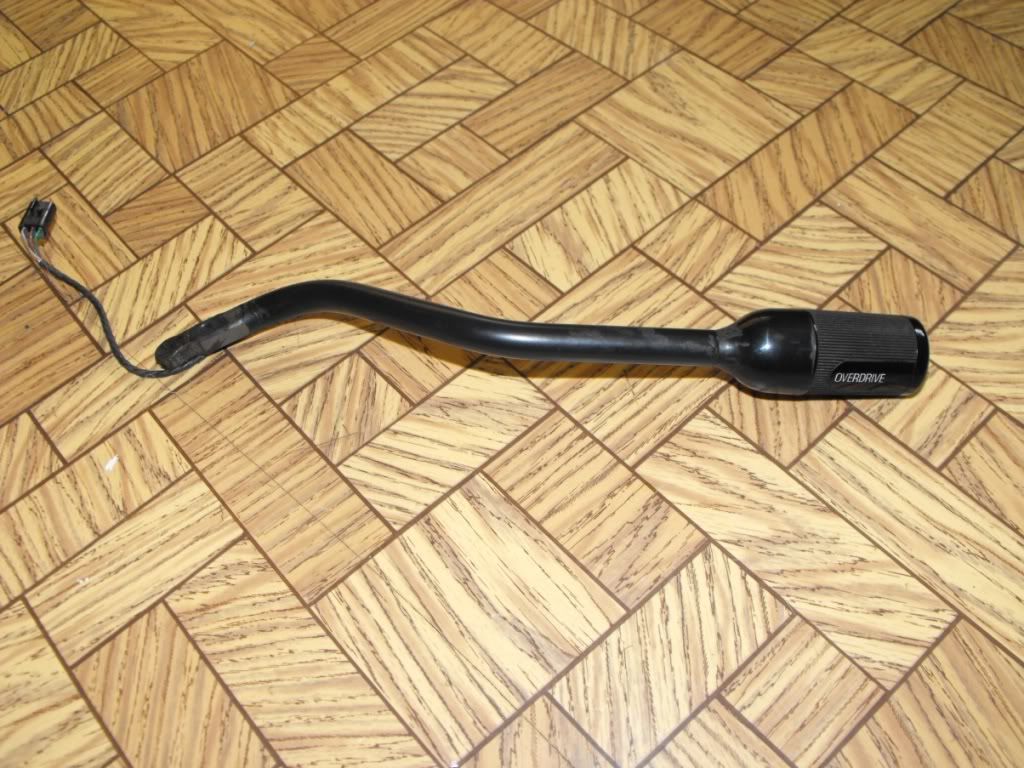
Shift cable modified and installed, didnt even need to adjust cable, the spot I modified it to fit made it the perfect length. I used a file to cut new grooves into the cable lock to fit the shifter
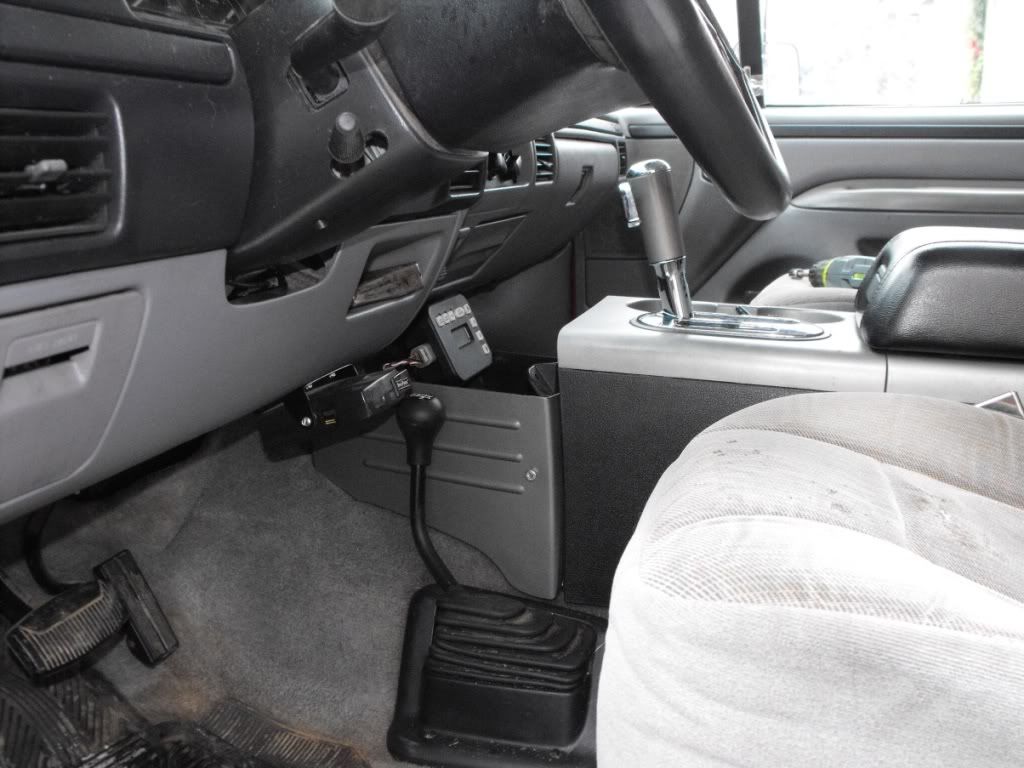
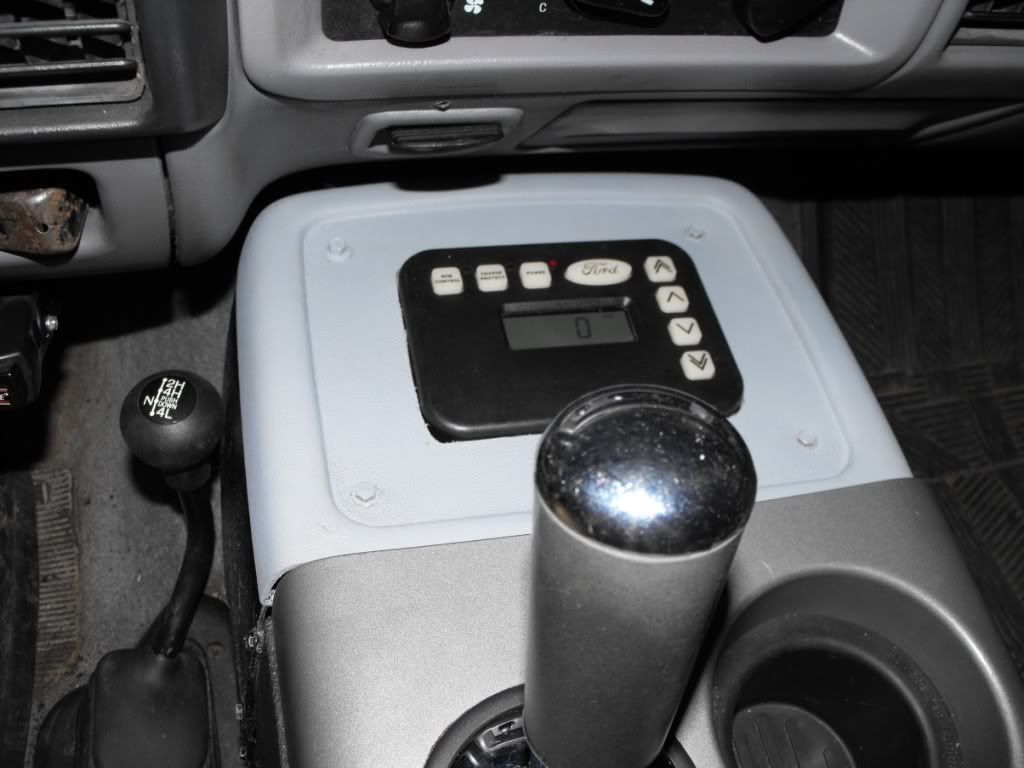
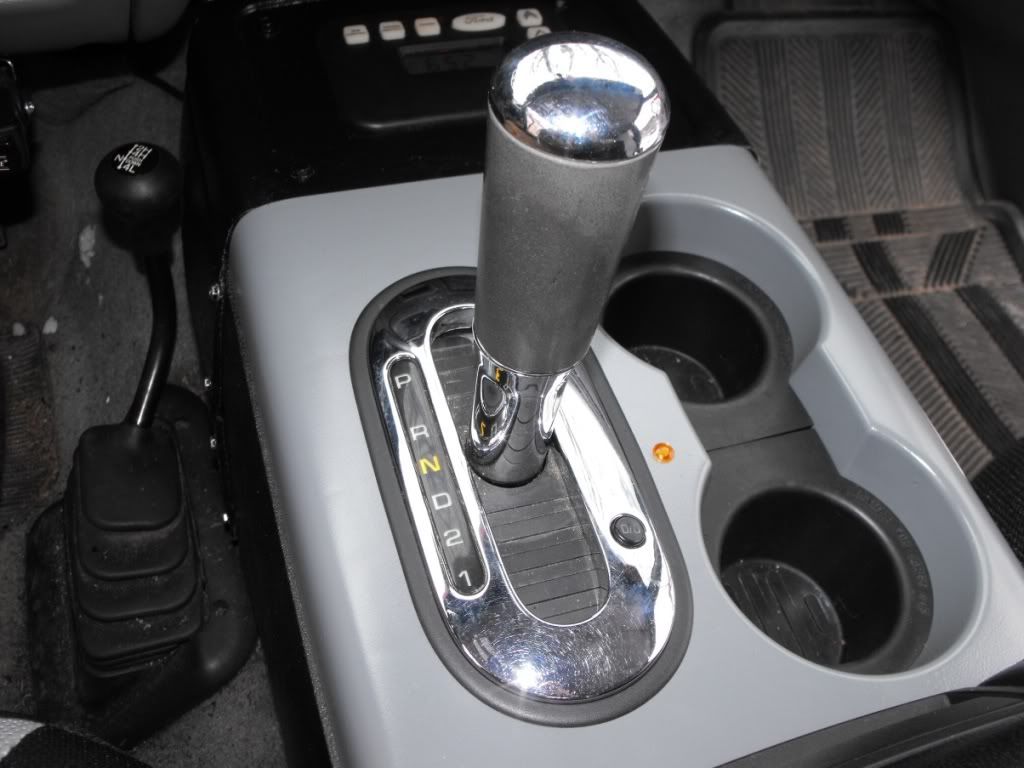
New front console, I need to find better matching black and gray, but the overall fit is pretty good

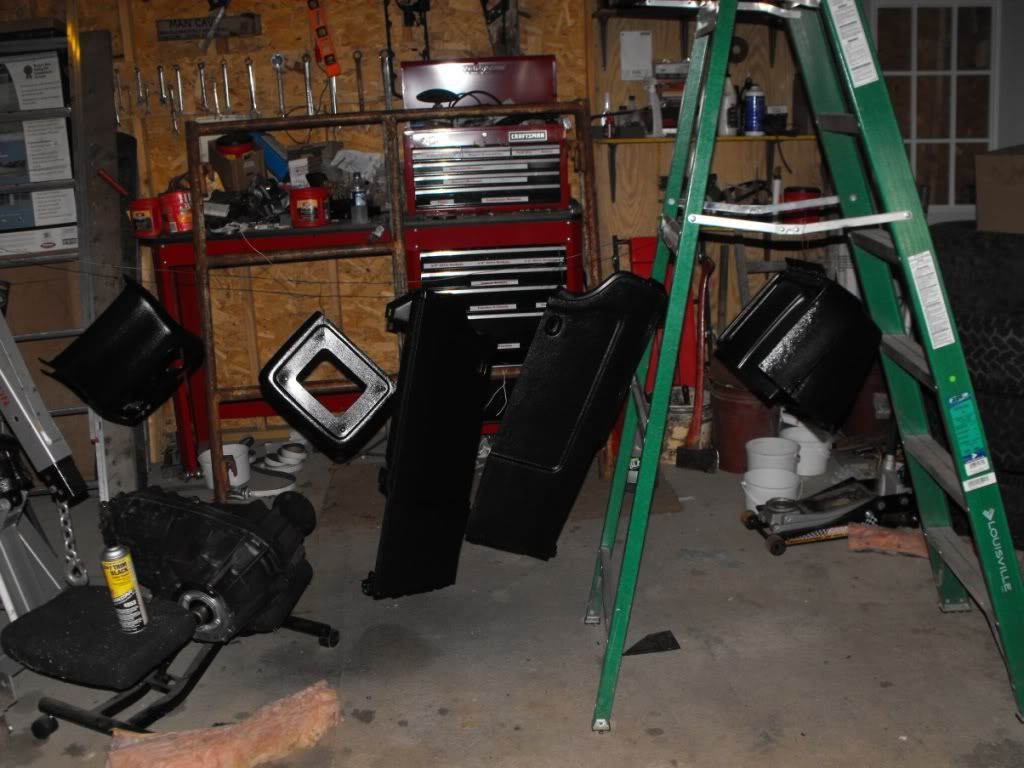
Console disassembled for paint and paint matched parts.
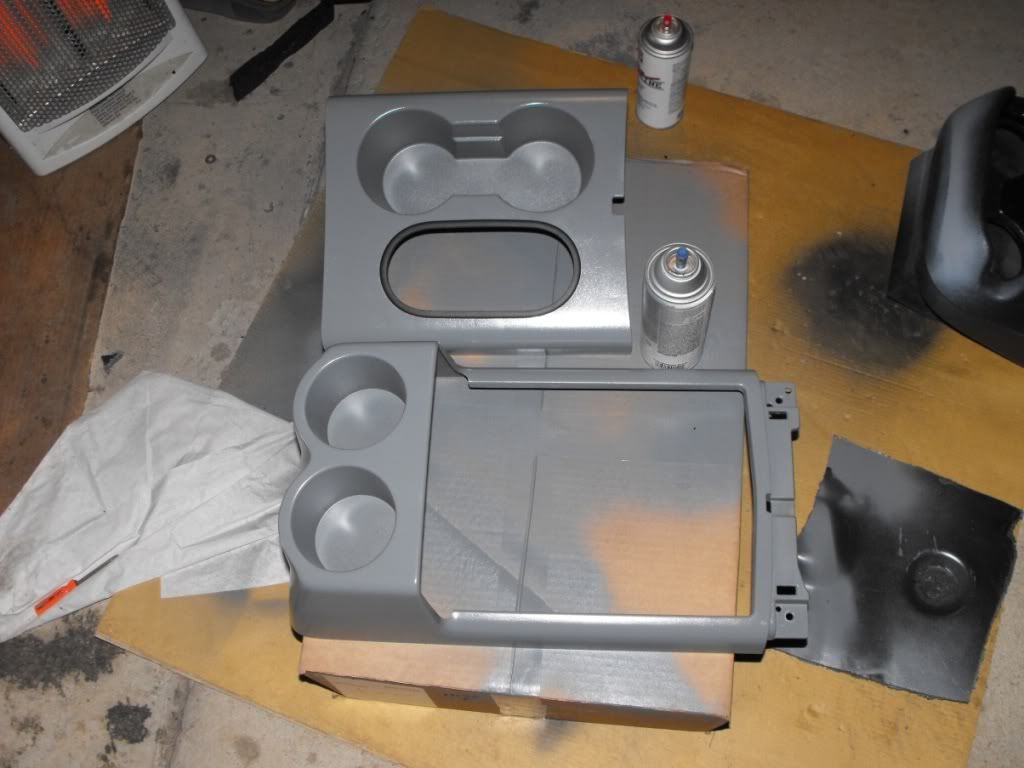
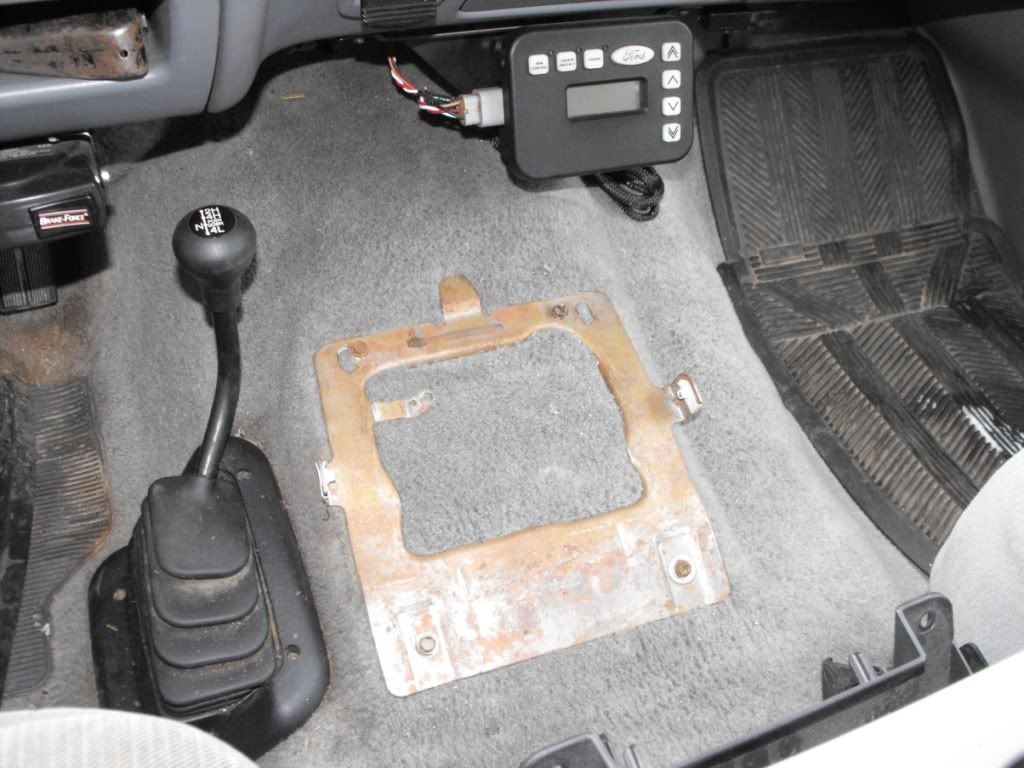
Dont need this anymore
Console back in matching the rest of the interior

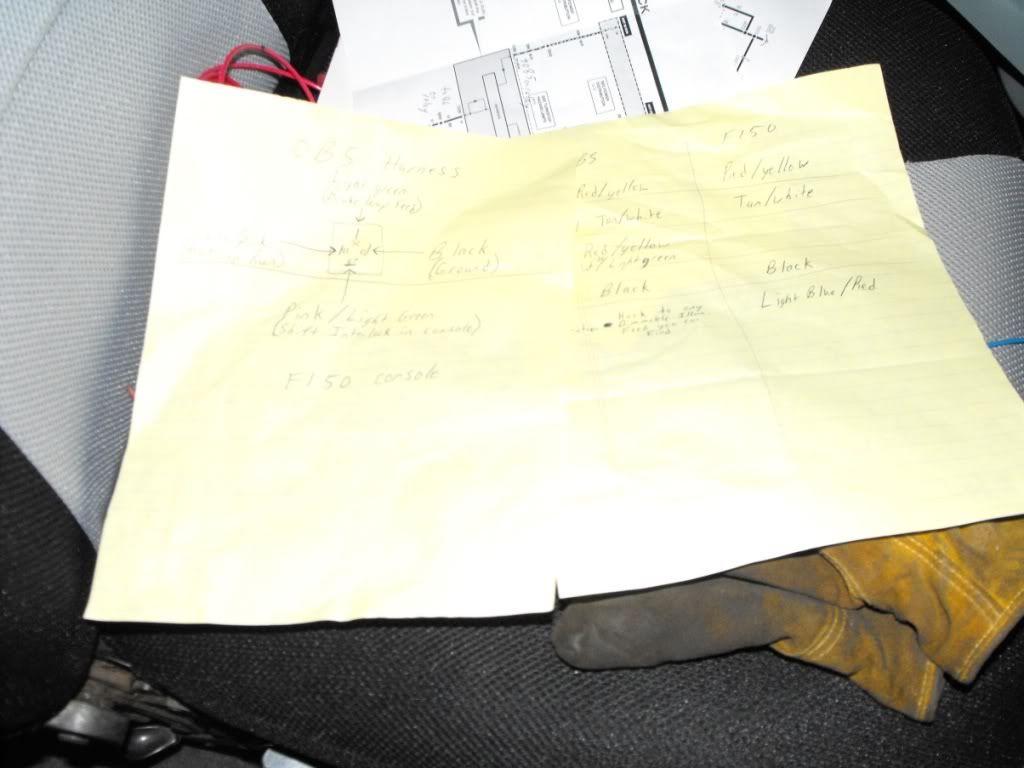
Wiring reasearch, Thank you very very much Zach
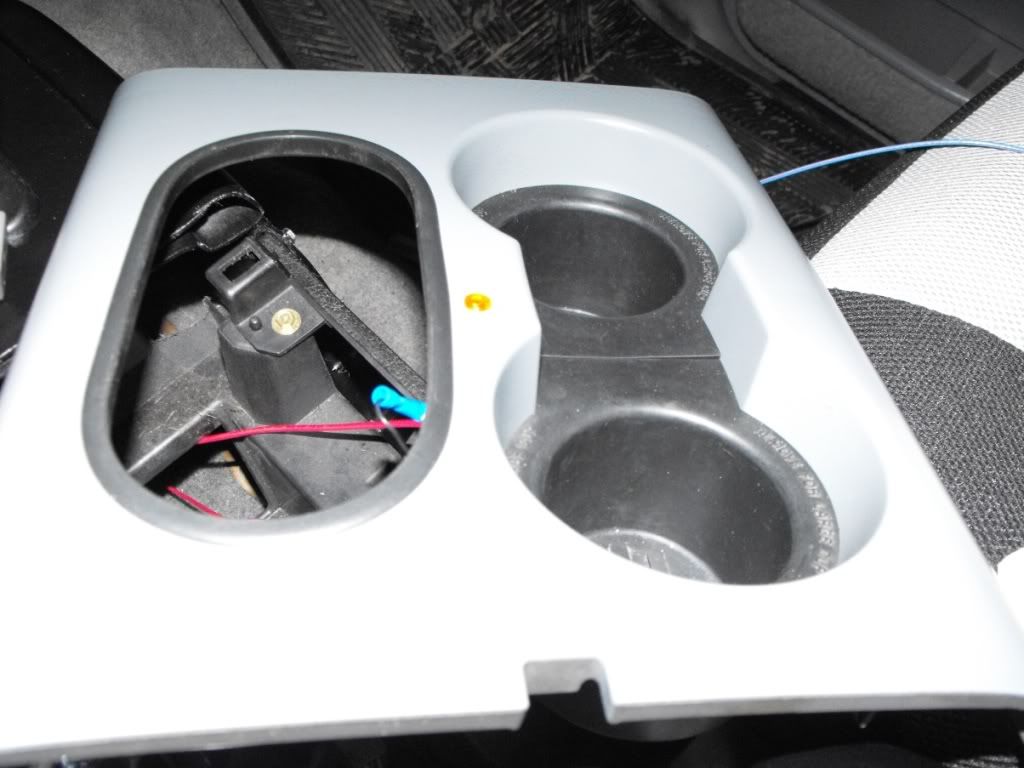
Here is the wiring hooked up to test and LED for the OD off
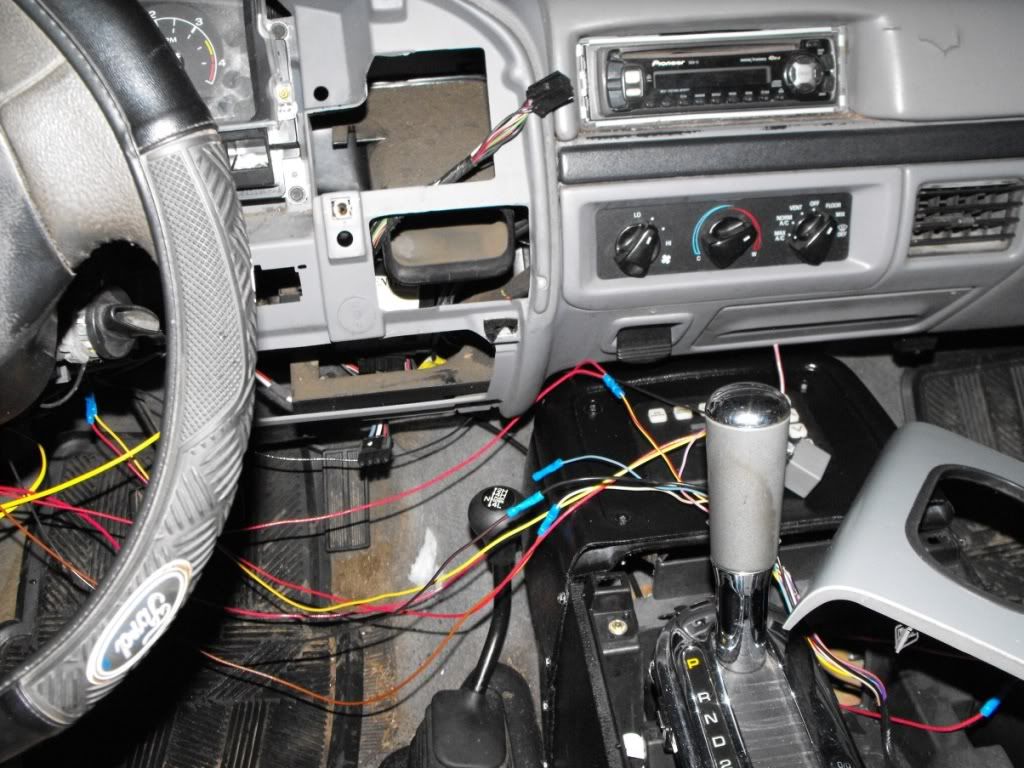
Everything tied up, complete and test driven
Od button on & off

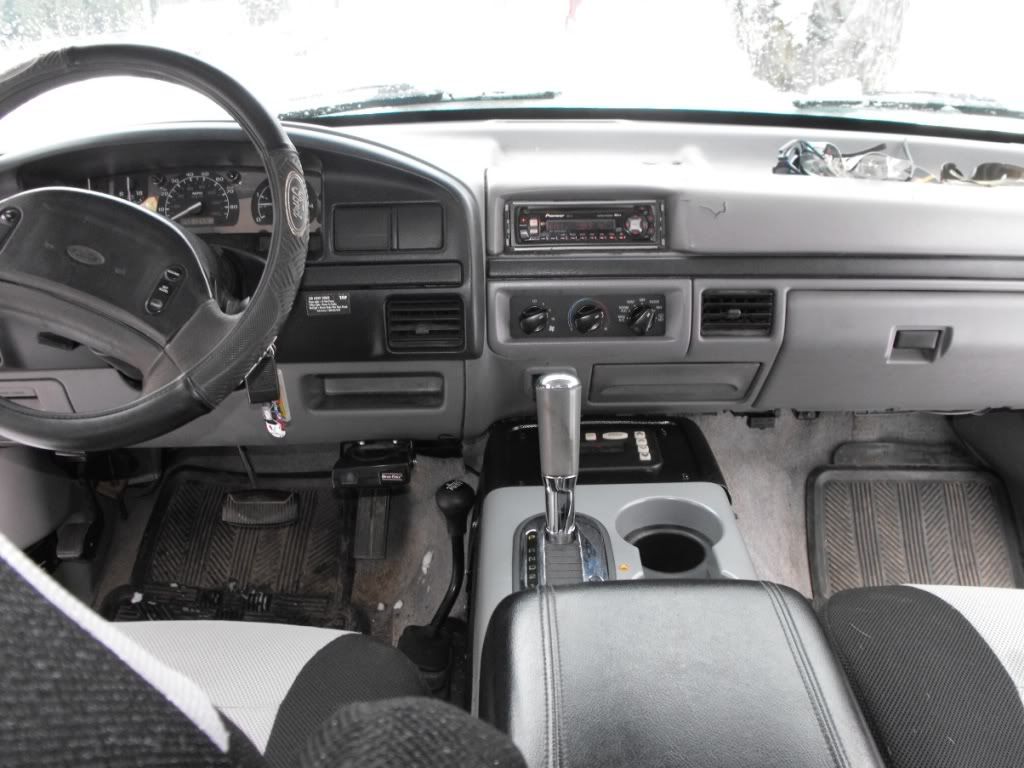
This mod is complete. Thanks for watching.
I want to give a huge thank you to Zach (forddieseldoctor) for giving me the wiring information needed to complete this mod.
Thanks also to Garrett (weareweird69) for his support, and to Bill (alberta 7.3) for making sure the safety features were kept intact.
All pics and information for the build will be posted in this first post for ease of understanding.
Console arrived today, for anyone wondering exactly what I am doing....
The console and shifter I used are from an 06 F150 FX4
In position
I got the console to sit lower and in the correct position by taking out the heat tube under it, as that wont be used.
Console mount
Console mounted
Dash wings installed
Shift cable modified and installed, didnt even need to adjust cable, the spot I modified it to fit made it the perfect length. I used a file to cut new grooves into the cable lock to fit the shifter
New front console, I need to find better matching black and gray, but the overall fit is pretty good
Console disassembled for paint and paint matched parts.
Dont need this anymore
Console back in matching the rest of the interior
Wiring reasearch, Thank you very very much Zach
Here is the wiring hooked up to test and LED for the OD off
Everything tied up, complete and test driven
Od button on & off
This mod is complete. Thanks for watching.
Thread Starter
|
Post Fiend
Joined: Dec 2010
Posts: 10,121
Likes: 3
From: Orrville, Ohio
That looks sweet! Combine that with an 05+ wheel and some new (black leather) seats and you would really have people confused! I'm not sure I could part with the middle seat though. Every once in a while the wife is sweet enough to grace it with her presence and we ride in redneck lovebird style!
Postmaster
Joined: Nov 2005
Posts: 3,168
Likes: 10
From: San Ramon Ca.

Nate your full of surprises my friend. Thats a great idea on the grab handles. Console and shifter looks great! Outstanding work!
Wheelskins make a great steering wheel cover if you don't go another direction.
Somebody rep him for me. I'm out of ammo.
Wheelskins make a great steering wheel cover if you don't go another direction.
Somebody rep him for me. I'm out of ammo.
Trending Topics
Hotshot

Joined: Jan 2012
Posts: 11,132
Likes: 3
From: Southern West Virginia
That's pretty slick Nate! Great job on those man. I think I may try to find some of those handles. My wife is only 5' 2", so she also has a hard time getting in my truck. I'm just not sure if she'll be able to reach the handles! LOL!! Poor little thing! LOL!!
FTE Stories
Ford Trucks for Ford Truck Enthusiasts

Top 6 Best Deals Available on New Fords & Lincolns Right Now
Brett Foote
This Hennessey Takes the Expedition Tremor's Off-Roading Capability to the Next Level
Verdad Gallardo
Top 10 Fords at 2026 Carlisle Ford Nationals
Joe Kucinski
3 Best / 3 Worst Parts of Modern Ford Ownership
Brett Foote
10 Amazing Upgrades That Solve Common Ford Truck Owner Headaches
Pouria Savadkouei
Every 2026 Ford Engine Explained
Brett Foote
10 Ugly Ford Trucks That We Still Kinda Love
Joe Kucinski
10 Things Every Truck Owner NEEDS (2026 Edition)
Michael S. Palmer
Rezvani's Latest Post-Apocalyptic Monster Is a Ford F-150 Raptor Underneath
Verdad Gallardo
Hotshot


Joined: Dec 2005
Posts: 14,379
Likes: 609
From: evansville in
I will pete! Also,i was planning on doing some handles as well since my wife hates getting in mine.I had NOT thought about the fold up ones.THAT is a faboulous idea! I am running to the yard sat and get this done...if the babies let me...


Thread Starter
|
Post Fiend
Joined: Dec 2010
Posts: 10,121
Likes: 3
From: Orrville, Ohio
Thanks guys.
My wife is about 5' 6" and she can reach these without too much trouble. Bill you might think about putting the handle on the A pillar itself (by the windshield) if this is too high.
At some point I hope to build a set of step bars for the truck as well, but that is a long way down the "to do" list. Got to get some bodywork done ahead of that. I like the design of the N-Fab bars, but I don't like the way they attach and the fact that they hit the bed if you flex the truck very much. I intend to build something similar and fasten them to the frame instead of the rockers.
Hotshot

Joined: Oct 2003
Posts: 17,799
Likes: 104
From: Ashland City, TN
People bitch about no grab handles in my truck.
I tell them to blow it out their ***.
As a proper gentleman, you should be helping your lady in the truck.
if they are a guy, they need to man up and grow a pair and learn to get in an effing truck.
I tell them to blow it out their ***.
As a proper gentleman, you should be helping your lady in the truck.
if they are a guy, they need to man up and grow a pair and learn to get in an effing truck.
Thread Starter
|
Post Fiend
Joined: Dec 2010
Posts: 10,121
Likes: 3
From: Orrville, Ohio
...guess I am not a proper gentleman...

It's probably more that she doesn't like when I help her into the truck. Always seem to be putting my hands in places that get me in trouble, lol. Married 10 years and I still feel like a newlywed! LOL


