


My 53 build
Thread Starter
|
5th Wheeling
Joined: Dec 2009
Posts: 34
Likes: 0
From: Rhode Island
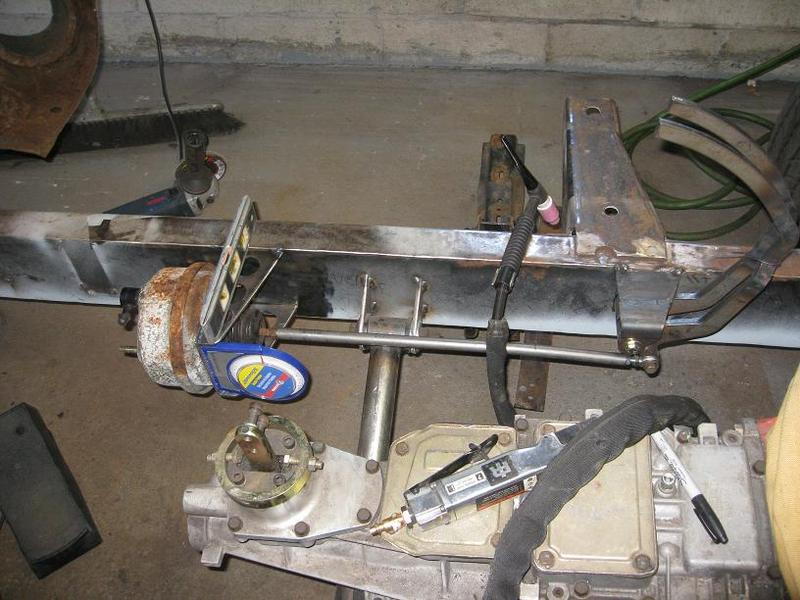
Thanks again guys, heres what I worked on today. I got the brake booster mount tacked on, then cut the push rod down to size (had to re-tap the threads). this booster and master came with the truck the booster is broken. Not sure if im going to run the same setup or something similar, depends on the brakes I go with I guess. I just have to work on the clutch now, not sure if I am going to try and run a cable or hydraulic operated one yet. The hydraulic throw out bearing would be the best option for me but they are a bit pricey.


Elder User
Joined: Mar 2011
Posts: 935
Likes: 2
From: Vancouver, WA
Very, Very nice work, man! You definitely got skills! That truck is gonna turn out really nice. Isn't the shift lever gonna be a bit far back? Sure like the color. You gonna put it back to that blue when you re-paint it?
Nice work, very nice work.
You gonna put it back to that blue when you re-paint it?Nice work, very nice work.
Thread Starter
|
5th Wheeling
Joined: Dec 2009
Posts: 34
Likes: 0
From: Rhode Island
planning on changing the teel blue Dano78, thinking of doing a copper and black two tone. It all depends on the budget, Id love to paint it myself just have to find the patients to do it myself. The shifter ended up a little further back than I wanted but it actually turned out to be a good place. I will have the seat back as far as possible, I can move the shifter forward on the transmission with a kit for the tremec.
Elder User
Joined: Mar 2011
Posts: 935
Likes: 2
From: Vancouver, WA
planning on changing the teel blue Dano78, thinking of doing a copper and black two tone. It all depends on the budget, Id love to paint it myself just have to find the patients to do it myself. The shifter ended up a little further back than I wanted but it actually turned out to be a good place. I will have the seat back as far as possible, I can move the shifter forward on the transmission with a kit for the tremec.
 Copper and black would look good too, kinda a newer-aged color that would surely look good.
Elder User
Joined: May 2009
Posts: 729
Likes: 0
From: Peoria, Arizona
Really great work. I wish I had those kind of skills with fabrication! That tranny tunnel looks great and the ifs looks really clean also
FTE Stories
Ford Trucks for Ford Truck Enthusiasts

Rezvani's Latest Post-Apocalytic Monster Is a Ford F-150 Raptor Underneath
Verdad Gallardo
Top 10 Most Expensive Ford Trucks Ever Sold on Bring a Trailer
Joe Kucinski
2027 Ford Super Duty Buyer's Guide (Every Model, Engine, & Package)
Brett Foote
Top 10 Ford Truck Tragedies
Joe Kucinski
AEV FXL Super Duty - the Super Duty Raptor Ford Doesn't Make
Brett Foote
Lobo Vs Lobo: Proof the F-150 Lobo Should Be Even Lower!
Michael S. Palmer
Ford's 2001 Explorer Sportsman Concept Looks For a New Home
Verdad Gallardo
10 Best Ford Truck Engines We Miss the Most!
Joe Kucinski
2026 Shelby F-150 Off-Road: Better Than a Raptor R?
Brett Foote

Fleet Owner


Joined: Jul 2004
Posts: 27,294
Likes: 1,055
From: NM
Excellent excellent work! You're a great welder for sure. That is the strongest Z on the rear I've seen.
One question on the 4-link; shouldn't the upper links be identical, length and angle? Maybe it's an optical illusion, but they seem to go to the same place on the pumpkin, which is offset.
One question on the 4-link; shouldn't the upper links be identical, length and angle? Maybe it's an optical illusion, but they seem to go to the same place on the pumpkin, which is offset.
Thread Starter
|
5th Wheeling
Joined: Dec 2009
Posts: 34
Likes: 0
From: Rhode Island
I've had the truck for two years but progress has been slow, I work on it a couple hours here and there when I can. Most of my free time has been taken up by my fathers 68 camaro that we should be wrapping up this winter.
Thread Starter
|
5th Wheeling
Joined: Dec 2009
Posts: 34
Likes: 0
From: Rhode Island
I think the angle on them might be a bit off, I have to into moving the mount a bit. Not sure on how this could affect ride quality etc. This is the first four link I've built from scratch, so it might need some tweeking
Hotshot
Joined: Oct 2004
Posts: 15,882
Likes: 88
From: Durham NC
What did you use as a reference when you designed the 4 link? I'd have to go back to my reference texts to see if what you have will work properly or not. Typically the links are all symmetrical in a triangulated 3 or 4 link or are adjusted so they operate like they are symmetrical as possible. Some OEM systems are not symmetrical for practical clearance or packaging but they compensate with large compliant mounting bushings that absorb the misalignment.
You are doing outstanding work.
AFA the body work, if you want a lower profile I'd suggest sectioning the cab like they did with the Foose 56, cutting it at the beltline and taper section it 1-1/2" at the front to 0 at the rear, taking it out of the cowl just below the windshield frame. That way you don't have the difficult problem of cutting the wrap around glass or any other glass and making it fit, plus it's actually easier than a chop. The 56 windshield is already narrower than the previous years because of the 56's "forehead", and by lowering the cowl, the seat can be lowered giving more cab room and greater forward visibility.
Thread Starter
|
5th Wheeling
Joined: Dec 2009
Posts: 34
Likes: 0
From: Rhode Island
I basically based the four link off a foxbody mustang rear suspension, Ive got to go over the angles again. I believe the right upper bar is a bit off, the picture makes it look worse than it is. As far as sectioning the body Id love to just not sure if I will or not. If i can find another cab localy for a good price I may give it a shot. this cab is in good shape (for trucks in this neck of the woods at least) the last truck I had was swiss cheese.