


insight (steps) for cam kit installation
Thread Starter
|
Laughing Gas

Joined: Aug 2011
Posts: 1,116
Likes: 0
insight (steps) for cam kit installation
Hey guys..I just need help. The engine is out..but I have no idea where to begin on this while cam swap. Those of you who have done it..could you give me a direction or a step by step platform for me to put my foot on? It's pretty overwhelming seeing as how this is the first time I've done this.
Moderator


Joined: Dec 2007
Posts: 7,987
Likes: 104
From: Boise, Idaho

If the engine's out, it's actually quite simple.
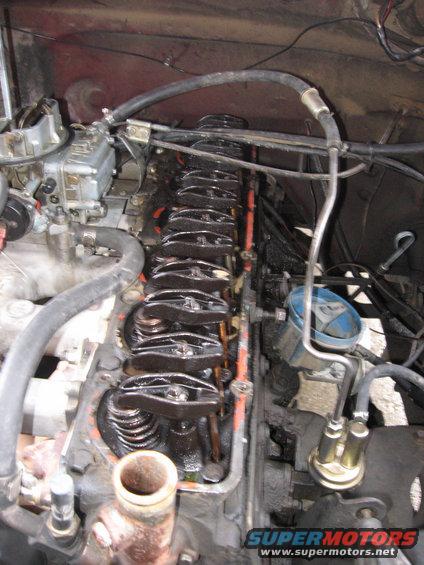
Remove the valve cover and remove the rocker arms and push rods. The push rods hold the lifters in place.
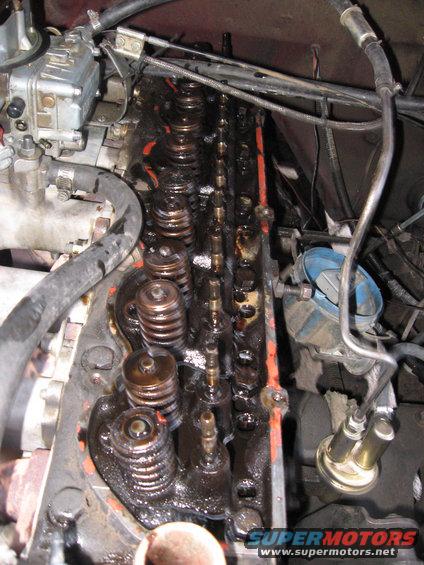
Remove the lifter cover and remove all of the lifters. The lifters are sitting on top of the cam.
Remove the fuel pump. The arm on the pump rides on a lobe on the cam and will block it coming out.
Pull the harmonic balancer since it's in the way of the timing cover.
Remove the timing cover and unbolt the two bolts that hold the cam shaft in the block.
Remove the oil pan so you can hold onto the cam shaft. You don't want to pull it out from the front or the lobes dragging across the cam bearings can score them.
Ease the cam shaft out. It helps if you have one person reaching underneath through the oil pan area, and one pulling from the front. If it's just you, walk it out slowly with your hands on the cam from the oil pan area.
Inspect the cam bearings to be sure they're good. Any sign of copper color and they need to be replaced. Might be a good idea to just do it anyway.
Reverse the process to install the cam.
Keep in mind though that you'll need to put a new spacer, thrust plate, and timing gear onto the new cam first. Or, reuse the ones you have.
Once installed, goop the snot out of the cam and lifters with break-in lube. Then, follow the break-in procedure to the T the first time you fire it up or your cam and lifters can fail.
Remove the valve cover and remove the rocker arms and push rods. The push rods hold the lifters in place.
Remove the lifter cover and remove all of the lifters. The lifters are sitting on top of the cam.
Remove the fuel pump. The arm on the pump rides on a lobe on the cam and will block it coming out.
Pull the harmonic balancer since it's in the way of the timing cover.
Remove the timing cover and unbolt the two bolts that hold the cam shaft in the block.
Remove the oil pan so you can hold onto the cam shaft. You don't want to pull it out from the front or the lobes dragging across the cam bearings can score them.
Ease the cam shaft out. It helps if you have one person reaching underneath through the oil pan area, and one pulling from the front. If it's just you, walk it out slowly with your hands on the cam from the oil pan area.
Inspect the cam bearings to be sure they're good. Any sign of copper color and they need to be replaced. Might be a good idea to just do it anyway.
Reverse the process to install the cam.
Keep in mind though that you'll need to put a new spacer, thrust plate, and timing gear onto the new cam first. Or, reuse the ones you have.
Once installed, goop the snot out of the cam and lifters with break-in lube. Then, follow the break-in procedure to the T the first time you fire it up or your cam and lifters can fail.
Thread Starter
|
Laughing Gas
Joined: Aug 2011
Posts: 1,116
Likes: 0
If the engine's out, it's actually quite simple.
Remove the valve cover and remove the rocker arms and push rods. The push rods hold the lifters in place.
Remove the lifter cover and remove all of the lifters. The lifters are sitting on top of the cam.
Remove the fuel pump. The arm on the pump rides on a lobe on the cam and will block it coming out.
Remove the timing cover and unbolt the two bolts that hold the cam shaft in the block.
Remove the oil pan so you can hold onto the cam shaft. You don't want to pull it out from the front or the lobes dragging across the cam bearings can score them.
Ease the cam shaft out. It helps if you have one person reaching underneath through the oil pan area, and one pulling from the front. If it's just you, walk it out slowly with your hands on the cam from the oil pan area.
Inspect the cam bearings to be sure they're good. Any sign of copper color and they need to be replaced. Might be a good idea to just do it anyway.
Reverse the process to install the cam.
Keep in mind though that you'll need to put a new spacer, thrust plate, and timing gear onto the new cam first. Or, reuse the ones you have.
Once installed, goop the snot out of the cam and lifters with break-in lube. Then, follow the break-in procedure to the T the first time you fire it up or your cam and lifters can fail.
Moderator
Joined: Dec 2007
Posts: 7,987
Likes: 104
From: Boise, Idaho
Forgot to mention the harmonic balancer (updated my post). You can't get the timing cover off with it in the way. Usually, after I take the large bolt off (which takes a 15/16" socket if I remember right), I remove the washer and put the bolt back in. Some pullers can really bugger up the threads and I'd rather have them press on the bolt head.
Elder User - What???
Joined: Dec 2011
Posts: 714
Likes: 1
From: Moore, OK

I second this practice.
Thread Starter
|
Laughing Gas
Joined: Aug 2011
Posts: 1,116
Likes: 0
Kudos also..cuz I'm sure a lot of guys would like to know how its done since cam swapping in these engines is mighty popular! Now..am I gonna have to take the head off? I figured so since when I loosen the rockers I don't want the valves to fall..especially since ill be putting in the kit with new springs and such. If I CAN leave it on it would be great..but if I have to take it off.I guess I could do some porting
Trending Topics
Moderator
Joined: Dec 2007
Posts: 7,987
Likes: 104
From: Boise, Idaho
Thanks.  Just a lot of 'been there, done that' so the more people can learn from my (many) mistakes, the better!
No, the head doesn't need to come off. The valves and springs are independent of the rocker arms.
Just a lot of 'been there, done that' so the more people can learn from my (many) mistakes, the better!No, the head doesn't need to come off. The valves and springs are independent of the rocker arms.
FTE Stories
Ford Trucks for Ford Truck Enthusiasts

10 Things Every Truck Owner NEEDS (2026 Edition)
Michael S. Palmer
Rezvani's Latest Post-Apocalyptic Monster Is a Ford F-150 Raptor Underneath
Verdad Gallardo
Top 10 Most Expensive Ford Trucks Ever Sold on Bring a Trailer
Joe Kucinski
2027 Ford Super Duty Buyer's Guide (Every Model, Engine, & Package)
Brett Foote
Top 10 Ford Truck Tragedies
Joe Kucinski
AEV FXL Super Duty - the Super Duty Raptor Ford Doesn't Make
Brett Foote
Lobo Vs Lobo: Proof the F-150 Lobo Should Be Even Lower!
Michael S. Palmer
Ford's 2001 Explorer Sportsman Concept Looks For a New Home
Verdad Gallardo
10 Best Ford Truck Engines We Miss the Most!
Joe KucinskiModerator
Joined: Dec 2007
Posts: 7,987
Likes: 104
From: Boise, Idaho
At that point, it's easier to remove the head, but not necessary. You just need to find a way to keep the valves from falling into the head. When I did mine, I didn't remove it.
The trick I used is to get a bunch of soft nylon rope. Drop the cylinder you're working on to its lowest point. Feed the rope in through the spark plug hole and then bring it back up to TDC. That'll press the rope up against the valve and keep it up. Pretty simple, but kind of a pain.
The other is if you have an air compressor, get a fitting for the compressor that's the same as the spark plug thread. Bring the cylinder to TDC (so you know the valves are closed), thread it into the spark plug hole, and fill it with compressed air. The air will keep the valves up.
Moderator
Joined: Dec 2007
Posts: 7,987
Likes: 104
From: Boise, Idaho
Yes and no.
If you have it off, you'll want to have it magnafluxed to be sure there aren't any cracks in it, (which wouldn't be a bad thing anyway.)
You'll also have to have it checked to be sure it isn't warped. If it is, you'll have to have it resurfaced. Common with such a long head.
Plus, you'll need a new head gasket and new head bolts.
Not a bad thing if you want to be sure the head's tip-top, but just a heads up so you know why sometimes it's easier (aka cheaper) to just do the tricks to keep the valves up.
Moderator
Joined: Dec 2007
Posts: 7,987
Likes: 104
From: Boise, Idaho
If it were me, I wouldn't worry about removing it then, and just do one of the ideas above. But, do it first before removing the cam so that you can turn the crank with the harmonic balancer still bolted and tightened down.