Big Blackie - The Build
#571
 07-02-2014, 01:18 PM

Join Date: Jan 2012
Location: Corvallis, OR
Posts: 582
Likes: 0
Received 0 Likes
on
0 Posts
Earlier I had shown a bespoke dual-snorkel air cleaner that I intended to use. It was made by someone else and the snorkels didn't really exit at the best angle for my truck so over the last year I have been collecting air cleaner parts from the junkyard and finally I made up another one.
The base came from a 70s-body style F350, it was very rusted but still sound. It had almost no holes for emissions components except a single one for the Thermal Vacuum Switch (TVS). I've seen some later air-cleaners with half a dozen holes for this and that.
This truck in the yard was missing the lid so I got one of those from some other car I can't remember. And there are multiple versions of snorkels that were used, some had wax pellet expansion actuators, and others have the traditional vacuum motor mounted to the top. I prefer the latter style so I rounded up two of those.
Next is to cut the second hole in the air cleaner base. The photos below show the process, I used a drill, a dremel, some wide flat pliers to bend out the tabs (the stock side has these tabs, I assume it is for strength), and a file and sandpaper to even it all out. Honestly it came out looking pretty good if I say so myself.


This shows the lid I found. The writing on the white sticker was completely faded off, and I don't remember what car I took it from.

#572
07-02-2014, 01:24 PM

Lead Driver
#573
07-02-2014, 01:25 PM
Join Date: Jan 2012
Location: Corvallis, OR
Posts: 582
Likes: 0
Received 0 Likes
on
0 Posts
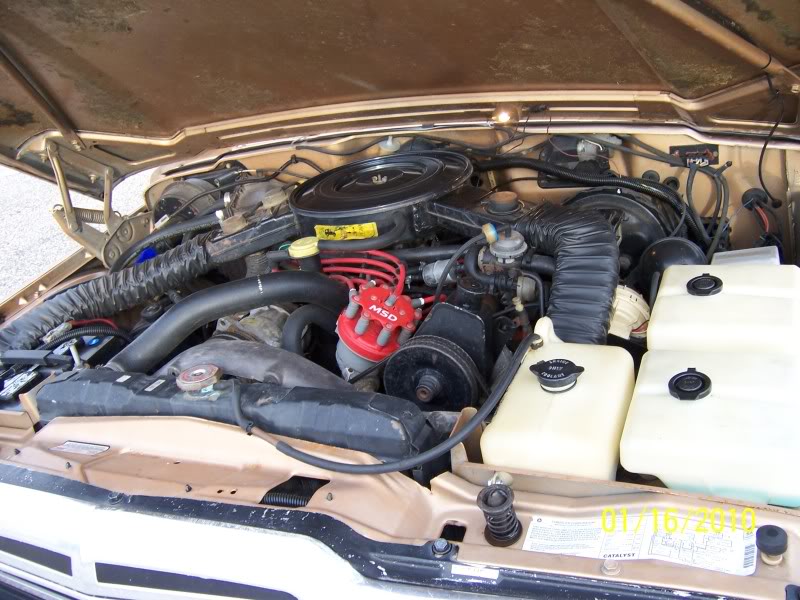
And here it is during a test-fit in the truck. It was extremely sunny that day so not really the best for taking photos. I'm afraid my engine bay looks like a mess. Not sure if I should blame that on the sun or admit it's the reality.
Here's the overall view:

Passenger side. I am using a "late style" plastic adapter mounted low on the core support. Routing is very tight around the heater hoses, custom fuse box, and York air compressor. But it does all fit.

Driver's side. I am using the "early" style S-type plastic adapter on the core support. Lots more room on the driver's side.


#574
07-02-2014, 01:34 PM
Join Date: Jan 2012
Location: Corvallis, OR
Posts: 582
Likes: 0
Received 0 Likes
on
0 Posts
I had posted this over in Dad's Air Cleaner thread but will go ahead and copy it here too.
On the driver's side of the core support the only plastic adapter that would fit in the location of the existing hole, was the "early" style S-type adapter. However this adapter was intended by Ford to be used on the passenger side, and the S-curve was meant to go around the battery. On the driver's side I had to flip it upside-down so the S-curve would clear the wheel-well as you can see in the previous post. That works fine but then the nozzle that the air duct hose attaches to is pointing towards the ground, so no bueno.
My solution was to cut the plastic adapter in half, flip the nozzle, then glue it all back together with fiberglass drywall tape and Amazing Goop.
I admit it looks a bit dodgy but is quite firm. Once tucked down in my engine bay it is way down low and probably no one will see it. All the same I intend to paint it black but I need to wait another week or so until the glue fully cures (ie, stops smelling).
I also need to figure out a mounting arrangement for this side since the stock tabs don't mate up to anything. I'll probably use a bit of metal strap and some rivets or something, but it shouldn't be too hard.


#575
07-02-2014, 01:35 PM
Posting Legend
Excellent work, Luke! The bends on those flanges looks just right. I had planned to scavenge that area for another base and braze it in for strength, but I think your approach is better as it looks stock.
Speaking of brazing, I do plan to braze nuts on the inside for the screws holding the snorkels on. The factory punched the holes and the metal bent in and gave more threads when the self-tapping screws were run in - as you can see in your first two pictures. But when I drill it I don't have that much thread so think it might need more.
Any thoughts on running brass tubing inside to hide the vacuum hose?
#576
07-02-2014, 01:54 PM
Join Date: Jan 2012
Location: Corvallis, OR
Posts: 582
Likes: 0
Received 0 Likes
on
0 Posts
Yeah, I don't think we can reliably use the Ford method of self-tapping screws for our drilled holes. Frankly I don't care for that arrangement anyway because if the threads ever strip then you're toast.
In my picture you can see some heinous bolts holding the snorkels on, this was just for testing. But I do plan to use stainless bolts and locknuts in the end, only they will be sized appropriately (ie not an inch too long like the ones in the picture) and they will be socket button head which I think will look good.
But brazing would also work well. On more than one occasion I have really wished for a brazing rig, it would have come in handy several times. So far I have resisted buying one.
By the way, probably everyone already knew this, but I'm sending that rusty air cleaner off to Leanna to get powder-coated, so it will look much nicer in the end! And it will match my valve covers.
As for the hidden vacuum lines - I think it's a unique idea, and I'm looking forward to seeing your implementation of it. But my engine bay is already so cluttered with junk it's no use hiding a few more vacuum hoses at this point. Also I have decided to use both ACTS and CWM and the latter especially doesn't play well with the hidden hose concept as you have pointed out. Which I guess should be my next post...
#577
07-02-2014, 02:03 PM
Posting Legend
I suppose it wouldn't be necessary to make the nuts captive as a self-locking nut wouldn't come loose. So, maybe I won't braze them on.
I do like the button-head screw idea as it'll give large surface area w/o a washer. And, since I need to order SS SHCS's for my valve covers I might as well order everything in one go. Thanks for the idea and the link!
I do like the button-head screw idea as it'll give large surface area w/o a washer. And, since I need to order SS SHCS's for my valve covers I might as well order everything in one go. Thanks for the idea and the link!
#578
07-02-2014, 02:25 PM
Join Date: Jan 2012
Location: Corvallis, OR
Posts: 582
Likes: 0
Received 0 Likes
on
0 Posts
There is a lively discussion of the various vacuum components that are associated with the air cleaner over in Gary's thread called "Dad's Air Cleaner."
Here is another really great thread I found by those awesome Bronco guys, that lists tons of components, their names as shown in Ford vacuum diagrams, and pictures of the real parts so you can identify them in real life:
Emission & Vacuum Diagram Picture Reference
After much thought and deliberation I have decided to use two vacuum components in association with my air cleaner vacuum motors (which select hot air from the exhaust manifold area when vacuum is applied, or cold air from the core support when vacuum is bled off).
A/CL BI MET: Air Cleaner Bi-Metallic switch, also called ACTS (air cleaner temperature switch). It looks like a metal disc and is usually installed on the base or sometimes the lid of the air cleaner, I have never seen one installed on the side.
CWM: Cold Weather Modulator, this one is plastic and installed on the side of the air cleaner.
The ACTS allows vacuum to travel to the actuators when the engine is taking in cold air, so the actuators close the valve in the snorkel that shuts off cold air from the core support and instead sucks in hot air from the exhaust manifold. When the engine heats up sufficiently the ACTS warms up and eventually bleeds off the vacuum so the actuators release the flapper valve and cold air is now brought in from the core support.
There are different variants of the ACTS that bleed out the vacuum (let the actuators revert to cold air intake) at different temperatures. They can be identified by the paint splotches applied to them although often there are up to three different colors of paint I have seen on a single switch so it can get confusing.
The CWM is also a temperature vacuum switch. It "closes" (traps vacuum) below a certain temperature, and "opens" (lets vacuum flow through) above a certain temperature. It is used to keep vacuum on the air cleaner actuators below a certain temperature, even if engine vacuum is otherwise lost through the ACTS. Again there are different CWMs with different opening/closing temperatures, and they can be identified by the color of the switch.
Here is a great diagram that shows the operation of these two switches in tandem with each other:

Here are some color references for the ACTS and CWM, taken from Bubba's M-Block Workshop:


Here is another really great thread I found by those awesome Bronco guys, that lists tons of components, their names as shown in Ford vacuum diagrams, and pictures of the real parts so you can identify them in real life:
Emission & Vacuum Diagram Picture Reference
After much thought and deliberation I have decided to use two vacuum components in association with my air cleaner vacuum motors (which select hot air from the exhaust manifold area when vacuum is applied, or cold air from the core support when vacuum is bled off).
A/CL BI MET: Air Cleaner Bi-Metallic switch, also called ACTS (air cleaner temperature switch). It looks like a metal disc and is usually installed on the base or sometimes the lid of the air cleaner, I have never seen one installed on the side.
CWM: Cold Weather Modulator, this one is plastic and installed on the side of the air cleaner.
The ACTS allows vacuum to travel to the actuators when the engine is taking in cold air, so the actuators close the valve in the snorkel that shuts off cold air from the core support and instead sucks in hot air from the exhaust manifold. When the engine heats up sufficiently the ACTS warms up and eventually bleeds off the vacuum so the actuators release the flapper valve and cold air is now brought in from the core support.
There are different variants of the ACTS that bleed out the vacuum (let the actuators revert to cold air intake) at different temperatures. They can be identified by the paint splotches applied to them although often there are up to three different colors of paint I have seen on a single switch so it can get confusing.
The CWM is also a temperature vacuum switch. It "closes" (traps vacuum) below a certain temperature, and "opens" (lets vacuum flow through) above a certain temperature. It is used to keep vacuum on the air cleaner actuators below a certain temperature, even if engine vacuum is otherwise lost through the ACTS. Again there are different CWMs with different opening/closing temperatures, and they can be identified by the color of the switch.
Here is a great diagram that shows the operation of these two switches in tandem with each other:
Here are some color references for the ACTS and CWM, taken from Bubba's M-Block Workshop:
#579
07-02-2014, 02:46 PM
Join Date: Jan 2012
Location: Corvallis, OR
Posts: 582
Likes: 0
Received 0 Likes
on
0 Posts
So that is the general idea, putting it all together is a something of a different challenge as I have discovered.
For one, good luck finding a CWM valve for sale - anywhere. These are more rare than air duct hose, the junkyard is the only place you can find them.
The bit-metallic ACT switches are not unobtainium but close. If you find one for sale you probably won't know what the specifications for it are, since the seller will rarely say anything about it. I was able to buy a Motorcraft CX-1384 from RockAuto but I may have gotten the last one - it said "wholesaler closeout" and if you search their site now it won't come up.
However, the ACTS are frequently found in junkyards. The only problem is getting them off the old air-cleaner without destroying the clip that holds them in (more or less impossible).
I have not see very many CWMs in junk-yards, but I have seen lots of TVS (thermal vacuum switches). These function the exact same as the CWM, and are even the same shape and size, but they were typically used to control emissions components rather than the air cleaner vacuum motors. They also come in different temperature ratings than the CWM, shown below.
I have also attached some generic photos of the ACTS, CWM, and TVS (but of course they come in other colors as well).

ACTS

CWM

TVS

For one, good luck finding a CWM valve for sale - anywhere. These are more rare than air duct hose, the junkyard is the only place you can find them.
The bit-metallic ACT switches are not unobtainium but close. If you find one for sale you probably won't know what the specifications for it are, since the seller will rarely say anything about it. I was able to buy a Motorcraft CX-1384 from RockAuto but I may have gotten the last one - it said "wholesaler closeout" and if you search their site now it won't come up.
However, the ACTS are frequently found in junkyards. The only problem is getting them off the old air-cleaner without destroying the clip that holds them in (more or less impossible).
I have not see very many CWMs in junk-yards, but I have seen lots of TVS (thermal vacuum switches). These function the exact same as the CWM, and are even the same shape and size, but they were typically used to control emissions components rather than the air cleaner vacuum motors. They also come in different temperature ratings than the CWM, shown below.
I have also attached some generic photos of the ACTS, CWM, and TVS (but of course they come in other colors as well).
ACTS
CWM
TVS
#580
07-02-2014, 03:01 PM
Join Date: Jan 2012
Location: Corvallis, OR
Posts: 582
Likes: 0
Received 0 Likes
on
0 Posts
If you notice in the specification tables, a couple of the TVSs have the exact same opening and closing temperature as some of the CWMs. They are the same size and shape and have the same function, so you could use the TVS instead of the CWM and get the same effect.
- Purple TVS and Blue (very light blue) CWM both close at 40* and open at 50*
- White TVS and Green CWM both close at 50* and open at 76*
These seem to be the most reasonable temperature ranges and from what I have seen in junk-yards, about the most common. In fact I don't know this for sure but from my observation the purple TVS seems the most common.
So anyway - I wasn't able to find a CWM for sale anywhere but I did find a NOS purple TVS on eBay. I also have a used purple TVS that I picked up from a junkyard, and it seems to still work when I put it in the freezer.
If you want to search for a TVS on eBay, try looking for "9A995".
#581
07-02-2014, 03:17 PM
Join Date: Jan 2012
Location: Corvallis, OR
Posts: 582
Likes: 0
Received 0 Likes
on
0 Posts
Ok, I have a bi-metallic switch and my CWM switch (which is actually a TVS). What else could I need for an air cleaner?
Probably most important, the vacuum motors themselves. I have some used ones but they look real awful and I don't know how much I trust the rubber inside. These used to be sold on the aftermarket but are becoming much harder to find.
About a year ago I posted here that you could use a Standard Motor Products VA19, which I see is still available on the internet. The problem is I don't remember how I arrived at that part number and I haven't checked it to be certain. In my more recent searching it seemed like I might instead need a VA11 (not available) which is the equivalent of Motorcraft CX-149. I was able to find a couple of these Motorcrafts which I ordered and I will report back if they are correct or not. I guess I should also go ahead and try the VA19 too - if it is the correct size, they are a lot more common (for now).
Two more things you might need to refurbish an old air-cleaner:
- Clips to hold the TVS/CWM: Dorman/Help! sells a kit, #41114
- New gaskets for your air-cleaner lid. There are various ones available and it's hard to know which will work. For now I have ordered 9673-2A from NPD. Hasn't shown up yet but I will let you know if it's correct or not when it does.
That summarizes my air-cleaner research for now!
What I have certainly discovered is that all these air-cleaner components are becoming more and more difficult to find. Until 70s/80s-era vehicles start to be considered "classics" (they may never), in which case perhaps restoration companies may start offering more of these pieces in reproduction, the future of many of these components looks bleak. I have had a hard enough time sourcing these pieces today in 2014, I would not want to be doing it again in 2020. By then it will probably be impossible.
#582
07-02-2014, 05:12 PM
Posting Legend
Luke - Good info. I hadn't seen the air cleaner gasket, so I'm happy you found it and am anxious to see what you think of it.
On the vacuum motors, let's compare notes on what we find. I need to check the ones I have to see what the numbers are and if we can determine any differences. I'm having a hard time understanding what the differences might be since the snorkels appear to be the same size. In fact, it looks to me like the snorkels themselves were all the same and the difference was in the adapter that connects the snorkel to the air cleaner base.
I'll check tomorrow to see what I have, what numbers they have, etc. and, by the way, we need the SS button-head screws to hold them on as well.
#583
07-02-2014, 05:22 PM

Luke, I am in awe at your attention to detail. Most everyone would have just cut the oval opening for the snorkel and called it good. I can not believe you thought about leaving enough material to flare the opening to match the other side.
People can criticize and say what they want about values of trucks, but I would put yours into the very high 5 digits sale price. Your tedious detail work is really great.
On another note, my local tool store has a specialty tape that bonds and seals to anything. It gets rock hard when dry and will not break free. I played with a sample there. It almost sets like a cast. Home depot also sells it in different widths and lengths. It can even repair radiator hoses.
Not sure of the name, but it has a carbon fiber pattern.
#584
07-03-2014, 08:31 AM
Senior User
Luke76, you're knowledge and attention to detail is second to none. Thank you for all of your posts. I too added another snorkel to an air cleaner. However, it wasn't a Ford; it was a Jeep 360 
Anyhow, it appears that the intake hoses might be the same, as you've pointed out that you used one from a Jeep application. Keep up the good work; I need it lol.

Anyhow, it appears that the intake hoses might be the same, as you've pointed out that you used one from a Jeep application. Keep up the good work; I need it lol.
#585
07-03-2014, 08:49 AM
Senior User