


Power Brake Conversion
Posting Guru
Joined: Jan 2011
Posts: 2,315
Likes: 0
From: Rossmoor at Seal Beach
Thanks for all the replies! I asked about using a dual pot, the mechanic said it wasn't necessary, so we stayed with with the original m/c. I wanted to swap it out someday anyway, now I will. I suppose to make it easier would be another (ahem) S10 m/c. Thanks for the comment on my picture Buzz...it's totally primered in gray now.
Daddywags! The CPP dual master/booster is actually an older model Corvette master booster, with an adapter mounting bracket to make it fit Most Slicks.. Mine was $295 a few years ago, but I have seen a few of these on older Vette's at the junkyard.. Mine was about a two hour install.. It comes with an adjustable length push rod, to make connecting to the brake pedal a breeze, the most time consuming part was splitting the front lines from the rear, and most of that time was spent driving around to find the right plumbing fittings... Good luck with it!

Postmaster
Joined: Oct 2010
Posts: 4,656
Likes: 4
From: Northern and Southern Cal

He is right, it's not necessary for the operation of the system.
However, I know of two that have failed. One on me (no big deal there) and one on my brothers wife (oops, big deal).
So, if you travel flat back roads by yourself, no big deal, if you maintain your system well.
However,,,,,,,, if your wife or kids get in it you may want to think about it (as you probably have). Hell it's $60 worth of good insurance.
I learned something new.
Didn't know that '67s> had a safety valve in them. Thanks Garbz.
Posting Guru
Joined: Jan 2011
Posts: 2,315
Likes: 0
From: Rossmoor at Seal Beach
He is right, it's not necessary for the operation of the system.
However, I know of two that have failed. One on me (no big deal there) and one on my brothers wife (oops, big deal).
So, if you travel flat back roads by yourself, no big deal, if you maintain your system well.
However,,,,,,,, if your wife or kids get in it you may want to think about it (as you probably have). Hell it's $60 worth of good insurance.
I learned something new.
Didn't know that '67s> had a safety valve in them. Thanks Garbz.
However, I know of two that have failed. One on me (no big deal there) and one on my brothers wife (oops, big deal).
So, if you travel flat back roads by yourself, no big deal, if you maintain your system well.
However,,,,,,,, if your wife or kids get in it you may want to think about it (as you probably have). Hell it's $60 worth of good insurance.
I learned something new.
Didn't know that '67s> had a safety valve in them. Thanks Garbz.
Agreed learned something new also.. i was just reading up and doing a little research.. found out that they also have an optional check valve that maintains about 10 psi in the system on the rear, and 2 psi in the system on the front to help prevent the wheel cylinders from retracting back to rapidly and popping the seals out... but I am attaching a good explanation page of the basics of the brake system.
HowStuffWorks "How Master Cylinders and Combination Valves Work"

More Turbo


Joined: Oct 2009
Posts: 596
Likes: 58
From: West Plains, MO

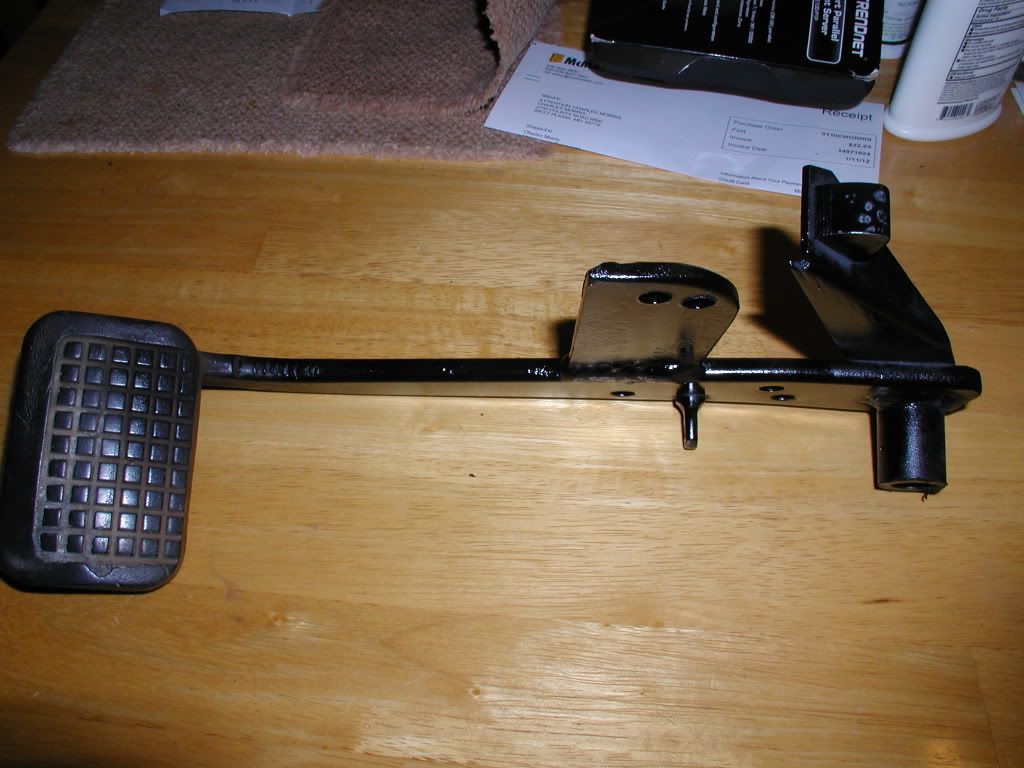
New mounting plate is made and tack-welded in place (a couple hours work with 3" air cutoff wheel and other hand tools). The pedal bracket is also 1/8" steel, and 6x6" cutoff pieces were $1 each at my local steel place.
http://i1181.photobucket.com/albums/...s/P1060143.jpg
http://i1181.photobucket.com/albums/...s/P1060142.jpg
Since I'm a lousy welder, I'll get a local shop to do the welding on Monday. Then just drill four holes for the new booster pattern (and a big one for the pushrod/boot)
I could start a new thread if it would be more appropriate, but this seems relevant to a thread entitled "Power Brake Conversion"

More Turbo
Joined: Oct 2009
Posts: 596
Likes: 58
From: West Plains, MO
Progress
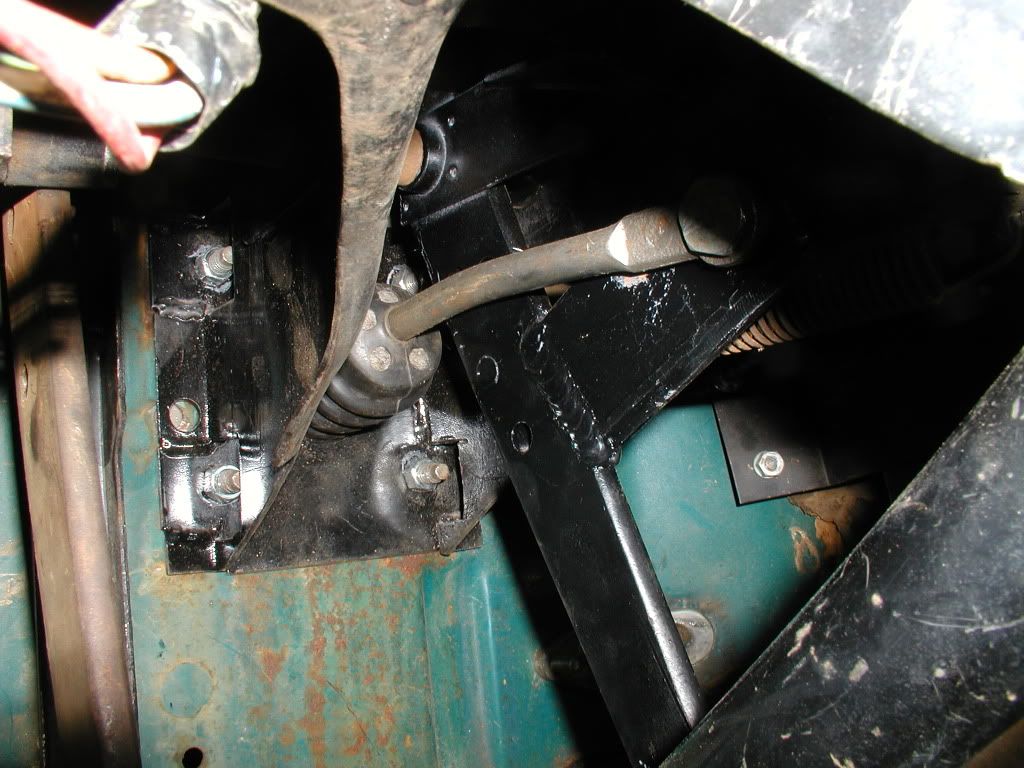
Today I drilled the holes for the new booster, and used a 2" holesaw in a drill press to cut the opening for the pushrod/boot. Now to get it professionally welded.
http://i1181.photobucket.com/albums/...s/P1080144.jpg
The firewall will be drilled to match, of course. Test fit:
http://i1181.photobucket.com/albums/...s/P1080145.jpg
Also got under the truck and plugged off the old rear port at the cross, and ran a new line for the feed from the master. Discovered that the master's ports are two different sizes, presumably to prevent accidental interchanging, and neither is the same as the flare nuts that fit 1/4" brake line. Back to the auto parts store
More Turbo
Joined: Oct 2009
Posts: 596
Likes: 58
From: West Plains, MO
OK, got the plate neatly MIG-welded (for $10)  and O'Reilly had the right fittings. I scuff-sanded, primered and painted the plate black. Mocked it up under the dash and drilled the firewall to match. Routed the new brake lines to the master (360 degree bends are really fun to make with a tubing bender) and put the flare nuts on.
The only thing left to do is make the linkage work, but that is turning out to be quite a PITA. The pushrod on the #503125 rebuilt master/booster combo is way too long. I have two choices at this point: have a tab of 1/4" steel plate welded onto the pedal and use the shoulder bolt to secure the pushrod to it; or cut off the pushrod (1/2" diameter), thread it for 1/2-20 and use a rod end (Heim joint). I have one on order, but not sure there will be enough room for it. Meanwhile I made the extension from a piece of 1/4" scrap and tack-welded it to the pedal for a test, and that will definitely work.
I never realized how long ago I started this project... the second Google hit for "503125 power brake booster" was my query about whether the bolt pattern for this '72 unit would fit... in 2001
https://www.ford-trucks.com/forums/5...5-f-350-a.html
Incidentally that unit is now considerably cheaper than in '01... only $112 plus $40 core at Autozone and others. Go figure.
and O'Reilly had the right fittings. I scuff-sanded, primered and painted the plate black. Mocked it up under the dash and drilled the firewall to match. Routed the new brake lines to the master (360 degree bends are really fun to make with a tubing bender) and put the flare nuts on.The only thing left to do is make the linkage work, but that is turning out to be quite a PITA. The pushrod on the #503125 rebuilt master/booster combo is way too long. I have two choices at this point: have a tab of 1/4" steel plate welded onto the pedal and use the shoulder bolt to secure the pushrod to it; or cut off the pushrod (1/2" diameter), thread it for 1/2-20 and use a rod end (Heim joint). I have one on order, but not sure there will be enough room for it. Meanwhile I made the extension from a piece of 1/4" scrap and tack-welded it to the pedal for a test, and that will definitely work.
I never realized how long ago I started this project... the second Google hit for "503125 power brake booster" was my query about whether the bolt pattern for this '72 unit would fit... in 2001
https://www.ford-trucks.com/forums/5...5-f-350-a.html
Incidentally that unit is now considerably cheaper than in '01... only $112 plus $40 core at Autozone and others. Go figure.
Posting Guru
Joined: Jan 2011
Posts: 2,315
Likes: 0
From: Rossmoor at Seal Beach
How long have you been working on it now? CPP around $300 and installs in about an hour.....How much is a Doctors time worth, not to mention all of the welding and custom made plates and brackets?
More Turbo
Joined: Oct 2009
Posts: 596
Likes: 58
From: West Plains, MO
Well, I work part-time, my "hobby" time doesn't have an hourly rate and I also wanted to convert from single- to dual-circuit brakes, and replace the rusty, improperly-coupled rear steel lines, which is not done in an hour! So far I have spent $1 for steel and $10 for welding which I think is reasonable.
Not only that, as you can see from the original thread, quite a few parts for the pre-'67 F350 do NOT interchange with the F-100/250 of the same period. I don't remember if I called them back in 2001, but seem to remember that their kit didn't work with my master's bolt pattern.
The other reason for this conversion is to use a commonly available and inexpensive master and booster, should replacement eventually be needed. Autozone shows a (single-circuit) master and booster that's supposed to fit my truck... for $654
and I also wanted to convert from single- to dual-circuit brakes, and replace the rusty, improperly-coupled rear steel lines, which is not done in an hour! So far I have spent $1 for steel and $10 for welding which I think is reasonable.Not only that, as you can see from the original thread, quite a few parts for the pre-'67 F350 do NOT interchange with the F-100/250 of the same period. I don't remember if I called them back in 2001, but seem to remember that their kit didn't work with my master's bolt pattern.
The other reason for this conversion is to use a commonly available and inexpensive master and booster, should replacement eventually be needed. Autozone shows a (single-circuit) master and booster that's supposed to fit my truck... for $654
FTE Stories
Ford Trucks for Ford Truck Enthusiasts

Top 10 Fords at 2026 Carlisle Ford Nationals
Joe Kucinski
3 Best / 3 Worst Parts of Modern Ford Ownership
Brett Foote
10 Amazing Upgrades That Solve Common Ford Truck Owner Headaches
Pouria Savadkouei
Every 2026 Ford Engine Explained
Brett Foote
10 Ugly Ford Trucks That We Still Kinda Love
Joe Kucinski
10 Things Every Truck Owner NEEDS (2026 Edition)
Michael S. Palmer
Rezvani's Latest Post-Apocalyptic Monster Is a Ford F-150 Raptor Underneath
Verdad Gallardo
Top 10 Most Expensive Ford Trucks Ever Sold on Bring a Trailer
Joe Kucinski
2027 Ford Super Duty Buyer's Guide (Every Model, Engine, & Package)
Brett FooteNew User
Joined: Sep 2011
Posts: 19
Likes: 0
I spotted a severely work brake hose on my 66 F-100 - one thing led to another and I ended up replacing the entire system becasue of old rusty lines. While I was at it, decided to upgrade to a dual chamber sys to eliminate the single point of failure - potentially fatal. I bought a new master for a Mustang based on a post here - approx same year, I can't remember. I also put in a Mustang proportioning valve - important to have in so light a truck in my opinion so the back wheels don't lock up first. It was a lot of work with the tubing fabrication and routing, but it was a cheap project - including tubing tools and 4 new slave cylinders only about $175. It jumps out as being non-original when you pop the hood, but very worthwhile - albiet drums, she stops on command with enough advance notice, and is considerably safer now! One thing I did as the last step was build a brake fluid pressure pot from a $15 yard weed sprayer and a couple feet of fuel hose - quick, cheap, easy. pressuring up from the bottom sends the bubbles up into the master making it much more effective and easier than regular bleeding.
More Turbo
Joined: Oct 2009
Posts: 596
Likes: 58
From: West Plains, MO
That's a really neat bleeding technique... never heard of it before! I suspect it is not used often because you have to move the "pot" from bleeder to bleeder and watch for overflowing the master, instead of just hooking it up at the master once.
Does reverse-bleeding eliminate the need to bench bleed the master?
Does reverse-bleeding eliminate the need to bench bleed the master?
New User
Joined: Sep 2011
Posts: 19
Likes: 0
Yup - have to be careful. Overflowing the master can cause paint damage, so you need to have the cap on the reservoir. Less 'spillage' at the wheels this way - once the hose is on the fittling and sealed you can turn the wrench to open/close, and very little get spilled. Need to hold the hose over the grass and shoot fluid out so you're bubble free when you hook it up - kind of like how they prep a hypodermic needle. The regular bleeding routine sometimes just sends bubbles back and forth because the bubbles try to naturally go back up - this pressure pot technique sends the bubbles on up and out. In aviation they have pressure pots made just for this on airplane brakes - I stole the idea! This method doesn't prime the master, so still need to do that in a new install.
Senior User
Joined: Dec 2011
Posts: 157
Likes: 2
One can achieve the same "bubbles go up and away from the sylinder" affect by taking the drain line from the bleed nipple and running it up (over the tire works well) and then into a container. By doing this, one does not need someone to open/close the bleed nipple. The -push- stroke forces fluid and air out, the -return- stroke only sucks back fluid (if any at all). I watched this in action with my son at the wheel while I observed it while under my truck. Works great as a one-person bleed technique. Just keep the master filled!
More Turbo
Joined: Oct 2009
Posts: 596
Likes: 58
From: West Plains, MO
I made a tab of 1/4" scrap to match the new longer pushrod. The pushrod required a slight bend to line up (it has to angle slightly upward since it comes downward as the pedal swings, and there is only so much clearance in the booster's "snout" in both directions). I paid $5 to have a shop weld that tab on for good... if it breaks off there would be no brakes... then primered and painted for rust protection. It works fine mocked-up on the workbench. Tomorrow it goes under the dash, bleed the mc/lines and cross fingers!
More Turbo
Joined: Oct 2009
Posts: 596
Likes: 58
From: West Plains, MO
OK. Got it all in there, bench-bled the master (actually, in-place, using the pedal and a pair of homemade short lines), hooked it up, bled the rear system, and TRIED to bleed the front. Left front ok, right front nothing
So now I have discovered why the right front brake felt like it wasn't working - it wasn't. Either the flex hose to the wheel is clogged, or the hard line under the chassis. Unfortunately, disconnecting them almost certainly means destroying the 47-year-old steel tubing since it always rusts to the nuts.

Guess I have a bit more fabricating to do underneath. Also don't forget to run a 3/8" vacuum line from the intake manifold to the booster.
Looks like it belongs there, even if my pigtails aren't very neat
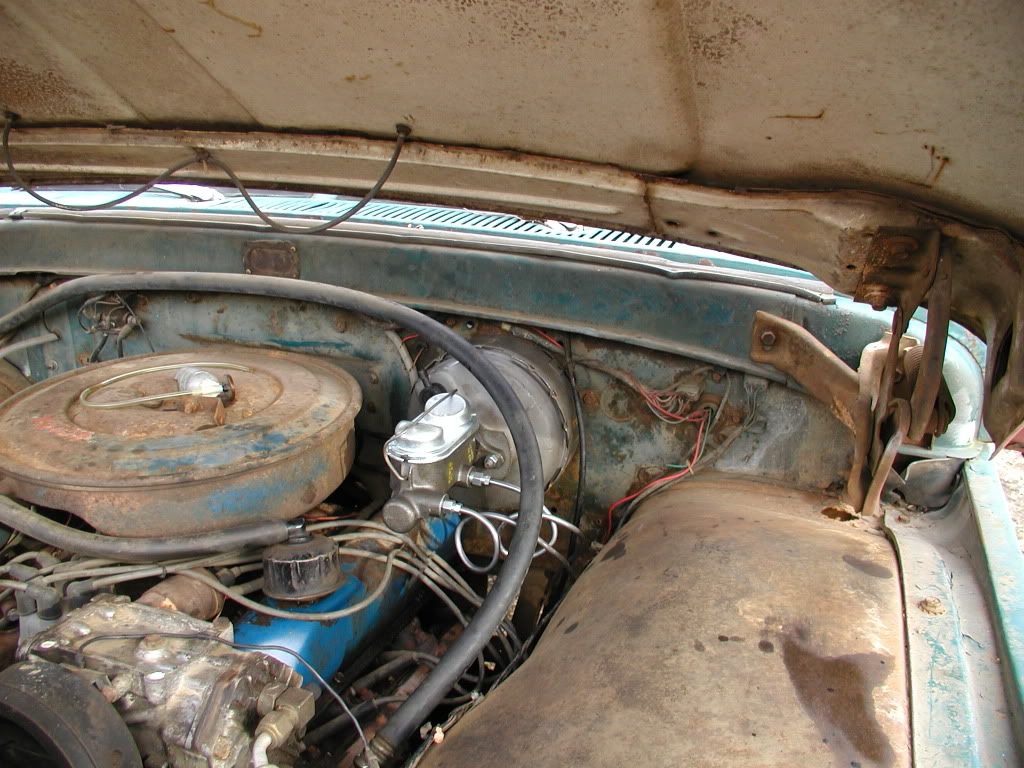
So now I have discovered why the right front brake felt like it wasn't working - it wasn't. Either the flex hose to the wheel is clogged, or the hard line under the chassis. Unfortunately, disconnecting them almost certainly means destroying the 47-year-old steel tubing since it always rusts to the nuts.
Guess I have a bit more fabricating to do underneath. Also don't forget to run a 3/8" vacuum line from the intake manifold to the booster.
Looks like it belongs there, even if my pigtails aren't very neat
Postmaster
Joined: Oct 2010
Posts: 4,656
Likes: 4
From: Northern and Southern Cal
Way to be Doc.
If you ever feel like cleaning up those pig tails get yourself a closet hanger dowel or (the best) a screw jack off of some scaffold. Then carefully bend the tubing around it and "hot dog" nice looking loops.
If you ever feel like cleaning up those pig tails get yourself a closet hanger dowel or (the best) a screw jack off of some scaffold. Then carefully bend the tubing around it and "hot dog" nice looking loops.