


How-To install cab lights
Thread Starter
|
Fleet Owner


Joined: May 2009
Posts: 21,437
Likes: 76
From: Gilbert, PA
How-To install cab lights
This topic comes up pretty often so I figured I would do How to since I was installing them on my 97. This is not for the faint of heart. You have to drill 15 holes
The harness is the same from the 70s-97, with the only differences being on the end where it plugs into the truck. I had a 89 harness so I had to change the plug at the end. NOT a big deal. The 70s-91 have one type of plug, the 92-97 have another. 92-97 have the power lug on the passenger side. 80-91 have the power plug on the drivers side. Adjust accordingly
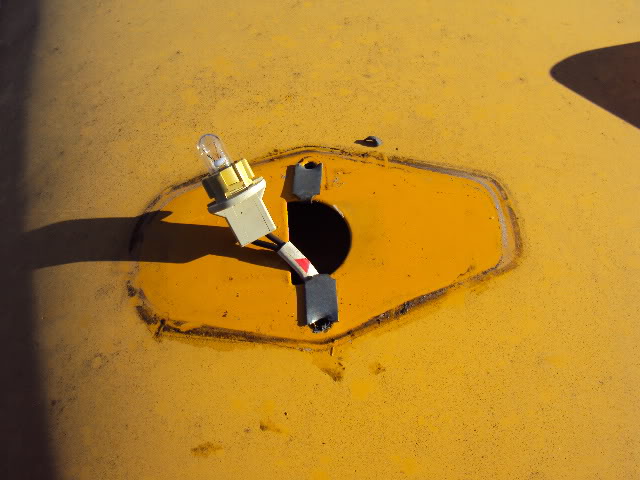
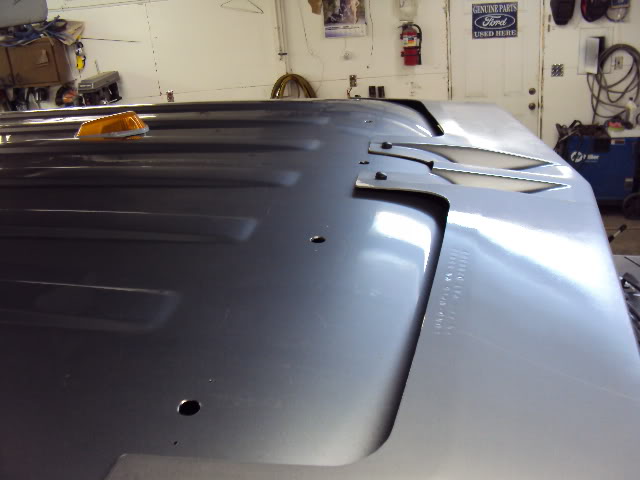
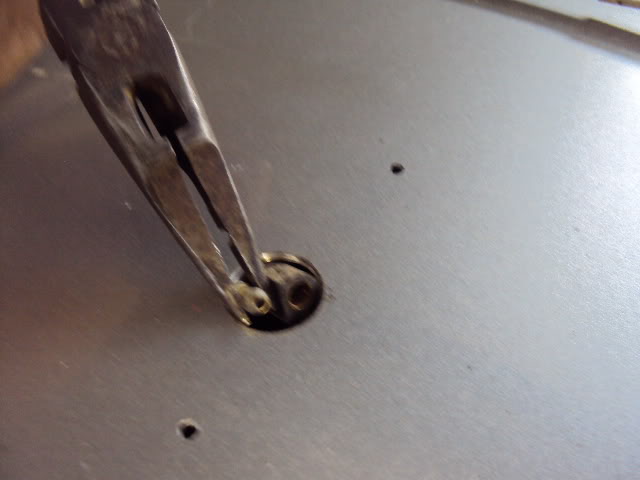
First I will show you what the FACTORY cab holes looks like. The hole is big enough to put the entire socket thru it. and Ford uses the little speed clips for the attaching screws(not necessary)
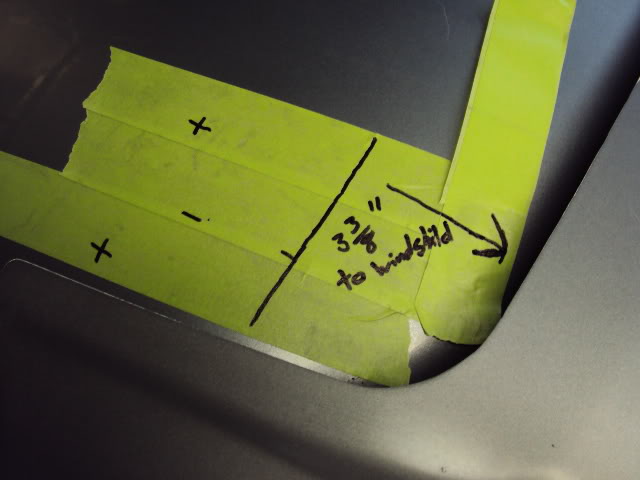
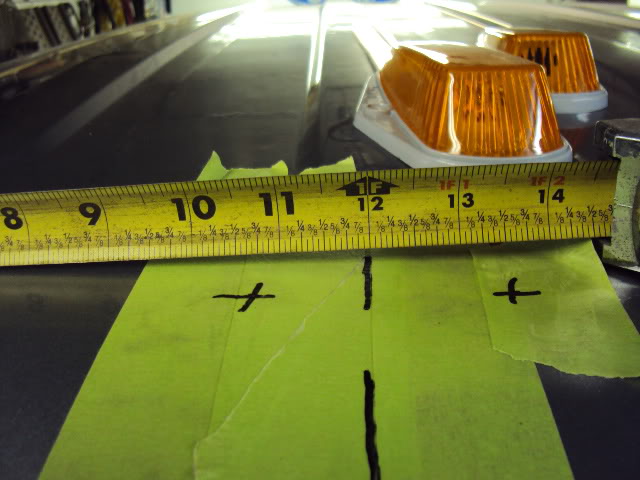
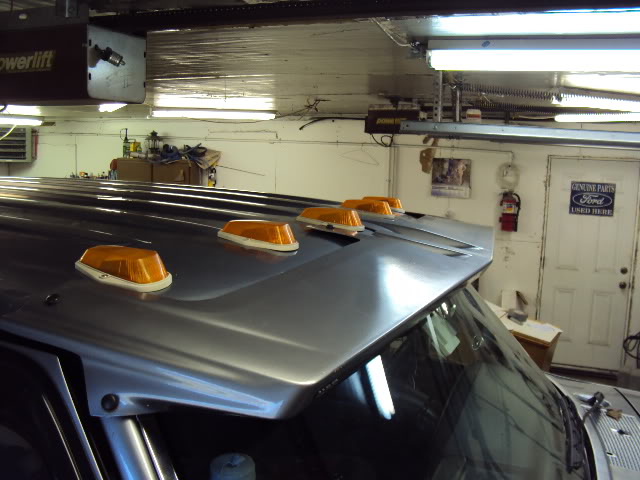
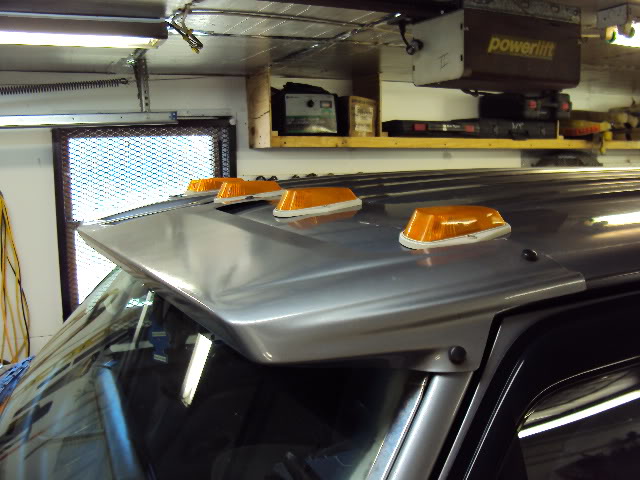
Ok. 1st Tape off the general are where each light will go. The light is set back from the windshield trim 3 3/8" and they are evenly spaced out at 12".
Find the center of the roof and work your way out. Remember measure TWICE if need be. Then lay the lights on the roof and and back and look at them to make sure they look right. Do fine tuning as you see fit. I like to have them as close to factory as possible, all facing straight ahead. Some like to have them follow the arc of the roof.
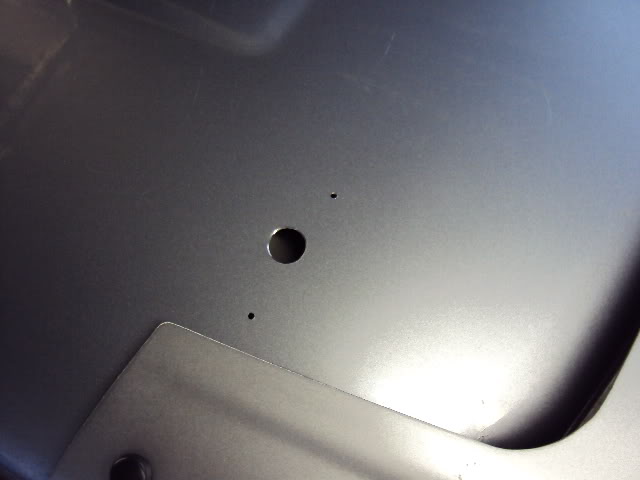
Once you get them where your want them, mark your screw holes. Then remove the light and mark a spot of the wire to pass thru about dead center between the screw holes
Then get out your drill and drill away. Just drill thru the OUTER roof. DO NOT drill thru the inner roof. I use a 7/64" bit to drill all the holes. Then I come back with a UNI-BIT and open up the WIRE holes to 3/4".
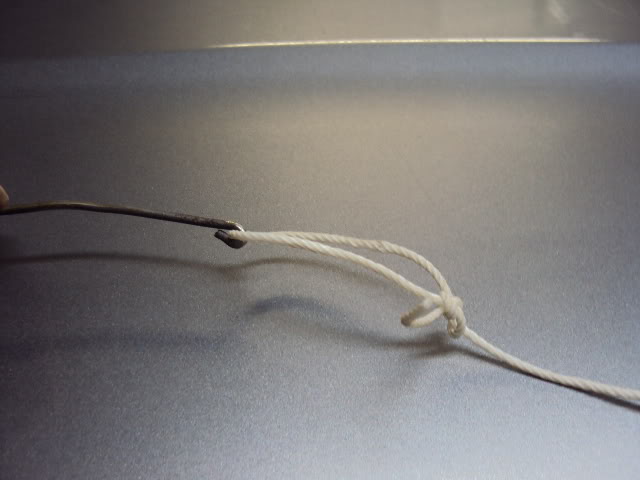
Next up is fishing the wire thru the roof. Remove the passenger side sun visor. You will need to use the visor hole to fish the wire. The best way I have found to fish the wire is like so. Take a coat hanger and straighten it out and bend a SMALL loop on the end. The tire a good piece of string thru the loop.
Start on the drivers side and fish it in the 1st hole and try to get it out the middle hole. Once you get it out the middle hole pull the coat hanger completely out. then stick it back in the middle hole and try to get it out the far passenger side hole. Again, pull the coat hanger all the way out then stick it back in the far passenger side hole and thru the inside hole for the passenger visor.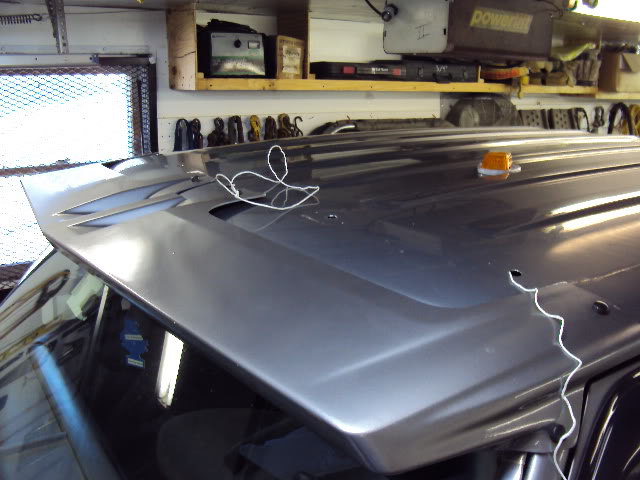
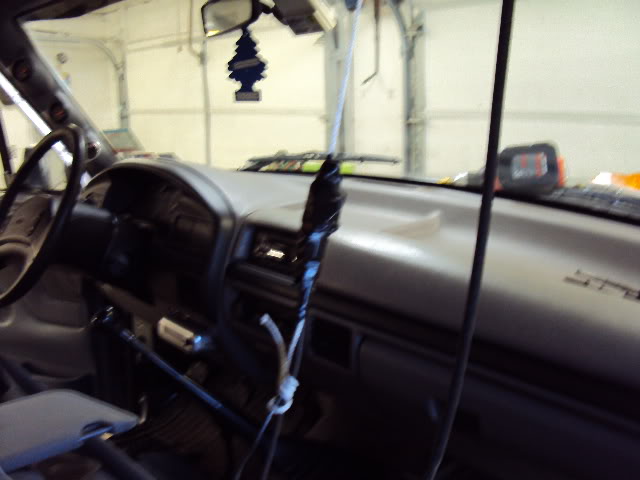
Pull the coat hanger all the way out and untie the string. Tie the string onto the harness for the drivers side light(unplug all the 5 light sockets from the harness). If you left your self enough string you can have it come thru the drivers door and to the passenger side with the string. This will allow you to pull the string and feed the harness at the same time
Keep feeding the harness and pulling the string. Once the last cab light plug goes into the visor hole, the 1st cab light pug should hit a stopping point.
Then you need to get a pair of needle nose pliers to pull each connector from each hole
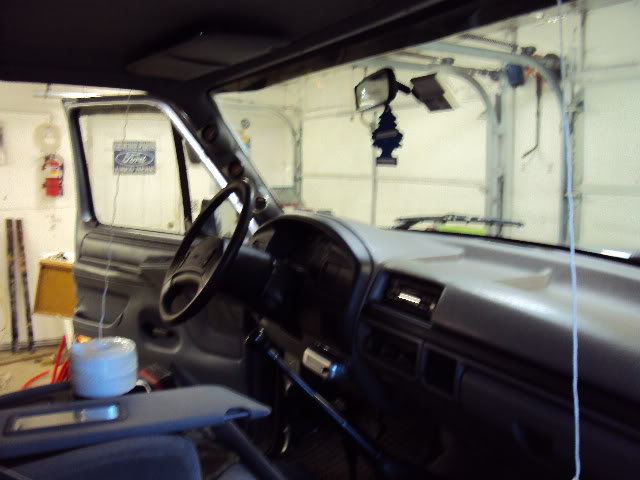
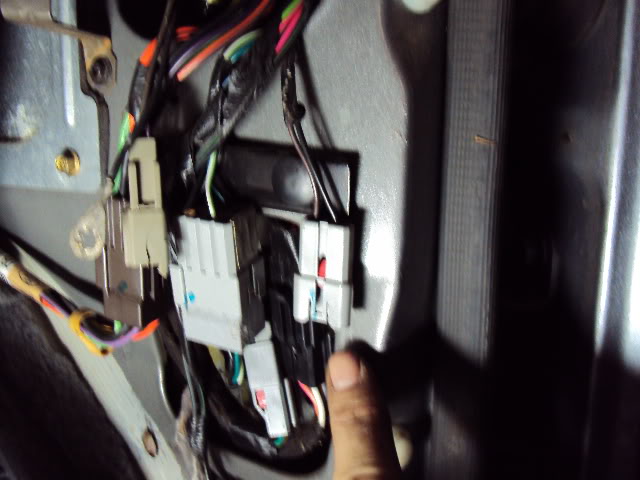
Now you need to fish the passenger side A pillar. Remove the Kick panel and A pillar cover.Again with the coat hanger and string. Start at the top in the visor hole and work the coat hanger down the A pillar. Once it is thru tie the other end of the string to the plug on the other end of the harness w a stopper knot and tape the dead so it will not get caught while pulling
it is a tight fit so just keep pulling and feeding at the same time. Once you get the head down to the kick panel you will need to plug it into the truck side harness. This plug
I had to modify my harness to fit the plug(because I had an older harness).
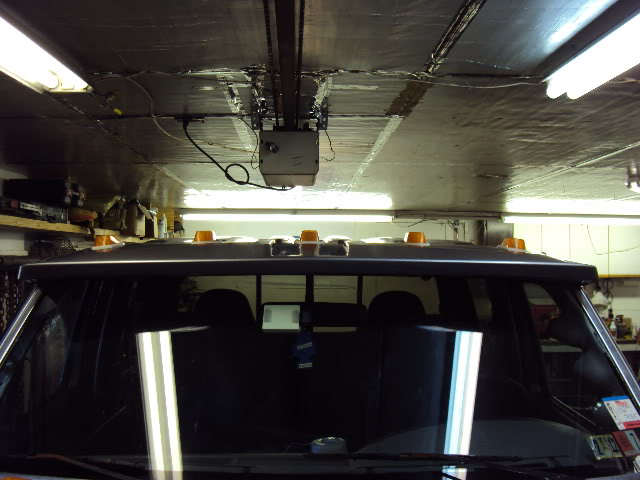
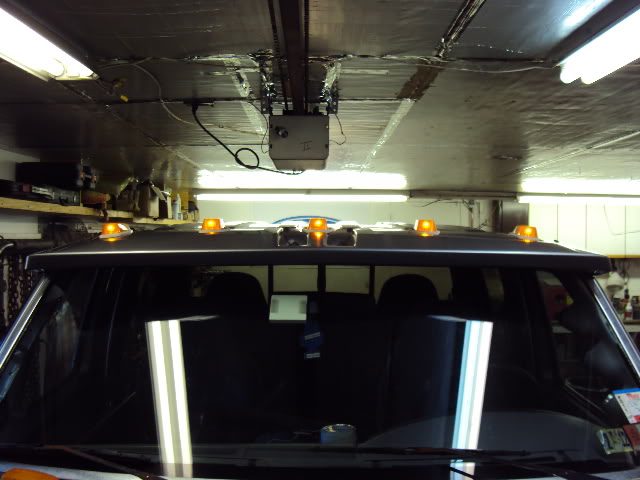
Plug in the 5 sockets for the cab lights and turn on your headlights. You SHOULD have lights.
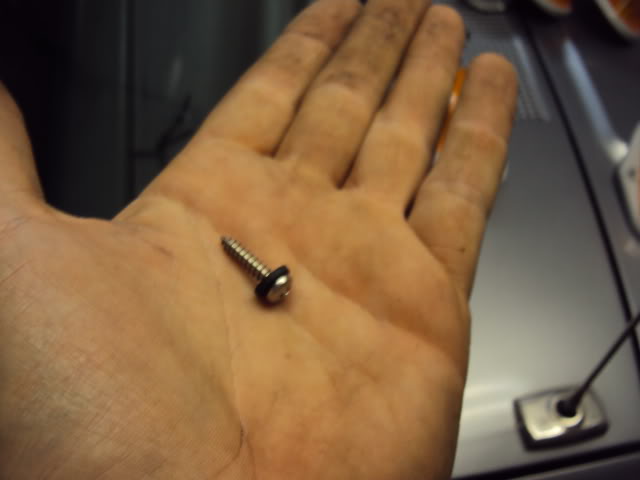
Putting the cab lights on is pretty simple. The sockets are a 1/4 turn in to the lens and I use #8 stainless pan head screws a Neoprene washers to seal better. I also put silicone on the treads of each screw as well
Tighten the screws but DO NOT OVER TIGHTEN
There is no need for silicone on the cab light gasket, that will just make thing harder if.when a cab light burns out.
And there ya go. Cab lights 101
The harness is the same from the 70s-97, with the only differences being on the end where it plugs into the truck. I had a 89 harness so I had to change the plug at the end. NOT a big deal. The 70s-91 have one type of plug, the 92-97 have another. 92-97 have the power lug on the passenger side. 80-91 have the power plug on the drivers side. Adjust accordingly
First I will show you what the FACTORY cab holes looks like. The hole is big enough to put the entire socket thru it. and Ford uses the little speed clips for the attaching screws(not necessary)
Ok. 1st Tape off the general are where each light will go. The light is set back from the windshield trim 3 3/8" and they are evenly spaced out at 12".
Find the center of the roof and work your way out. Remember measure TWICE if need be. Then lay the lights on the roof and and back and look at them to make sure they look right. Do fine tuning as you see fit. I like to have them as close to factory as possible, all facing straight ahead. Some like to have them follow the arc of the roof.
Once you get them where your want them, mark your screw holes. Then remove the light and mark a spot of the wire to pass thru about dead center between the screw holes
Then get out your drill and drill away. Just drill thru the OUTER roof. DO NOT drill thru the inner roof. I use a 7/64" bit to drill all the holes. Then I come back with a UNI-BIT and open up the WIRE holes to 3/4".
Next up is fishing the wire thru the roof. Remove the passenger side sun visor. You will need to use the visor hole to fish the wire. The best way I have found to fish the wire is like so. Take a coat hanger and straighten it out and bend a SMALL loop on the end. The tire a good piece of string thru the loop.
Start on the drivers side and fish it in the 1st hole and try to get it out the middle hole. Once you get it out the middle hole pull the coat hanger completely out. then stick it back in the middle hole and try to get it out the far passenger side hole. Again, pull the coat hanger all the way out then stick it back in the far passenger side hole and thru the inside hole for the passenger visor.
Pull the coat hanger all the way out and untie the string. Tie the string onto the harness for the drivers side light(unplug all the 5 light sockets from the harness). If you left your self enough string you can have it come thru the drivers door and to the passenger side with the string. This will allow you to pull the string and feed the harness at the same time
Keep feeding the harness and pulling the string. Once the last cab light plug goes into the visor hole, the 1st cab light pug should hit a stopping point.
Then you need to get a pair of needle nose pliers to pull each connector from each hole
Now you need to fish the passenger side A pillar. Remove the Kick panel and A pillar cover.Again with the coat hanger and string. Start at the top in the visor hole and work the coat hanger down the A pillar. Once it is thru tie the other end of the string to the plug on the other end of the harness w a stopper knot and tape the dead so it will not get caught while pulling
it is a tight fit so just keep pulling and feeding at the same time. Once you get the head down to the kick panel you will need to plug it into the truck side harness. This plug
I had to modify my harness to fit the plug(because I had an older harness).
Plug in the 5 sockets for the cab lights and turn on your headlights. You SHOULD have lights.
Putting the cab lights on is pretty simple. The sockets are a 1/4 turn in to the lens and I use #8 stainless pan head screws a Neoprene washers to seal better. I also put silicone on the treads of each screw as well
Tighten the screws but DO NOT OVER TIGHTEN
There is no need for silicone on the cab light gasket, that will just make thing harder if.when a cab light burns out.
And there ya go. Cab lights 101
Post Fiend
Joined: Oct 2003
Posts: 6,214
Likes: 13
From: New Jersey
Not sure why you'd *want* potentially leaky, scraped up junkyard cab lights considering you can buy a set of five for about $30-35 brand new.
Nice write up Brad, and you're right, the most difficult part of this kind of project is drilling the first hole through the roof.
Nice write up Brad, and you're right, the most difficult part of this kind of project is drilling the first hole through the roof.
Thread Starter
|
Fleet Owner
Joined: May 2009
Posts: 21,437
Likes: 76
From: Gilbert, PA
Actually, I just fond them for $4.88 a piece! Think I'm gonna order me up some NEW shiny lens'
Trending Topics
Post Fiend
Joined: Oct 2003
Posts: 6,214
Likes: 13
From: New Jersey


I drilled for mine a little differently - since the socket is in the housing itself, I only had to drill a 1/4: diameter hole for the plastic hollow post to stick through. The post sticks through the roof sheet metal so the wire going through the center doesn't get cut on the drilled hole. I drilled that one first, put the light on so the hollow post went through, adjusted it to a straight position, then drilled the mounting screw holes slightly undersized to the screws.
I had originally replaced the outer two sockets with two-wire sockets and installed dual-filiment bulbs so they'd light up with the others but also act as turn signals. That got annoying at night reflecting on the hood so I installed the original sockets back in and wired accordingly. I use a switch in the Chrysler overhead console I installed to operate them separately from the parking lights and the center console taps power from the mounting flange of the original, mostly useless interior light that the console covers.

FTE Stories
Ford Trucks for Ford Truck Enthusiasts

Top 6 Best Deals Available on New Fords & Lincolns Right Now
Brett Foote
This Hennessey Takes the Expedition Tremor's Off-Roading Capability to the Next Level
Verdad Gallardo
Top 10 Fords at 2026 Carlisle Ford Nationals
Joe Kucinski
3 Best / 3 Worst Parts of Modern Ford Ownership
Brett Foote
10 Amazing Upgrades That Solve Common Ford Truck Owner Headaches
Pouria Savadkouei
Every 2026 Ford Engine Explained
Brett Foote
10 Ugly Ford Trucks That We Still Kinda Love
Joe Kucinski
10 Things Every Truck Owner NEEDS (2026 Edition)
Michael S. Palmer
Rezvani's Latest Post-Apocalyptic Monster Is a Ford F-150 Raptor Underneath
Verdad GallardoElder User
Joined: May 2010
Posts: 756
Likes: 1
From: central illinois
Do tell where you found them. All i find are the cheap crappy ones here.
Thread Starter
|
Fleet Owner
Joined: May 2009
Posts: 21,437
Likes: 76
From: Gilbert, PA


Lead Driver

Joined: Aug 2006
Posts: 5,670
Likes: 13
From: Sand Lake, MI
Its either a extended or CC truck, roof is longer so its ribbed for added support. Regular cab roof doesn't need em, "acreage" up there isn't as great.
Thread Starter
|
Fleet Owner
Joined: May 2009
Posts: 21,437
Likes: 76
From: Gilbert, PA
Correct. Crew Cabs have the ribbing for extra support