



Wastegate Question
Logistics Pro

Joined: Dec 2010
Posts: 4,738
Likes: 15
From: Temperance, MI
They are...... I have some pictures that might help if your going to replace the gaskets. PM me and Ill send them to you

PREMIUM SPONSOR


Joined: Feb 2009
Posts: 6,040
Likes: 74
http://www.riffraffdiesel.com/mm5/RE...structions.pdf

Thread Starter
|
Senior User
Joined: Oct 2009
Posts: 411
Likes: 1
From: Plant City
They aren't fun but if you have an extra set of hands it isn't to bad.
http://www.riffraffdiesel.com/mm5/RE...structions.pdf
http://www.riffraffdiesel.com/mm5/RE...structions.pdf
I have become VERY acquainted with your site. I found them last night and I will be making another order soon for the ceramic kit. I will prob do the boots as well just to make sure I get everything. I was also toying around with the idea of getting a van turbo which I think you sell the rebuild kit for that also correct?
Hotshot


Joined: Jan 2011
Posts: 18,849
Likes: 179
From: Puget Sound
I had exhaust leaks everywhere and replaced everything from block to turbo. I watched the boost response with my DP and that needle has a nice snap to it - then I have to look up to keep things under control. 65 MPH is 4PSI on the flat and a punch takes it right to 20, then it builds to 25 with more speed.
PREMIUM SPONSOR
Joined: Feb 2009
Posts: 6,040
Likes: 74
Riffraff Diesel: Garrett GTP38 Journal Bearing Rebuild Kit
Thread Starter
|
Senior User
Joined: Oct 2009
Posts: 411
Likes: 1
From: Plant City
Here is a link for the rebuild kit. It is the same for Early 99 - 2003 turbos including vans.
Riffraff Diesel: Garrett GTP38 Journal Bearing Rebuild Kit
Riffraff Diesel: Garrett GTP38 Journal Bearing Rebuild Kit
PREMIUM SPONSOR
Joined: Feb 2009
Posts: 6,040
Likes: 74
The van turbo is basically the same so it will take all the same bolts, orings and rebuild kits. Only difference is the turbine wheel size and housing.
Logistics Pro
Joined: Dec 2010
Posts: 4,738
Likes: 15
From: Temperance, MI
Youll also need this to run a Van turbo Riffraff Diesel: 1.0 A/R 1.15 A/R Turbo Outlet Adapter
FTE Stories
Ford Trucks for Ford Truck Enthusiasts

Top 6 Best Deals Available on New Fords & Lincolns Right Now
Brett Foote
This Hennessey Takes the Expedition Tremor's Off-Roading Capability to the Next Level
Verdad Gallardo
Top 10 Fords at 2026 Carlisle Ford Nationals
Joe Kucinski
3 Best / 3 Worst Parts of Modern Ford Ownership
Brett Foote
10 Amazing Upgrades That Solve Common Ford Truck Owner Headaches
Pouria Savadkouei
Every 2026 Ford Engine Explained
Brett Foote
10 Ugly Ford Trucks That We Still Kinda Love
Joe Kucinski
10 Things Every Truck Owner NEEDS (2026 Edition)
Michael S. Palmer
Rezvani's Latest Post-Apocalyptic Monster Is a Ford F-150 Raptor Underneath
Verdad Gallardo
Logistics Pro
Joined: Dec 2010
Posts: 4,738
Likes: 15
From: Temperance, MI
I also sent this to you in a PM but incase anyone else was wondering heres how I did it..........
Clays directions are much more detailed than my pictures
Disconnect both batterys!!!!
Pull everything away from the spyder, inter cooler tube, bootselectrical connections and pull spyder out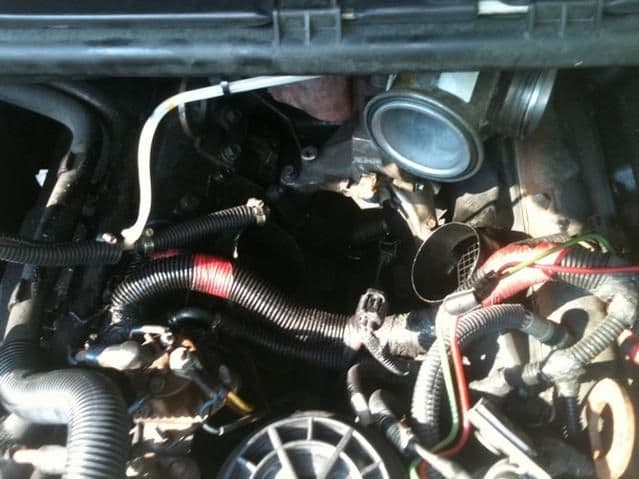
Disconnect the babys butt from the turbo via stupid clamp thats a PITA, disconnect the down pipe and remove your going to need it out of the way to tighten everything back up when your done. There are 2 bolts that hold the turbo on the aluminum pedistal, take them out and pull the turbo, you should end up having the same thing as in the picture here at this point
There are 2 bolts per side to pull the collecter off of the uppipes, DO NOT strip them!!! The best thing you can do before doing this job is to spray every bolt and nut down with PB Blaster at least twice a day for a week prior to starting. Heres a picture of the factory gaskets vs. the Felpro big difference in size
If you are installin a Van turbo you need to take the aluminum piece off and delete the EBP rod, theres 4 bolts holding it on, one is a PITA to get to, I dont have any pictures of me doing that but you need a 1/4'' NPT tap and plug, I also wrapped it up with thread tape to make sure there was no leaks. There are 2 Orings there make sure to put new ones in.
Van turbo vs stock turbo with adapter flange installed
Now reinstall everything in the opposit order, be sure to leave babys butt loose with new gaskets and bolts installed loose until everything is in place, then tighten everything up, youll have to get under the truck to tighten the the new gaskets but it makes life a lot easier. I drove about 100 miles then rechecked everything to make sure it was still tight.
Im gonna post all the pictures I took of the tear down and install in no order, if you have any questions feel free to ask

I also installed reinforcement pleniums from Clay too, they are installed here, I would highly recommend them

If I left something out feel free to let me know and Ill explain
Clays directions are much more detailed than my pictures
Disconnect both batterys!!!!
Pull everything away from the spyder, inter cooler tube, bootselectrical connections and pull spyder out
Disconnect the babys butt from the turbo via stupid clamp thats a PITA, disconnect the down pipe and remove your going to need it out of the way to tighten everything back up when your done. There are 2 bolts that hold the turbo on the aluminum pedistal, take them out and pull the turbo, you should end up having the same thing as in the picture here at this point
There are 2 bolts per side to pull the collecter off of the uppipes, DO NOT strip them!!! The best thing you can do before doing this job is to spray every bolt and nut down with PB Blaster at least twice a day for a week prior to starting. Heres a picture of the factory gaskets vs. the Felpro big difference in size
If you are installin a Van turbo you need to take the aluminum piece off and delete the EBP rod, theres 4 bolts holding it on, one is a PITA to get to, I dont have any pictures of me doing that but you need a 1/4'' NPT tap and plug, I also wrapped it up with thread tape to make sure there was no leaks. There are 2 Orings there make sure to put new ones in.
Van turbo vs stock turbo with adapter flange installed
Now reinstall everything in the opposit order, be sure to leave babys butt loose with new gaskets and bolts installed loose until everything is in place, then tighten everything up, youll have to get under the truck to tighten the the new gaskets but it makes life a lot easier. I drove about 100 miles then rechecked everything to make sure it was still tight.
Im gonna post all the pictures I took of the tear down and install in no order, if you have any questions feel free to ask
I also installed reinforcement pleniums from Clay too, they are installed here, I would highly recommend them
If I left something out feel free to let me know and Ill explain
Thread Starter
|
Senior User
Joined: Oct 2009
Posts: 411
Likes: 1
From: Plant City
Youll also need this to run a Van turbo Riffraff Diesel: 1.0 A/R 1.15 A/R Turbo Outlet Adapter
Thread Starter
|
Senior User
Joined: Oct 2009
Posts: 411
Likes: 1
From: Plant City
I also sent this to you in a PM but incase anyone else was wondering heres how I did it..........
Clays directions are much more detailed than my pictures
Disconnect both batterys!!!!
Pull everything away from the spyder, inter cooler tube, bootselectrical connections and pull spyder out
Disconnect the babys butt from the turbo via stupid clamp thats a PITA, disconnect the down pipe and remove your going to need it out of the way to tighten everything back up when your done. There are 2 bolts that hold the turbo on the aluminum pedistal, take them out and pull the turbo, you should end up having the same thing as in the picture here at this point
There are 2 bolts per side to pull the collecter off of the uppipes, DO NOT strip them!!! The best thing you can do before doing this job is to spray every bolt and nut down with PB Blaster at least twice a day for a week prior to starting. Heres a picture of the factory gaskets vs. the Felpro big difference in size
If you are installin a Van turbo you need to take the aluminum piece off and delete the EBP rod, theres 4 bolts holding it on, one is a PITA to get to, I dont have any pictures of me doing that but you need a 1/4'' NPT tap and plug, I also wrapped it up with thread tape to make sure there was no leaks. There are 2 Orings there make sure to put new ones in.
Van turbo vs stock turbo with adapter flange installed
Now reinstall everything in the opposit order, be sure to leave babys butt loose with new gaskets and bolts installed loose until everything is in place, then tighten everything up, youll have to get under the truck to tighten the the new gaskets but it makes life a lot easier. I drove about 100 miles then rechecked everything to make sure it was still tight.
Im gonna post all the pictures I took of the tear down and install in no order, if you have any questions feel free to ask
I also installed reinforcement pleniums from Clay too, they are installed here, I would highly recommend them
If I left something out feel free to let me know and Ill explain
Clays directions are much more detailed than my pictures
Disconnect both batterys!!!!
Pull everything away from the spyder, inter cooler tube, bootselectrical connections and pull spyder out
Disconnect the babys butt from the turbo via stupid clamp thats a PITA, disconnect the down pipe and remove your going to need it out of the way to tighten everything back up when your done. There are 2 bolts that hold the turbo on the aluminum pedistal, take them out and pull the turbo, you should end up having the same thing as in the picture here at this point
There are 2 bolts per side to pull the collecter off of the uppipes, DO NOT strip them!!! The best thing you can do before doing this job is to spray every bolt and nut down with PB Blaster at least twice a day for a week prior to starting. Heres a picture of the factory gaskets vs. the Felpro big difference in size
If you are installin a Van turbo you need to take the aluminum piece off and delete the EBP rod, theres 4 bolts holding it on, one is a PITA to get to, I dont have any pictures of me doing that but you need a 1/4'' NPT tap and plug, I also wrapped it up with thread tape to make sure there was no leaks. There are 2 Orings there make sure to put new ones in.
Van turbo vs stock turbo with adapter flange installed
Now reinstall everything in the opposit order, be sure to leave babys butt loose with new gaskets and bolts installed loose until everything is in place, then tighten everything up, youll have to get under the truck to tighten the the new gaskets but it makes life a lot easier. I drove about 100 miles then rechecked everything to make sure it was still tight.
Im gonna post all the pictures I took of the tear down and install in no order, if you have any questions feel free to ask
I also installed reinforcement pleniums from Clay too, they are installed here, I would highly recommend them
If I left something out feel free to let me know and Ill explain
Logistics Pro
Joined: Dec 2010
Posts: 4,738
Likes: 15
From: Temperance, MI
Correct, the main purpose is to lower drive pressure, some people say it takes longer to spool but I didnt see a difference

Because racetruck
Joined: Apr 2007
Posts: 2,786
Likes: 104
From: Monterey Bay, CA

It works great for play too. With the larger exhaust housing it really pulls strong on the top end. I've been using mine for play in the NHRDA for a couple years now.
Thread Starter
|
Senior User
Joined: Oct 2009
Posts: 411
Likes: 1
From: Plant City
I know I said one more question but heck why not. What is the max boost you guys run on it?