
'96 F250 build, AKA the Rustoleum truck
#1
 10-10-2011, 07:24 PM


'96 F250 build, AKA the Rustoleum truck
I was a little leary of calling this a build. It's more of a freshening up of an old girl than a ground up build. Here's the deal - I got the truck last winter by trading my beloved '79 and some ca$h for it. The kid at work who I got it from let me keep my '79 to plow with until winter was over and then he took it home, less the plow. It was a great truck I had for almost 13 years, but when you start welding patches to the patches, it's time to let her retire to farm use. I am going to post a few things at at time to try and get caught up to where the '96 is at now. I am under the gun to finish her before winter sets in again, LOL.
The '79 as traded:

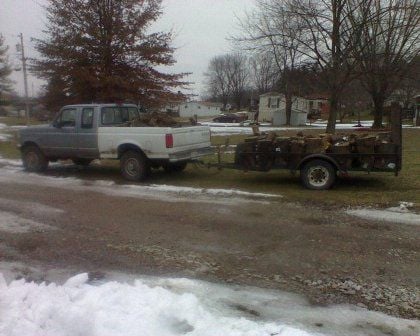
The '96 as received:
First thing's first, a new plow mount needed fabbed up. Some 3" square tubing, an old Reese hitch and the hydraulic mount from the '79s bumper were the starting point. Everything is just tacked in the pictures:

There are skirts made of 1/8" plate welded to it to cover up the front open end of the frame rails. No pictures of that yet, even though it's actually done...

Next on the list was a headache rack to prevent the dreaded firewood log through the back glass trick. The rear stansion is removable and was made to haul long items by keeping them off the cab and gate. There are also removable stakes that go in the forward part to keep the long stuff from sliding off the sides as well as matching the rear part. It will get some side rails made of local hardwood when it's finished:

The '79 as traded:
The '96 as received:
First thing's first, a new plow mount needed fabbed up. Some 3" square tubing, an old Reese hitch and the hydraulic mount from the '79s bumper were the starting point. Everything is just tacked in the pictures:
There are skirts made of 1/8" plate welded to it to cover up the front open end of the frame rails. No pictures of that yet, even though it's actually done...
Next on the list was a headache rack to prevent the dreaded firewood log through the back glass trick. The rear stansion is removable and was made to haul long items by keeping them off the cab and gate. There are also removable stakes that go in the forward part to keep the long stuff from sliding off the sides as well as matching the rear part. It will get some side rails made of local hardwood when it's finished:
#2
10-11-2011, 07:19 PM
#3
10-11-2011, 07:34 PM
front fender rot
There was some rot in the front fenders and radiator support. At first I thougth they were very patchable, but my friend who owns a body shop got me some CAPA (certifiied automotive parts association) panels at a price so low that it didn't make much sense fabbing patches.


#4
10-12-2011, 05:50 PM
cab corners
Next was to adress the cab corner rot.
Starting point - Drivers side was the worst:

Installed patch using a flanging tool and spot welded. I tried a new technique for me and ran a small bead of seam sealer on the bottom edge of the original panel, then spot welded where the top edge of the patch panel meets the orignal. I used to drill the patch and plug weld everything in the center of the flange, but am thinking this may seal it up better. Time will tell.

Added some mud and primer:
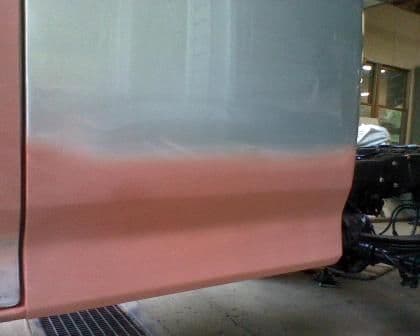
The whole truck had been power washed underneath and wire wheeled. Then rust converter from the Rust Store was applied. I didn't take any pictures of that process unfortunately, but here is one of the shocks after rust converter but before being painted. This rust converter appears to be similar to Eastwood's (Tanic Acid and Polymer based), but less expensive:


Here's the rear part of the frame after paint. I did replace the rear brake lines from the proportioning valve back while doing this:

My oldest home from college helping with getting ready for paint:

Taped off and ready:

Vintage siphon gun and $26 a gallon paint:

Got some bugs and dirt in it, but not bad for a driveway paint job. Still need to do the bed and re-install. But this is pretty much where the truck is now in her freshening up:


Starting point - Drivers side was the worst:
Installed patch using a flanging tool and spot welded. I tried a new technique for me and ran a small bead of seam sealer on the bottom edge of the original panel, then spot welded where the top edge of the patch panel meets the orignal. I used to drill the patch and plug weld everything in the center of the flange, but am thinking this may seal it up better. Time will tell.
Added some mud and primer:
The whole truck had been power washed underneath and wire wheeled. Then rust converter from the Rust Store was applied. I didn't take any pictures of that process unfortunately, but here is one of the shocks after rust converter but before being painted. This rust converter appears to be similar to Eastwood's (Tanic Acid and Polymer based), but less expensive:
Here's the rear part of the frame after paint. I did replace the rear brake lines from the proportioning valve back while doing this:
My oldest home from college helping with getting ready for paint:
Taped off and ready:
Vintage siphon gun and $26 a gallon paint:
Got some bugs and dirt in it, but not bad for a driveway paint job. Still need to do the bed and re-install. But this is pretty much where the truck is now in her freshening up:
#5
10-12-2011, 06:19 PM

Senior User
Join Date: May 2011
Location: Morgantown, WV
Posts: 497
Likes: 0
Received 0 Likes
on
0 Posts
#6
10-12-2011, 06:30 PM
Postmaster
#7
10-12-2011, 07:15 PM
Senior User
Join Date: Jun 2010
Location: Curwensville,PA
Posts: 408
Likes: 0
Received 0 Likes
on
0 Posts
Trending Topics
#9
10-13-2011, 05:05 AM
Senior User
Join Date: Apr 2008
Location: Cleveland,OH
Posts: 406
Likes: 0
Received 0 Likes
on
0 Posts
#10
10-13-2011, 05:22 AM
Posting Guru
Join Date: Dec 2009
Location: Calverton
Posts: 1,053
Likes: 0
Received 0 Likes
on
0 Posts
#11
10-13-2011, 08:33 AM
Senior User
Join Date: Jul 2008
Location: Coatesville ,PA.
Posts: 295
Likes: 0
Received 0 Likes
on
0 Posts
#13
10-13-2011, 12:23 PM
FTE Legend

#15
10-13-2011, 03:52 PM