

Phil's 1979 Ford F250 Build

Logistics Pro

Joined: Aug 2003
Posts: 4,701
Likes: 6
I love your style. It is one of the more entertaining reads
I have a question, though. What is the difference between ospho and regular old naval jelly? The result looks the same. I do understand chemistry a little, but not the difference between these two
I think using the wire wheel is the worst part of redoing stuff. It is just a nasty mess.
I think the reason driver's sides rust worse is because of winter weather spray from oncoming traffic. It seems like every vehicle is worse on the driver's side.

Thread Starter
|
Junior User
Joined: Aug 2011
Posts: 84
Likes: 0
From: Rockford, MI
The big difference between the two is their active ingredients. The methodology for applying the two is different. Ospho remains on overnight and actually bonds to the metal and creates a reasonably paintable surface.
Naval jelly on the other hand is water with a bunch of phosphoric and sulfuric acids. This is not intended to remain on your vehicle for long periods of time.
Ospho goes on easily due to its surfactants, cutting surface tension down by a long shot (meaning it is incredibly easy to put on and doesn't hold surface tension very well). Furthermore, Ospho's second main ingredient is sodium dichromate, a known industrial corrosion inhibitor. I think this is what makes Ospho a better choice.
In the end, I've been reading that none of this really matters, it is more about surface prep than it is about what your weapon of choice is.
That is my input on the subject. Take it for what it is worth. Seeing as it will never earn me any money, its not worth very much.
Fleet Mechanic
Joined: Jan 2010
Posts: 1,287
Likes: 16
From: San Carlos, CA

I realize some might wonder what I was using for this work. Some might not care at all. But either way, here are the things I used, not included in the picture is Purple Power concentrated degreaser and wife repellant.

(She's 13 years younger than me)

New User
Joined: Jan 2011
Posts: 10
Likes: 0
I'm new to this site and loved reading your posts, I have a '79 F250 4x4 regular cab and have already started rebuilding it. I will be reading your future posts and maybe even start my own. I would love to do a cummins conversion in it or in a supercab or maybe crew cab, havnt quite decided yet.
Thread Starter
|
Junior User
Joined: Aug 2011
Posts: 84
Likes: 0
From: Rockford, MI
I appreciate the responses. I am happy to keep you all updated, just realize you'll need to stick around for the long haul before this green 4x4 is done. Yes, that was an unintentional pun.
Feel free to chime in as to the things I'm doing wrong or anything constructive or destructive. I'll roll with the punches as best as I can.
Be easy on me, this is my first time through all this. On the other hand, remember, if I can do it, so can you 10x better.
Either way, today I finished the majority of the bottom of the box. I need to do some body work in the coming weekends to complete the box. I also need to restore my gas tank and find the fill components ASAP. I'm not entirely positive the truck box will fit over the 18 gallon fuel cell very well. I need to get this thing in storage before winter, and I'll be damned if I'm pushing it there.
Today, I cleaned up the Ospho as best as I could, and then painted on the POR 15. You know something is potent when it warns you not to drip any of it in the lid seam or else the lid will be immovable later. I did manage to get it on my hands, and I will be enjoying it for at least three more days according to literature.
My first mistake of the day is evidentally you are recommended to put two layers on. Unfortunately, I only had time to properly paint and cure one layer. So it'll have to do. I'll let you know in a couple years how that works out for me. I hope I made up for it with the Ospho treatment.
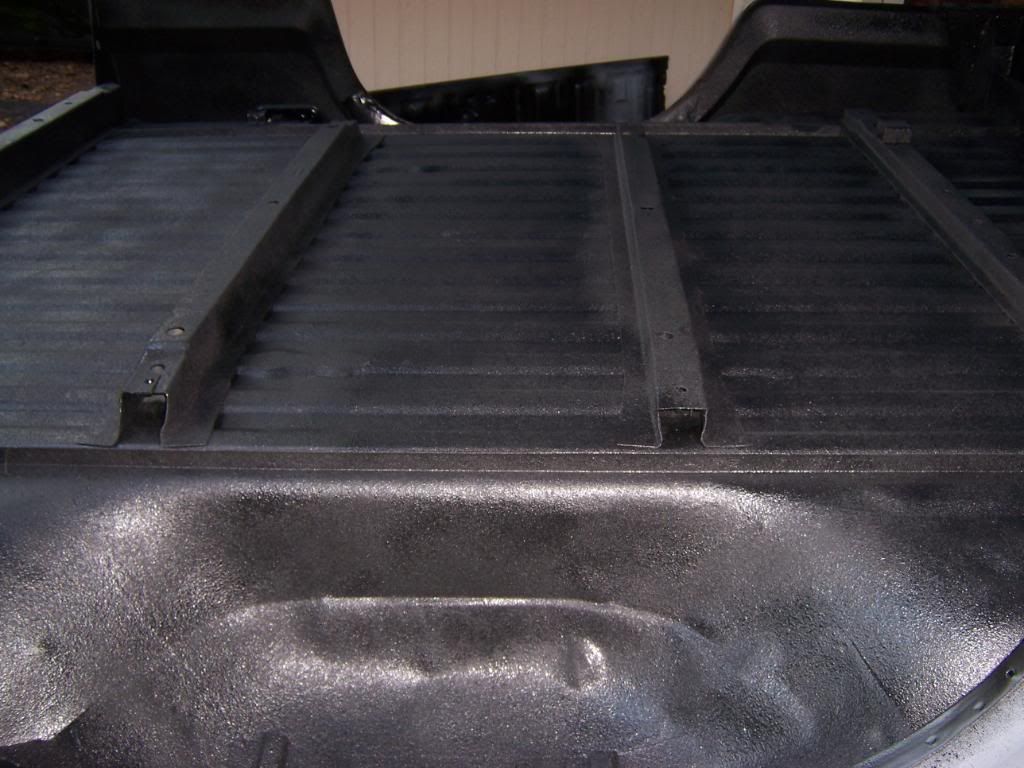
Finally, I coated the box in rubberized undercoat from 3M. I applied two coats of this and burned through 2 full cans. When all was said and done, it looked really good. I was amazed at how it looked. A couple minutes later I checked how the drying was coming along and put a fingerprint in it. Not to be outdone, I went and got the leftover can and figured I'd just spray it to cover up my fingerprint. Someone was laughing at me somewhere because then the can sent forth a fountain of paint instead of a spray. A few choice words later, and my perfect coat looked like crap. FAIL. Good thing this was practice and no one will ever see it.
While all this was going on, I primed the heat shields and painted them in black heat resistant enamel. They came out good.
My front chrome bumper was all rusted and crappy looking (I plan on buying a new one when the time is right), and I figured I could improve its looks temporarily with a little elbow grease. I prepped it yesterday, scuffed the chrome down with 80 grit. I then used self etching primer. I was left with the decision to go with the black paint I used for the heat shields, or try the poor man's chrome paint.
I opted for the heat resistant black paint.
In summary: my bumper was chrome and had some rust on it and looked average. Now my bumper has no rust and looks like it was pulled off a Charbroil grill. Wonderful.
Today's supplies
<a href="http://s1137.photobucket.com/albums/n507/manthony222/?action=view&current=IMG_7480.jpg" target="_blank"><img src="http://i1137.photobucket.com/albums/n507/manthony222/IMG_7480.jpg" border="0" alt="Photobucket"></a>
Coating the Box with POR15
<a href="http://s1137.photobucket.com/albums/n507/manthony222/?action=view&current=IMG_7483.jpg" target="_blank"><img src="http://i1137.photobucket.com/albums/n507/manthony222/IMG_7483.jpg" border="0" alt="Photobucket"></a>
A medicine cup works well for transferring POR15
<a href="http://s1137.photobucket.com/albums/n507/manthony222/?action=view&current=IMG_7484.jpg" target="_blank"><img src="http://i1137.photobucket.com/albums/n507/manthony222/IMG_7484.jpg" border="0" alt="Photobucket"></a>
<a href="http://s1137.photobucket.com/albums/n507/manthony222/?action=view&current=IMG_7486.jpg" target="_blank"><img src="http://i1137.photobucket.com/albums/n507/manthony222/IMG_7486.jpg" border="0" alt="Photobucket"></a>
And the final product!
<a href="http://s1137.photobucket.com/albums/n507/manthony222/?action=view&current=IMG_7500.jpg" target="_blank"><img src="http://i1137.photobucket.com/albums/n507/manthony222/IMG_7500.jpg" border="0" alt="Photobucket"></a>
<a href="http://s1137.photobucket.com/albums/n507/manthony222/?action=view&current=IMG_7501.jpg" target="_blank"><img src="http://i1137.photobucket.com/albums/n507/manthony222/IMG_7501.jpg" border="0" alt="Photobucket"></a>
Before and after shots of bumper and heat shields
<a href="http://s1137.photobucket.com/albums/n507/manthony222/?action=view&current=IMG_7456.jpg" target="_blank"><img src="http://i1137.photobucket.com/albums/n507/manthony222/IMG_7456.jpg" border="0" alt="Photobucket"></a>
<a href="http://s1137.photobucket.com/albums/n507/manthony222/?action=view&current=IMG_7478.jpg" target="_blank"><img src="http://i1137.photobucket.com/albums/n507/manthony222/IMG_7478.jpg" border="0" alt="Photobucket"></a>
<a href="http://s1137.photobucket.com/albums/n507/manthony222/?action=view&current=IMG_7493.jpg" target="_blank"><img src="http://i1137.photobucket.com/albums/n507/manthony222/IMG_7493.jpg" border="0" alt="Photobucket"></a>
Feel free to chime in as to the things I'm doing wrong or anything constructive or destructive. I'll roll with the punches as best as I can.
Be easy on me, this is my first time through all this. On the other hand, remember, if I can do it, so can you 10x better.
Either way, today I finished the majority of the bottom of the box. I need to do some body work in the coming weekends to complete the box. I also need to restore my gas tank and find the fill components ASAP. I'm not entirely positive the truck box will fit over the 18 gallon fuel cell very well. I need to get this thing in storage before winter, and I'll be damned if I'm pushing it there.
Today, I cleaned up the Ospho as best as I could, and then painted on the POR 15. You know something is potent when it warns you not to drip any of it in the lid seam or else the lid will be immovable later. I did manage to get it on my hands, and I will be enjoying it for at least three more days according to literature.
My first mistake of the day is evidentally you are recommended to put two layers on. Unfortunately, I only had time to properly paint and cure one layer. So it'll have to do. I'll let you know in a couple years how that works out for me. I hope I made up for it with the Ospho treatment.
Finally, I coated the box in rubberized undercoat from 3M. I applied two coats of this and burned through 2 full cans. When all was said and done, it looked really good. I was amazed at how it looked. A couple minutes later I checked how the drying was coming along and put a fingerprint in it. Not to be outdone, I went and got the leftover can and figured I'd just spray it to cover up my fingerprint. Someone was laughing at me somewhere because then the can sent forth a fountain of paint instead of a spray. A few choice words later, and my perfect coat looked like crap. FAIL. Good thing this was practice and no one will ever see it.
While all this was going on, I primed the heat shields and painted them in black heat resistant enamel. They came out good.
My front chrome bumper was all rusted and crappy looking (I plan on buying a new one when the time is right), and I figured I could improve its looks temporarily with a little elbow grease. I prepped it yesterday, scuffed the chrome down with 80 grit. I then used self etching primer. I was left with the decision to go with the black paint I used for the heat shields, or try the poor man's chrome paint.
I opted for the heat resistant black paint.
In summary: my bumper was chrome and had some rust on it and looked average. Now my bumper has no rust and looks like it was pulled off a Charbroil grill. Wonderful.
Today's supplies
<a href="http://s1137.photobucket.com/albums/n507/manthony222/?action=view&current=IMG_7480.jpg" target="_blank"><img src="http://i1137.photobucket.com/albums/n507/manthony222/IMG_7480.jpg" border="0" alt="Photobucket"></a>
Coating the Box with POR15
<a href="http://s1137.photobucket.com/albums/n507/manthony222/?action=view&current=IMG_7483.jpg" target="_blank"><img src="http://i1137.photobucket.com/albums/n507/manthony222/IMG_7483.jpg" border="0" alt="Photobucket"></a>
A medicine cup works well for transferring POR15
<a href="http://s1137.photobucket.com/albums/n507/manthony222/?action=view&current=IMG_7484.jpg" target="_blank"><img src="http://i1137.photobucket.com/albums/n507/manthony222/IMG_7484.jpg" border="0" alt="Photobucket"></a>
<a href="http://s1137.photobucket.com/albums/n507/manthony222/?action=view&current=IMG_7486.jpg" target="_blank"><img src="http://i1137.photobucket.com/albums/n507/manthony222/IMG_7486.jpg" border="0" alt="Photobucket"></a>
And the final product!
<a href="http://s1137.photobucket.com/albums/n507/manthony222/?action=view&current=IMG_7500.jpg" target="_blank"><img src="http://i1137.photobucket.com/albums/n507/manthony222/IMG_7500.jpg" border="0" alt="Photobucket"></a>
<a href="http://s1137.photobucket.com/albums/n507/manthony222/?action=view&current=IMG_7501.jpg" target="_blank"><img src="http://i1137.photobucket.com/albums/n507/manthony222/IMG_7501.jpg" border="0" alt="Photobucket"></a>
Before and after shots of bumper and heat shields
<a href="http://s1137.photobucket.com/albums/n507/manthony222/?action=view&current=IMG_7456.jpg" target="_blank"><img src="http://i1137.photobucket.com/albums/n507/manthony222/IMG_7456.jpg" border="0" alt="Photobucket"></a>
<a href="http://s1137.photobucket.com/albums/n507/manthony222/?action=view&current=IMG_7478.jpg" target="_blank"><img src="http://i1137.photobucket.com/albums/n507/manthony222/IMG_7478.jpg" border="0" alt="Photobucket"></a>
<a href="http://s1137.photobucket.com/albums/n507/manthony222/?action=view&current=IMG_7493.jpg" target="_blank"><img src="http://i1137.photobucket.com/albums/n507/manthony222/IMG_7493.jpg" border="0" alt="Photobucket"></a>
Thread Starter
|
Junior User
Joined: Aug 2011
Posts: 84
Likes: 0
From: Rockford, MI
NBC Steve - Normally I'm working on my truck at my parent's place. The strongest form of wife repellent seems to be directly correlated with my mother (her mother-in-law). I doubt this is a coincidence.
79FordCummins - I don't know much about diesels in these trucks, but a crew cab would be very nice. They look awesome too.
Old Reliable - You are welcome anytime! Just warning you though, I'm not keeping this baby stock though! I've got some plans for her! I'm hoping to be near done by next year end of summer. I somehow doubt it'll happen though.
Senior User
Joined: Apr 2011
Posts: 247
Likes: 1
From: Lake City, FL
Nice work on that bed. As far as stock goes, those are my plans I do not care what you do your truck just make sure you do not scrap it. BUt if you do scrap it, I do not think that I will be the only one in your yard with at torch or pitchfork....
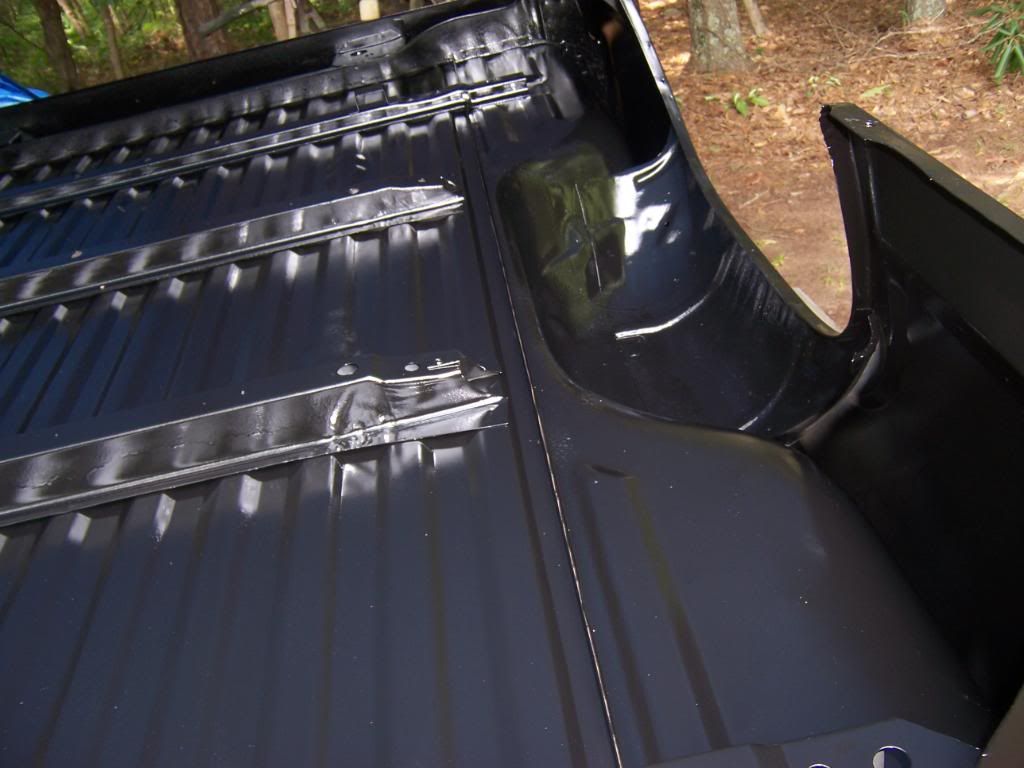
My only suggestion that I have for you is you may want to finish coating your bed. I was refering to the inside of the vertical sides. I have rust in those areas that is see though, so I think I may have a probelm. The ares I am refering to are circled in red for you.

My only suggestion that I have for you is you may want to finish coating your bed. I was refering to the inside of the vertical sides. I have rust in those areas that is see though, so I think I may have a probelm. The ares I am refering to are circled in red for you.
Thread Starter
|
Junior User
Joined: Aug 2011
Posts: 84
Likes: 0
From: Rockford, MI
Thanks Old Reliable. I do plan on hitting the inner metal surfaces of the box. That is kind of like phase two of this process. I am going to be sand blasting those harder to reach areas like under the tailgate also. I will then repair the sheet metal and finish it all together at the same time.
The inner fender metal (right above the wheels) Is actually going to be removed completely. The idea was from Grinnergetter, to avoid future rusting above my wheel wells. I will take those out and support the fenders with some metal.
The inner fender metal (right above the wheels) Is actually going to be removed completely. The idea was from Grinnergetter, to avoid future rusting above my wheel wells. I will take those out and support the fenders with some metal.
Logistics Pro
Joined: Aug 2003
Posts: 4,701
Likes: 6
Looking good! You asked for constructive criticism, and the only thing I have to say is that your bumper has stripes. It looks like you only sprayed one way. When I do odd shaped stuff like the bumper, I start by spraying the short way (what would be up and down on the bumper) and put the final coat on going long ways.
On an unrelated note, it is funny how many people like/want crewcabs. My dream truck is next to my username. I had to sell it because I have too many kids, but I think I will build another regular cab when my kids are grown. I guess that is why I like these regular cab builds so much. Being green doesn't hurt either
On an unrelated note, it is funny how many people like/want crewcabs. My dream truck is next to my username. I had to sell it because I have too many kids, but I think I will build another regular cab when my kids are grown. I guess that is why I like these regular cab builds so much. Being green doesn't hurt either
Cargo Master
Joined: Apr 2010
Posts: 2,936
Likes: 9
From: Acworth, GA
QuackSalvar, I too did the underside of my truck bed this year. After thoroughly cleaning, I sprayed it with 2 coats of epoxy primer. Then I sprayed it with 3M Undercoating. One quart was not enough, so I used a couple cans of Zep Undercoating that I had left from another project to finish it up. I did as far as I could reach on the sides, and anywhere else that needed it that I could get to. As far as the heat shields, I just cleaned them up real good and left them. I didn't want to take any chance painting them and having them get too hot and catching fire or anything. I am hoping that this will help it last at least another 30 years or so. You can see more pictures of my project here;
https://www.ford-trucks.com/forums/9...build-log.html

It looks like you are coming along nicely with your project, good luck.
https://www.ford-trucks.com/forums/9...build-log.html
It looks like you are coming along nicely with your project, good luck.
Senior User
Joined: Feb 2011
Posts: 183
Likes: 0
From: Grand Junction, Colo.
Well i am officially hooked on this thread.....had me laughing my butt off and it seems lately that is something that is hard to do. I think you are doing an awesome job please by all means keep it going.....I may not chime in but rest assured i will by reading and learning.
Thank you for writing such a great build.
Thank you for writing such a great build.
Thread Starter
|
Junior User
Joined: Aug 2011
Posts: 84
Likes: 0
From: Rockford, MI
teds74ford - I normally would argue that the picture of the bumper and such was wet at that time. But I must shamefully admit you hit the nail on the head, I did paint in only one direction. Way to rub salt in my wound. Not only did I paint a bumper that looks like it belongs in a George Foreman commercial, I painted it wrong. Thank you for the input, I'll do it right next time when I switch to a truer black enamel.
Grubbworm - Yeah, I think you did the right thing not painting the heat shields. I think I'm gonna strip them back down to metal and shamefully not tell my wife about the $10 in paint I blew. I don't want the paint burning off.
Grubbworm - Yeah, I think you did the right thing not painting the heat shields. I think I'm gonna strip them back down to metal and shamefully not tell my wife about the $10 in paint I blew. I don't want the paint burning off.