


Fender Removal
Thread Starter
|
Mountain Pass
Joined: Jul 2011
Posts: 168
Likes: 0
I have a 1992 Ford F250 and I'm planning on removing the driver side fender to do some body work. I've been looking for all the bolts and it seems like there is less than usual. Is there a diagram showing where the mounting points are located? Plus are there any tips or tricks I should know? I have enough rusted broken parts and don't want anymore to screw me up. 

Logistics Pro
Joined: Apr 2011
Posts: 4,744
Likes: 5
From: Earth
did you check the bolts inside the engine compartment? there also may be some twards the wheel well, i looked in the haynes manual i got and couldn't find any answers... i know there should at least 4 visible with hood open
Thread Starter
|
Mountain Pass
Joined: Jul 2011
Posts: 168
Likes: 0
I think I might have to take out the radiator reservoir and maybe the air cleaner box to completely see them and access them. the fender well ones look like a pain. It just seemed like there was only 4 bolts holding this thing on haha
The Southernmost Mod
Joined: Dec 2004
Posts: 6,902
Likes: 20
From: Caracas, Venezuela

Oh no, there are a lot of them, you will also need to take the ones joining it to the front clip. You won't need to take any lights out, but the plastic chrome-like part has to be removed. There is also one screw you can only access with the door open, as it's in the gap left by it.
Logistics Pro
Joined: Apr 2011
Posts: 4,744
Likes: 5
From: Earth
Oh no, there are a lot of them, you will also need to take the ones joining it to the front clip. You won't need to take any lights out, but the plastic chrome-like part has to be removed. There is also one screw you can only access with the door open, as it's in the gap left by it.

Thread Starter
|
Mountain Pass
Joined: Jul 2011
Posts: 168
Likes: 0
Oh no, there are a lot of them, you will also need to take the ones joining it to the front clip. You won't need to take any lights out, but the plastic chrome-like part has to be removed. There is also one screw you can only access with the door open, as it's in the gap left by it.
The Southernmost Mod
Joined: Dec 2004
Posts: 6,902
Likes: 20
From: Caracas, Venezuela
I don't get what you mean by shims (english is not my native, and dictionary's translation doesn't seem to help much). But anyway, if you do the job in one day you won't have much trouble remembering what went where.
On edit: oh, now i get it, you meant like spacers. No, there aren't a lot of them that i can remember, but be careful of the threaded inserts, specially the ones holding the hood's damper.
On edit: oh, now i get it, you meant like spacers. No, there aren't a lot of them that i can remember, but be careful of the threaded inserts, specially the ones holding the hood's damper.
Trending Topics
Logistics Pro
Joined: Apr 2011
Posts: 4,744
Likes: 5
From: Earth
FTE Stories
Ford Trucks for Ford Truck Enthusiasts

10 Things Every Truck Owner NEEDS (2026 Edition)
Michael S. Palmer
Rezvani's Latest Post-Apocalyptic Monster Is a Ford F-150 Raptor Underneath
Verdad Gallardo
Top 10 Most Expensive Ford Trucks Ever Sold on Bring a Trailer
Joe Kucinski
2027 Ford Super Duty Buyer's Guide (Every Model, Engine, & Package)
Brett Foote
Top 10 Ford Truck Tragedies
Joe Kucinski
AEV FXL Super Duty - the Super Duty Raptor Ford Doesn't Make
Brett Foote
Lobo Vs Lobo: Proof the F-150 Lobo Should Be Even Lower!
Michael S. Palmer
Ford's 2001 Explorer Sportsman Concept Looks For a New Home
Verdad Gallardo
10 Best Ford Truck Engines We Miss the Most!
Joe KucinskiThe Southernmost Mod
Joined: Dec 2004
Posts: 6,902
Likes: 20
From: Caracas, Venezuela
Well, cu�as = something very different from spacers in spanish, lol... More like the tools used to break a stone block in ancient egipt, or the ones used to prevent a car from moving when working on it (or used to stop a door).
Logistics Pro
Joined: Apr 2011
Posts: 4,744
Likes: 5
From: Earth
yea wasnt sure if it was off or not, your translation in this case would mean something like a wheel chock (item used to prevent a wheel from rolling)

Elder User
Joined: Mar 2011
Posts: 923
Likes: 1
From: North Central MA
There were shims in mine. Looked to be made out of a cardboard/press board. I put it back together with new panels and shimmed it out to the body lines the hard way (trial and error) the old shims didn't fit the new fenders correctly.


FTE Chapter Leader


Joined: May 2009
Posts: 8,843
Likes: 27
From: Eastern Ky

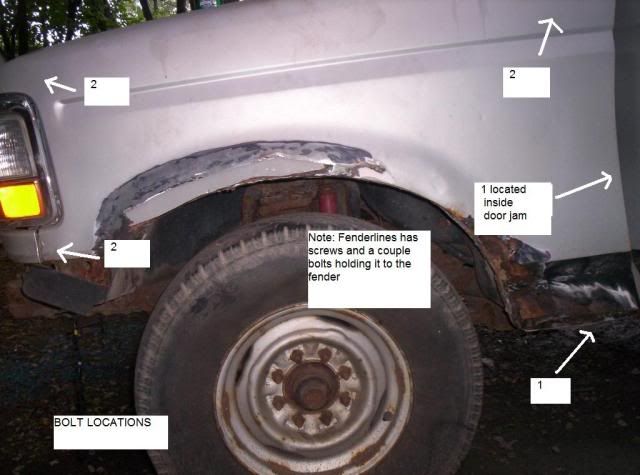
As Jaime said...There are 4 bolts visible from the top;
2-Radiator support brace
2-Fender/hood hinge meets (You'll have to remove the one for the hood hinge thats on the inside of the fender.....
1-In the gap of where the door opens and you can see into the fender....Its about 12" up from the bottom
1-On the MAIN bottom of the fender....Its on the outside....Just run your hand around the bottom, you'll find it...
1/2-Attaches the fender/Stone Guard together (May involve removing the washer fluid resevoir.....
And THEN, theres like 10-15 small screws that holds the fender apron onto the fender.....
Once you've located them all, its a easy thing to remember, and get it all back together, and as a word of advice, TAKE IT SLOW.....Also, sort of work the fender off by moving a end at a time.....In an up/down fashion while slowly pulling it out...
Elder User
Joined: Nov 2010
Posts: 957
Likes: 2
From: Graniteville
This is off the top of my head. You will also need to remove the hood (or support it up when you remove the spring on the left side) and pull the grill and headlight backing. You can do it without pulling the whole headlight backing, but you run the risk of cracking it when you swing it forward out of the way with the other side still attached. Once you pull the center grill, there are 2 bolts on each headlight trim assy that are accessed under the batt box and air box. The backing has 6 bolts holding it on (4 to core support, and 1 on each outer side.)
Thread Starter
|
Mountain Pass
Joined: Jul 2011
Posts: 168
Likes: 0
This is off the top of my head. You will also need to remove the hood (or support it up when you remove the spring on the left side) and pull the grill and headlight backing. You can do it without pulling the whole headlight backing, but you run the risk of cracking it when you swing it forward out of the way with the other side still attached. Once you pull the center grill, there are 2 bolts on each headlight trim assy that are accessed under the batt box and air box. The backing has 6 bolts holding it on (4 to core support, and 1 on each outer side.)
Perfect! That'll work great. Thanks!