WIRING 12 VOLT CONVERSION HELP
#1
 07-27-2010, 12:12 AM

Join Date: Sep 2008
Location: Edmonton Alberta
Posts: 270
Likes: 0
Received 0 Likes
on
0 Posts

#2
07-27-2010, 12:59 AM
Did your new wiring harness come with directions? Your fuse box is normally located under the dash on the drivers side, there should be some wires comming out of your firewall and those wires should be on the backside of the fusebox. When you do get started do it 1 section at a time. When I rewired mine I used a Rebel Wiring harness. I separated the wiring and started with the ignition. Once I got the truck to start then I went on to the front end with the headlights, turn signals etc.. That really worked for me because if I had any problems I could call up Rebel and they would help me make sure I had things correct. I have a set of directions (in PDF form) for the Rebel wiring harness, I don't know if they will help but if you would like them I'll be more than happy to email them to you...
#3
07-27-2010, 03:17 AM

#4
07-27-2010, 11:05 AM

Post Fiend
If you are asking where the "original" fuse box is on you 52, stop looking - there wasn't one.
There are two basic types of power going out to all your electrical things - "hot" (where the item is powered all the time like lights, horns, etc) and "Switched" (things that turned on withthe ignition switch like radio, heater, electric wipers, etc)
The "Switched" items recieved power off the "ACC" post of the ignition switch and either had an inline fuse or no fuse protection at all.
The Hot items were powered out of two sugar cube sized circuit breakers that are mounted onto your instrument panel under the dash.
Power to these two circuit breakers was supplied off the "BATT" terminal of the Generator Voltage Regulator. There was a metal bridge connecting the two circuit breakers. Power was supplied to the "B" terminal of ignition switch off one of the circuit breakers.
Lastly, the power wire from the Voltage Regulator continued on at the "BATT" connection on the Circuit Breaker through the induction loop of the "Ammeter" then on to the large terminal of the Starter Solenoid that the negative battery terminal (on 6 Volt positive ground vehicle) cable was attached to.
If one is retaining the OEM 6 volt positive ground electrical system, you can still use the circuit breakers. But since you are conveting to 12 volt negative ground, you will need to install a fuse panel that will allow for BOTH switched and hot configuration, or two separate fuse boxes - one hot, one switched.
Your kit should have come with a fuse box, if it didn't you'll have to install some.
Here is the OEM wiring configuration for power distribution for your 52:
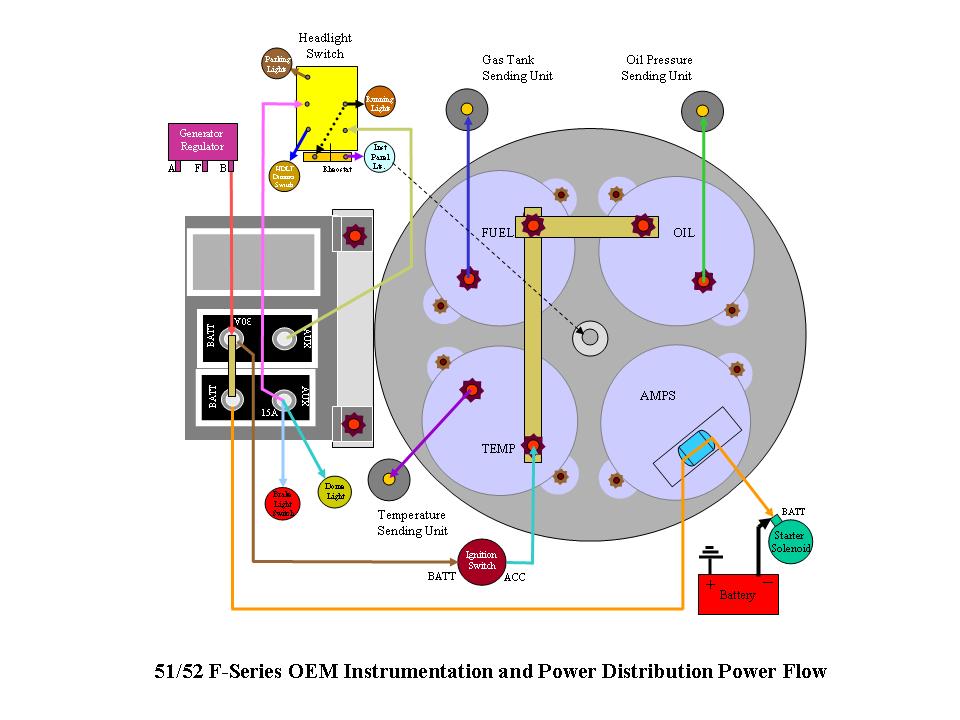
Edit note: I realize after re rereading your post, that by asking where to "locate" the fuse box, you may not necessarily been asking where to "find" the fuse box, but rather where to "mount" the new one. DA DOY! If that's the case, I'd put it up on the fire wall well above the steering column (about a foot above) so it's accessible, but not under foot and close to the firewall hole on the upper left firewall used for routing wiring.
There are two basic types of power going out to all your electrical things - "hot" (where the item is powered all the time like lights, horns, etc) and "Switched" (things that turned on withthe ignition switch like radio, heater, electric wipers, etc)
The "Switched" items recieved power off the "ACC" post of the ignition switch and either had an inline fuse or no fuse protection at all.
The Hot items were powered out of two sugar cube sized circuit breakers that are mounted onto your instrument panel under the dash.
Power to these two circuit breakers was supplied off the "BATT" terminal of the Generator Voltage Regulator. There was a metal bridge connecting the two circuit breakers. Power was supplied to the "B" terminal of ignition switch off one of the circuit breakers.
Lastly, the power wire from the Voltage Regulator continued on at the "BATT" connection on the Circuit Breaker through the induction loop of the "Ammeter" then on to the large terminal of the Starter Solenoid that the negative battery terminal (on 6 Volt positive ground vehicle) cable was attached to.
If one is retaining the OEM 6 volt positive ground electrical system, you can still use the circuit breakers. But since you are conveting to 12 volt negative ground, you will need to install a fuse panel that will allow for BOTH switched and hot configuration, or two separate fuse boxes - one hot, one switched.
Your kit should have come with a fuse box, if it didn't you'll have to install some.
Here is the OEM wiring configuration for power distribution for your 52:
Edit note: I realize after re rereading your post, that by asking where to "locate" the fuse box, you may not necessarily been asking where to "find" the fuse box, but rather where to "mount" the new one. DA DOY! If that's the case, I'd put it up on the fire wall well above the steering column (about a foot above) so it's accessible, but not under foot and close to the firewall hole on the upper left firewall used for routing wiring.
#5
07-27-2010, 11:12 AM

more electrics
Julie - I sent earlier message/thread. You have my vote for "all knowing." I replaced my headlight switch in 65 F100 ... now when I turn on headlights (rheostat) the gas and temp gauges peg far right! I cleaned the old switch so may attempt to reinstall --- are those gauges somehow powered from the light switch rheostat when it is turned on? Is the new switch bad? Did I screw something up in the install? Thanks, michael
<input id="gwProxy" type="hidden"><!--Session data--><input onclick="if(typeof(jsCall)=='function'){jsCall();} else{setTimeout('jsCall()',500);}" id="jsProxy" type="hidden">
<input id="gwProxy" type="hidden"><!--Session data--><input onclick="if(typeof(jsCall)=='function'){jsCall();} else{setTimeout('jsCall()',500);}" id="jsProxy" type="hidden">
#6
07-27-2010, 11:58 AM
Post Fiend

Hi Michael,
Well unfortunately, I'm not terribly familiar with the wiring on the 65s. But, It really didn't change alot over the years in flow, just in power distribution.
There shouldn't be ANY connection with gauges and headlights at all. The headlights are on "Hot" power (the power that is on all the time) and the gauges are "Switched" (power is supplied when you turn on the key!)
As a first guess, I would say that you have a couple of wires or connections on these two systems that are touching or, OR, you have somehow crossed the power supply wires for one or the other and reconnected them to the other system.
The problem is being caused by something in your lights providing a redundant and direct ground for your gauges wires. That ground may be back feeding through your light circuit when it is turned on.
OR, you have double power flowing into the gauges caused by a conncetion or wire on the gauge power wire touching the lights power wire. Do you have a fuse panel on your truck? If not, the power for the gauges should be coming right off the "ACC" post of the ignition switch.
Can you give me a little more info: Does it happen when you pull the headlight switch out to the first detent? The second detent? Ignition on or off? Affected by the dash panel lights dimmer?
It's kind of crazy, but you have a miswire or short somewhere (duh) it's just going to be a matter of isolating it down.
PS Do you have a shop manual for your truck? And if so do you have a way to scan the electrical diagram in the back and send it to me?
#7
07-27-2010, 12:28 PM
wierd is right!
Julie - Okay I just went out and tried: key on gauges read normal. Lights to first detent (parking) and fuel gauge actually went to zero. Same in 2nd detent. When I turn the panel lights to on by twisting **** clockwise fuel gauged pegged past the full indication!
The only thing I did was changed the light switch -cold be I pinched a wire somewhere putting the instrument panel back on but it is a mystery -- I don't want to drive it today as I may be late and don;t want to use lights then burn out my fuel/temp gauges.
michael
<input id="gwProxy" type="hidden"><!--Session data--><input onclick="if(typeof(jsCall)=='function'){jsCall();} else{setTimeout('jsCall()',500);}" id="jsProxy" type="hidden">
Trending Topics
#8
07-27-2010, 12:29 PM
#9
07-27-2010, 12:44 PM

Woody,
First things first, get a frosty beverage of choice and set back and do some "pondering". Decide where you want things and mentally run through how the wires will have to be routed. Once you decide on where the fuse box will go and the wired will be mounted start routing them. DON'T make any terminations or cuts on the harness yet. There is a good chance you will have to reroute or move things so wait until you are absolutely sure before making any termination.
I ended up rerouting mine three times before I got it where I wanted it. I wish I would have added some connectors in the harness for the front clip and the engine just in case I need to pull them in the future.
On my 49 I spent alot of time filling holes in the firewall so I didn't want to poke any holes for fuse block mounting. I used the large fuse block 21 circuit kit from EZ Wiring and mounted in to the left of the steering column. I fabbed a bracket and hung it from my hanging brake pedal assy. I ended up mounting my fuse block upside down so that the main bundle of wires exited it towards the top instead of down to the floor.
I didn't want that huge bundle of wire exiting through the firewall through the original opening on the upper left of the firewall so I routed mine across the inside of the firewall and down and out on the passenger side footwell. Since I'm running a 500ci Caddy this works out great as its real close to the starter and the main power feed.
For my engine wiring I wanted to keep things clean so I routed everything below the engine and brought the wires up only where needed so as to not have wiring draped all over the engine.
I had a huge stock of crimp style butt connectors on hand but I can't stand the look of that huge colored plastic piece at every union or termination. I used a small punch and pushed the "innards" out of the plastic sleeves and then soldered the wires into the crimp part and then covered it with heat shrink to make a nice clean termination. When its all done cover the harness with split loom, You can get it at most parts stores or hardware stores. If you hit the wreckign yards you can even get the special split loom pieces for "T" or "Y" branches.


Good luck
Bobby
First things first, get a frosty beverage of choice and set back and do some "pondering". Decide where you want things and mentally run through how the wires will have to be routed. Once you decide on where the fuse box will go and the wired will be mounted start routing them. DON'T make any terminations or cuts on the harness yet. There is a good chance you will have to reroute or move things so wait until you are absolutely sure before making any termination.
I ended up rerouting mine three times before I got it where I wanted it. I wish I would have added some connectors in the harness for the front clip and the engine just in case I need to pull them in the future.
On my 49 I spent alot of time filling holes in the firewall so I didn't want to poke any holes for fuse block mounting. I used the large fuse block 21 circuit kit from EZ Wiring and mounted in to the left of the steering column. I fabbed a bracket and hung it from my hanging brake pedal assy. I ended up mounting my fuse block upside down so that the main bundle of wires exited it towards the top instead of down to the floor.
I didn't want that huge bundle of wire exiting through the firewall through the original opening on the upper left of the firewall so I routed mine across the inside of the firewall and down and out on the passenger side footwell. Since I'm running a 500ci Caddy this works out great as its real close to the starter and the main power feed.
For my engine wiring I wanted to keep things clean so I routed everything below the engine and brought the wires up only where needed so as to not have wiring draped all over the engine.
I had a huge stock of crimp style butt connectors on hand but I can't stand the look of that huge colored plastic piece at every union or termination. I used a small punch and pushed the "innards" out of the plastic sleeves and then soldered the wires into the crimp part and then covered it with heat shrink to make a nice clean termination. When its all done cover the harness with split loom, You can get it at most parts stores or hardware stores. If you hit the wreckign yards you can even get the special split loom pieces for "T" or "Y" branches.
Good luck
Bobby
#10
07-27-2010, 02:04 PM
Post Fiend
Yeah, you've got wire thingys touching other wire thingys that shouldn't be. MAybe you mistakingly hooked your gauge power up to your headlight switch rheostat instead of the instrument lights.
But Hey Michael, lets start a new thread for this so we don't mix electrical advice on Woodys thread. It may get a little involved and to mix them will be confusing.
#12
07-27-2010, 11:04 PM
Cargo Master
Fuse block location
Woody;
I've been in the throws of wiring my truck for quite a while. I located my fuse block like Bobby, slightly left of column, under dash. Today I actually removed my instrument panel, and am cleaning up my "rough-in" that proved my circuits. I am working at the signal light wiring, hopefully will finish my next days off. I fed my wiring to the left of fuse block; wires enter engine compartment at original location. My computer (EFI) is located above fuse panel; I would route it differently, lower through the firewall if I were to do it over. Good luck with your wiring, take your time, plan before cutting; and solder all connections.

I've been in the throws of wiring my truck for quite a while. I located my fuse block like Bobby, slightly left of column, under dash. Today I actually removed my instrument panel, and am cleaning up my "rough-in" that proved my circuits. I am working at the signal light wiring, hopefully will finish my next days off. I fed my wiring to the left of fuse block; wires enter engine compartment at original location. My computer (EFI) is located above fuse panel; I would route it differently, lower through the firewall if I were to do it over. Good luck with your wiring, take your time, plan before cutting; and solder all connections.

#14
07-28-2010, 09:43 AM
Cargo Master
#15
07-28-2010, 11:48 PM

We rewired our 55 with a new harness from American Autowire which works well. We mounted the fuse block high on the firewall just left of the steering column inside the cab. If I were to do it again I would mount it lower on the fire wall to make access easier. When I go to add features and need to get at the fuse panel I have to contort like a pretzel. Unfortunately I am not as flexible as I used to be.
T900
T900