
Injector cup removal and replacement
#1
 03-23-2010, 09:52 PM

Join Date: Oct 2009
Location: Cottage Grove, OR
Posts: 127
Likes: 0
Received 0 Likes
on
0 Posts
Injector cup removal and replacement
To start I have to credit clay From Riffraff for his help and finding a great tool to beable to do this on the truck.
Secondly im sure many others have done write-ups on this process. I used the knowledge learned here to accomplish project.
Third I just did a quick write up with what I remember doing during the project. I also did one cylinder at a time in order to no confuse parts.
Injector Cup replacement
<O:p</O:p
<O:p</O:p
<O:p</O:p
<O:p</O:p
IT was pretty straight forward. <O:p</O:p
<O:p</O:p
<O:p</O:p
Here are the steps<O:p</O:p
<O:p</O:p
<O:p</O:p
Pull battery cables and keep bats on trickle charge while working you will need it to get the truck restarted.<O:p</O:p
<O:p</O:p
<O:p</O:p
Drain coolant<O:p</O:p
<O:p</O:p
<O:p</O:p
Pull valve covers<O:p</O:p
<O:p</O:p
<O:p</O:p
Pull all glow plug's and test while out<O:p</O:p
<O:p</O:p
<O:p</O:p
Pull injector (I did one at a time) I also Installed new injector O rings<O:p</O:p
<O:p</O:p
<O:p</O:p
Pull rockers and label (I used a paint pen and wiped it off when I was done)<O:p</O:p
<O:p</O:p
<O:p</O:p
Pull push rods and label (copper end goes up when reinstalling)<O:p</O:p
<O:p</O:p
<O:p</O:p
Use tool to remove Injector cup<O:p</O:p
<O:p</O:p
<O:p</O:p
Clean out injector bore with small wire brush and some air<O:p</O:p
<O:p</O:p
<O:p</O:p
Put new thread locker around tip (small end of cup) and top (big end of cup) doesn�t take much.<O:p</O:p
<O:p</O:p
<O:p</O:p
Tap new cup into bore with tool until cup bottoms out in bore (you can kind of hear it) I also used a press type tool on the back ones and to help align the cups<O:p</O:p
<O:p</O:p
<O:p</O:p
Re install pushrods and rockers. Torque to 20 ft lbs<O:p</O:p
<O:p</O:p
<O:p</O:p
Oil up injector and reinstall it. Torque to 120 in lbs<O:p</O:p
<O:p</O:p
<O:p</O:p
When done with all injectors crank engine over by hand 4 revs at least with gp's out and valve covers loosely bolted down (to prevent oil from flying everywhere)<O:p</O:p
<O:p</O:p
<O:p</O:p
I then cranked the engine with the starter a few times to be sure the oil cleared the cylinders<O:p</O:p
<O:p</O:p
<O:p</O:p
Then pull vc's off again and reinstall the gp's and torque to 124 in lbs<O:p</O:p
<O:p</O:p
<O:p</O:p
Reinstall vc's<O:p</O:p
<O:p</O:p
<O:p</O:p
Fill radiator with water and simple green bout a gal or two of simple green. (to clean fuel out of cooling system)<O:p</O:p
<O:p</O:p
<O:p</O:p
Install all piping and reconnect bats<O:p</O:p
<O:p</O:p
<O:p</O:p
Change oil and filter<O:p</O:p
<O:p</O:p
<O:p</O:p
Cycle gp's and crank for 15 sec at a time with a couple min break between cranks (don�t over heat starter) until it fires (took probably 5 times maybe more to fire up)<O:p</O:p
<O:p</O:p
<O:p</O:p
It ran really rough till I went and drove it (need to clear all air from fuel rail and high pressure oil rail)<O:p</O:p
<O:p</O:p
<O:p</O:p
Run simple green for a day then drain and determine if you need to do it again to remove all fuel from the cooling system<O:p</O:p
<O:p</O:p
<O:p</O:p
Then it is recommended to replace all cooling hoses and fill with coolant and water<O:p</O:p
<O:p</O:p
<O:p</O:p
Oil change in another couple hundred miles<O:p</O:p
<O:p</O:p
<O:p</O:p
Check coolant and top off if low<O:p</O:p
<O:p</O:p
<O:p</O:p
I also replaced my fuel filter and dropped the tank and cleaned it out to ensure I had good fuel before I restarted the truck.<O:p</O:p
Alright here are the pics

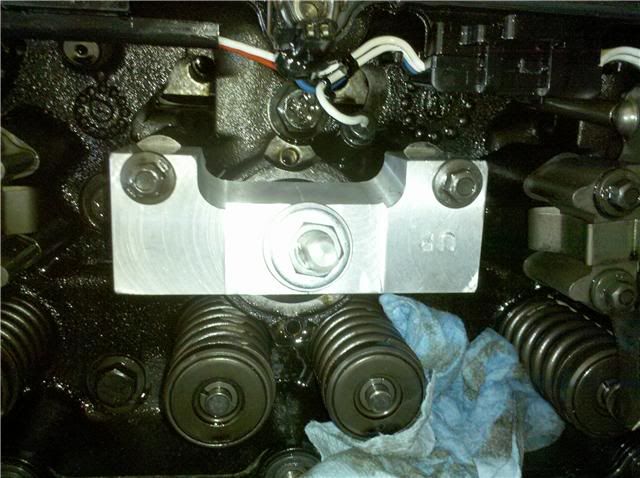
Bolts circled in red are rocker bolts 20 ft lbs
Bolt circled in blue is Injecter hold down bolt 120 in lbs(with this tool it is necessary to remove top injector bolt and bottom bolt)
Bolt circled in blue is Injecter hold down bolt 120 in lbs(with this tool it is necessary to remove top injector bolt and bottom bolt)
Only pic I have of the tool in one piece. Installed pulling the cup.
Note the up stamp is upside down this tool must have been marked wrong its the only way it will mount.
Note the up stamp is upside down this tool must have been marked wrong its the only way it will mount.

Tool broken in half but useable also note it is with the up lable mounted up
but it wont align with the puller tool. Puller is in the bore.
but it wont align with the puller tool. Puller is in the bore.

tool in the upside down position but only way it works.
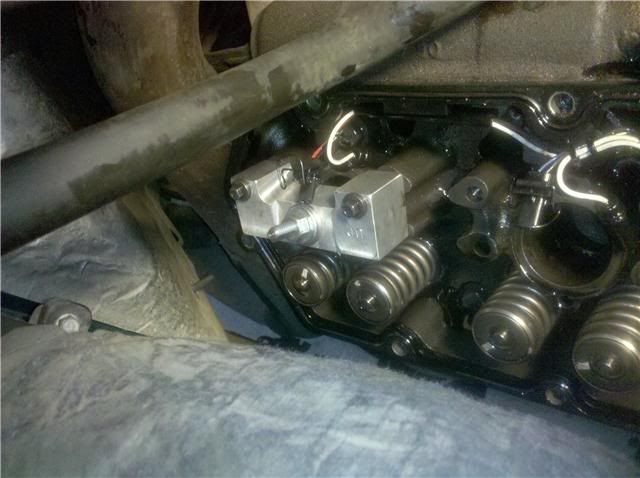
Tool installed on passenger side next to the Air box (CYL 7??) cant remember off hand.
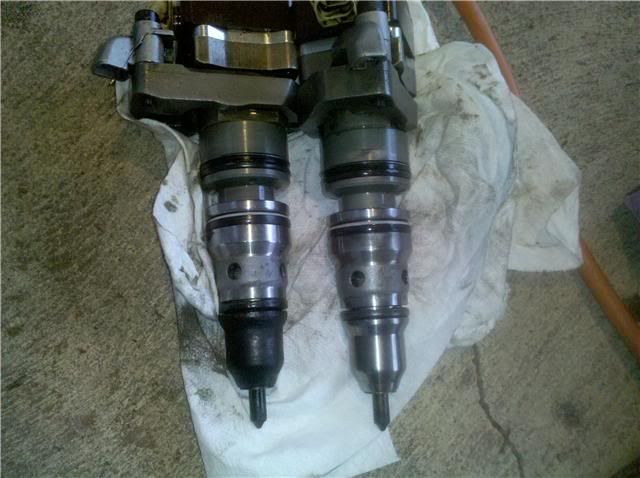
Injector on left had a blown washer on the tip which caused the discoloration the one on the right was in good shape.
#2
03-23-2010, 10:28 PM
#3
03-23-2010, 10:44 PM
Join Date: Oct 2009
Location: Cottage Grove, OR
Posts: 127
Likes: 0
Received 0 Likes
on
0 Posts
Thanks for the reps
I think that the up is for the upside too but it could have been stamped so it is readable when installed on the head.
I don't think the tool is a ford tool. I didnt see ford anywhere in the instructions of stamped on the tool. You would have to ask Clay where he got it from. Also I dont have the part number. It is well made and with one change to the machining of the Bridge part which broke it will work flawlessly.
Actually being broke almost made it easier to align it with the tooling and rocker pedestal holes.
Also I forgot to snap a pic of the extractor tool, which works great, so if you get the same tool post a pic of it here if you dont mind.
The installer is nothing fancy just a piece that fits the cup and you can drive it in or crank it in with a wrench.
#4
03-23-2010, 11:29 PM
Thanks for the reps.
You earned them.
I think that the up is for the upside too but it could have been stamped so it is readable when installed on the head.
That would make more sense.
Actually being broke almost made it easier to align it with the tooling and rocker pedestal holes.
You earned them.
I think that the up is for the upside too but it could have been stamped so it is readable when installed on the head.
That would make more sense.
Actually being broke almost made it easier to align it with the tooling and rocker pedestal holes.

I'll take some pics as well.
#5
03-24-2010, 12:14 AM

PREMIUM SPONSOR


#6
03-24-2010, 12:40 AM

#7
03-24-2010, 09:13 AM
Join Date: Oct 2009
Location: Cottage Grove, OR
Posts: 127
Likes: 0
Received 0 Likes
on
0 Posts
If you look at my pics the problem was obvious with the old tool, it was just machined way to thin in the area where the hole is for the extractor to go through.
It is really a simple fix so im sure that clay has got you covered.
Also when you tighten the extractor in the cup it didnt take much to get it to bite maybe once had tight 1/2 a turn with a wrench. I got all 8 on the first try.
Another thing as I was pulling the cups I wasnt finding any obvious visible cracks. (In other posts I had seen big cracks) It wasnt until I inspected one of them on the tool that I found a hairline crack due to the tool pushing it open. I reinspected and found one other cup that had a similar crack.
This was letting presurized fuel in the coolant when the engine was running, and letting presurized water in the fuel when the hot engine was shut down. IMO
Trending Topics


#9
03-24-2010, 09:44 AM
If you look at my pics the problem was obvious with the old tool, it was just machined way to thin in the area where the hole is for the extractor to go through.
It is really a simple fix so im sure that clay has got you covered.
Also when you tighten the extractor in the cup it didnt take much to get it to bite maybe once had tight 1/2 a turn with a wrench. I got all 8 on the first try.
Another thing as I was pulling the cups I wasnt finding any obvious visible cracks. (In other posts I had seen big cracks) It wasnt until I inspected one of them on the tool that I found a hairline crack due to the tool pushing it open. I reinspected and found one other cup that had a similar crack.
This was letting presurized fuel in the coolant when the engine was running, and letting presurized water in the fuel when the hot engine was shut down. IMO
It is really a simple fix so im sure that clay has got you covered.
Also when you tighten the extractor in the cup it didnt take much to get it to bite maybe once had tight 1/2 a turn with a wrench. I got all 8 on the first try.
Another thing as I was pulling the cups I wasnt finding any obvious visible cracks. (In other posts I had seen big cracks) It wasnt until I inspected one of them on the tool that I found a hairline crack due to the tool pushing it open. I reinspected and found one other cup that had a similar crack.
This was letting presurized fuel in the coolant when the engine was running, and letting presurized water in the fuel when the hot engine was shut down. IMO
I'm replacing the cups so I can use the new sealant that is compatible with ELC. All engine build dates prior to 2/2/99 (pre-SN 940614) have cup sealant that is not compatible. My engine build date is 3-10-98.
#10
03-24-2010, 09:01 PM
Join Date: Oct 2009
Location: Cottage Grove, OR
Posts: 127
Likes: 0
Received 0 Likes
on
0 Posts
What is the sealant you are using?
Every thing I read used locktite bearing and stud formula. I hope I didnt screw up.
I know that the sealant really doesn't do much as most on the big end of the cup rubs off on the side of the bore when you install it. On the small end it will stay on the cup around the seat of the bore. However it also fits tight aginst the side of the bore there too.
I would compare it to a freeze plug fit. Also looks like a freeze plug kinda with a hole in it.
Forgot to ask if you are going to do o-rings? Its so easy and cheap I would never do the job without doing them.
#12
03-24-2010, 10:15 PM
What is the sealant you are using?
Every thing I read used locktite bearing and stud formula. I hope I didnt screw up.
I know that the sealant really doesn't do much as most on the big end of the cup rubs off on the side of the bore when you install it. On the small end it will stay on the cup around the seat of the bore. However it also fits tight aginst the side of the bore there too.
I would compare it to a freeze plug fit. Also looks like a freeze plug kinda with a hole in it.
Forgot to ask if you are going to do o-rings? Its so easy and cheap I would never do the job without doing them.
Every thing I read used locktite bearing and stud formula. I hope I didnt screw up.
I know that the sealant really doesn't do much as most on the big end of the cup rubs off on the side of the bore when you install it. On the small end it will stay on the cup around the seat of the bore. However it also fits tight aginst the side of the bore there too.
I would compare it to a freeze plug fit. Also looks like a freeze plug kinda with a hole in it.
Forgot to ask if you are going to do o-rings? Its so easy and cheap I would never do the job without doing them.
Best cut-a-way pic I have.
Definately putting in new o-rings because I am putting in new injectors.
#13
03-24-2010, 11:28 PM
Join Date: Oct 2009
Location: Cottage Grove, OR
Posts: 127
Likes: 0
Received 0 Likes
on
0 Posts
Nice cut aways pics I wish I had those when I was doing the job and trying to explain to my friend what the cups did.
I cant tell in the pics how the Tip end of the cup seals...but when installing the cups its very obvious. Must be something in the pic im not seeing or due to the part it seals to being cut away. For that matter you cant see where the spray tip goes in the cut away.
The tips of the cups had factory sealant on them when I removed the originals. They kinda pop when the sealant breaks while pulling them.
Im interested to hear what you find when you pull your cups.
Also are you upgrading your injectors or doing stock replacements???
Inquiring minds want to know.
#14
03-25-2010, 01:09 AM
Nice cut aways pics I wish I had those when I was doing the job and trying to explain to my friend what the cups did.
I have searched long and hard trying to find an original size of that pic. Just haven't found it yet. I can't even remember where I found this one.
I cant tell in the pics how the Tip end of the cup seals...but when installing the cups its very obvious. Must be something in the pic im not seeing or due to the part it seals to being cut away. For that matter you cant see where the spray tip goes in the cut away.
If you read the the fine print then you know the cup is surrounded by coolant. The sealant at the top and bottom of the cup keeps the coolant from migrating past the top or bottom of the cup. The cup seats in a hole in the bottom of the coolant passage and that is where the tip of the injector extends into the combustion chamber. The washer on the tip of the injector puts additonal sealing pressure on the bottom of the cup as well as sealing the hole in the cup.
The tips of the cups had factory sealant on them when I removed the originals. They kinda pop when the sealant breaks while pulling them.
Im interested to hear what you find when you pull your cups.
I will post my findings and PM you.
Also are you upgrading your injectors or doing stock replacements???
Inquiring minds want to know.

Thread
Thread Starter
Forum
Replies
Last Post
Big-Sarge
6.7L Power Stroke Diesel
168
10-28-2022 02:54 PM
NAMDROF
1999 - 2003 7.3L Power Stroke Diesel
13
04-05-2011 11:02 PM
BlackJeep
1999 - 2003 7.3L Power Stroke Diesel
50
06-18-2008 05:22 PM