
78 Bronco Ruff Stuff universal shackle flip installation
#1
 09-03-2016, 03:44 PM

78 Bronco Ruff Stuff universal shackle flip installation
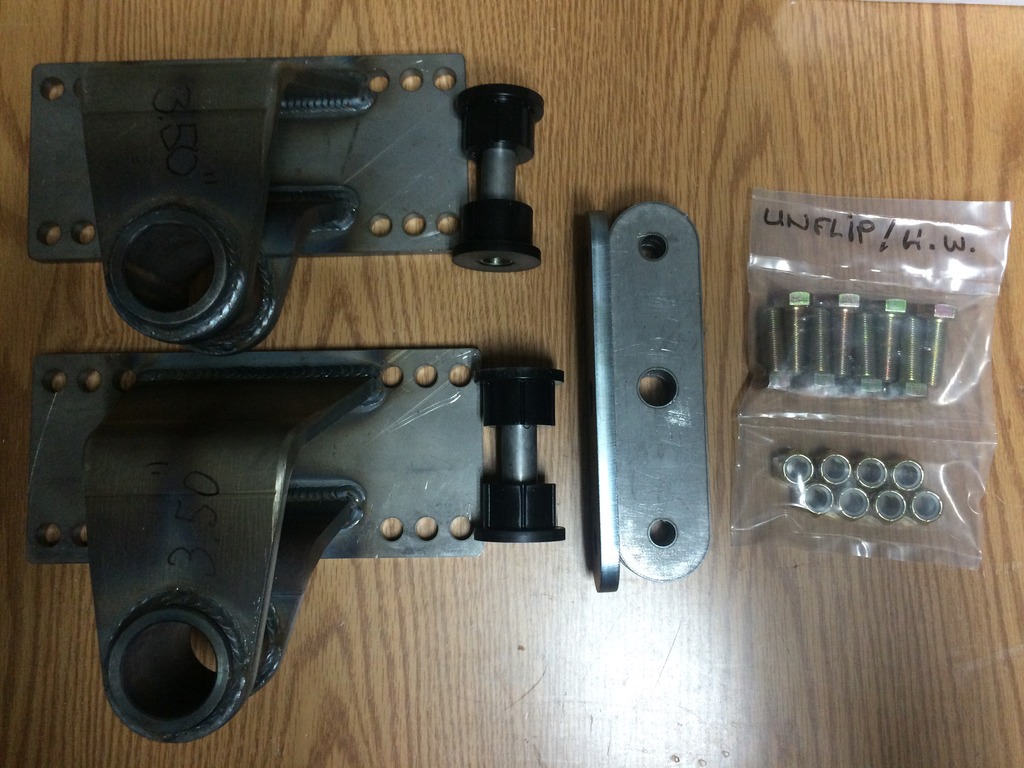
This will be as complete of a write up as I can manage so feel free to ask questions about anything I forgot or that confused you. I am using the Ruff Stuff Specialties universal shackle flip kit with their 6" shackles. While it is a universal kit, they actually make it to the dimensions that you provide to them. This kit also changes from the Ford factory pocket style shackle to a dual outer mounting style. I'm not an expert, just trying to help out the next guy that try's this swap. I did forget to take pictures at the start so I hope you can figure the easy steps out. I'm also not done at this point but I figured I would try to write it up while it is still fresh in my head.
My project is a 1978 Ford Bronco that I bought in pieces from the second owner. It already had a lift on it of unknown height and a Dana 60 swapped into the rear, I did the rear disc swap. So it was finally time to get rid of the blocks on the rear of my Bronco and the scary long U-bolts that were not even straight on the axle! The blocks are 5 1/2" at the rear and taper to 5" at the front. That makes me guess the lift on my Bronco was a 6" lift from some unknown company. My goal is to get rid of the blocks, correct the pinion angle, and maintain or increase the rear lift slightly.
I read a bunch of threads on a lot of different sites to try and figure out where the perfect mounting for the bracket is on the frame. After all the reading it seems the answer is, "it depends on your rig and suspension setup." I did find that most guys agree that at ride height the shackle should have an angle of 40 to 50 degrees to allow full droop without the shackle swinging too far forward. This should also allow full compression without the shackle limiting the spring movement.
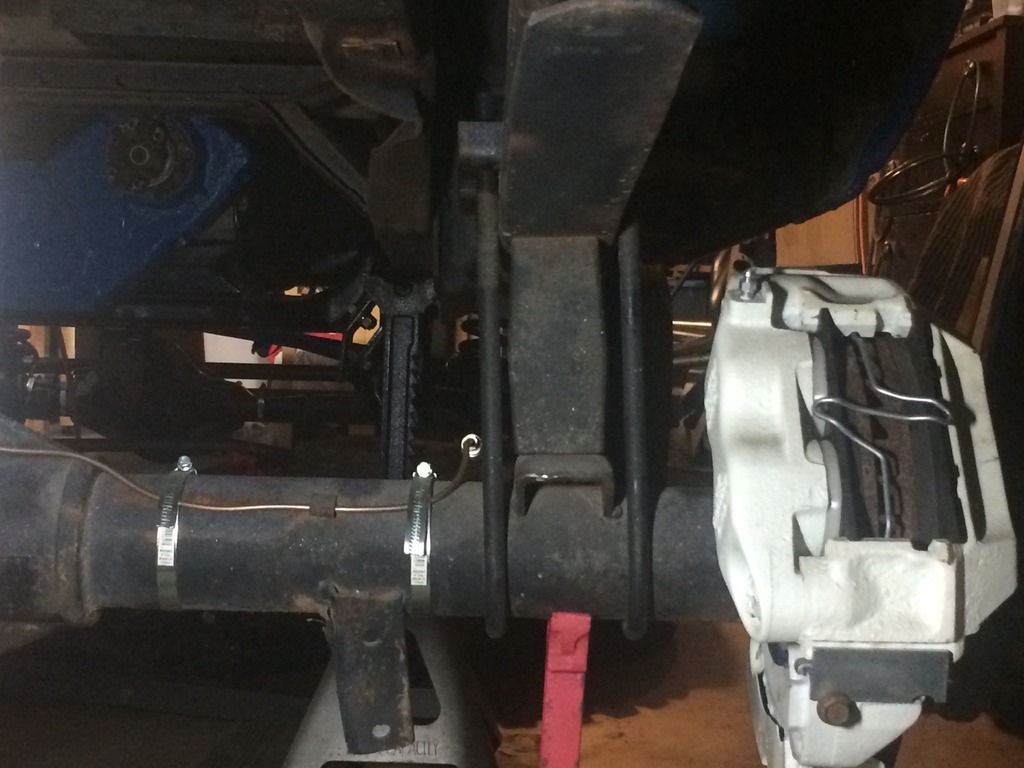
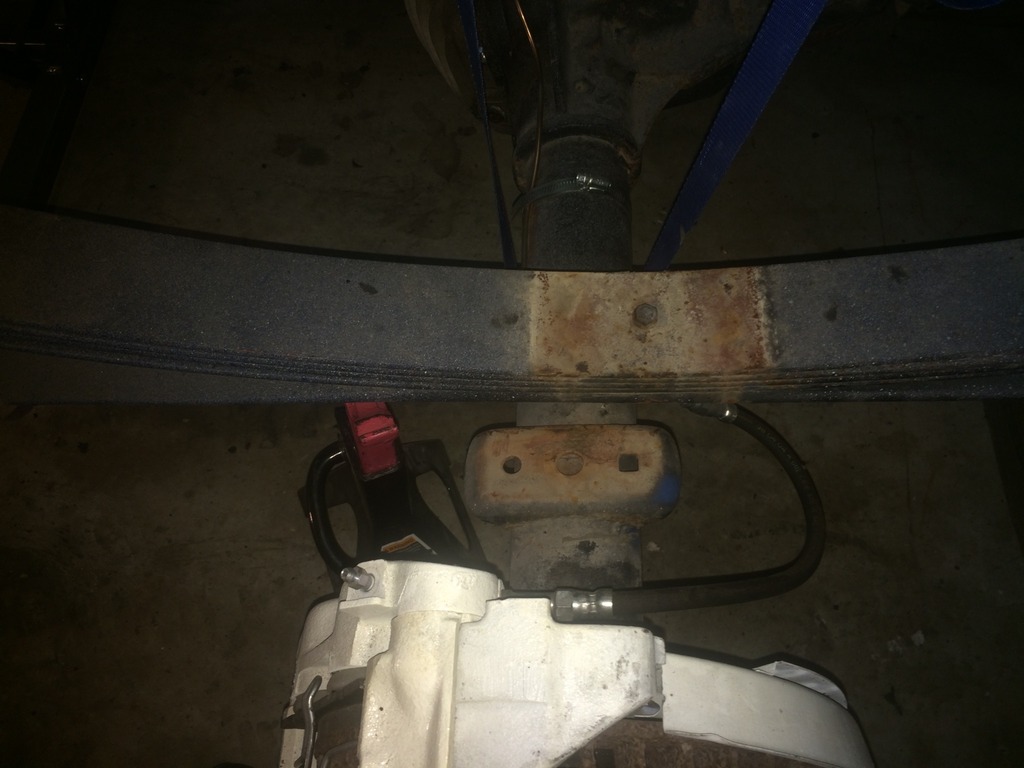
I started today by taking a lot of measurements so I had a good base for before and after comparisons. Next up was jacking up the rear and supporting the Bronco by the frame. Then I set a second set of jack stands just as a precaution. I removed the rear tires and lowered the rear axle until it was neutral, no tension or compression on it while leaving it on the floor jack. Next up was putting a couple of ratchet straps from the frame to the axle to keep things from falling sideways, or onto a toe or leg. Then I took the nuts off the U-bolts, tapped them off the axle, and knocked out the blocks. Next step was to unbolt the factory shackles from the factory hanger and lower the spring onto the axle.
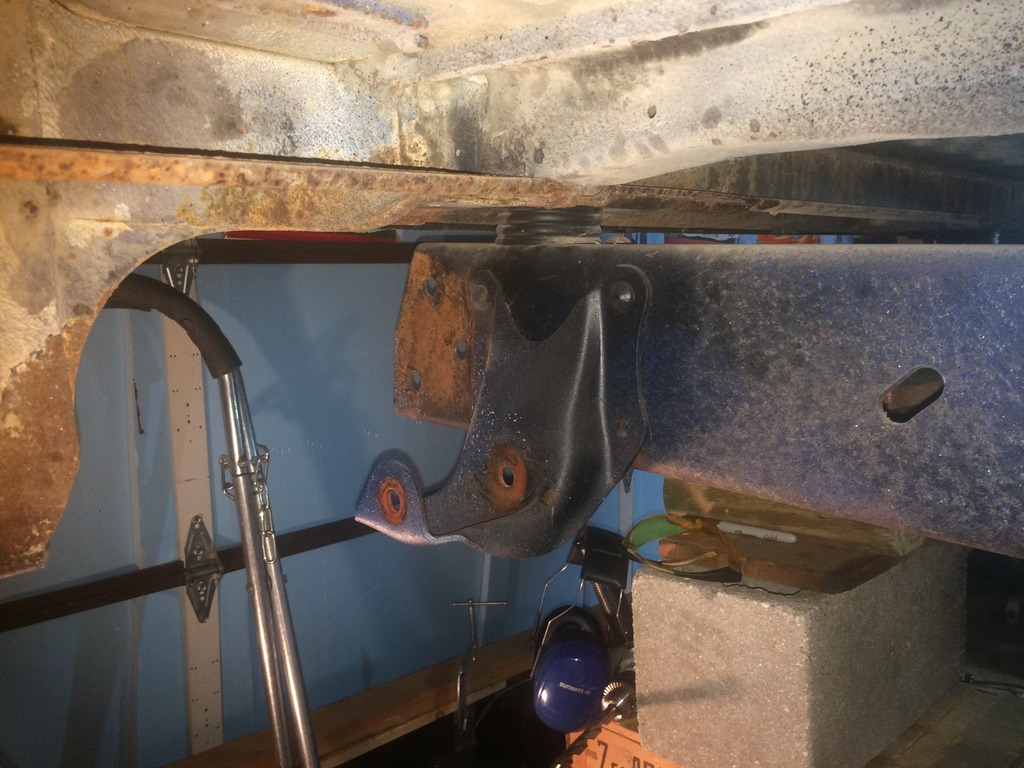
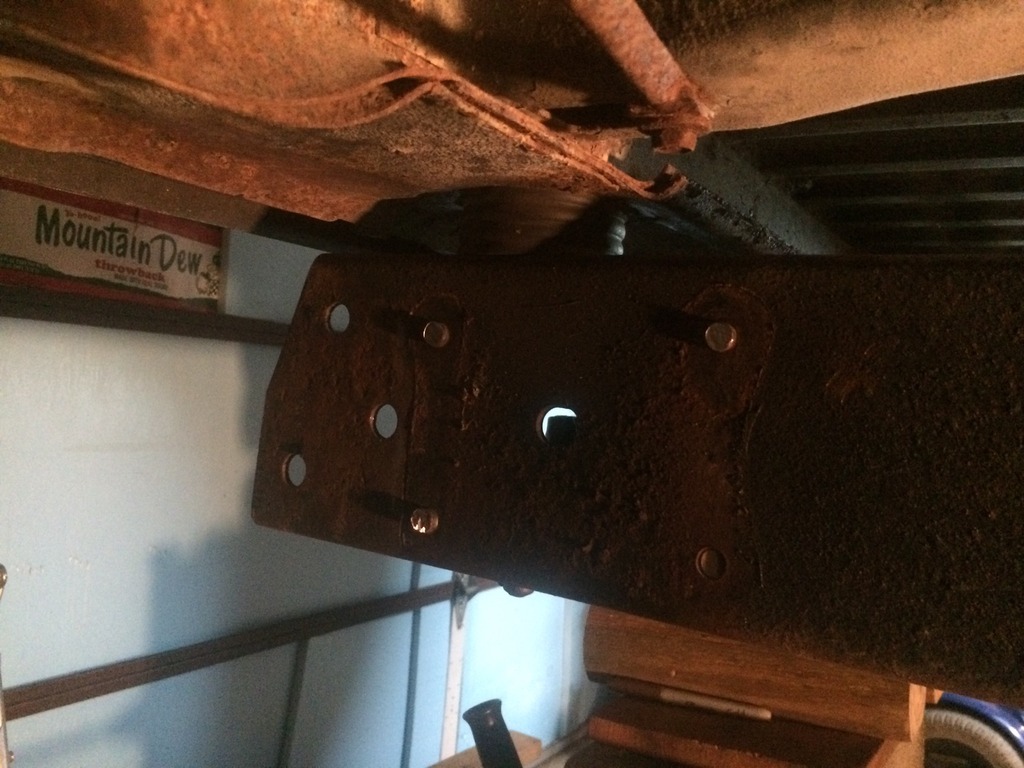
Now is when I discovered that I needed to remove my rear bumper to gain access to the rivets on the rear half of the factory hanger. I have a custom rear bumper that I had already sliced a piece of the rear hangers off to use two of the factory holes because the bumper brackets are so long. Once the access to the rivets is clear you can break out the grinder and start taking the heads off the factory rivets off so you can drive them out and remove the factory shackle hanger. This is also where I noticed that my passenger side bracket was missing the lower front rivet, wonder how long it was gone...
Got the rear two rivets off.

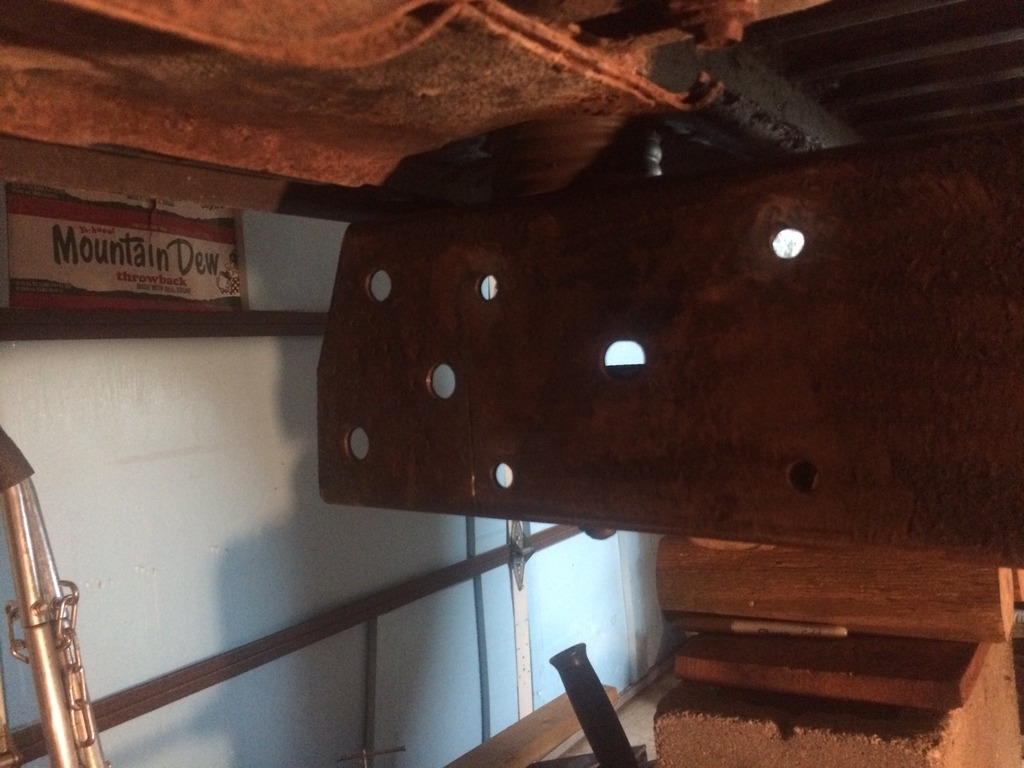
Next I used the three pound hammer to knock the bracket off the frame.
Then I grabbed the air chisel and drove the rivets out of the frame. After that I grabbed the wire wheel and flap disc and cleaned up the frame behind the bracket since this was the first time it's seen the light of day since 1978.
This is when I realized I should have painted the brackets a long time ago when I had nice weather since I can't paint in the attached garage and it's going to be raining for the next few days here. I guess I will get everything mocked into place then take it off later to paint it all since I will have to wait for new U-bolts to arrive.
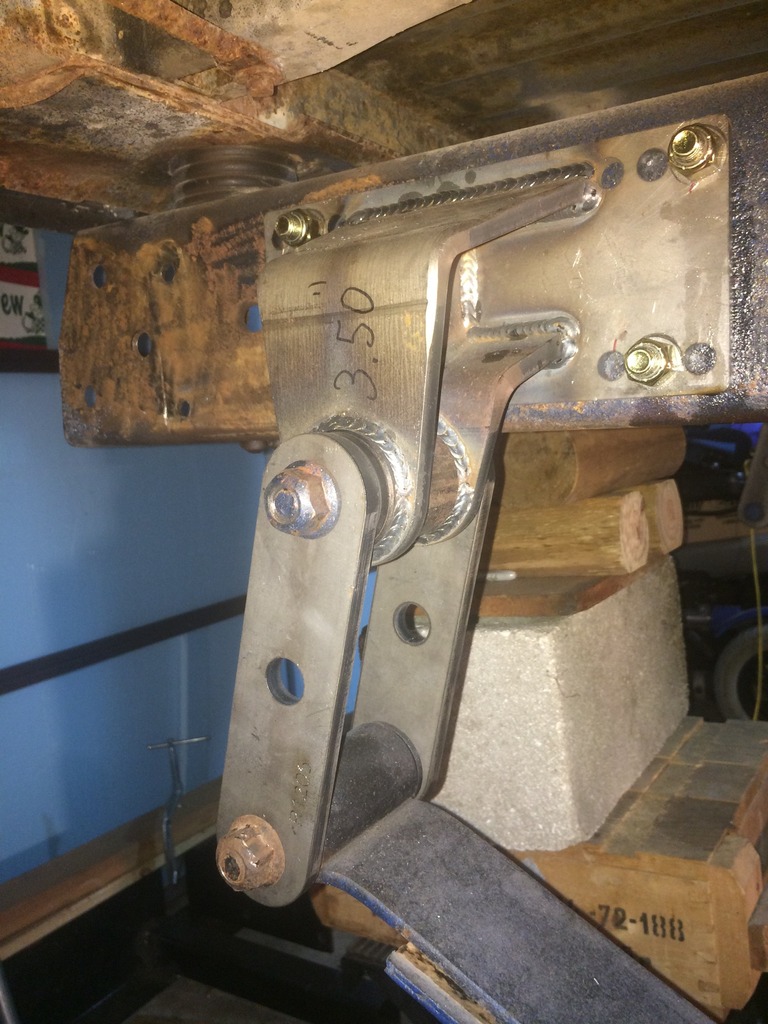
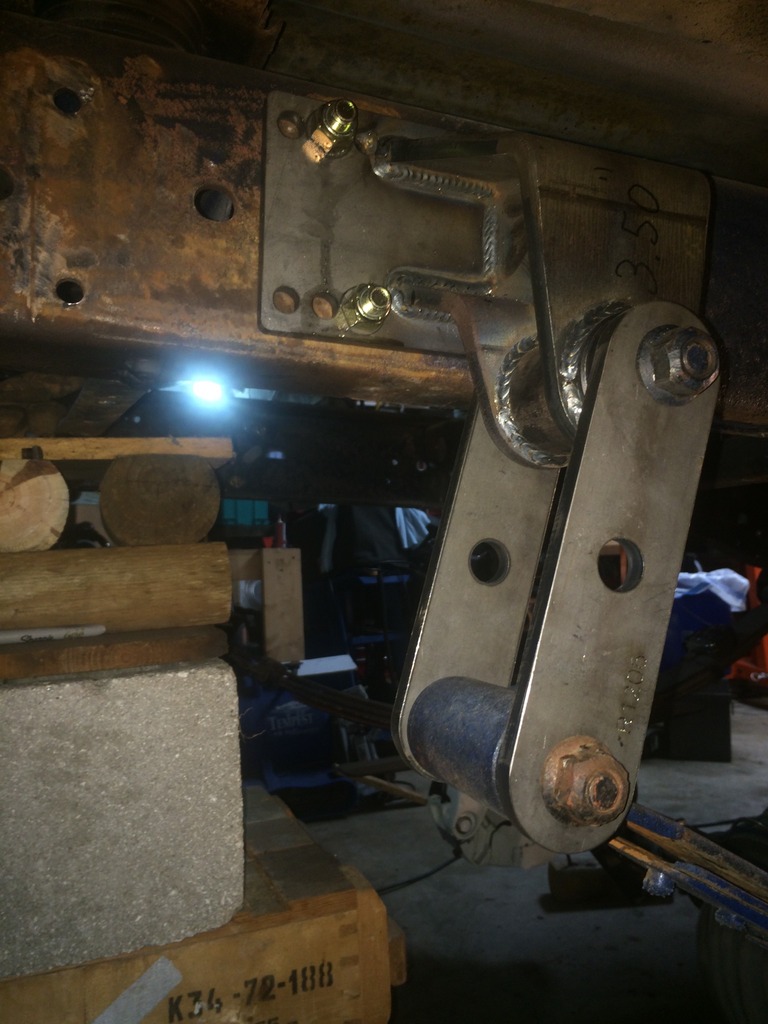
Now that the old parts were off it was time to start figuring out where to install the new hanger bracket on the clean frame rail. I measured, clamped the bracket on. Mocked up the spring, checked the shackle angles thru their range of motion, then adjusted and did it all again. Once I found what I decided was the location I wanted I realized that if I moved the bracket a 1/16" forward I could enlarge and use a factory hole. That will make it so much easier to duplicate the mounting on the other side. So I chose to line up the front most lower hole on the bracket with where the front lower factory rivet for the factory hanger was in the frame. I drilled out the hole to 1/2" while the bracket was clamped to the frame. Then I bolted that location and started drilling the other three mounting holes.
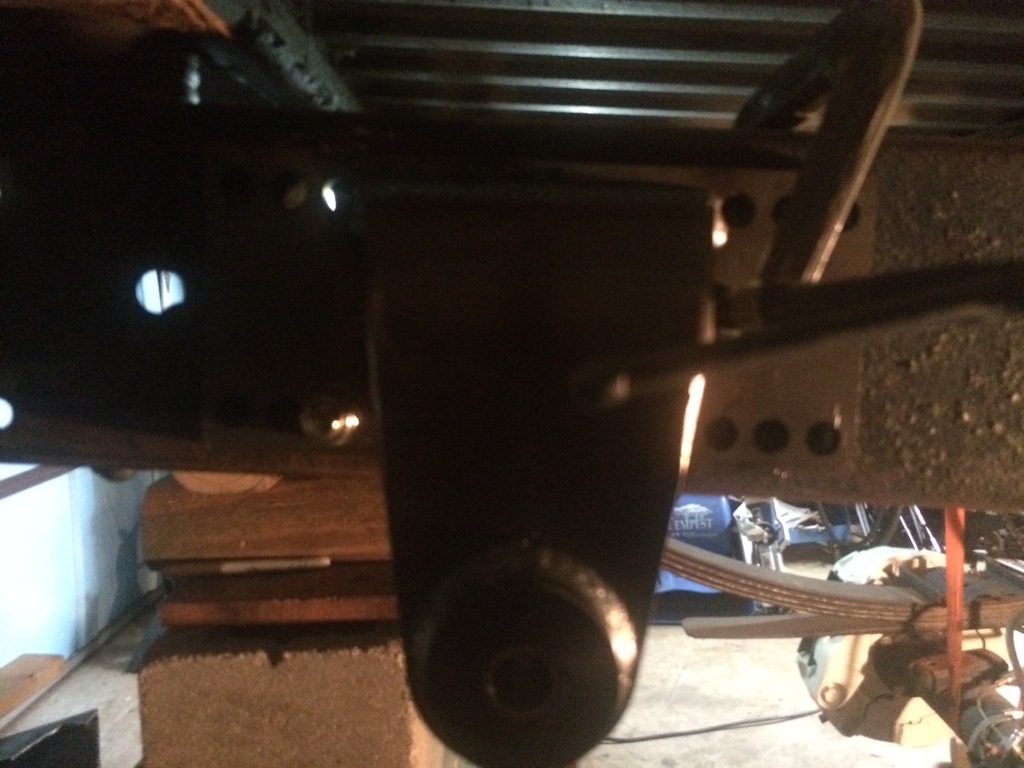
Then I started drilling the rest of the holes that I am using to mount the hanger. I used the 1/2" bit in the hole to mark the center. Then I used a 1/8" hole to drill a pilot hole before going back to the 1/2" to drill all the way thru the frame.
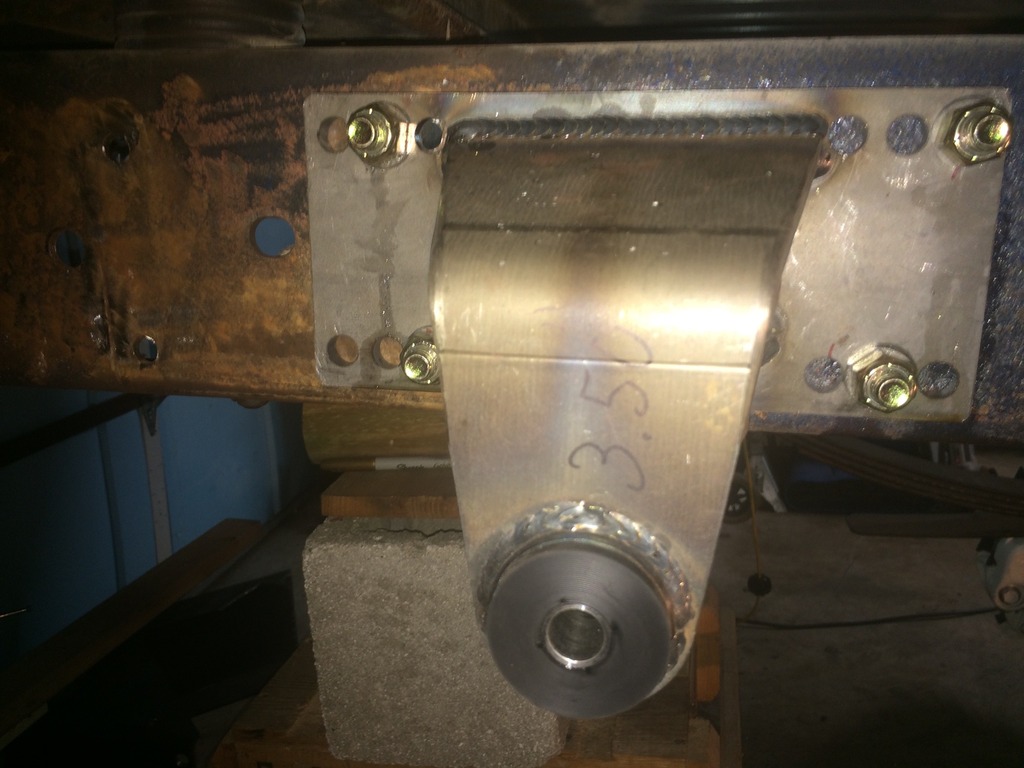
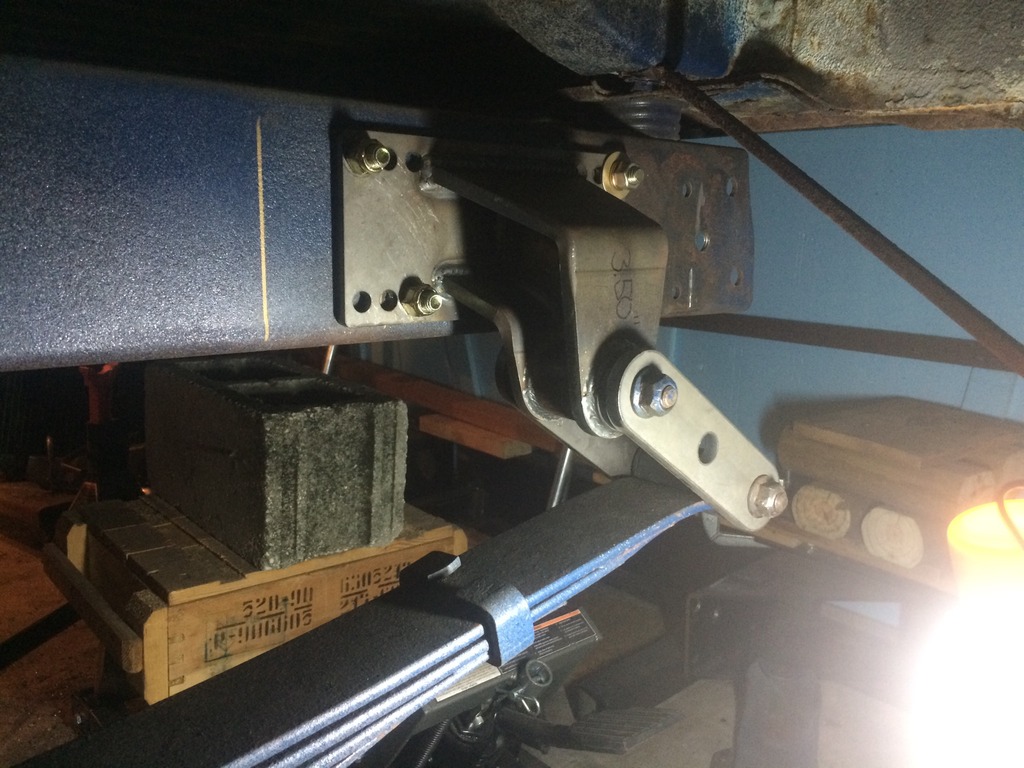
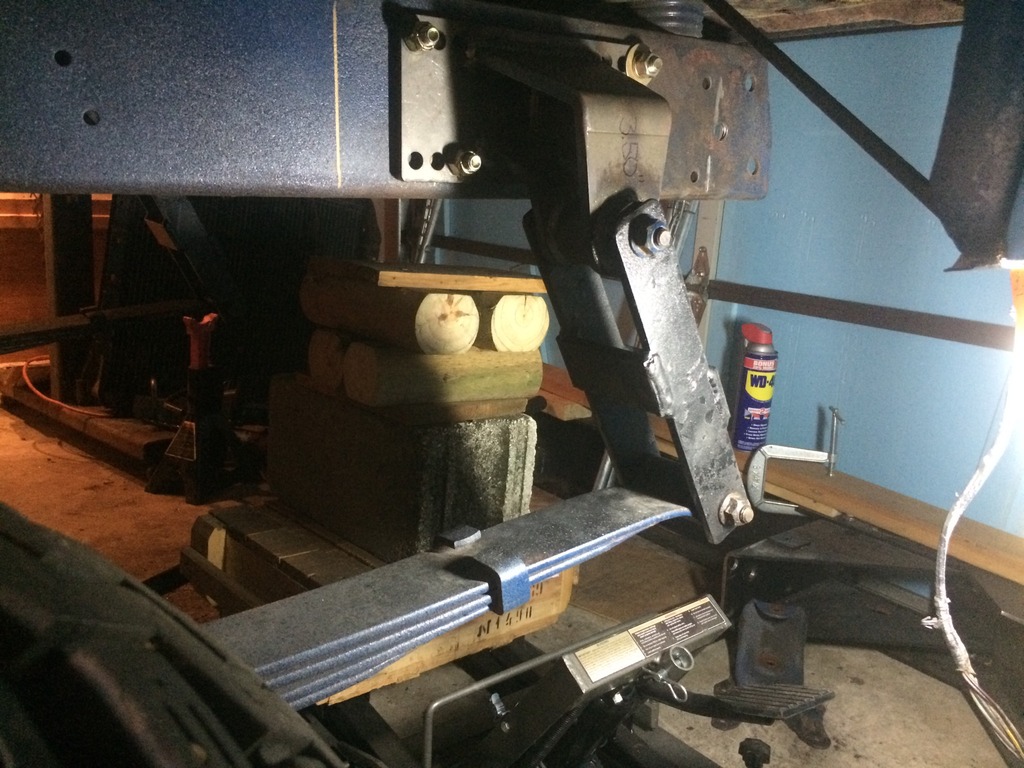
After you have secured the hanger with the four supplied bolts it is time to bolt on the shackles to the hanger and the spring. The stack of stuff in the back of the pic is on my ATV jack and jacked up to the rear crossmember just to help keep the Bronco steady while I was pounding on it, the weight of the Bronco is being supported by the jackstands under it.
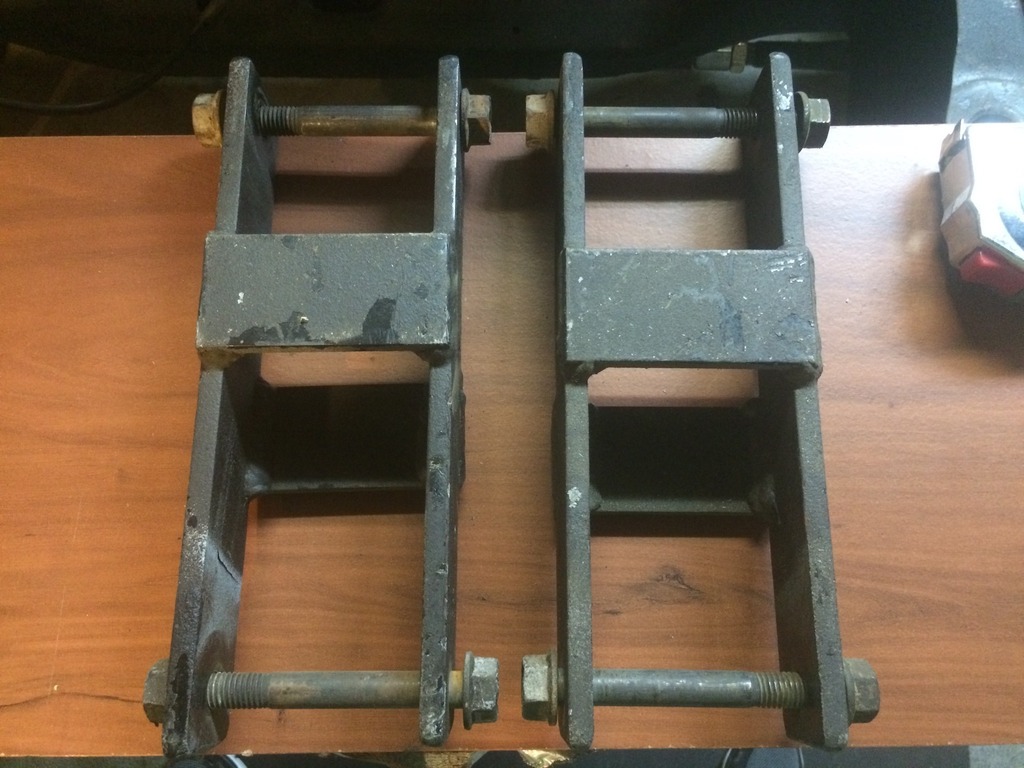
Next up is to copy all of the work to the other side. Once you are done with the other side it's time to figure out if you got all of the lift that you wanted and if the tire is where you want it to be in the wheel well. I used the old U-bolts to attach the springs back to the axle to do this because I was still waiting to order the new U-bolts after I figured out if I need a zero rate block to move the axle in the wheel well. Once it was back on the ground I found that I had a shackle angle of 52* and had lost exactly 1" of lift.
At this point I'm not sure if I'm going to try a longer shackle, add a zero rate 1" block, some add a leaves, or let it be as it is. I really don't know if these are a stock leaf pack or if they are supposed to have some minor lift of their own. I have a set of 10" shackles I made years ago for another truck and I might try them on at some point just to see what it does to the lift and shackle angle. I am happy with the ease of the Ruff Stuff kits to work with and really impressed with the thickness of the material and quality of the welds.
I hope this helps the next guy trying this project. It probably took me 10 hours of time in the garage to do it, but I am working alone in a cramped garage and had to stop frequently to do other things. If you are planning this I recommend signing up for Ruff Stuff's email list as they send out several big sales a year. I got the kit at 22% off by waiting until a sale to buy it.

My project is a 1978 Ford Bronco that I bought in pieces from the second owner. It already had a lift on it of unknown height and a Dana 60 swapped into the rear, I did the rear disc swap. So it was finally time to get rid of the blocks on the rear of my Bronco and the scary long U-bolts that were not even straight on the axle! The blocks are 5 1/2" at the rear and taper to 5" at the front. That makes me guess the lift on my Bronco was a 6" lift from some unknown company. My goal is to get rid of the blocks, correct the pinion angle, and maintain or increase the rear lift slightly.

I read a bunch of threads on a lot of different sites to try and figure out where the perfect mounting for the bracket is on the frame. After all the reading it seems the answer is, "it depends on your rig and suspension setup." I did find that most guys agree that at ride height the shackle should have an angle of 40 to 50 degrees to allow full droop without the shackle swinging too far forward. This should also allow full compression without the shackle limiting the spring movement.
I started today by taking a lot of measurements so I had a good base for before and after comparisons. Next up was jacking up the rear and supporting the Bronco by the frame. Then I set a second set of jack stands just as a precaution. I removed the rear tires and lowered the rear axle until it was neutral, no tension or compression on it while leaving it on the floor jack. Next up was putting a couple of ratchet straps from the frame to the axle to keep things from falling sideways, or onto a toe or leg. Then I took the nuts off the U-bolts, tapped them off the axle, and knocked out the blocks. Next step was to unbolt the factory shackles from the factory hanger and lower the spring onto the axle.

Now is when I discovered that I needed to remove my rear bumper to gain access to the rivets on the rear half of the factory hanger. I have a custom rear bumper that I had already sliced a piece of the rear hangers off to use two of the factory holes because the bumper brackets are so long. Once the access to the rivets is clear you can break out the grinder and start taking the heads off the factory rivets off so you can drive them out and remove the factory shackle hanger. This is also where I noticed that my passenger side bracket was missing the lower front rivet, wonder how long it was gone...

Got the rear two rivets off.

Next I used the three pound hammer to knock the bracket off the frame.

Then I grabbed the air chisel and drove the rivets out of the frame. After that I grabbed the wire wheel and flap disc and cleaned up the frame behind the bracket since this was the first time it's seen the light of day since 1978.

This is when I realized I should have painted the brackets a long time ago when I had nice weather since I can't paint in the attached garage and it's going to be raining for the next few days here. I guess I will get everything mocked into place then take it off later to paint it all since I will have to wait for new U-bolts to arrive.
Now that the old parts were off it was time to start figuring out where to install the new hanger bracket on the clean frame rail. I measured, clamped the bracket on. Mocked up the spring, checked the shackle angles thru their range of motion, then adjusted and did it all again. Once I found what I decided was the location I wanted I realized that if I moved the bracket a 1/16" forward I could enlarge and use a factory hole. That will make it so much easier to duplicate the mounting on the other side. So I chose to line up the front most lower hole on the bracket with where the front lower factory rivet for the factory hanger was in the frame. I drilled out the hole to 1/2" while the bracket was clamped to the frame. Then I bolted that location and started drilling the other three mounting holes.

Then I started drilling the rest of the holes that I am using to mount the hanger. I used the 1/2" bit in the hole to mark the center. Then I used a 1/8" hole to drill a pilot hole before going back to the 1/2" to drill all the way thru the frame.

After you have secured the hanger with the four supplied bolts it is time to bolt on the shackles to the hanger and the spring. The stack of stuff in the back of the pic is on my ATV jack and jacked up to the rear crossmember just to help keep the Bronco steady while I was pounding on it, the weight of the Bronco is being supported by the jackstands under it.


Next up is to copy all of the work to the other side. Once you are done with the other side it's time to figure out if you got all of the lift that you wanted and if the tire is where you want it to be in the wheel well. I used the old U-bolts to attach the springs back to the axle to do this because I was still waiting to order the new U-bolts after I figured out if I need a zero rate block to move the axle in the wheel well. Once it was back on the ground I found that I had a shackle angle of 52* and had lost exactly 1" of lift.

At this point I'm not sure if I'm going to try a longer shackle, add a zero rate 1" block, some add a leaves, or let it be as it is. I really don't know if these are a stock leaf pack or if they are supposed to have some minor lift of their own. I have a set of 10" shackles I made years ago for another truck and I might try them on at some point just to see what it does to the lift and shackle angle. I am happy with the ease of the Ruff Stuff kits to work with and really impressed with the thickness of the material and quality of the welds.

I hope this helps the next guy trying this project. It probably took me 10 hours of time in the garage to do it, but I am working alone in a cramped garage and had to stop frequently to do other things. If you are planning this I recommend signing up for Ruff Stuff's email list as they send out several big sales a year. I got the kit at 22% off by waiting until a sale to buy it.
#2
09-03-2016, 04:25 PM
Postmaster
Join Date: Nov 2009
Location: SE Georgia
Posts: 3,189
Likes: 0
Received 0 Likes
on
0 Posts

#4
09-06-2016, 06:56 PM
So I threw on the 10" shackles I made forever ago for a different truck. Going from 6" to 10" shackles gained me 2 5/8" more lift so the Bronco is now sitting 1 5/8" higher than before the swap. It also changer the shackle angle from 52* down to 28* so they are much more upright at ride height. The height change is nice, the angle change is not
Probably not the last that I will be messing with this setup.

Probably not the last that I will be messing with this setup.
#5
09-06-2016, 09:09 PM
Those brackets are nice, but it seems to me, if someone wanted too they could just get a couple of the factory brackets for the front of the rear spring, and make the shackle to whatever length they need. Like the ones you made. Probably would be a bunch cheaper.
If the brackets are strong enough to hold the front of the spring, why not the back?
Just an idea. The brackets you got in your kit look really beefy.
Jess
If the brackets are strong enough to hold the front of the spring, why not the back?
Just an idea. The brackets you got in your kit look really beefy.
Jess

Thread
Thread Starter
Forum
Replies
Last Post