1999 - 2003 7.3L Power Stroke Diesel  
Sponsored by:
Sponsored by: DP Tuner

Wicked Wheel Installation Gone Wrong - PLEASE HELP

Thread Tools
 
Search this Thread
 
  #31  
Old 01-01-2015, 04:34 PM
timmyboy76's Avatar
timmyboy76
timmyboy76 is offline
Lead Driver
Join Date: Sep 2010
Posts: 7,793
Received 48 Likes on 36 Posts
impacted the 1st wheel on, and lasted about a month. Bought a "needed rebuild" turbo from member here. Received it and the XBP wheel, just to find out, that the XBP wheels' threads, sucked. Had to pretty much make my own threads for it, for the wheel to install correctly....moral here, to me anyhow, is..remove turbo and install wheel that way..no impact, no jamming things in on exhaust side...etc.
 
  #32  
Old 01-01-2015, 04:46 PM
Pikachu's Avatar
Pikachu
Pikachu is offline
Post Fiend
Join Date: Jun 2004
Location: CT (My ♡ is in TX)
Posts: 5,051
Likes: 0
Received 4 Likes on 4 Posts
I hope the people who keep parroting that whole, "Just use an impact to change the compressor wheel. I've never heard of any problems with it" mantra read and remember that post ^ ^ ^.
 
  #33  
Old 01-01-2015, 08:09 PM
ScaldedDog's Avatar
ScaldedDog
ScaldedDog is offline
Fleet Mechanic

Join Date: Aug 2010
Location: Sedalia, CO
Posts: 1,362
Received 106 Likes on 66 Posts
Brett, I have a couple of extra Vitron O-rings from my turbo reinstall, as I didn't remove the pedestal. They are yours, if you want them.

Mark
 
  #34  
Old 01-01-2015, 09:50 PM
brettdacosta's Avatar
brettdacosta
brettdacosta is offline
Tuned
Thread Starter
Join Date: Apr 2010
Location: Tullahoma, TN
Posts: 279
Received 0 Likes on 0 Posts
Originally Posted by ScaldedDog
Brett, I have a couple of extra Vitron O-rings from my turbo reinstall, as I didn't remove the pedestal. They are yours, if you want them.

Mark
Yeah, Mark. I think I'll only need the upper 2 ones. Didn't plan on removing the pedestal unless you had the lower ones too, and I'd only take it off since it's only 4 bolts and I'll be cleaning everything. So if you have the upper 2 pm me and I'll take them.

Thanks, buddy.
 
  #35  
Old 01-01-2015, 09:51 PM
Pitcrw6's Avatar
Pitcrw6
Pitcrw6 is offline
Logistics Pro
Join Date: Apr 2010
Location: Panama City, FL
Posts: 4,410
Received 16 Likes on 10 Posts
I jammed a screwdriver with duct tape on it in the exhaust side and tightened the compressor wheel by hand with a thick leather glove, no socket or impact.
 
  #36  
Old 01-01-2015, 09:53 PM
Pitcrw6's Avatar
Pitcrw6
Pitcrw6 is offline
Logistics Pro
Join Date: Apr 2010
Location: Panama City, FL
Posts: 4,410
Received 16 Likes on 10 Posts
Originally Posted by brettdacosta
Yeah, Mark. I think I'll only need the upper 2 ones. Didn't plan on removing the pedestal unless you had the lower ones too, and I'd only take it off since it's only 4 bolts and I'll be cleaning everything. So if you have the upper 2 pm me and I'll take them.

Thanks, buddy.
Just to let you know, the upper and lower orings are the same size.
 
  #37  
Old 01-01-2015, 09:58 PM
brettdacosta's Avatar
brettdacosta
brettdacosta is offline
Tuned
Thread Starter
Join Date: Apr 2010
Location: Tullahoma, TN
Posts: 279
Received 0 Likes on 0 Posts
Originally Posted by Pitcrw6
Just to let you know, the upper and lower orings are the same size.
But the 2 upper differ in size, so you'd have to have 1 of each, right?
 
  #38  
Old 01-01-2015, 10:14 PM
ScaldedDog's Avatar
ScaldedDog
ScaldedDog is offline
Fleet Mechanic

Join Date: Aug 2010
Location: Sedalia, CO
Posts: 1,362
Received 106 Likes on 66 Posts
Originally Posted by brettdacosta
But the 2 upper differ in size, so you'd have to have 1 of each, right?
Correct.

Mark
 
  #39  
Old 01-01-2015, 10:16 PM
ScaldedDog's Avatar
ScaldedDog
ScaldedDog is offline
Fleet Mechanic

Join Date: Aug 2010
Location: Sedalia, CO
Posts: 1,362
Received 106 Likes on 66 Posts
BTW, in case anyone cares, the wheel torque spec in Clay's turbo rebuild instructions is 10ft/lbs, the my stock one was on with way less than that. I certainly couldn't achieve 10ft/lbs bare handed, and couldn't modulate my 1/2" impact down to that. Just sayin'...

Mark
 
  #40  
Old 01-01-2015, 10:46 PM
ScaldedDog's Avatar
ScaldedDog
ScaldedDog is offline
Fleet Mechanic

Join Date: Aug 2010
Location: Sedalia, CO
Posts: 1,362
Received 106 Likes on 66 Posts
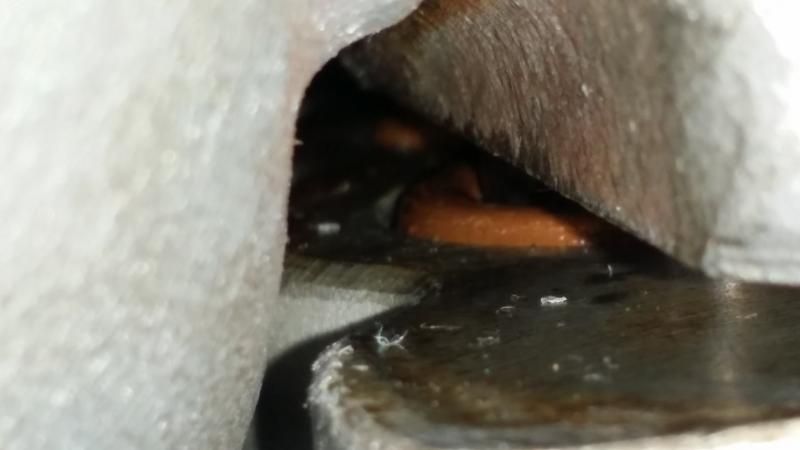
Since I just reinstalled my turbo today, I thought I'd share a couple of pics of those O-rings. Here they are held in place with a little Vaseline:


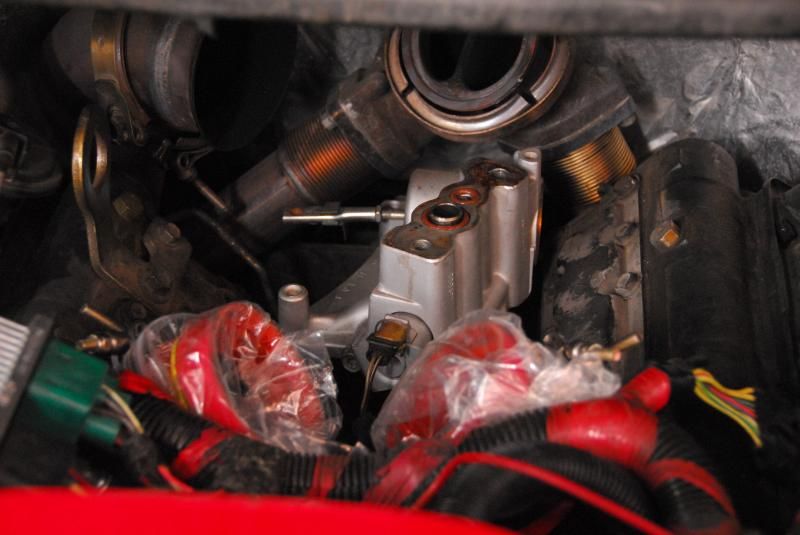
The front one rarely moves, but that back one can move really easily. I find wrestling the turbo into place a real pain, and am paranoid about the rings moving. I spent forever using my Samsung Note III inspection camera to prove to myself the rings were still in place. Here's best pic I got, barely showing the back ring in place:


Mark
 
  #41  
Old 01-01-2015, 10:52 PM
Pitcrw6's Avatar
Pitcrw6
Pitcrw6 is offline
Logistics Pro
Join Date: Apr 2010
Location: Panama City, FL
Posts: 4,410
Received 16 Likes on 10 Posts
Originally Posted by brettdacosta
But the 2 upper differ in size, so you'd have to have 1 of each, right?
I should've clarified it better. 4 orings, 2 different sizes. The top ones fit in the bottom ones and vise versa.
 
  #42  
Old 01-02-2015, 08:36 AM
timmyboy76's Avatar
timmyboy76
timmyboy76 is offline
Lead Driver
Join Date: Sep 2010
Posts: 7,793
Received 48 Likes on 36 Posts
Originally Posted by Pitcrw6
I should've clarified it better. 4 orings, 2 different sizes. The top ones fit in the bottom ones and vise versa.
lol...i pulled the "thinking man" pose there, for a second. Wondering, if they WERE all different, and i just so, got lucky with my instal..HAHA
 
  #43  
Old 01-02-2015, 08:48 AM
Pitcrw6's Avatar
Pitcrw6
Pitcrw6 is offline
Logistics Pro
Join Date: Apr 2010
Location: Panama City, FL
Posts: 4,410
Received 16 Likes on 10 Posts
Originally Posted by timmyboy76
lol...i pulled the "thinking man" pose there, for a second. Wondering, if they WERE all different, and i just so, got lucky with my instal..HAHA
yeah, if you got that kind of luck then you need to go buy a few lottery tickets...lol. I know I sure don't.
 
  #44  
Old 01-02-2015, 09:11 AM
aawlberninf350's Avatar
aawlberninf350
aawlberninf350 is offline
It's a Van Gogh
Join Date: Feb 2010
Location: Elk Grove, CA
Posts: 6,812
Received 786 Likes on 575 Posts
Originally Posted by Pitcrw6
I jammed a screwdriver with duct tape on it in the exhaust side and tightened the compressor wheel by hand with a thick leather glove, no socket or impact.

That's how I removed the OE wheel too. Except the screwdriver I used was too thin, and it slid out to the fragile end of the fin and bent it. So it turned out to be a $$ method for me.


The new wheel will be tightened by normal operation, so no need to torque it on there. Hand tight is fine.
 
  #45  
Old 01-02-2015, 09:23 PM
Sous's Avatar
Sous
Sous is online now
Fleet Owner
Join Date: May 2014
Location: Lake Hartwell, GA
Posts: 26,032
Received 4,464 Likes on 2,853 Posts
So, for those that are looking for the best and safest method (least likely to cause damage) to install a compressor wheel what should be done.

1. Spin off and on the compressor wheel with an impact wrench (this is not the right way, but wanted to be fair)?

2. Put vice grips on the exhaust side of the shaft and use a wrench to remove/install the compressor wheel to 10 ft/lbs?

3. Use a screwdriver to hold the exhaust side wheel in place with a cushion around it and remove/install the compressor wheel to 10 ft/lbs?

4. Another method yet to be discussed in this thread?


Quick Reply: Wicked Wheel Installation Gone Wrong - PLEASE HELP


All times are GMT -5. The time now is 11:18 PM.