How To Change Oil pan / Gasket / Pump / Pickup with Motor Still in Truck (300 Straight Six)
#1
 02-25-2013, 03:20 PM


How To Change Oil pan / Gasket / Pump / Pickup with Motor Still in Truck (300 Straight Six)
This weekend I changed out my old oil pan and gasket with the motor still in the truck. My reason for doing this was some leaking from the back of the pan and up near the timing cover. I should have done this when I had my motor out, but for some reason I decided not to. Big mistake! The old pan was bent/deformed from over-tightening and what looks like someone using a screw driver to pull it off the block. I stupidly assumed that a new gasket would be able to accommodate the damaged pan, but I was wrong.
Overall, it took me about a day working mostly by myself. I will detail changing the pan and the gasket... swapping the pump and pickup assembly are two more (easy) steps.
First, you need the right tools. I used:
I ordered a new oil pan and a one-piece gasket from Summit Racing. The pan was $50, Dorman unit, Part #264-011. I was pleasantly surprised with this pan. It comes with a new drain plug and the paint was top-notch. It looks much better than the old pan. The one-piece gasket is $33, made by Fel-Pro , Part #QOS34601R. On Summit, this gasket does not show up as a fit for our year trucks - it is labelled as fitting 1988-96. This is probably the same case as what the parts store will tell you. Don't worry - it fits perfectly. The gasket is made out of a synthetic rubber material and is a much better solution than the typical four-piece cork/rubber gasket set. I put the gasket on the pan and let it sit for a couple days to straighten it out - it will be kind of kinked up when you get it. If you're replacing the pump/pickup assembly, order those as well.

Okay, so here are the steps:
So there you have it. It is a pain to do, but it is doable. It took my all day Saturday to get this done and I had no idea what I was doing. A few more recommendations:
Overall, it took me about a day working mostly by myself. I will detail changing the pan and the gasket... swapping the pump and pickup assembly are two more (easy) steps.
First, you need the right tools. I used:
- Two floor jacks
- A piece of 2x4
- A jack stand
- Ratchet with 1/2" socket, long extension, and U-joint
- Lots of paper towels
- Degreaser
- Razor blade(s)
- Gloves would help
- Safety glasses/goggles are recommended
- A FLAT SURFACE TO WORK ON!
- Beer
I ordered a new oil pan and a one-piece gasket from Summit Racing. The pan was $50, Dorman unit, Part #264-011. I was pleasantly surprised with this pan. It comes with a new drain plug and the paint was top-notch. It looks much better than the old pan. The one-piece gasket is $33, made by Fel-Pro , Part #QOS34601R. On Summit, this gasket does not show up as a fit for our year trucks - it is labelled as fitting 1988-96. This is probably the same case as what the parts store will tell you. Don't worry - it fits perfectly. The gasket is made out of a synthetic rubber material and is a much better solution than the typical four-piece cork/rubber gasket set. I put the gasket on the pan and let it sit for a couple days to straighten it out - it will be kind of kinked up when you get it. If you're replacing the pump/pickup assembly, order those as well.
Okay, so here are the steps:
- Park the truck on a FLAT SURFACE. If you're dumb like me and do it on an inclined driveway, the motor/transmission will be much harder to get back into the motor mount perches. Go ahead and have a beer because it's about to get aggravating.
- Drain your oil. I would suggest letting it drain for 30 minutes to an hour because it will make things a lot less messy for you later on. While you're waiting, have a few beers.
- Unbolt the motor mount bolts from the perches and the transmission mount from the cross member. I used an 11/16" socket on the tranny bolts and 3/4" on the motor mount bolts. If your truck is 4x4, you will be happy you have a long extension and a U-joint for your ratchet unless you like making about a hundred little turns with your ratchet to get the driver's side motor mount bolt off. Go ahead and have another beer.

- Place your first floor jack underneath the front of the truck. I put a piece of 2x4 on top of the jack and then put a jack stand on top of that. You need to line it up with the crank pulley and jack the front of the motor up. Be EXTREMELY careful! You do not want the jackstand to tip with the weight of the motor on it! In my case, the drag link provided support to the jackstand while I lifted up the front of my motor. BE CAREFUL!
- As your lifting the front of the motor, make sure nothing is interfering. A few things to check include: air cleaner, valve cover, radiator hoses, PS return hose. Ask me how I know about all of these! Okay I'll tell you. My air cleaner (14"x3") ran into the firewall and buckled the cleaner. I had to remove the valve cover because it also hit the fire wall. My PS return hose was too short, came off the pump, and drained the PS reservoir all over the drive way. If all of this happens to you too, have TWO beers... otherwise just one.
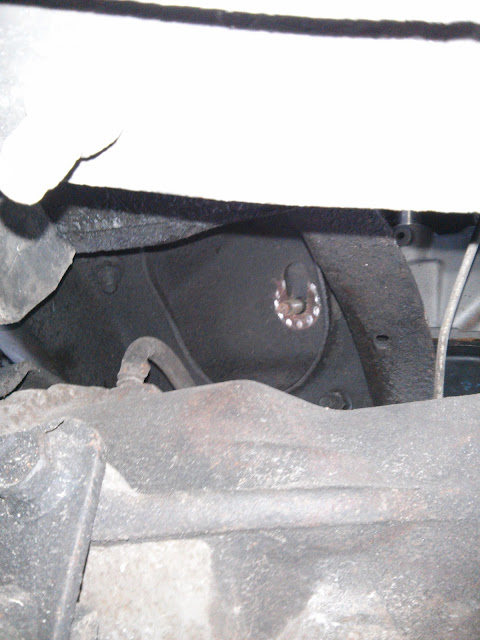
- You are going to have to lift the motor up pretty high. Your motor mounts will come out of the perches. I had to lift the motor high enough to have 12" of clearance between the bottom of the BLOCK and the top of the cross member. I took a picture after I'd gotten the pan off... it should give you an idea of how high it needs to be lifted.

- Make sure everything is rock-steady before you get underneath the truck. Start loosening the bolts that hold the pan to the block. I believe there are 25 of them, give or take a few. They are 5/16"xNC18 bolts. I replaced all of my bolts because the ones that were on there were all crudded up. After you get all the bolts off, have another beer.
- At this point, you should be able to drop the pan. You will probably have to pry on it a little bit. Do NOT pry at the front of the pan underneath the timing cover. The timing cover is aluminum and you might hurt it. If you've lifted the motor up high enough, you should have just enough clearance to work the pan off towards the back. If not you can either raise the front of the motor some more, or put another floor jack under the transmission and raise the transmission up a little bit. Have another beer.
- If you are replacing the oil pump, you now have access to it from underneath. There are two bolts that hold it to the block and they have a 1/2" head. The bolt towards the rear of the block is accessible with a ratchet/socket. The bolt towards the front of the block is only accessible with a wrench. Be prepared to make a lot of tiny little turns with the wrench UNLESS you want to take the motor mount off.
- Once you have the oil pump disconnected, unbolt the pickup assembly from the stud on the passenger's side of the #6 (I think) crankshaft main. At this point, you should be able to drop the oil pump/pickup assembly as a single unit. Be aware that you might have to pull the distributor up if your input shaft to the pump is stuck. Have another beer!!!
- Clean up the bottom of the block where the gasket goes with a razor blade. Try to get it as clean as possible. Then hit it with some degreaser. You don't want the gasket squeezing out while you tighten the pan down.
- Install your oil pump in the reverse order as taking it off.
- The one-piece gasket comes with four little screw-in clips to hold the gasket up (kind of like a Cleco fastener). Put one in each corner.
- Hang the gasket from the screw-in clips. The gasket has metal grommets for each bolt hole. Line the gasket up and push it over the clip. The clips will prevent the gasket from falling back down. Work the rear-main gasket into the groove. There are little tabs that insert along both sides of the rear main. Push those in. The gasket should pretty much hold itself up to the rear main.
- Make sure your new (or old) pan is clean. This would be a great time to look for any FOD in the pan. Also, you have pretty clear access to all your mains, bearings, cam lobes, etc. Get a flashlight and check it out. Hopefully you don't see anything major. If you do, have a beer. If you don't, have a beer.
- The screw-in clips will also hold the pan up. Line the pan up and push the clips through the bolt holes. Start at the front of the pan and get those two fasteners through the bolt holes. The move to the back. At this point, your pan and gasket should be hanging down from the bottom of the block and are ready to be bolted up. Take a break and have a beer.
- Start putting in the bolts to hold the pan up. Don't get them tight yet. Just get them started. That way you can fiddle around with the gasket and make sure everything is lined up.
- Tighten down the pan bolts working from the center out following a similar sequence to tightening down a head. Don't tighten them down too much! If you do, the pan will deform and you might have a leak later on. Once you're done, have a beer.
- At this point, the oil pan should be bolted back to the block, and you're almost ready to set the motor back down. More than likely the motor has slipped back towards the firewall. You are probably going to need a buddy to help you pull the motor back towards the front. I jacked up the transmission all the way so the mount bolts weren't going through the cross member. This helped a lot. Be sure to position the jack so it rolls towards the front of the truck.
- Carefully lower the motor back down. Even with the motor mounts lined up with the slots on the perches, it still took some persuasion with a long rod and a hammer to knock the bolts down into the slot. I was working on an incline which didn't help at all.
- Tighten down the motor mounts and tranny mount. Reinstall anything you had to remove from the top of the motor when you lifted it up (i.e. valve cover, air cleaner). MAKE SURE YOUR DRAIN PLUG IS TIGHTENED ALL THE WAY. Fill 'er up with oil and you're done!
So there you have it. It is a pain to do, but it is doable. It took my all day Saturday to get this done and I had no idea what I was doing. A few more recommendations:
- Wear safety glasses or goggles. Oil is going to be dripping all over the place.
- WORK ON A FLAT SURFACE
- BE VERY CAREFUL LIFTING THE MOTOR UP
- Watch for interference with the firewall. I damaged a $100 Edelbrock air cleaner because I wasn't paying attention. You'll probably have to remove the valve cover.
- Have a buddy nearby to help you muscle that SOB back onto the motor mount perches.
- Don't drink so many beers that you can't work safely.
#2
02-25-2013, 04:17 PM


#3
02-25-2013, 04:50 PM
Excellent writeup, reps to you. Timely, too, since I plan to do just this next month.
A few questions, though, if you don't mind:
1. If I read you correctly, you jacked the engine up by the crank pulley - is this correct? Also, did you leave the engine supported by the jack the whole time, or did you do the wooden blocks on the perches bit and rest the engine on them?
2. I like the price on the oil pan you used (I'm replacing my pan as well), but does the pan have a hole for the dipstick in it? The Summit website suggests not, but I'd like to be sure - because I want to get a pan that I can put a dipstick in.
3. Did you use any kind of sealant or compound on the gasket?
Thanks for your help!
#4
02-25-2013, 05:58 PM
Excellent writeup, reps to you. Timely, too, since I plan to do just this next month.
A few questions, though, if you don't mind:
1. If I read you correctly, you jacked the engine up by the crank pulley - is this correct? Also, did you leave the engine supported by the jack the whole time, or did you do the wooden blocks on the perches bit and rest the engine on them?
I left it supported by the crank pulley the whole time. I didn't have anything big enough to support the engine on the perches. It was wayyy up in the air... there was about a foot between the motor mounts and the perches. Of course, it's probably better to do it like you're saying instead of supporting it on the crank snout.
2. I like the price on the oil pan you used (I'm replacing my pan as well), but does the pan have a hole for the dipstick in it? The Summit website suggests not, but I'd like to be sure - because I want to get a pan that I can put a dipstick in.
The pan does not have provisions for a dipstick. How come you aren't going to use the one in the block?
3. Did you use any kind of sealant or compound on the gasket?
I did not use any sealant on this gasket. I've had bad experiences with gaskets squeezing out when I put silicon on them. A little on the rear main might not be a bad idea though. Maybe some experts can weigh in on this...
Thanks for your help!


#6
02-25-2013, 06:54 PM
#7
02-25-2013, 07:08 PM
Senior User
Join Date: May 2011
Location: North, Ga.
Posts: 155
Likes: 0
Received 0 Likes
on
0 Posts
Trending Topics
#8
02-25-2013, 07:40 PM

EDIT: On further research, looks like the change was for the 1983 model year, as NAPA shows the same pan for the 1980-1982 vehicles. Either way, no easy one-piece gasket conversion for me.
#9
02-25-2013, 07:41 PM

Junior User
Join Date: Nov 2012
Location: Raleigh N.C.
Posts: 65
Likes: 0
Received 0 Likes
on
0 Posts
Wish i saw this before i did mine!!! i used a 4 piece gasket and it sucked. one thing i didn't see that i had a problem with, the bolts on the front of the pan don't go into the cast block but into an aluminum part BE CAREFUL NOT TO STRIP THE THREADS. I also kept mine classy and painted the pan ford blue before i re installed it!
#10
02-25-2013, 07:47 PM
I'm pretty sure the torque specs for oil pans & valve covers are given in inch pounds of torque, not foot pounds. Basically, you just snug it up to the gaskets, not extremely tight or anything.
A ball peen hammer on the mating side can be used to flatten out deformed metal that's had too much pressure applied to it.
A ball peen hammer on the mating side can be used to flatten out deformed metal that's had too much pressure applied to it.
#11
03-13-2015, 08:52 PM

Freshman User
Join Date: Nov 2011
Location: olympia,wa
Posts: 47
Likes: 0
Received 0 Likes
on
0 Posts

Thread
Thread Starter
Forum
Replies
Last Post
oxfordgt
1980 - 1986 Bullnose F100, F150 & Larger F-Series Trucks
10
11-07-2006 09:16 AM