
Ugly Betty: Frame-Up Rebuild w/ a Donor
#46
 12-26-2012, 07:46 PM

Fleet Owner
Line-X is a quality product, BUT I am sure they will tell you, the wrong product for a frame.
I went thru all the trouble on multiple frames to sandblast, POR15 and then Tractor Supply black.I didn't do it on these trucks because there is something better. I did it, because it WORKS. I have the ability to do my own spray in liner but the problem with it, it the ability for it to correctly bond to the surface. POR is very finicky. It has to be scuffed Completely for Anything to stick to it. There is nothing out there that will"bite" into POR like other base coats. That is why When I top coat it, I do it when the POR is tacky(and black only. The silver does NOT like to be topcoated AT ALL). There is no way you will be able to sand every square inch off the frame after it is POR15'd. And any spot you miss, will be where the bed liner lifts, then moisture will get under it and start to peal.
trust me, I have done ALOT of truck frames/ trailers . From show truck to everyday tow truck/wreckers. The POR/tractor paint is the MOST durable
#47
12-26-2012, 08:34 PM
Join Date: Dec 2010
Location: Carlisle
Posts: 221
Likes: 0
Received 0 Likes
on
0 Posts
Line-X is a quality product, BUT I am sure they will tell you, the wrong product for a frame.
I went thru all the trouble on multiple frames to sandblast, POR15 and then Tractor Supply black.I didn't do it on these trucks because there is something better. I did it, because it WORKS. I have the ability to do my own spray in liner but the problem with it, it the ability for it to correctly bond to the surface. POR is very finicky. It has to be scuffed Completely for Anything to stick to it. There is nothing out there that will"bite" into POR like other base coats. That is why When I top coat it, I do it when the POR is tacky(and black only. The silver does NOT like to be topcoated AT ALL). There is no way you will be able to sand every square inch off the frame after it is POR15'd. And any spot you miss, will be where the bed liner lifts, then moisture will get under it and start to peal.
trust me, I have done ALOT of truck frames/ trailers . From show truck to everyday tow truck/wreckers. The POR/tractor paint is the MOST durable
I went thru all the trouble on multiple frames to sandblast, POR15 and then Tractor Supply black.I didn't do it on these trucks because there is something better. I did it, because it WORKS. I have the ability to do my own spray in liner but the problem with it, it the ability for it to correctly bond to the surface. POR is very finicky. It has to be scuffed Completely for Anything to stick to it. There is nothing out there that will"bite" into POR like other base coats. That is why When I top coat it, I do it when the POR is tacky(and black only. The silver does NOT like to be topcoated AT ALL). There is no way you will be able to sand every square inch off the frame after it is POR15'd. And any spot you miss, will be where the bed liner lifts, then moisture will get under it and start to peal.
trust me, I have done ALOT of truck frames/ trailers . From show truck to everyday tow truck/wreckers. The POR/tractor paint is the MOST durable
#49
12-26-2012, 08:51 PM
Join Date: Dec 2010
Location: Carlisle
Posts: 221
Likes: 0
Received 0 Likes
on
0 Posts
Good progress today that might lead to getting the engine, tranny and transfer case out tomorrow. One of the limiting factors is going to be finding a place to store the three items, which in my book is a great problem to have!
Just to recap, I started the day with some rather boring marking of connections for three main types of things: 1) electrical connections, hoses and vacuum lines. I started out using a sequential number, but at times forgot where I was so I just picked the nearest 10 digit that I knew I didn�t use. Also, as the tear down and marking progressed I started getting more descriptive of the connections since simple number wasn�t always adequate. Also, where possible I tried to remove entire �systems� of stuff rather than tear town each and every piece. That way I can work on the �system� later as a unit and not need to worry about all 10,000 unique connection points on the truck. So, here�s the quick summary of the day�
First off, I�ve wondered what this is for a while. I thought it had something to do with the smog control system, but I only recall vacuum lines on it� So, the second installment of the name that component�

Anyhow, what ever it is, it came off really easily (since all the bolts broke off the mounting to the wheel well), but I made sure to carefully label each of the vacuum connections and hoses before taking it off. Next I hit the smog plumbing- there are a LOT of hoses that just kind of float over the driver's side of the engine that I removed as one big chunk of hoses. I didn�t get a picture though (sorry) because it wasn�t all that interesting- trust me, if you can unscrew a hose clamp (most my mind just broke off) then you can get it off your truck if you want�
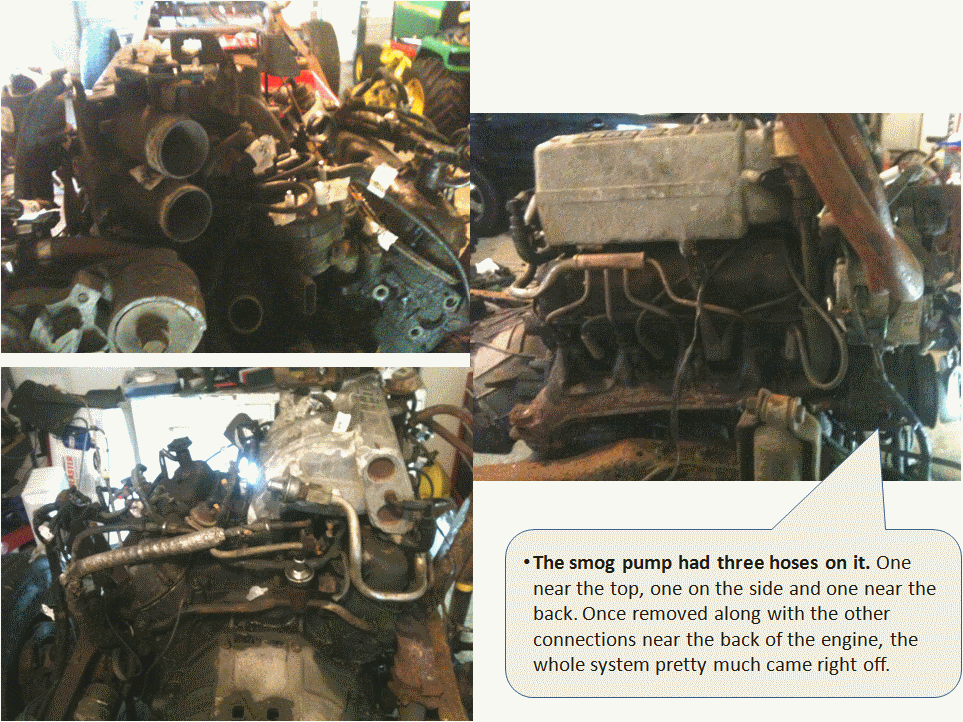
Once the smog stuff was off I could see much better over the driver�s side of the engine and continued marking connections and unplugging stuff. I also started unbolting things from the front of the engine including the power steering unit, alternator, and smog pump. I think I found a pretty big �sleeper� problem when I took the alternator off�
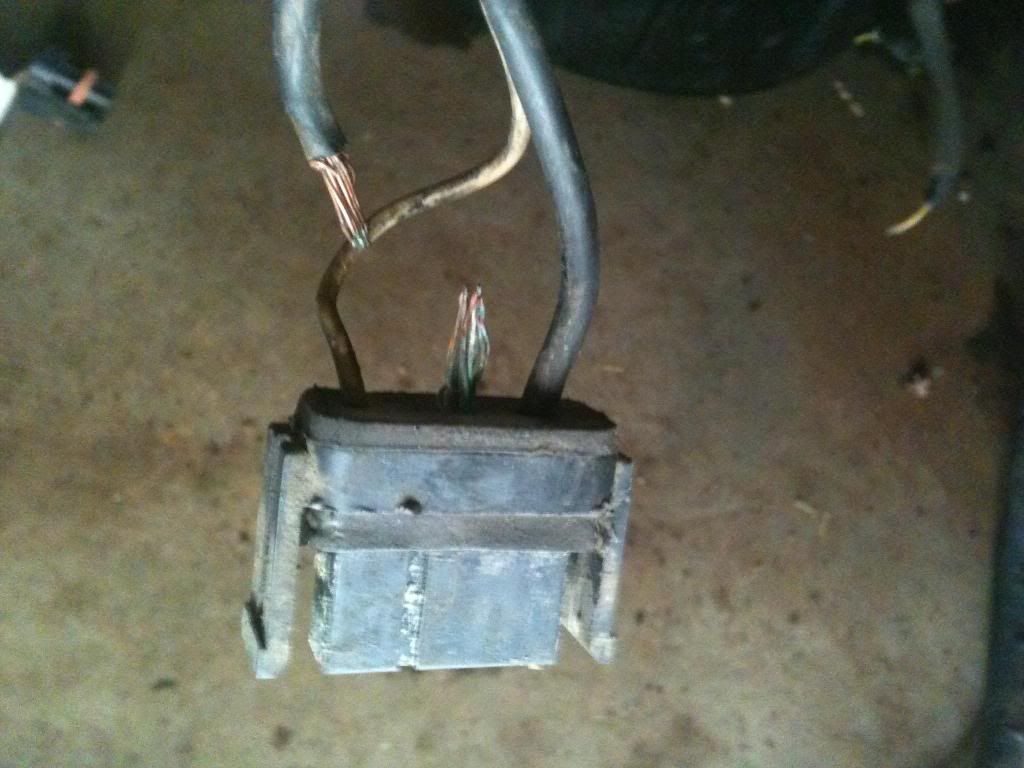
Looks like the ground wire was just about to break, and did when I took it off (glad I wasn�t driving around when that happened).
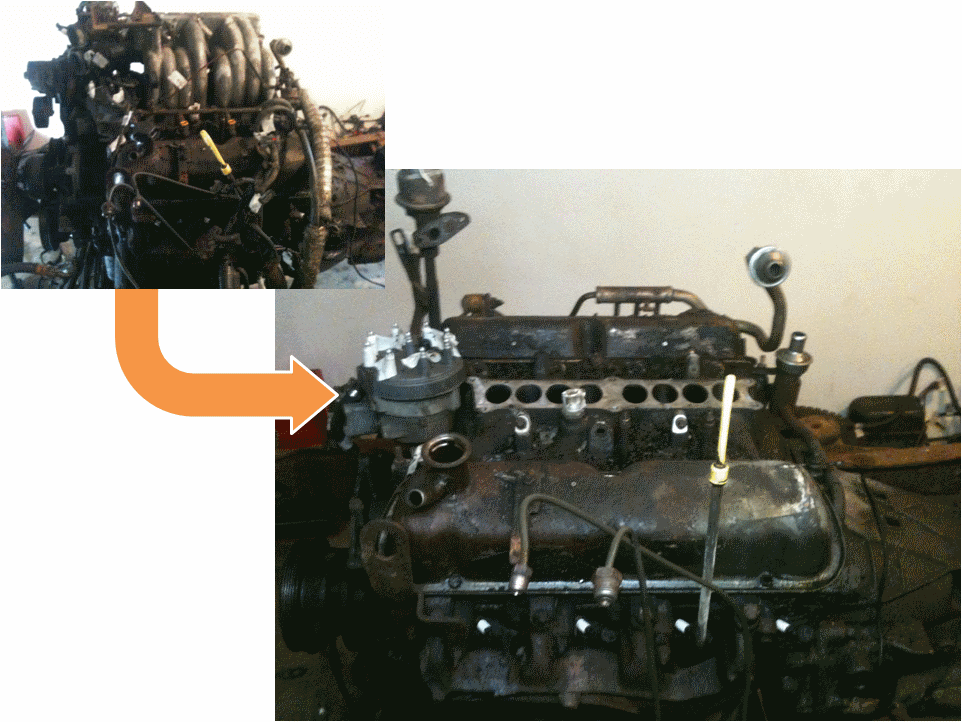
Okay, so fast forward to the 5.8L EFI plenum, which for me was a big milestone to remove since I�d never seen the engine without the plenum. There are a lot of things happening around the plenum, including the fuel rail, injectors, EFI wire harness (ironic that I was just talking about the MAF conversion and the Speed Density EFI wring harness on my engine build thread), spark plug cables and the EGR. I must have circled around the engine at least 30 times while getting things detached and ready to go and then, finally, started taking the bolts out of the plenum.
I got 5 bolts out and with little to-do and started wiggling. No luck. Hm, I must have missed something. Ah ha! In the middle of plenum, between the first bank of ducts, and the last bank is a small space where a bolt holds the plenum to the intake manifold. �Right.� I thought. �I remember reading about that one too.� So I peak down and guess what I find- a friggin STAR nut.
I have to tell you, as a non-pro/guru I don�t have the specialty tools to handle all the little stuff (like the oil sender socket, which I now own), and a full set of troks (spelling) and star bits are among them. I tried to deny the inevitable when sucking down a beer and working around the plenum, but eventually broke down and braved the nasty weather to go buy a set of star bits. Thankfully during my denial I noticed the fuel rail and spring loaded connections that I�d have to remove (more on that later). Anyhow, star bit in hand and the plenum gladly comes off�
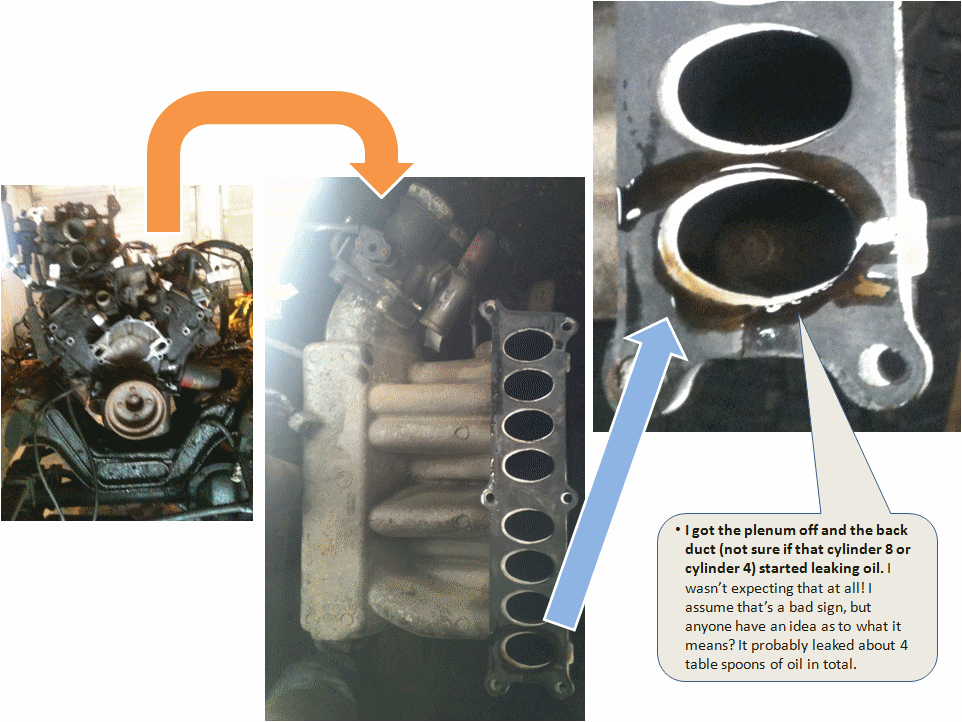
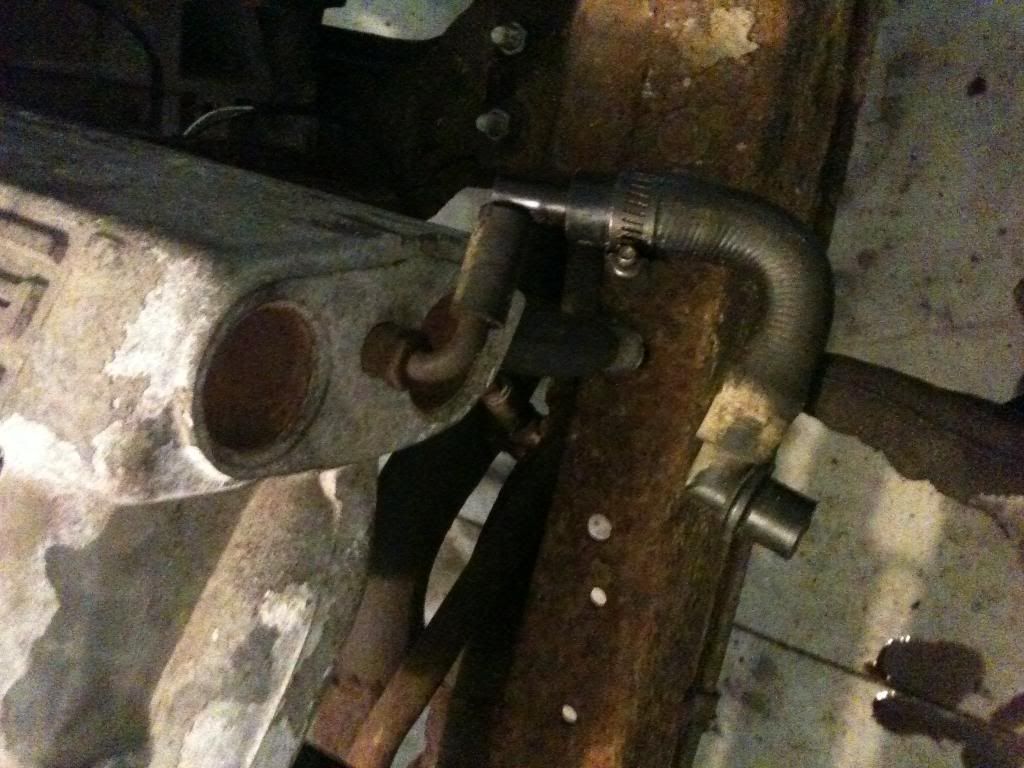
One strange thing- I�m not exactly sure what this plug-hose is (vaguely remember a PCV return), but it was super loose and detached with little more than a touch. I had to hold it up with my finger just to get the picture. Is it supposed to be that loose- if it is the PCV return I guess it wouldn�t be a huge issue since it would just vent to the atmosphere, but it doesn�t seem right to be that loose�.
Enough playing around, we�re about to get serious here with the fuel rail and injectors...
Before I explain why the fire department visited my house during a winter storm let me say that, one thing I forgot to do before detaching the battery was to remove the pressure from the fuel rail (there�s a procedure in the Haine�s manual). Before starting anything I had a simple thought� �Uh, I hope I don�t get sprayed with gas when I detach the fuel lines from the engine. (think GrinderKing 10 times in your head)� So seriously, before you mess with the fuel rail please think about this at least 10 time- don�t play around with gasoline. I knew my truck had been sitting for a few weeks without having pressure on the rails and wouldn�t have much, if any pressure, left. I did forget to take the pressure out however, so make sure you do before you take the battery out. And just kidding about the fire department visiting- but gasoline deserves a healthy bit of respect no matter what you are doing! (period- well, exclamation point I guess)
Okay, so I went to AutoZone to get my star bits and asked about spring loaded fuel line connector removers. The guy pointed me to this handy package, which specifically said it was good for �Ford vehicles�. I recall seeing this type of doo-dah used somewhere so I splurged on the $12 bucks and bought it. I had two connections to remove�
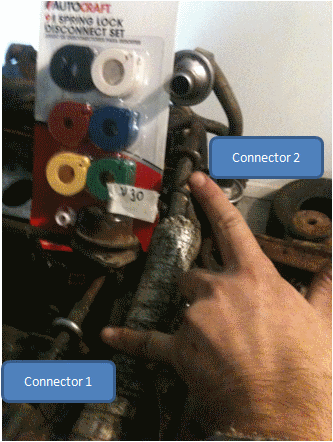
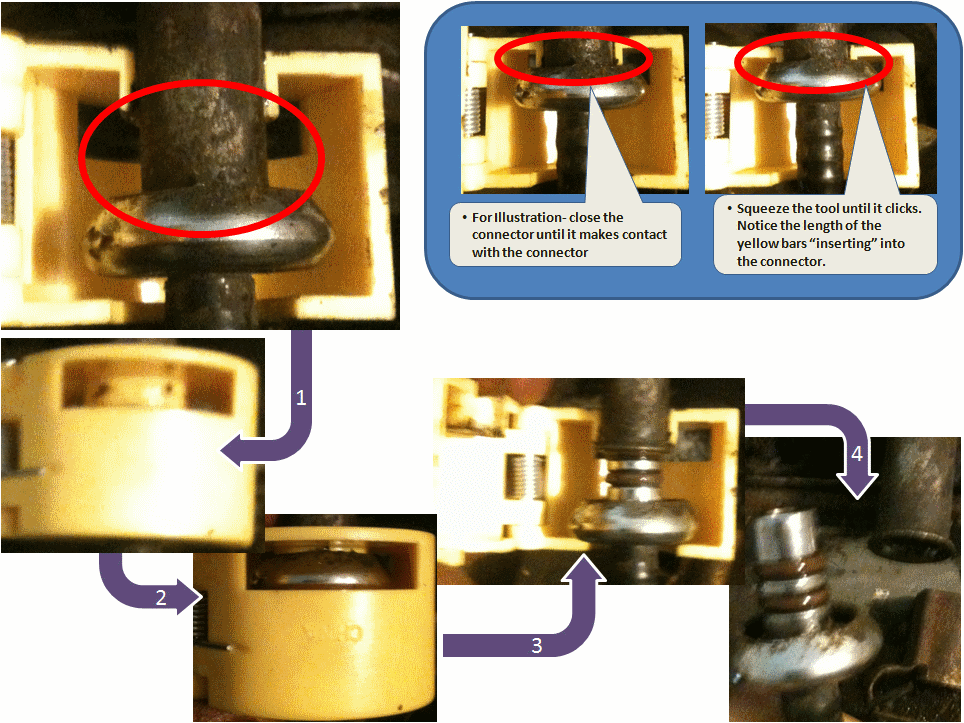
There�s a bit of a trick to using the kit- you only need to use one pac-man type tool (none of the accessories) to get the connections apart (there are a few things in the package that you might feel tempted to use, as I did). The basic gist is shown in the following figure, but read the following about 10 times first because I had to open the connector to show you what is happening.
Open the �clamp� tool and put it over the connector with sizes of the openings matching the sizes of the tubes (1) Pull the tool toward you until you feel a click (3) , and then pull the end closest to you out- it won�t pull totally free, but will move about 1/4� out. Remove the tool and pull the connector completely out (4).
Ford, in their infinite genius used two different connectors however. Before I figured out they were different I darn near broke the yellow clamp thinking the other connector was frozen in place. Turns out the blue clamp is just want the doctor ordered�
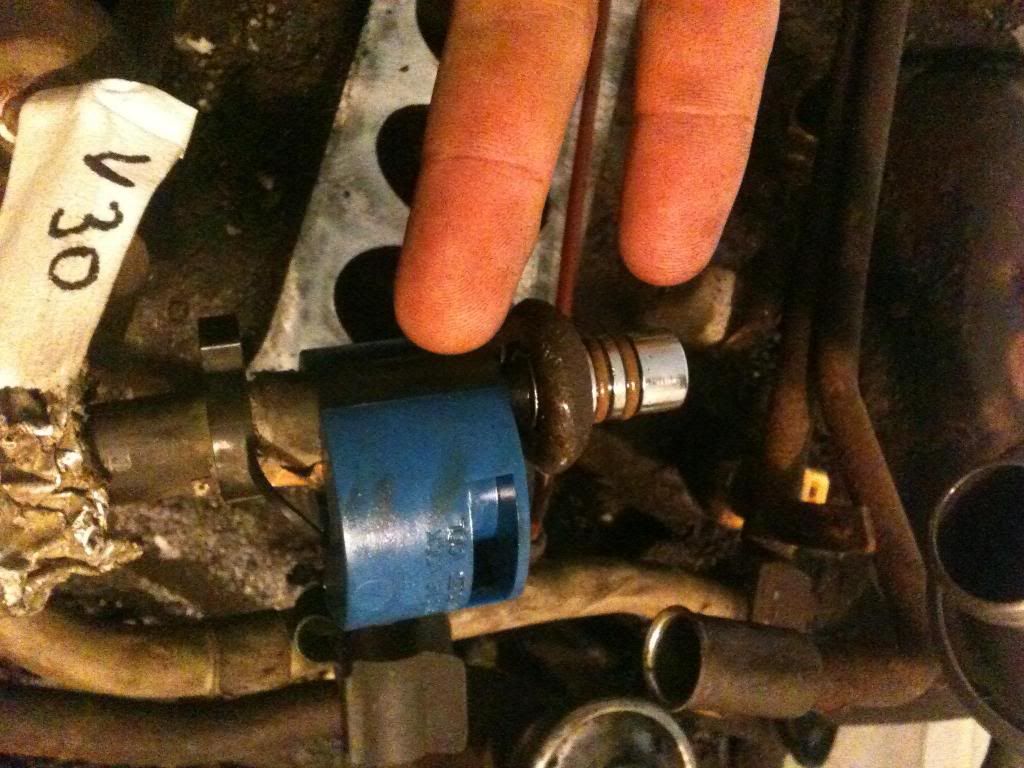
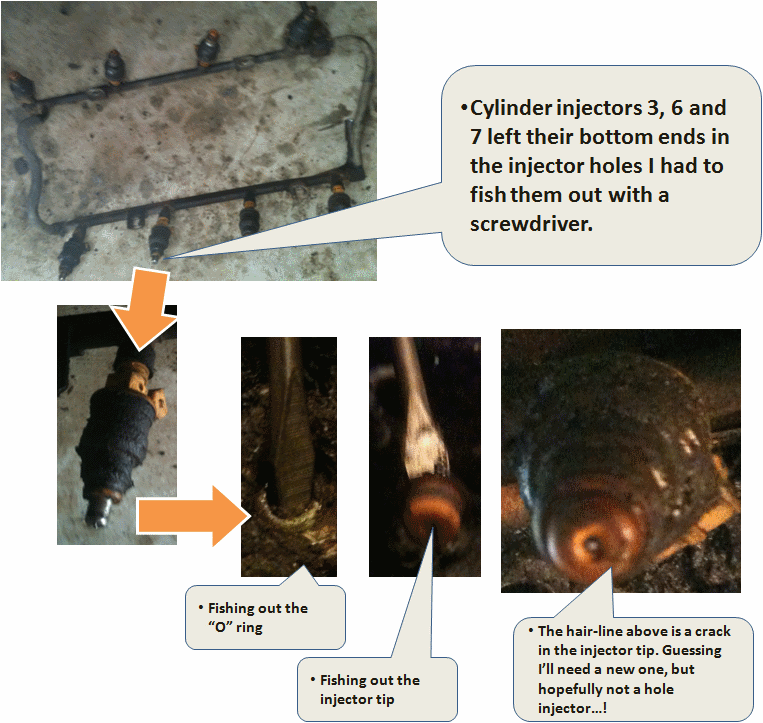
Once the fuel rail was disconnected from the supply it was just a matter of unscrewing the four bolts off the intake manifold and then pulling the fuel rail off. Of course, nothing is that simple- I broke one bolt on the rail that will need to be drilled and tapped off the intake manifold and several of the injectors lost their end �O� rings and tips in the intake manifold holes�
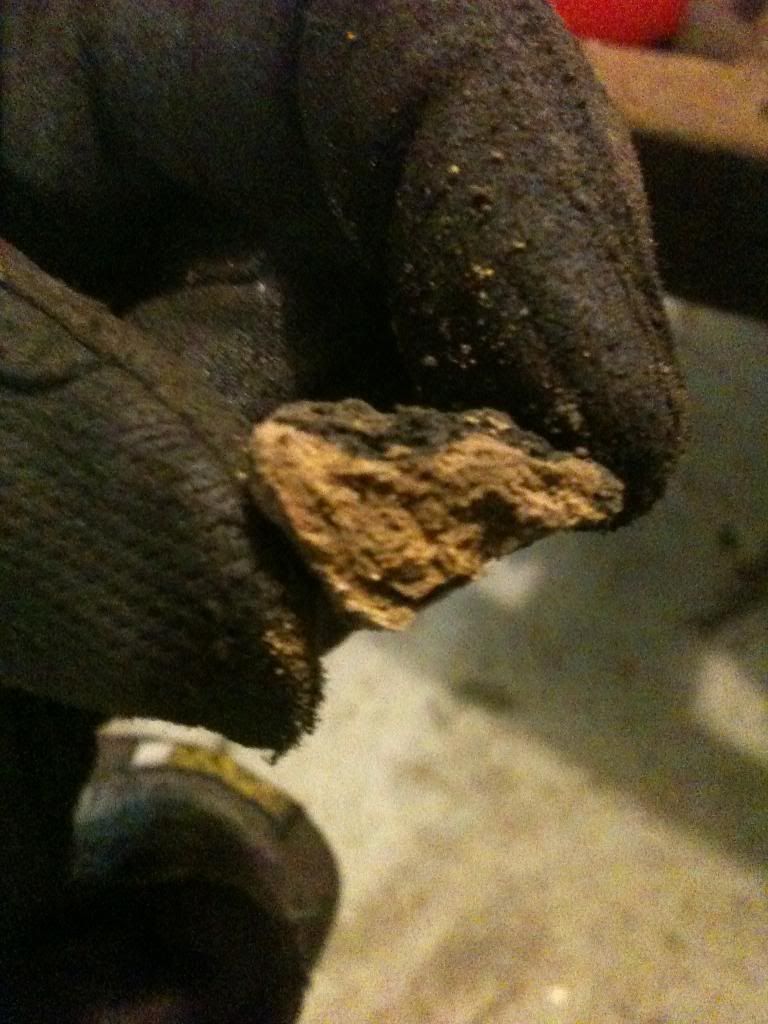
One interesting note along the way- I found this piece of dirt on the tranny that I think tells an interesting story. From what I can tell the engine was running well for some time (apparently a 4x4 trip) where mud and dirt accumulated on the tranny. At some point it started leaking and coated a decent layer of oil on top of the dirt. CSI �89 Ford F350 in the house!
That�s pretty much where I ended. I�m ready to rip the exhaust off tomorrow but need my sawz-all to cut the exhaust off since I�m not even going to mess with those bolts. Then I need to get the engine mounts off- which I think is four (not so fun to access) bolts.
One question, should I take the engine, tranny and transfer case all at once, or some other order? I know the tranny can�t sit by itself since the engine mount bears it�s weight- I�m looking for advice since the three together are more than 6� of bulk and probably not fun to pick up all at once.
Cheers my friends!
Just to recap, I started the day with some rather boring marking of connections for three main types of things: 1) electrical connections, hoses and vacuum lines. I started out using a sequential number, but at times forgot where I was so I just picked the nearest 10 digit that I knew I didn�t use. Also, as the tear down and marking progressed I started getting more descriptive of the connections since simple number wasn�t always adequate. Also, where possible I tried to remove entire �systems� of stuff rather than tear town each and every piece. That way I can work on the �system� later as a unit and not need to worry about all 10,000 unique connection points on the truck. So, here�s the quick summary of the day�
First off, I�ve wondered what this is for a while. I thought it had something to do with the smog control system, but I only recall vacuum lines on it� So, the second installment of the name that component�
Anyhow, what ever it is, it came off really easily (since all the bolts broke off the mounting to the wheel well), but I made sure to carefully label each of the vacuum connections and hoses before taking it off. Next I hit the smog plumbing- there are a LOT of hoses that just kind of float over the driver's side of the engine that I removed as one big chunk of hoses. I didn�t get a picture though (sorry) because it wasn�t all that interesting- trust me, if you can unscrew a hose clamp (most my mind just broke off) then you can get it off your truck if you want�
Once the smog stuff was off I could see much better over the driver�s side of the engine and continued marking connections and unplugging stuff. I also started unbolting things from the front of the engine including the power steering unit, alternator, and smog pump. I think I found a pretty big �sleeper� problem when I took the alternator off�
Looks like the ground wire was just about to break, and did when I took it off (glad I wasn�t driving around when that happened).
Okay, so fast forward to the 5.8L EFI plenum, which for me was a big milestone to remove since I�d never seen the engine without the plenum. There are a lot of things happening around the plenum, including the fuel rail, injectors, EFI wire harness (ironic that I was just talking about the MAF conversion and the Speed Density EFI wring harness on my engine build thread), spark plug cables and the EGR. I must have circled around the engine at least 30 times while getting things detached and ready to go and then, finally, started taking the bolts out of the plenum.
I got 5 bolts out and with little to-do and started wiggling. No luck. Hm, I must have missed something. Ah ha! In the middle of plenum, between the first bank of ducts, and the last bank is a small space where a bolt holds the plenum to the intake manifold. �Right.� I thought. �I remember reading about that one too.� So I peak down and guess what I find- a friggin STAR nut.
I have to tell you, as a non-pro/guru I don�t have the specialty tools to handle all the little stuff (like the oil sender socket, which I now own), and a full set of troks (spelling) and star bits are among them. I tried to deny the inevitable when sucking down a beer and working around the plenum, but eventually broke down and braved the nasty weather to go buy a set of star bits. Thankfully during my denial I noticed the fuel rail and spring loaded connections that I�d have to remove (more on that later). Anyhow, star bit in hand and the plenum gladly comes off�
One strange thing- I�m not exactly sure what this plug-hose is (vaguely remember a PCV return), but it was super loose and detached with little more than a touch. I had to hold it up with my finger just to get the picture. Is it supposed to be that loose- if it is the PCV return I guess it wouldn�t be a huge issue since it would just vent to the atmosphere, but it doesn�t seem right to be that loose�.
Enough playing around, we�re about to get serious here with the fuel rail and injectors...
Before I explain why the fire department visited my house during a winter storm let me say that, one thing I forgot to do before detaching the battery was to remove the pressure from the fuel rail (there�s a procedure in the Haine�s manual). Before starting anything I had a simple thought� �Uh, I hope I don�t get sprayed with gas when I detach the fuel lines from the engine. (think GrinderKing 10 times in your head)� So seriously, before you mess with the fuel rail please think about this at least 10 time- don�t play around with gasoline. I knew my truck had been sitting for a few weeks without having pressure on the rails and wouldn�t have much, if any pressure, left. I did forget to take the pressure out however, so make sure you do before you take the battery out. And just kidding about the fire department visiting- but gasoline deserves a healthy bit of respect no matter what you are doing! (period- well, exclamation point I guess)
Okay, so I went to AutoZone to get my star bits and asked about spring loaded fuel line connector removers. The guy pointed me to this handy package, which specifically said it was good for �Ford vehicles�. I recall seeing this type of doo-dah used somewhere so I splurged on the $12 bucks and bought it. I had two connections to remove�
There�s a bit of a trick to using the kit- you only need to use one pac-man type tool (none of the accessories) to get the connections apart (there are a few things in the package that you might feel tempted to use, as I did). The basic gist is shown in the following figure, but read the following about 10 times first because I had to open the connector to show you what is happening.
Open the �clamp� tool and put it over the connector with sizes of the openings matching the sizes of the tubes (1) Pull the tool toward you until you feel a click (3) , and then pull the end closest to you out- it won�t pull totally free, but will move about 1/4� out. Remove the tool and pull the connector completely out (4).
Ford, in their infinite genius used two different connectors however. Before I figured out they were different I darn near broke the yellow clamp thinking the other connector was frozen in place. Turns out the blue clamp is just want the doctor ordered�
Once the fuel rail was disconnected from the supply it was just a matter of unscrewing the four bolts off the intake manifold and then pulling the fuel rail off. Of course, nothing is that simple- I broke one bolt on the rail that will need to be drilled and tapped off the intake manifold and several of the injectors lost their end �O� rings and tips in the intake manifold holes�
One interesting note along the way- I found this piece of dirt on the tranny that I think tells an interesting story. From what I can tell the engine was running well for some time (apparently a 4x4 trip) where mud and dirt accumulated on the tranny. At some point it started leaking and coated a decent layer of oil on top of the dirt. CSI �89 Ford F350 in the house!
That�s pretty much where I ended. I�m ready to rip the exhaust off tomorrow but need my sawz-all to cut the exhaust off since I�m not even going to mess with those bolts. Then I need to get the engine mounts off- which I think is four (not so fun to access) bolts.
One question, should I take the engine, tranny and transfer case all at once, or some other order? I know the tranny can�t sit by itself since the engine mount bears it�s weight- I�m looking for advice since the three together are more than 6� of bulk and probably not fun to pick up all at once.
Cheers my friends!
#50
12-26-2012, 08:56 PM
Join Date: Dec 2010
Location: Carlisle
Posts: 221
Likes: 0
Received 0 Likes
on
0 Posts
I've seen two basic camps of people- people who don't like POR15 because it didnt' work (not sure about the prep work they did or quality of application) and 2) those who don't like Herculiner (not sure about the prep work they did or quality of application). After reading Brad's posts about POR and getting a feel for the man's quality standards I feel confident trusting his advice and going with POR and Tractor Supply black.
Besides, in 20 years if he turns out to be not totally correct, I won't mind one bit! I'll trust POR15 for my needs on this build...
Besides, in 20 years if he turns out to be not totally correct, I won't mind one bit! I'll trust POR15 for my needs on this build...

#53
12-27-2012, 09:35 AM
Fleet Owner
The tractor supply lo glare black has changed since I used it. I WAS made by Valspar. It is NOW make by Majic. I am not to confident in the new stuff, but I have never used ir. You can get the same quality as the Valspar from CASE. That is what the lo glare was mimicked at, their low glare chassis black. A lil more expensive, but a GOOD product
#54
12-27-2012, 09:58 AM
Posting Guru
One strange thing- I�m not exactly sure what this plug-hose is (vaguely remember a PCV return), but it was super loose and detached with little more than a touch. I had to hold it up with my finger just to get the picture. Is it supposed to be that loose- if it is the PCV return I guess it wouldn�t be a huge issue since it would just vent to the atmosphere, but it doesn�t seem right to be that loose�.
And your alt wiring harness is a common problem with these trucks. I went through 3 junkyard harnesses burning up 4 alternators before i said screw it and made my own harness. That was 4 years ago now and havnt had a problem since.
#55
12-27-2012, 10:42 AM
Join Date: Dec 2010
Location: Carlisle
Posts: 221
Likes: 0
Received 0 Likes
on
0 Posts
That is your PCV valve, and it DOES NOT vent to atmoshpere. the last piece of the conglomeration of hoses/plastic parts is the actual PCV valve, and it fits into the grommit on the back of the pass side valve cover. it needs to be installed before you reinstall your upper intake, otherwise it can be a real PITA.
And your alt wiring harness is a common problem with these trucks. I went through 3 junkyard harnesses burning up 4 alternators before i said screw it and made my own harness. That was 4 years ago now and havnt had a problem since.
And your alt wiring harness is a common problem with these trucks. I went through 3 junkyard harnesses burning up 4 alternators before i said screw it and made my own harness. That was 4 years ago now and havnt had a problem since.
As for the alternator setup, I'm planning on a 3G upgrade (mentioned that in the engine build thread) to either a 95 or 130 amp setup. Hopefully the 3Gs won't suffer from the same issue, but if they do I might end up going down the same road you did.
I had to shovel some snow in the AM after the big storm, so I'm getting back out to UB after I get some lunch. On the docket today:
1) Get the front and rear drive shafts out
2) Get the transfer case off the tranny
3) Remove the exhaust (got my sawz-all)
4) Get the engine unbolted from the frame
5) (maybe) Get the engine-tranny out, but I might wait till tomorrow when I have a little more time and daylight.
#56
12-27-2012, 04:04 PM

Movin' right along!
And as for your Alternator wiring issues...It's, as said previously...Just the nature of the beast...
Not scare you, etc...But those 2G alternators are NOTORIUS heat producers; Up to the point of catching fire.
IIRC, Ford released a TSB, or something to the effect of any Alternator work HAD to have a new wiring pigtail...And even if not; I can go with that advice.
I had to change mine, as it had charred/partially melted...
Just an FYI on the matter...
Encho-I know what you're talking about, and yes..There are like 2-3 seperate designs...
I found 1 once, at the boneyard that looked like a thin L shaped tube....Major "Wtf" moment...
But overall...This guy is doing GREAT!
*Note-The metal "X" style fuel line removal tool is the boss...(Can tap on it with a small hammer to help break up the crud, and allow the line to pull free)
I tried the plastic ones like you have and went to metal and never looked back.
#57
12-28-2012, 09:10 AM
Join Date: Dec 2010
Location: Carlisle
Posts: 221
Likes: 0
Received 0 Likes
on
0 Posts
I've read about the alternator issues on the forum(s) and my plug was pretty melted up and deformed- I had to break it up to get it apart. I'm hoping the 3G upgrade will address the spontaneous combustion issues and give me a few more amps along the way...
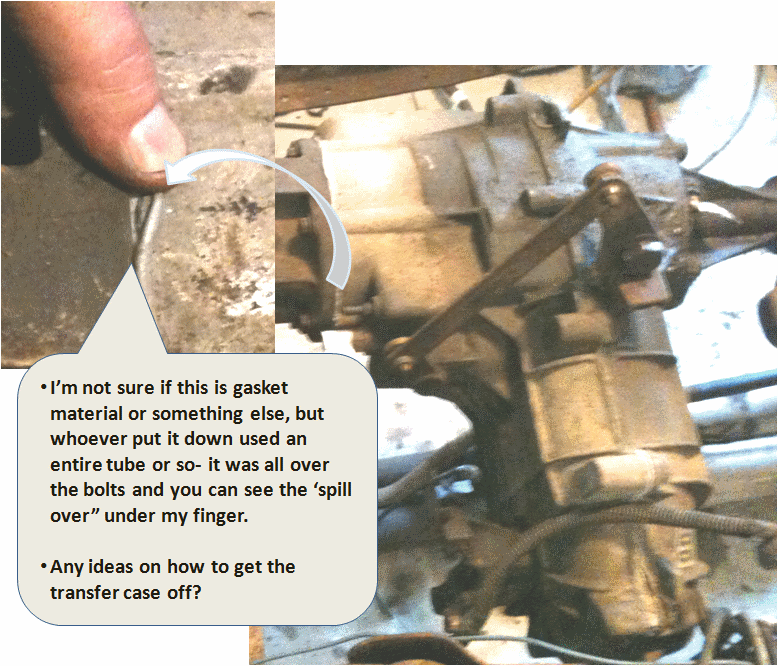
Yesterday was a slow day. I'll have pictures up in a few minutes, but before I do I want to get a question out ASAP- how do I get the transfer case off the transmission? I removed the 6 bolts and believe it slides off toward the back of the truck, but I know it was off before and whoever put it back used some kind of gasket type material and the friggin thing won't even budge!
Anyhow, if someone can confirm that the transfer case slips off toward the back and that I'm not nuts I'd appreciate it. Otherwise I'm ready to take the engine, tranny and transfer case off.
#58
12-28-2012, 09:36 AM
Posting Guru
#59
12-28-2012, 10:28 AM
Join Date: Dec 2010
Location: Carlisle
Posts: 221
Likes: 0
Received 0 Likes
on
0 Posts
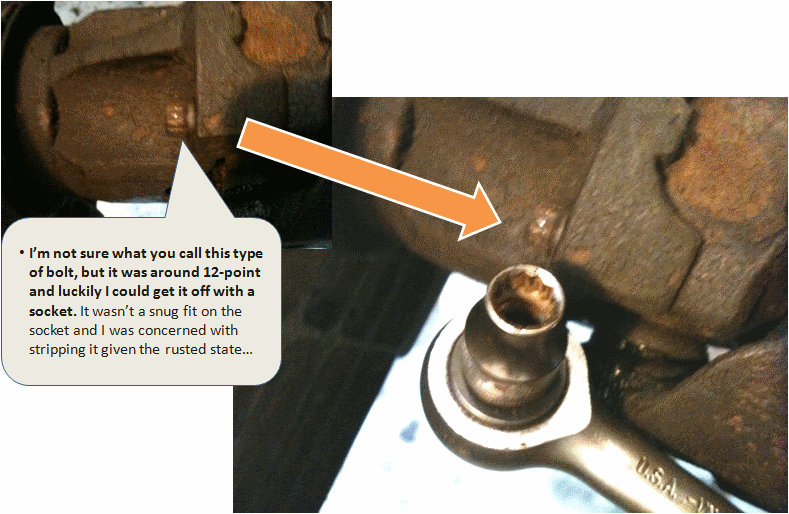
I only had a few goals for yesterday that mainly got me set to get the engine, tranny and transfer case off the truck. By and large I was successful, but progress was slow due to a few unexpected snags with the drive shafts. First off, on the front shaft coming out of the transfer case, 1 of the four bolts holding the U-joint on was, uh, non-standard…
Next snag was the rear axle and the four bolts that hold it to the pinion. Star bolts, GRRR. My little kit of bits that I bought yesterday had a few star bits, and one was just about the right size and felt snug. The first one came off pretty easily. “Huh, cool. Maybe Star nuts aren’t that bad after all.” Until I got to the next nut, which I couldn’t get off. “Crap… Back to the auto store.” I got a nifty little set of “L” shaped star wrenches that included the right size, but it still wasn’t exactly easy. First off, the drive shaft is connected to the axle (duh) and you have to twist bolts to get them off- twisting the bolts turns the drive shaft which turns the wheels. No big deal but annoying. Anyhow after a bit of coaxing I finally got those nasty bolts off.

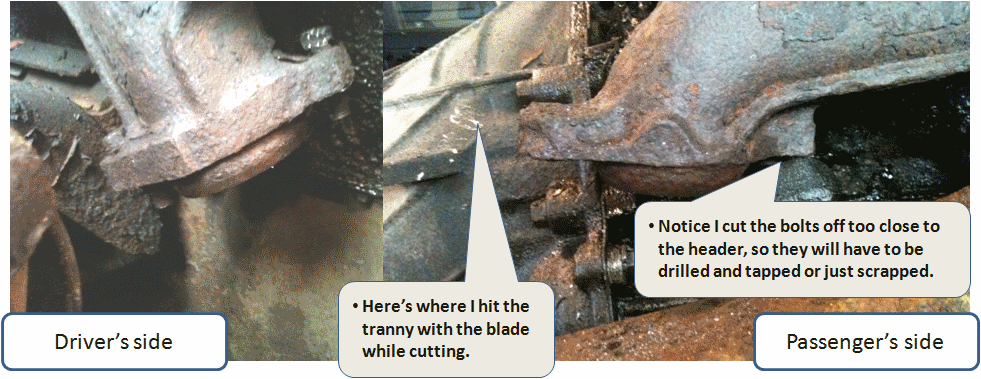
Next I cut the exhaust off- short order with the sawz-all, though I nicked the transmission housing a bit on the passenger side. Nothing serious- it just messed up the finish, but it’s one of those things where you kick yourself regardless.
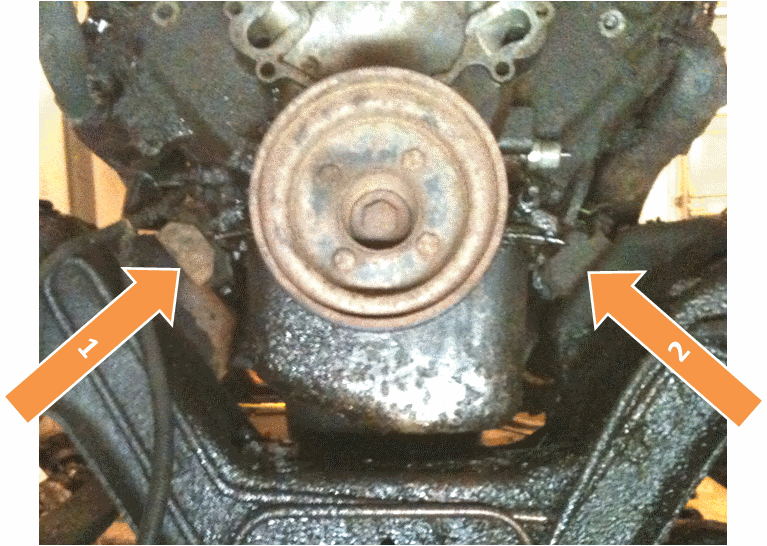
Now that I had the drive shafts and exhaust off I switched focus to the transfer case. I think it’s a bit too ambitious to try to pull the motor, transmission and the transfer case off all at once, so I wanted to see if I could lighten the load a bit. Unfortunately after taking the six bolts off I couldn’t get the t-case to budge- not even a little bit. I don’t want to bang on it too much since the case is aluminum- anyone with ideas or thoughts please let me know!!!
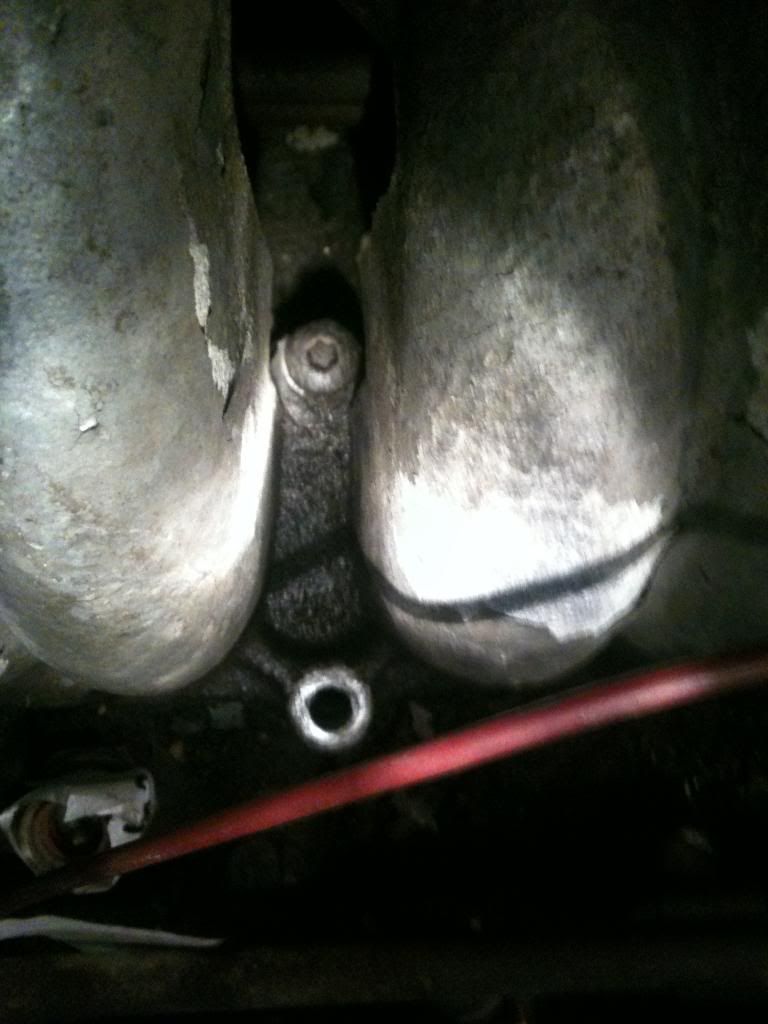
After giving up on the transfer case I wanted to get the last remaining bolts out to get the engine out- the engine-frame mount bolts. Turns out there are only two bolts, not four as I originally thought. They also came out easily- a peace offering from the truck gods for kicking my butt on the transfer case I’m guessing. Of course the nuts on the bolts were a different size, but with my 24” breaker bar they came off willingly once the right sized socket was found…
Next snag was the rear axle and the four bolts that hold it to the pinion. Star bolts, GRRR. My little kit of bits that I bought yesterday had a few star bits, and one was just about the right size and felt snug. The first one came off pretty easily. “Huh, cool. Maybe Star nuts aren’t that bad after all.” Until I got to the next nut, which I couldn’t get off. “Crap… Back to the auto store.” I got a nifty little set of “L” shaped star wrenches that included the right size, but it still wasn’t exactly easy. First off, the drive shaft is connected to the axle (duh) and you have to twist bolts to get them off- twisting the bolts turns the drive shaft which turns the wheels. No big deal but annoying. Anyhow after a bit of coaxing I finally got those nasty bolts off.
Next I cut the exhaust off- short order with the sawz-all, though I nicked the transmission housing a bit on the passenger side. Nothing serious- it just messed up the finish, but it’s one of those things where you kick yourself regardless.
Now that I had the drive shafts and exhaust off I switched focus to the transfer case. I think it’s a bit too ambitious to try to pull the motor, transmission and the transfer case off all at once, so I wanted to see if I could lighten the load a bit. Unfortunately after taking the six bolts off I couldn’t get the t-case to budge- not even a little bit. I don’t want to bang on it too much since the case is aluminum- anyone with ideas or thoughts please let me know!!!
After giving up on the transfer case I wanted to get the last remaining bolts out to get the engine out- the engine-frame mount bolts. Turns out there are only two bolts, not four as I originally thought. They also came out easily- a peace offering from the truck gods for kicking my butt on the transfer case I’m guessing. Of course the nuts on the bolts were a different size, but with my 24” breaker bar they came off willingly once the right sized socket was found…
#60
12-28-2012, 01:21 PM
Join Date: Dec 2010
Location: Carlisle
Posts: 221
Likes: 0
Received 0 Likes
on
0 Posts
I got the transfer case off! I put a 25� tow strap around the rear axle and strapped it around the transfer case to pull straight back. I must have had about 500 lbs of tension on the strap and hit the seam between the transfer case and tranny with a chisel and a hard rubber mallet for about 5 minutes. It didn�t show the signs of even beginning to move. I looked at my strap and though maybe I�m pinching the shaft too much since I put the crank end of the strap on the drivers side frame rail. I moved the end of the strap to the sway bar on the back axle to get more parallel pull on the case- while I was attaching the strap and getting just a tiny bit of tension the whole case popped out about 2� and just swung there freely! SWEET! Here are a few pictures�
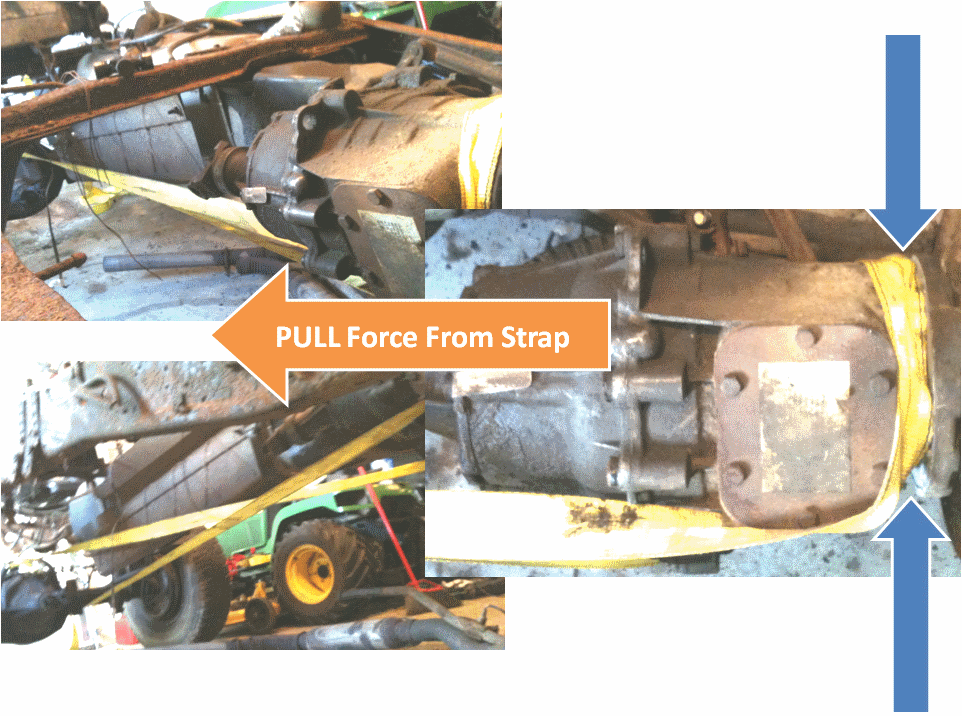
I also put an old mower tire under the case in the event that it just dropped off onto the ground before I could catch it� Thankfully I didn�t need it!
I also put an old mower tire under the case in the event that it just dropped off onto the ground before I could catch it� Thankfully I didn�t need it!