Rear brake overhaul
#1
 02-12-2012, 07:05 PM

Rear brake overhaul
Feb 1989, Eddie Bauer.
There were no prior issues with the rear brakes, rather this was part of a general vehicle overhaul to get critical systems reset to a known good status.
Note that in back, an Aerostar will have either 9 inch drum brakes or 10 inch.
If you have 9 inch brakes then your brake cylinder has a 3/4 inch piston.
My Eddie Bauer came standard with 10 inch brakes so my cylinders are 13/16 inch.
I declined to "upgrade" to the 7/8 inch piston (from 3/1989) but might have if I were hauling or towing (which would reward a bias further to the rear.)
{edit: This size info is good for my model year, you verify for your year.
On a slightly different matter, wheel cylinder size is matched up with master cylinder design, so swapping in larger rear brakes requires associated MC to give the correct front/rear bias.}
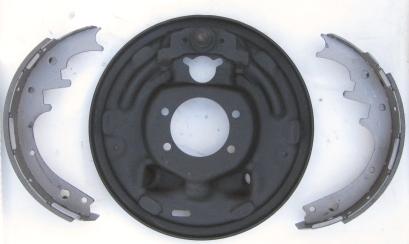
Note that the left and right side brakes mirror each other. For instance the right side adjuster has left handed threads, while the left side adjustor has right handed threads.
Either do your left & right sequentially or, (my method) place left brake parts on the left side of the garage, right on right.
Never mix the two.
****** Supplies and tools
- Jack & stands, something to remove tires.
- Wrench, 11mm. Brake line
- Pliers, stub nose. For installing shoe retaining springs.
- Wrench/socket, 14mm and 9/16. Bolts securing back plate to axle.
- Socket, 13mm. Two bolts securing the cylinder to the back plate.
- Brake shoes. Usually this comes as a complete kit per vehicle. Get your size, 9 or a big 10 inch.
- Brake cylinder. 2 per vehicle. Get your size: 3/4, 13/16, or 7/8. Mine came with nipple & cap.
- Brake hose. 1 per vehicle
- Spring hardware kit if you want.
- New nuts and bolts if you want.
- Brake fluid. Not optional.
- Cleaning supplies.
- Paint. Hi-temp enamel.
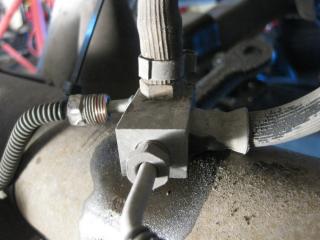
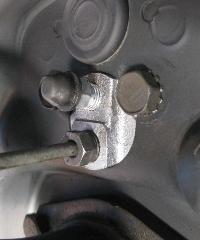
***** Hydraulic line **********
The rubber portion of the hose terminates on the axle. Hardlines go out to the left and right wheels.
The fourth line is a definite curiosity because, besides securing the brake line to the axle, it is not part of the brake system.
The far end of this 18 rubber hose was open, and was tucked into the floor spars. I suspect its an oil filler tube for the rear axle.
Either that or a water filler tube for the rear axle. (Think boating)
**** Inspecting parts *****
Remove and examine the drum for cracks. There's probably a spec for wear limit.
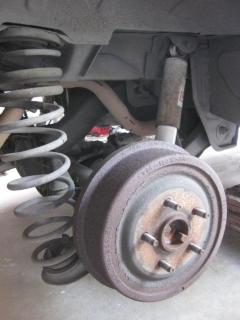
Removing the axles is NOT necessary to service the rear brakes.
It just happened that the brakes were included in a larger overhaul that included axle removal.
Having the axles off did allow me much better access and clear pics.

All of the brake brackets and the backing plate were brushed and painted using a hi-temp enamel. Quite excessive. Quite.

I replaced most of the springs using a kit. The kit did not cover two of springs but these should be available.
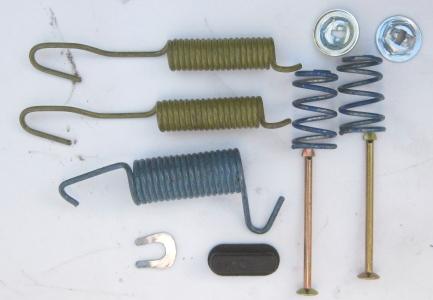
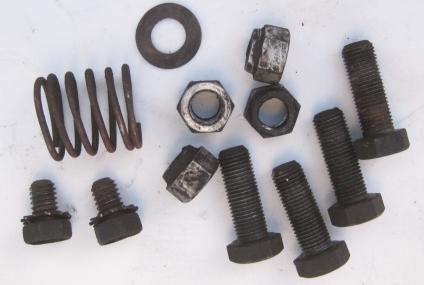
Bolts and nuts (cylinder & plate mounting) were retained.
The other of the two springs not replaced is on the parking brake cable.
{edit: Parking spring n/a separate. Replace the cable.}
New shoes. The longer one goes in the trailing position.
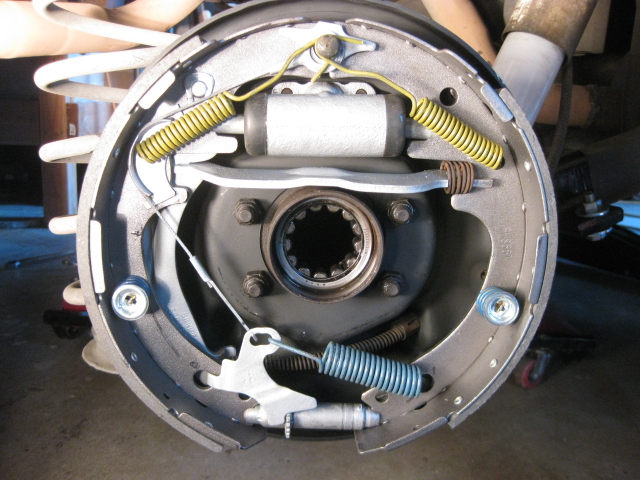
***** Assembly steps ******
Follow this sequence or you will have to backtrack. Then you would get annoyed.
Attach back plate to axle. (Orig shown)
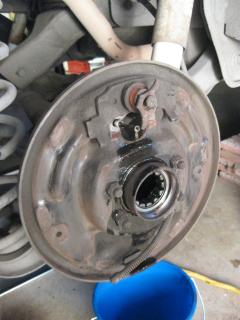
Attach brake cylinder to back plate. (Orig shown)
Attach the hand brake cable to the hand brake actuator lever.
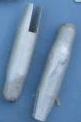
Insert the cylinder actuator pins into ends of the cylinder. Gentlemen...lubricate.
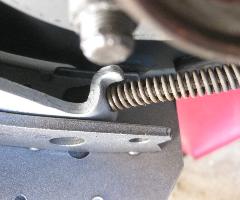
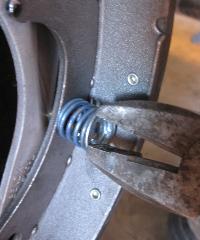
Attach the shoes to the back plate. Push down with snub nose pliers while reaching around to twist the pin.
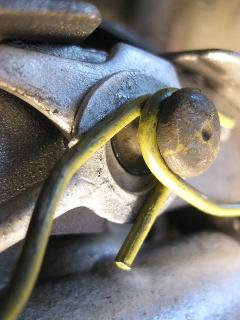
Build up the top spring-post. Point the cable in final direction before layering with the springs.
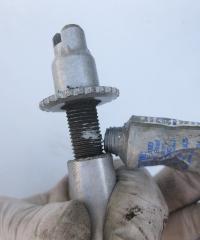
Assemble the ratch-wheel adjusting mechanism. I tend to use anti-seaze to lubricate threads and stop rust...or use some other product.
Patch in brake line and complete the fluid service.
Too clean, right?
Note: The axle seal is missing because we are right in the middle of replacing bearings.
{edit: Here, someday, something about parking brake set up, although I'm sure its been covered thirty-seven times already.}
There were no prior issues with the rear brakes, rather this was part of a general vehicle overhaul to get critical systems reset to a known good status.
Note that in back, an Aerostar will have either 9 inch drum brakes or 10 inch.
If you have 9 inch brakes then your brake cylinder has a 3/4 inch piston.
My Eddie Bauer came standard with 10 inch brakes so my cylinders are 13/16 inch.
I declined to "upgrade" to the 7/8 inch piston (from 3/1989) but might have if I were hauling or towing (which would reward a bias further to the rear.)
{edit: This size info is good for my model year, you verify for your year.
On a slightly different matter, wheel cylinder size is matched up with master cylinder design, so swapping in larger rear brakes requires associated MC to give the correct front/rear bias.}
Note that the left and right side brakes mirror each other. For instance the right side adjuster has left handed threads, while the left side adjustor has right handed threads.
Either do your left & right sequentially or, (my method) place left brake parts on the left side of the garage, right on right.
Never mix the two.
****** Supplies and tools
- Jack & stands, something to remove tires.
- Wrench, 11mm. Brake line
- Pliers, stub nose. For installing shoe retaining springs.
- Wrench/socket, 14mm and 9/16. Bolts securing back plate to axle.
- Socket, 13mm. Two bolts securing the cylinder to the back plate.
- Brake shoes. Usually this comes as a complete kit per vehicle. Get your size, 9 or a big 10 inch.
- Brake cylinder. 2 per vehicle. Get your size: 3/4, 13/16, or 7/8. Mine came with nipple & cap.
- Brake hose. 1 per vehicle
- Spring hardware kit if you want.
- New nuts and bolts if you want.
- Brake fluid. Not optional.
- Cleaning supplies.
- Paint. Hi-temp enamel.
***** Hydraulic line **********
The rubber portion of the hose terminates on the axle. Hardlines go out to the left and right wheels.
The fourth line is a definite curiosity because, besides securing the brake line to the axle, it is not part of the brake system.
The far end of this 18 rubber hose was open, and was tucked into the floor spars. I suspect its an oil filler tube for the rear axle.
Either that or a water filler tube for the rear axle. (Think boating)
**** Inspecting parts *****
Remove and examine the drum for cracks. There's probably a spec for wear limit.
Removing the axles is NOT necessary to service the rear brakes.
It just happened that the brakes were included in a larger overhaul that included axle removal.
Having the axles off did allow me much better access and clear pics.
All of the brake brackets and the backing plate were brushed and painted using a hi-temp enamel. Quite excessive. Quite.
I replaced most of the springs using a kit. The kit did not cover two of springs but these should be available.
Bolts and nuts (cylinder & plate mounting) were retained.
The other of the two springs not replaced is on the parking brake cable.
{edit: Parking spring n/a separate. Replace the cable.}
New shoes. The longer one goes in the trailing position.
***** Assembly steps ******
Follow this sequence or you will have to backtrack. Then you would get annoyed.
Attach back plate to axle. (Orig shown)
Attach brake cylinder to back plate. (Orig shown)
Attach the hand brake cable to the hand brake actuator lever.
Insert the cylinder actuator pins into ends of the cylinder. Gentlemen...lubricate.
Attach the shoes to the back plate. Push down with snub nose pliers while reaching around to twist the pin.
Build up the top spring-post. Point the cable in final direction before layering with the springs.
Assemble the ratch-wheel adjusting mechanism. I tend to use anti-seaze to lubricate threads and stop rust...or use some other product.
Patch in brake line and complete the fluid service.
Too clean, right?
Note: The axle seal is missing because we are right in the middle of replacing bearings.
{edit: Here, someday, something about parking brake set up, although I'm sure its been covered thirty-seven times already.}
Last edited by RojoStar; 05-07-2018 at 09:40 PM. Reason: PB pic link repair
#2
02-12-2012, 07:19 PM

#3
02-13-2012, 09:30 PM
Senior User
Join Date: Dec 2006
Location: Surrey BC Canada
Posts: 194
Likes: 0
Received 0 Likes
on
0 Posts
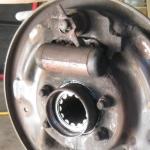
RojoStar, thanks for the post. I've done the rear brakes last year (and they seem to last forever). But I have an issue, or rather a personal complaint, with the backing plate contact surface factory design. My backing plate contacts surfaces are totally messed up because of the pads wearing down the surfaces resulting in the pads being stuck in the wear crevice.
I've read some posts on how to fix them with welding the indented crevice spots and then filing them down. I don't have a welder nor the time to do that sort of repair, and I am not about to buy new backing plates at about $100 each.
I don't know why they (the engineers) designed the backing plates without incorporating a replaceable brake pad backing plate contact surface solution.
#4
02-14-2012, 03:46 AM
#5
02-19-2012, 11:20 PM
Senior User
Join Date: Dec 2006
Location: Surrey BC Canada
Posts: 194
Likes: 0
Received 0 Likes
on
0 Posts
#6
03-08-2012, 09:42 PM

Senior User
Join Date: Aug 2010
Location: Waldshut-Tiengen
Posts: 205
Likes: 0
Received 0 Likes
on
0 Posts
Hello Community, i did the Rear Brake overhaul last sunday for the first time on a car. Hardest part was to get those two new springs over the anchor pin.. "wear boxing gloves or you may brake your hands at the wheelwell" ..better to buy that special hook-tool in advance  .
.
Now, where everything is reestablished and adjusted, there is excessive pedal travel and too much tension on the Handbrake. Guess, that when i've adjusted both sides of the Brakes by the Star-Wheels, there was still too much tension on the Parking Brake Lever (attached to secondary shoe). I should maybe release the tension at the Parking Brake Handle self-adjuster first and then adjusting the Brake Shoes again by the Star-Wheels.
Question: The Brake Fluid in the Master Cylinder smells like Anti-Freeze. I would feel much more comfortable with new Brake Fluid. Is it possible to exchange the old Brake Fluid entirely with the simple Bleeding procedure? I have 1 Litre of the right DOT3 from my FORD Dealer, enough for the entire Brake-System?
Have a good Time!
97' XLT 3.0L RWD 105656miles, RABS
.Now, where everything is reestablished and adjusted, there is excessive pedal travel and too much tension on the Handbrake. Guess, that when i've adjusted both sides of the Brakes by the Star-Wheels, there was still too much tension on the Parking Brake Lever (attached to secondary shoe). I should maybe release the tension at the Parking Brake Handle self-adjuster first and then adjusting the Brake Shoes again by the Star-Wheels.
Question: The Brake Fluid in the Master Cylinder smells like Anti-Freeze. I would feel much more comfortable with new Brake Fluid. Is it possible to exchange the old Brake Fluid entirely with the simple Bleeding procedure? I have 1 Litre of the right DOT3 from my FORD Dealer, enough for the entire Brake-System?
Have a good Time!
97' XLT 3.0L RWD 105656miles, RABS
Last edited by waterbear; 03-08-2012 at 09:46 PM. Reason: putting in paragraph for better reading
#7
03-09-2012, 03:00 AM
congradulations waterbear,
Hello Community, i did the Rear Brake overhaul last sunday for the first time on a car. Hardest part was to get those two new springs over the anchor pin.. "wear boxing gloves or you may brake your hands at the wheelwell" ..better to buy that special hook-tool in advance .
Now, where everything is reestablished and adjusted, there is excessive pedal travel and too much tension on the Handbrake. Guess, that when i've adjusted both sides of the Brakes by the Star-Wheels, there was still too much tension on the Parking Brake Lever (attached to secondary shoe). I should maybe release the tension at the Parking Brake Handle self-adjuster first and then adjusting the Brake Shoes again by the Star-Wheels.
yes
Question: The Brake Fluid in the Master Cylinder smells like Anti-Freeze. I would feel much more comfortable with new Brake Fluid. Is it possible to exchange the old Brake Fluid entirely with the simple Bleeding procedure? I have 1 Litre of the right DOT3 from my FORD Dealer, enough for the entire Brake-System?
yes, can use any poly glycol based brake fluid, NONE of your EU silicone based fluids please. lots of poly glycol ether based EU brake fluids. the Ford stuff must be expensive there? all the glycol based are cross compatible. Fuchs makes a top quality brake fluid thats DOT4 which is fine in our Aeros
their MAINTAIN DOT4
Specifications/Approvals:*
FMVSS NR. 116
DOT 3/DOT 4
ISO 4925 CLASS 3/4
SAE J 1703/J 1704
FUCHS Recommendations:
FORD M6C62-A
FORD M6C9103-A
NH 800 A
OPEL 19 42 421
pays in far less expensive brake component rust and lockup to change every 2>4 years depending on veh storage, snow slush driving and wet conditions.
Have a good Time!
97' XLT 3.0L RWD 105656miles, RABS
.Now, where everything is reestablished and adjusted, there is excessive pedal travel and too much tension on the Handbrake. Guess, that when i've adjusted both sides of the Brakes by the Star-Wheels, there was still too much tension on the Parking Brake Lever (attached to secondary shoe). I should maybe release the tension at the Parking Brake Handle self-adjuster first and then adjusting the Brake Shoes again by the Star-Wheels.
yes
Question: The Brake Fluid in the Master Cylinder smells like Anti-Freeze. I would feel much more comfortable with new Brake Fluid. Is it possible to exchange the old Brake Fluid entirely with the simple Bleeding procedure? I have 1 Litre of the right DOT3 from my FORD Dealer, enough for the entire Brake-System?
yes, can use any poly glycol based brake fluid, NONE of your EU silicone based fluids please. lots of poly glycol ether based EU brake fluids. the Ford stuff must be expensive there? all the glycol based are cross compatible. Fuchs makes a top quality brake fluid thats DOT4 which is fine in our Aeros
their MAINTAIN DOT4
Specifications/Approvals:*
FMVSS NR. 116
DOT 3/DOT 4
ISO 4925 CLASS 3/4
SAE J 1703/J 1704
FUCHS Recommendations:
FORD M6C62-A
FORD M6C9103-A
NH 800 A
OPEL 19 42 421
pays in far less expensive brake component rust and lockup to change every 2>4 years depending on veh storage, snow slush driving and wet conditions.
Have a good Time!
97' XLT 3.0L RWD 105656miles, RABS
Trending Topics
#8
03-09-2012, 09:37 AM
Haha, you're right. I should have gotten a shot of me gorilla-gripping the spring with pliers while pushing off against the nearest immovable object.
My road test review...
After overhauling both front and back including brake lines, the result is WAY better than before. Noticeably more powerful and competent, especially in the mountain twisties. With so many updates I don't know what to accuse. Candidates are...1) the new brake lines and fluid, 2) better front/back bias due to new/different rear pads, and 3) better front/back bias due to resetting/lubing the star wheel.
Fyi...
Last week I overhauled another set of older brakes on a honda. Same issue with internal rust and crap.
Conclusion...
Brake overhauls on older rides are not a waste of time/money.
**********
Re: Fronts
https://www.ford-trucks.com/forums/1...r-rebuild.html
#9
03-16-2012, 05:31 PM
Senior User
Join Date: Aug 2010
Location: Waldshut-Tiengen
Posts: 205
Likes: 0
Received 0 Likes
on
0 Posts

Master-Cylinder Cap is leaking now, just because i opened it for the first time after two years..
Important Threat for DIY First-Timers:
https://www.ford-trucks.com/forums/2...ml#post1577179
Yeah, my Aero* must be ready for the Mountains before the Season starts for Hobby Diggers in May. Offtopic:
Sampling Results From Medel Property In Switzerland Very Encouraging - Include Samples Of Over 10 G/T Gold
Have a good ride!

#10
03-16-2012, 08:26 PM
It's a good idea to replace the fluid every couple of years, as it absorbs water all on its own. If you notice the brake fluid turn from clear to an orange color, you know it's rust from inside the brake system. Don't wait for it to turn brown.
When bleeding, make sure you don't ever let the reservoir run dry, as that will let air get into the system. The master cylinder itself is a bear to bleed if you ever get air into it, and the RABS is almost impossible to bleed without Ford's special test rig. Ford uses a step-bore piston on a lot of their recent brakes, and if you get air into it, you have to lift up the rear end to tilt the whole vehicle up to get the air out.
I found a trick to bleed the RABS valve, but I would caution that it may be dangerous. First, disable 4wd (if you have it) by disconnecting the computer under the seat. Then chock the front wheels and jack up the rear end to get the rear wheels off the ground. Crack open the bleed hole in one of the rear slave cylinders and attach a hose to catch the fluid. Start the engine, put the transmission in gear, and let the rear end spin up to the idle speed. Gently apply the brakes. Usually the RABS will activate at this point (you will hear and feel it), and with the rear bleeder opened, you will push fluid, and hopefully air, out. Do this a couple times (again, make sure to not let the reservoir empty out). This has helped stiffen up the brake pedal on my van.
If you apply the brakes too hard, you will push the shuttle valve in the proportioning valve toward the front, and you will have to do something similar to re-center it. Close up the rear bleeder, open one of the fronts, and carefully pump the brake pedal. I usually use a VOM with a beeping continuity tester connected between the shuttle valve sensor switch and ground. Manipulate the shuttle valve until the continuity tester stops beeping.
#11
03-17-2012, 03:50 PM
Senior User
Join Date: Aug 2010
Location: Waldshut-Tiengen
Posts: 205
Likes: 0
Received 0 Likes
on
0 Posts
Okay, thanks for the explenation regarding Bleeding Procedure with RABS  but i guess, the RABS on my Van does not work. The ABS-Light is not lit when i turn the Key into Start position. Maybe the Bulb is blown or it misses the Bulb in the place where it should be. So i cannot check what or if something else is wrong with it.
Couple of days ago i had to step "fully into the irons" from 48mph to zero (a shiny AUDI did the same ahead of me..), fortunately i crashed not into him. I felt no RABS, the rear wheels blocked, it tooks some 30 feets to stop. I need to figure out first, how it works and where the RABS units are. Lots of Posts on here about RABS, have to get familar with it. Thanks again!
but i guess, the RABS on my Van does not work. The ABS-Light is not lit when i turn the Key into Start position. Maybe the Bulb is blown or it misses the Bulb in the place where it should be. So i cannot check what or if something else is wrong with it.Couple of days ago i had to step "fully into the irons" from 48mph to zero (a shiny AUDI did the same ahead of me..), fortunately i crashed not into him. I felt no RABS, the rear wheels blocked, it tooks some 30 feets to stop. I need to figure out first, how it works and where the RABS units are. Lots of Posts on here about RABS, have to get familar with it. Thanks again!
#12
03-18-2012, 12:22 AM

Thread
Thread Starter
Forum
Replies
Last Post
crucialprospect
1980 - 1986 Bullnose F100, F150 & Larger F-Series Trucks
20
06-06-2021 07:58 PM
Famouszor
1967 - 1972 F-100 & Larger F-Series Trucks
6
12-24-2010 12:51 PM