
Manual Injector Cleaning - The How To Thread
#1
 05-03-2011, 08:46 AM

Manual Injector Cleaning - The How To Thread
Ok so a couple of people have been after me to make a thread about manual injector cleaning. This is the $20-$40 at home injector cleaning solution instead of paying $125-$150 for refurbed and flow matched injectors.
Today I'll be showing the 19# 5.0-5.8 EV1 injectors. The process is pretty simple: strip, soak, open/blow, repeat soak/open/blow, reassemble.
What you need:
1.) Spare injector wire and 12volt battery or power source
2.) container and chem to soak in
3.) #8-10 screw (?) tool
4.) air compressor w/rubber tipped blow gun tool
5.) RJM kit (RJM Injection Tech — Fuel Injector Service Kit)
Optional:
6.) Spare injector set from junk yard
(This is only b/c it will take a couple days to get this done so your truck will be out of service- spare set of injectors reduces your trucks down time) I pulled 2 spare sets and paid $1 each for them ($16).
Step #1: Strip Your Injectors
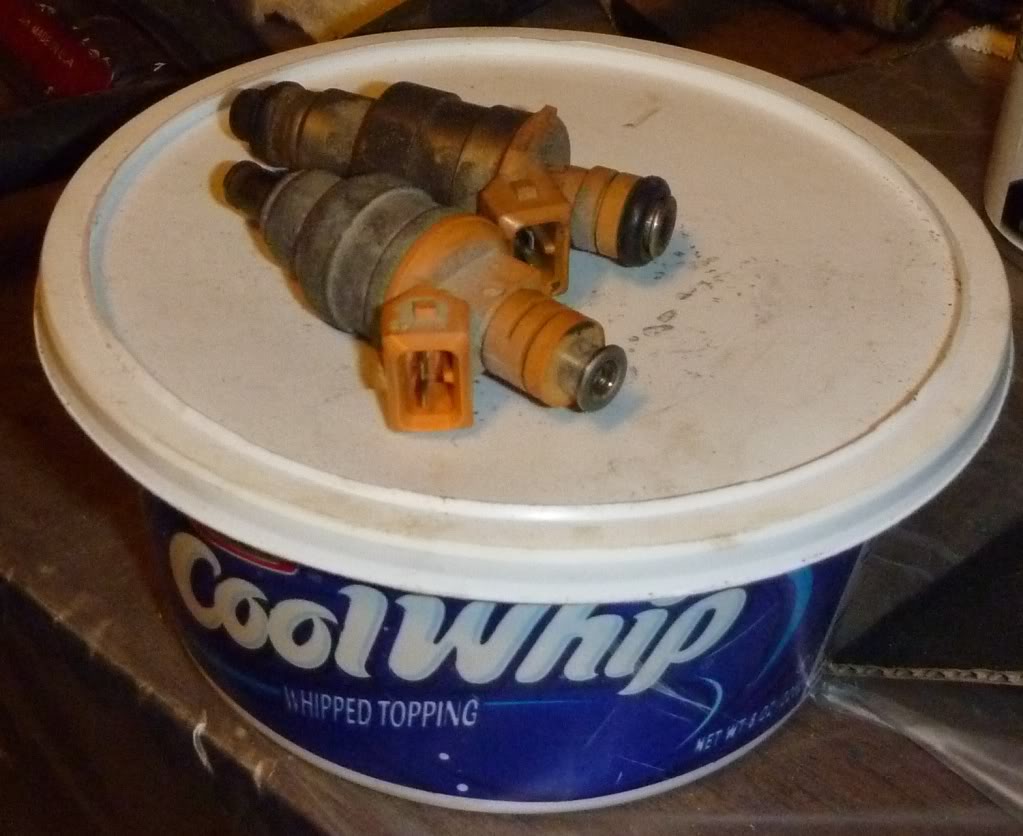
pull off the o-rings and plastic parts including the mini basket filters included in the RJM rebuild kit. You can see the front injector is stripped (cool whip container is what i used to soak them in)
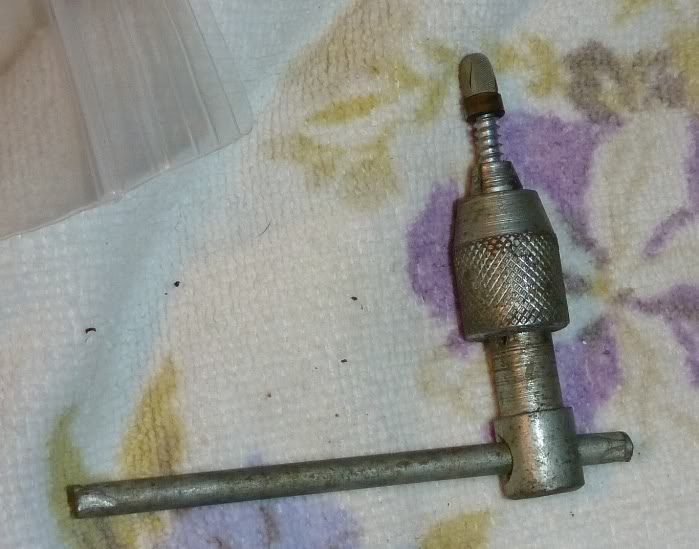
Use a #8 screw (i think- you may want to double check) to remove the mini filter basket from the top of the injector. Just screw into the basket and pull out... Don't worry the RJM kit has new mini basket filters to replace the old ones you're pulling out.
My injector basket filter tool... you can see a basket on the end of the screw.
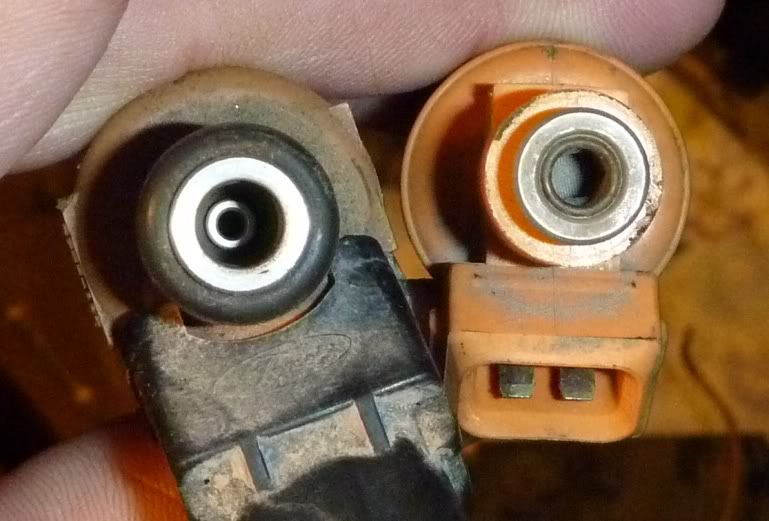
Left injector has the basket filter removed.
Step #2: Soak
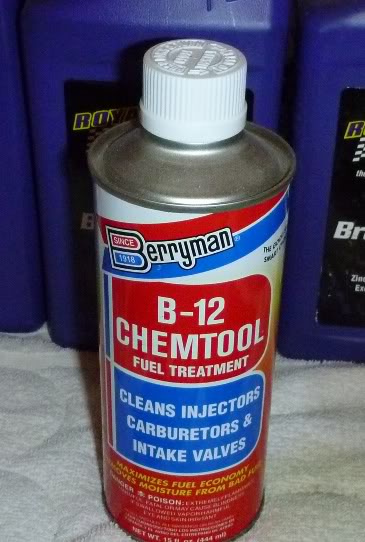
Drop all your injectors into a container of GOOD full strength injector cleaner. I use Berryman's B-12 Chemtool. Do not use cheap $2 store brand injector cleaner... It's not strong enough to break down the varnish deposits! You get what you pay for! Make sure your soaking container has a lid to keep evaporation of chem to a minimum, and to keep the wife from squaking about the smell (ie cool whip container - Or a 1gal can of Berryman's chem dip for $20 works good to). I usually leave them to soak a good 2 days at least... remember the can will say 20 mins but your trying to break down 20+ years of varnish buildup! This couple days of down time is the reason I suggest pulling a spare set of injectors from the JY...
Step #3: Open and Blow
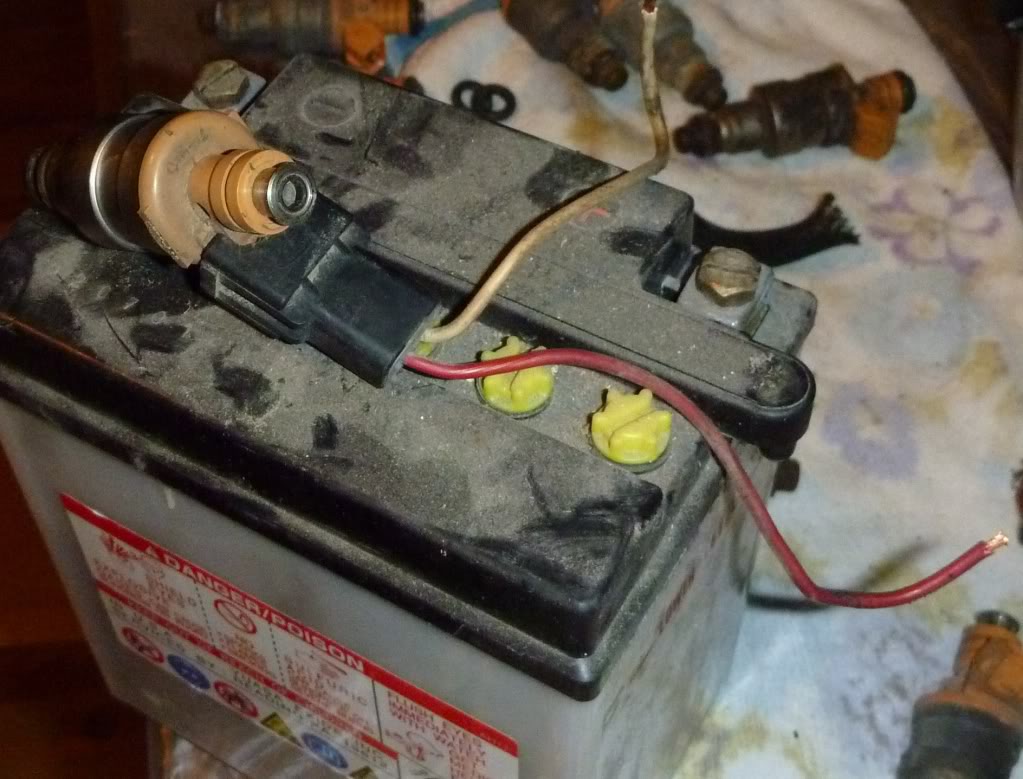
You need to use the spare injector wire hooked to 6-9 volt power source (ie: motorcycle battery or 9v fire alarm battery) to "open" the injector. !WARNING! Keeping a constant 12volt source (ie: car battery) to the injector will ruin IT!!!! (via: Subford's later comment). Remember a injector is just a electrical on-off valve for gas flow... Not shown but I used the clamps off an old car battery charger and wired them to the injector wires. Either way hook wires to your power source, and snap the clip onto injector to send power to open the internal valve (you need to keep constant power to the injector to keep it open. (I'll cut a injector apart to show internals if you guys want me too...)
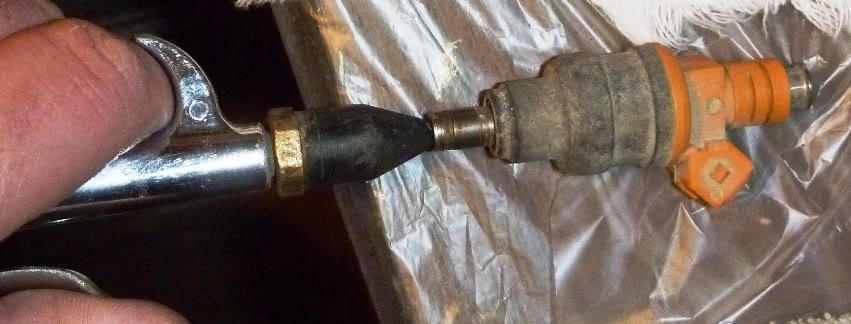
Now that you have the injector you want to blow compressed air backward through the injector to push and blow all the varnish out. You'll be surprised what actaully comes out some times if you hold a shop towel to the other end to catch the air blown out. Press the rubber tip of the blow tool to the injector like this...
Step #4: Repeat Soak, Open, Blow
If you want to and have the time, you can repeat the soaking proceedure and blowing out proceedure to make sure your extra clean... enough said.
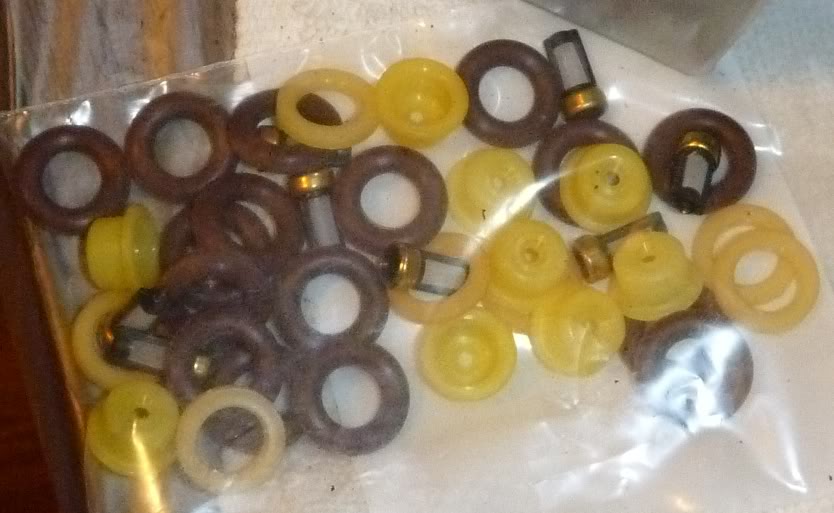
Step #5: Reassemble the Injector
Honestly if you can't figure out what to do with the kit pictured below after doing all of the above... well you should be slapped silly! This should be self explanatory...
Step #0: Ask questions
This is step "0" because you should ask questions first so you don't screw anything up... How hard is this??? Well this is like a 3 (on a 1-10 scale). Or about a 2 beer job for those of you who count beers while doing their truck work.
Today I'll be showing the 19# 5.0-5.8 EV1 injectors. The process is pretty simple: strip, soak, open/blow, repeat soak/open/blow, reassemble.
What you need:
1.) Spare injector wire and 12volt battery or power source
2.) container and chem to soak in
3.) #8-10 screw (?) tool
4.) air compressor w/rubber tipped blow gun tool
5.) RJM kit (RJM Injection Tech — Fuel Injector Service Kit)
Optional:
6.) Spare injector set from junk yard
(This is only b/c it will take a couple days to get this done so your truck will be out of service- spare set of injectors reduces your trucks down time) I pulled 2 spare sets and paid $1 each for them ($16).
Step #1: Strip Your Injectors
pull off the o-rings and plastic parts including the mini basket filters included in the RJM rebuild kit. You can see the front injector is stripped (cool whip container is what i used to soak them in)
Use a #8 screw (i think- you may want to double check) to remove the mini filter basket from the top of the injector. Just screw into the basket and pull out... Don't worry the RJM kit has new mini basket filters to replace the old ones you're pulling out.
My injector basket filter tool... you can see a basket on the end of the screw.
Left injector has the basket filter removed.
Step #2: Soak
Drop all your injectors into a container of GOOD full strength injector cleaner. I use Berryman's B-12 Chemtool. Do not use cheap $2 store brand injector cleaner... It's not strong enough to break down the varnish deposits! You get what you pay for! Make sure your soaking container has a lid to keep evaporation of chem to a minimum, and to keep the wife from squaking about the smell (ie cool whip container - Or a 1gal can of Berryman's chem dip for $20 works good to). I usually leave them to soak a good 2 days at least... remember the can will say 20 mins but your trying to break down 20+ years of varnish buildup! This couple days of down time is the reason I suggest pulling a spare set of injectors from the JY...
Step #3: Open and Blow
You need to use the spare injector wire hooked to 6-9 volt power source (ie: motorcycle battery or 9v fire alarm battery) to "open" the injector. !WARNING! Keeping a constant 12volt source (ie: car battery) to the injector will ruin IT!!!! (via: Subford's later comment). Remember a injector is just a electrical on-off valve for gas flow... Not shown but I used the clamps off an old car battery charger and wired them to the injector wires. Either way hook wires to your power source, and snap the clip onto injector to send power to open the internal valve (you need to keep constant power to the injector to keep it open. (I'll cut a injector apart to show internals if you guys want me too...)
Now that you have the injector you want to blow compressed air backward through the injector to push and blow all the varnish out. You'll be surprised what actaully comes out some times if you hold a shop towel to the other end to catch the air blown out. Press the rubber tip of the blow tool to the injector like this...
Step #4: Repeat Soak, Open, Blow
If you want to and have the time, you can repeat the soaking proceedure and blowing out proceedure to make sure your extra clean... enough said.
Step #5: Reassemble the Injector
Honestly if you can't figure out what to do with the kit pictured below after doing all of the above... well you should be slapped silly! This should be self explanatory...
Step #0: Ask questions
This is step "0" because you should ask questions first so you don't screw anything up... How hard is this??? Well this is like a 3 (on a 1-10 scale). Or about a 2 beer job for those of you who count beers while doing their truck work.
The following 2 users liked this post by nstueve:

#3
05-03-2011, 09:00 AM
Thanks for the reps... Seems like every time someone asks about MPGS and I suggest doing a manual injector cleaning I get nothing but 100 more questions about it. Figured this would help explain the process... That and there are a few users that PMed me waiting for me to do this thread for them.

#5
05-03-2011, 10:13 AM
Never use a 12 Volt car battery to do the above.
Use a 9 Volt battery as the car battery will burn the solenoid coils open.
The Computer only puts the 12 Volts on the injector for a very short time.
You can also use the 9 Volt battery for testing an injector on the Truck.
For more information on injector cleaning go to:
Ford Fuel Injection � Fuel Injector Cleaning
/
#6
05-03-2011, 11:07 AM
Never use a 12 Volt car battery to do the above.
Use a 9 Volt battery as the car battery will burn the solenoid coils open.
The Computer only puts the 12 Volts on the injector for a very short time.
You can also use the 9 Volt battery for testing an injector on the Truck.
For more information on injector cleaning go to:
Ford Fuel Injection � Fuel Injector Cleaning
/
Use a 9 Volt battery as the car battery will burn the solenoid coils open.
The Computer only puts the 12 Volts on the injector for a very short time.
You can also use the 9 Volt battery for testing an injector on the Truck.
For more information on injector cleaning go to:
Ford Fuel Injection � Fuel Injector Cleaning
/
MAN! It's like i read that forum before or somthing!LOL! Only they didn't share the 9volt battery info... I was actually using a 6volt motorcycle battery in the pics so I'll go back and edit that in my origional post (thanks for catching that subford!) To be completely honest I knew that was around somewhere (been a couple years since i've actually read it) either way it was missing a few pieces of info that people needed to know like the battery. Oh and incase you were wondering a piece of 220 or 300 grit sand paper can be used to sand down the metal bodies so you can spray paint them to match the picture on the top of the ford fuel injection forum... Don't forget to tape them off though. And make sure to keep the gritty matterial you sand off out of the injector!
#7
05-03-2011, 02:26 PM


Trending Topics
#8
05-03-2011, 07:17 PM

Cargo Master
#9
05-05-2011, 07:27 AM
Good write up!
I use a old ignition ballast resistor to operate the injectors. So far I never had any issues using it on injectors.
I am looking at a Harbour freight catalog they have the 2q ultrasonic cleaner listed. I wonder how that would clean a injector/ carb out.
I use a old ignition ballast resistor to operate the injectors. So far I never had any issues using it on injectors.
I am looking at a Harbour freight catalog they have the 2q ultrasonic cleaner listed. I wonder how that would clean a injector/ carb out.
#10
08-28-2011, 09:14 PM
Hey all,
I dont figure this thread is too awful old for me to revive, so I had a couple questions about this. Was your truck running roughly prior to this? If so, did the cleaning remedy that? Also, (feel free to laugh if need be), when yall say a 9 volt battery can be used to check the injector, do you literally mean a battery like one that would go in an alarm clock? Is there enough amps there? Would the battery last long enough to check a whole set?
I understand if I get laughed at, but I dont care as long it stops being clear as mud to me. I was just looking at the cost of a new set, and if I can ohm them out, clean them, check for clicks and replace o-rings then that's a plus!
Chris
One more question. Was it a lot of junk that had accumulated in there? I've never done it, so I dont know just how much can accumulate. I wish there was a picture of that. Just curiosity. Thanks!
Last edited by HD; 08-28-2011 at 09:21 PM. Reason: One more question/ Wording Change
The following users liked this post:
#11
08-28-2011, 09:29 PM
I also use one when removing/replacing the truck battery to save the Computer information and the radio stations and clock settings.
Yes it clicks them open.
A new battery should work for the whole set I would think.
#12
08-28-2011, 09:44 PM
#13
08-29-2011, 07:00 AM

#14
08-29-2011, 07:12 AM
Elder User
Join Date: Dec 2008
Location: Small town Iowa
Posts: 805
Likes: 0
Received 0 Likes
on
0 Posts
#15
08-29-2011, 08:12 AM
Sorry I didn't get a pic of the junk that blows out of the injectors. I'm not talking about big chunky stuff, but if you blow the injectors out onto a paper towel or into a clean cool whip container you will most likely see a dark grey (and/or) brown murkey liquid coming out of them (depends on what kind of deposites you have). I soak and blow them out once a day for 3 days... My thinking is that the soaking and blowing will help remove all deposites by taking a little off at a time. Either way You should soak and blow until the injector blows clean (take into account for the color of the soaking fluid though).
Also to answer to your rough engine question... Usually a rough running engine is a sign of...
1.) ign problem (ie spark plugs, cap, rotor, wires)
2.) fuel delivery (fuel pump going out, fuel filter or injectors clogged)
3.) myriad of electrical things to be determined by pulling codes
PS: pulling codes should be the 1st step with a rough running engine before doing extensive work like manual cleaning the injectors and replacings parts before you know what the problem is.
To add to the overall thread:
I am looking into an ultrasonic cleaner since I am relaoding ammo for myself (ie: an ultrasonic cleaner would benifit me in more than one way now). Just a thought for anyone who already has an ultrasonic and is going to be doing this injector cleaning.