


2016 CCSB S&B 56 gallon Fuel Tank Install

Thread Starter
|
Tuned


Joined: Jul 2021
Posts: 372
Likes: 199
From: NE Oklahoma
2016 CCSB S&B 56 gallon Fuel Tank Install
I thought I would share my experience installing the S&B 56 gallon fuel tank in my 2016 F250 CCSB since there is not a lot of info regarding this tank in the forums. !Warning! this is going to be a long post!
I ordered the S&B 56 gallon tank back in late September directly from S&B it was just over $1300 after sales tax, shipping was free via Fed-Ex. The tank arrived a week after I placed the order. 12 days after placing the order I received a phone call (voice mail since I missed the call) from Karl with S&B thanking me for my purchase and asking how the install went. He followed up that phone call immediately by sending me an email asking the same. I replied to the email thanking him for taking the time to reach out to me and told him I had not had the time to install the tank as of yet and asked if there were any tips or tricks he could recommend. He linked me to the Install Instructions and Install video which I did watch and read to familiarize myself with the install prior to doing any work.
A week later I was ready to install the tank on a nice Saturday morning which was a week prior to a camping trip I had planned and was excited to take advantage of the larger tank during this trip. The instructions said the install would take 2-3 hours. So I accounted for 4 hours just in case. Opened the box to inspect and account for all the included parts. This is where my luck changed. It appeared Fed-Ex placed the box in an upright position during transit because upon opening the box one of the two smaller white boxes inside which contained small parts was crushed. The box is huge roughly 20" x 20" x 80" so it makes sense to limit the amount of floor space needed in a delivery truck.
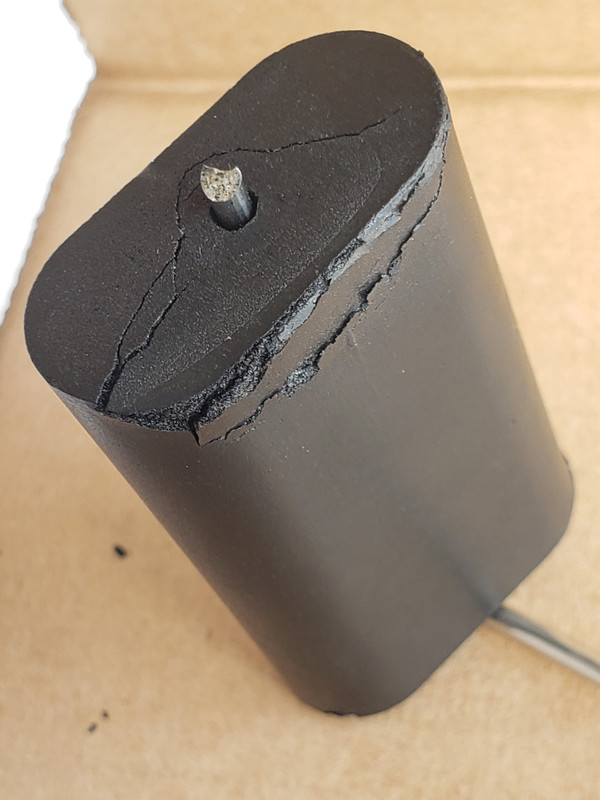
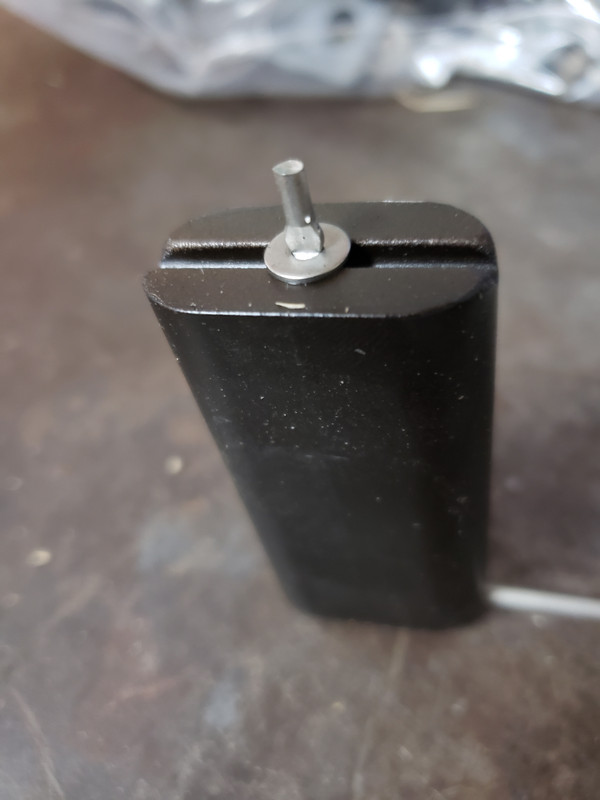
After all parts were accounted for and inspected I find the OEM replacement float S&B uses was damaged as a result of the tank shifting in the box and crushing the smaller box. This was a result of the tank traveling in the upright position. As you can see in the image below the float was smashed and the tip of the rod was missing the retaining clip.
Damaged S&B Float
OEM Float
At that point I knew the install was not going to take place that weekend. I fired off an email to S&B with a pic of the damaged float. S&B replied on Monday (email was sent on Saturday) and expedited the replacement part to me. I had the replacement part in just a few days. Excellent customer service from S&B! I also mentioned to the person that ordered my replacement float, that this could have been prevented if the box the float was in was placed in the void of the tank at the rear so there would be no case of a crushed box. He mentioned he would let Packaging know of this issue.
Fast forward a couple more weeks and my 15 year old son and I make attempt number 2 on the install. This is where my opinion on how easy/hard this install is compared to other users here that have installed an aftermarket tank differ. I've watched EpicCowlick's video of the Titan Tank install on his 2017 and the install video of the S&B tank on YouTube so I had an idea what I was getting myself into and it didn't look to bad. I'm fairly mechanically inclined and can tackle most things regarding maintenance and repair on a vehicle, though my experience of later model vehicles is limited.
Since I don't have a lift and was doing this in the driveway I purchased a pair of cam buckle tie down straps from Walmart (highly recommended by the way thanks to EpicCowlicks video) and had 2 floor jacks on hand so I felt I was ready. My tank had roughly 12 gallons of fuel in the tank at the time and the extra weight of the fuel didn't cause any issues for me. Those straps took all the weight and the floor jack was not needed for removing the OEM tank.
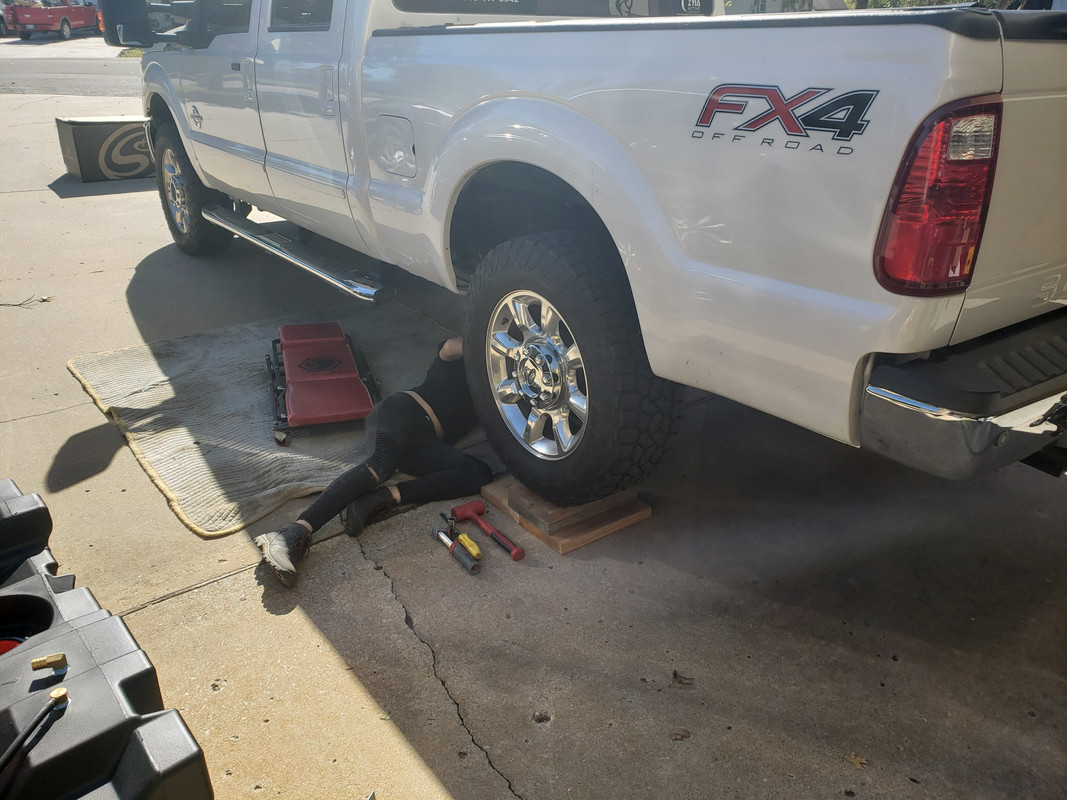
My son removing the skid plate under the OEM tank. I placed a few blocks under the rear tires to give a little bit more room under the truck in case the S&B tank needed more ground clearance to slide under the frame. It wasn't necessary but the extra room under truck was nice.
We removed the fill spout from the body in hopes that we would not have to remove the fill hose and vent hoses from the solid fill spout like the instructions indicated. Mostly because the nut for the hose clamps were pointed upwards and not accessible any other way. I read others had issues getting those hoses back on so my first thought was don't remove them if not necessary. It turns out the triangular shape of the fill spout will not fit between the bed and frame, so we had to remove the hoses anyway. Actually as a result re-connecting the hoses was hardly a chore since the solid fill spout was loose and made it easy to maneuver the hoses onto the solid fittings.
We placed each tie down strap over the frame and around the OEM tank in the factory strap locations, placed a floor jack underneath the tank and removed the tank strap bolts. Lowered the tank slowly while keeping an eye on the electrical connector and fuel lines. S&B's instructions say about 6 inches and I'd say that's accurate. At this point we are about an hour into this job and this is where things get tough for us.
With the tank dropped as far as possible with all the slack out of the wire harness going to the connector there is very little room to get one arm up there not to mention 2 arms or hands. There are no detailed instructions or images on how to remove the electrical connector on the sending unit other than (slide the red tab out and press the button to remove). I'm 50 yrs old 6'0" 185 lbs so not an overweight person by any means and I could not get my head up into any area of the truck to get a good look at that connector. If the driveline was removed there would have been plenty of room. I was able to slide the red locking tab out with a pick tool and the locking tab launched out of the connector to some unknown location. I could not get enough light and a close enough look at where the button was located to release that connector. Was it on the bottom? Was it on the top? Was it inside and required a small screw driver to slip in and release it? After 30 minutes of cursing, poking and prodding, scraping up my arms and then finally searching the Web for an image of said connector without any luck I decided to lower the front of the tank a bit more to see if that would gain any more access to find the release tab.
Wow! what do you know I can actually get my head up there behind the transfer case to see what's going on. As it turns out the release button is on the top rear of the connector (where the wires enter the connector) which was covered in wire wrap material so it was not obvious from the other vantage points where it was located. At this point I'm getting impatient and upset that, that damn connector almost defeated me, I decided to release the fuel lines from the sending unit without reading the next step of the instructions. The fittings look similar to the engine mounted fuel filter so I attempted to pull the blue tab on the return line with my fingers to release the lock then push down then pull up when "snap" goes the blue locking tab. These fittings are fragile to begin with and extra brittle since my truck will be 6 years old in January. I was able to get the return line off the sending unit with the help of a pair of needle nosed pliers to manipulate the broken release lock.
Before attempting to remove the yellow feed line I had my son read the instructions on how to remove the fuel lines. He says push-in on the colored tabs then push down then pull the fitting off. The feed line wouldn't budge so I used the needle nose pliers to help pry up on the fitting after pressing down and then "snap" goes the yellow locking tab at the same time the fitting releases from the sending unit. At this point the 4 letter words are flying out of my mouth faster than $%!t attracts flies and I'm thinking I need new fuel lines at this point. I re-attach both the feed and return lines to the tank to see if they lock back on with the tabs broken. Luckily for me they locked back on so I removed the lines a second time and finally lower the OEM tank out from under the truck.
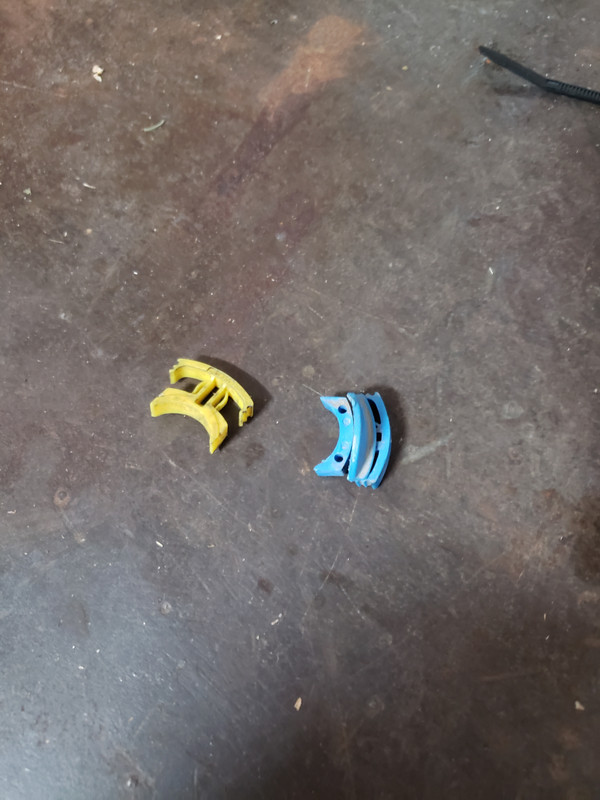
Broken locking tabs from the fuel lines (don't do what I did above)
The next step is to remove the OEM sending unit from the tank and instal the S&B float and make adjustments so it sits level on the table with the basket. Our float was a good 4 inches off the surface of the table and required to be bent downward. I felt that was an excessive amount of deviation but followed S&B's instructions and bent the rod slowly until the float just began to rest on the table. When we went to place the sending unit into the S&B tank there was no way that float was going into the hole with it attached to the sending unit with the extra bends it has in it to clear the baffles in the tank. We detached the float, placed it in the tank and then reattached it after lower the basket part way into the tank (that's step 14 if we would have been following along). Installing the OEM retaining ring onto the S&B tank is a 2 person job no doubt about it. It took us another 30 minutes, 2 screwdrivers, 2 rubber mallets and 4 hands to manipulate that locking ring onto the S&B tank. We marked the hoses and transferred them to the S&B tank and pressure tested. That all went well!
I swapped the Yellow and Blue fuel lines on the frame rail like the instructions indicated. Now for the install of the tank into the truck, using the straps to help lift the larger tank into the truck; the tank wanted to "swing" out from under the frame instead of rise "upward" into position. After a little trial and error we realized if the straps were routed over the frame and around the drive shaft the tank would rise into it's location. This thing is a beast of a tank and there is virtually no room once the the tank is lifted partially into position. The tank wraps around the DFCM on the 11-16 trucks and while I was wrestling the tank into position the tank hit the WIF sensor and broke it. I had to remove 2 x wire harness retainers from the cross frame to get enough slack to reattach the sending unit electrical connector. I'm not sure if it's only my truck or not but we could not reattach the fuel lines to the tank without removing the steel lines from the frame mounts. As a result the fuel lines are loose and could potentially rub a hole in them over time, crossing my fingers that doesn't happen. I was also able to re-attach the WIF sensor even though there was a small piece missing from the outer housing.
The straps for the S&B tank are slightly short and it was a chore to get a bolt started on both sides of the strap. After a bit of trial and error we found that installing the rear strap onto the outer frame first then install the bolt on the driveline side second was the only way that strap would accept both bolts. The center strap was just the opposite, install the bolt on the driveline side of the strap first then fit the outer frame bolt second. The front strap was a breeze connecting it to the supplied U-Bolt.
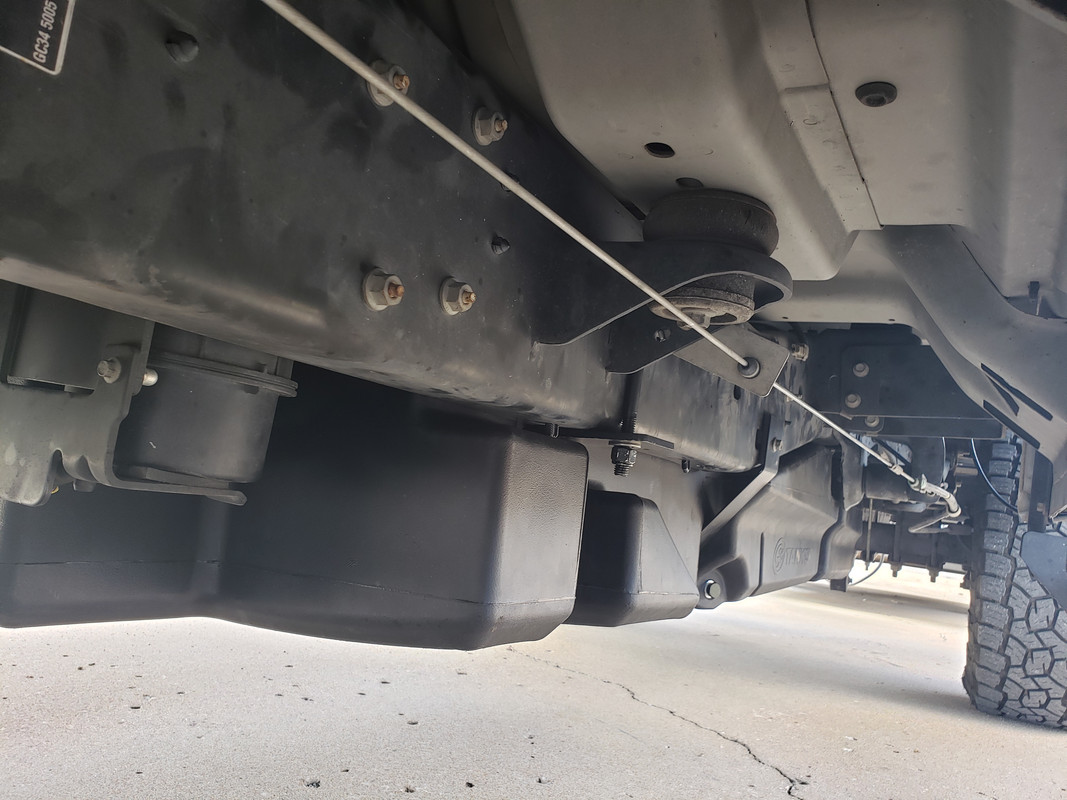
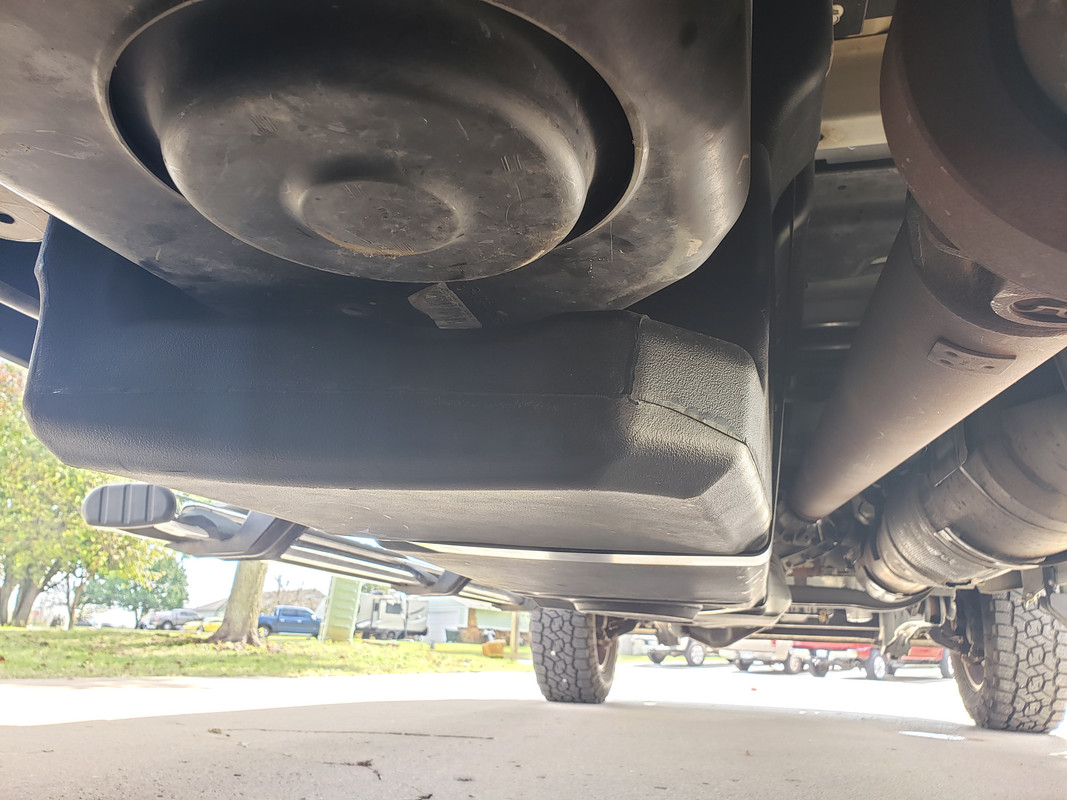
After having a look at the tank after in place I realized the fuel tank extends out underneath the DEF tank. This was something that concerned me. I had contacted S&B prior to purchase and their reply was "you may have to loosen the rear strap" to get the DEF tank out in the future. From what I can see by looking at it, both the center and rear straps will need to be removed and the rear of the tank dropped slightly to remove the DEF tank should the heater assembly fail again the future. I would have preferred the tank be slightly smaller to not obstruct the DEF tank removal.
We filled the new tank with 10 gallons from the OEM tank which I measured by placing them into my Diesel Jerry Cans first. I'm not sure if it was necessary or not but I made 6 key on engine off cycles to prime the fuel system prior to cranking the engine. It fired right up like it normally would. After start up I got a low fuel warning light and 18 miles to empty. No other warnings or codes (forgot to take a pic at that point). We headed across the street to fill the tank. My son filled the tank while I was inside purchasing some much needed beer at that point. The tank took 37 gallons when the pump clicked off on it's own. I didn't explain to my son how to wait for the foam to subside and then fill it slowly to get the max amount of fuel in the tank. Either there is 9 gallons of foam in the tank or it does not really hold 56 gallons. I will have to update this later when I try to fill the tank a second time.
S&B offers to send an Ez LYnk AutoAgent device at the cost of a $500 refundable deposit out with the purchase of the tank to make the changes to the IPC so the DTE will read correctly. I chose not to use this option since I had used FORScan in the past and was familiar with how the extended license process worked.
Visit the FORScan forums for detailed instructions with images on How to use FORScan to adjust fuel tank size and DTE. You will need a Windows Computer, extended license and an OBII adapter.
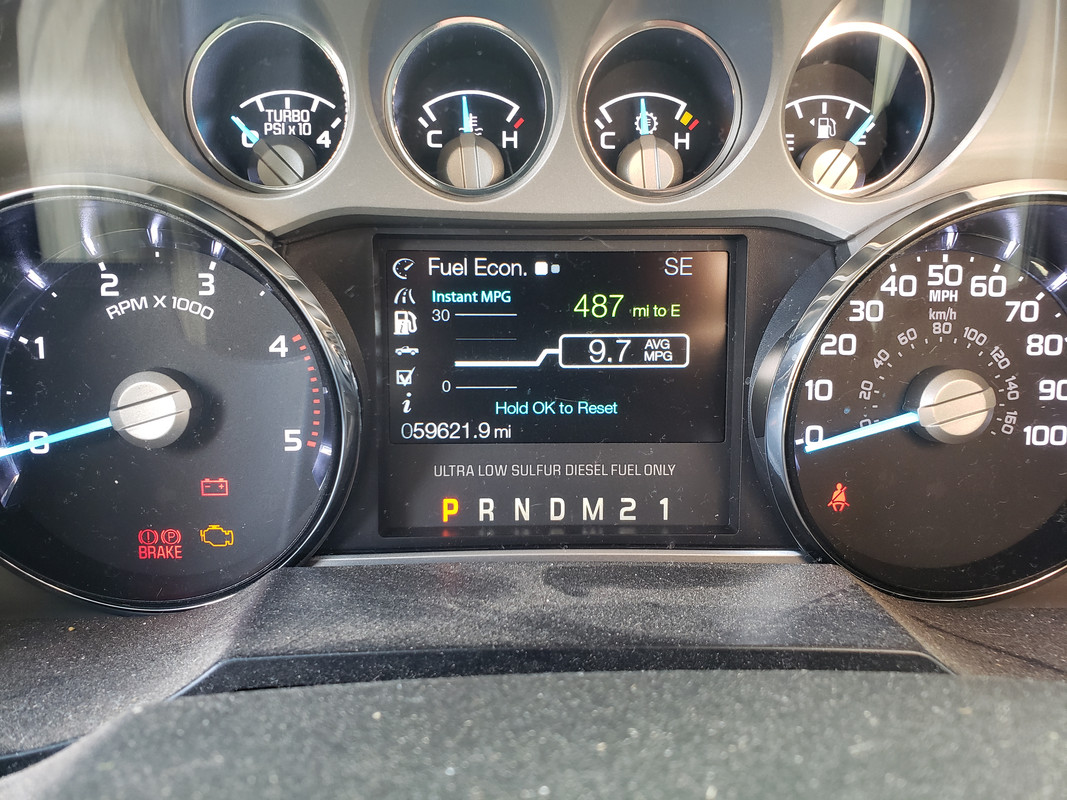
Before programming the IPC with FORScan and after driving 50 miles so there should be 42 gallons in the new tank at this point.
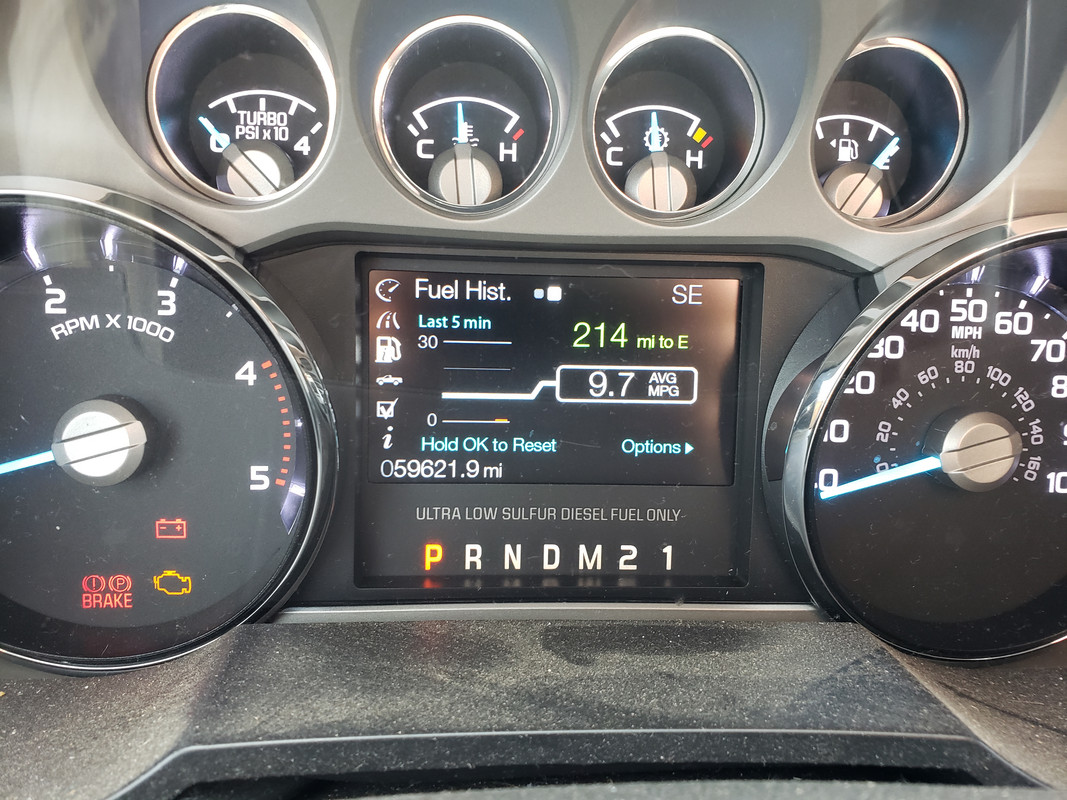
After programming the IPC with FORScan.
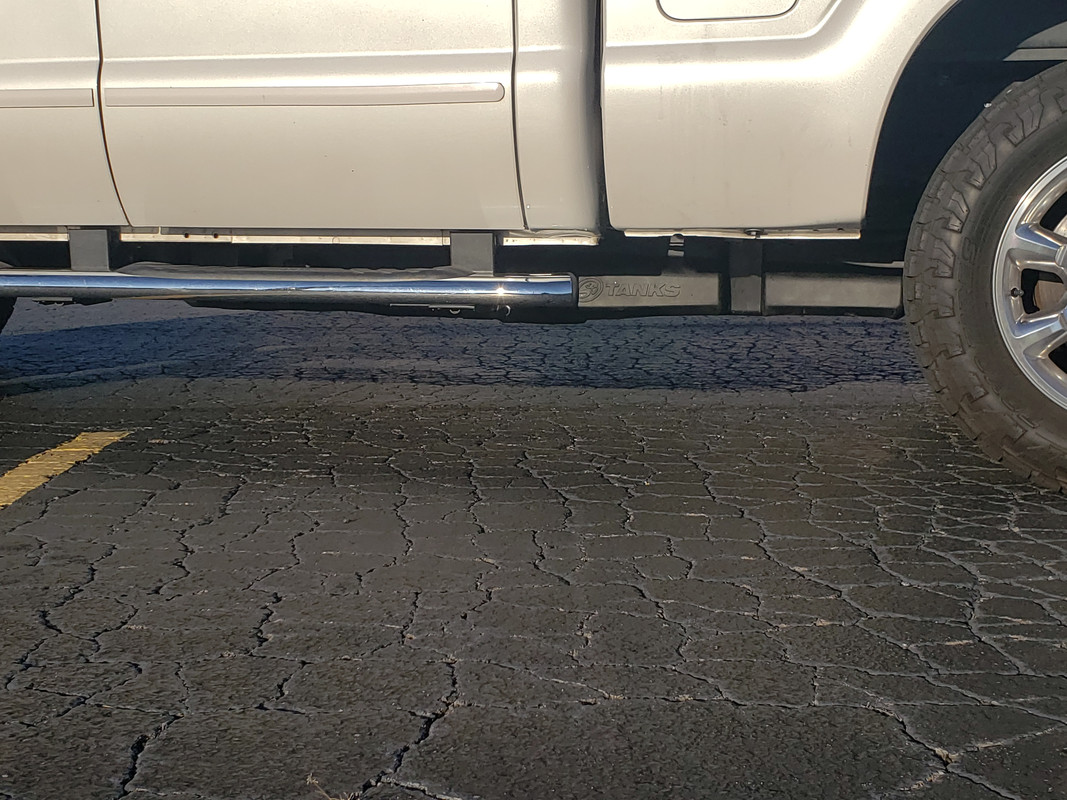
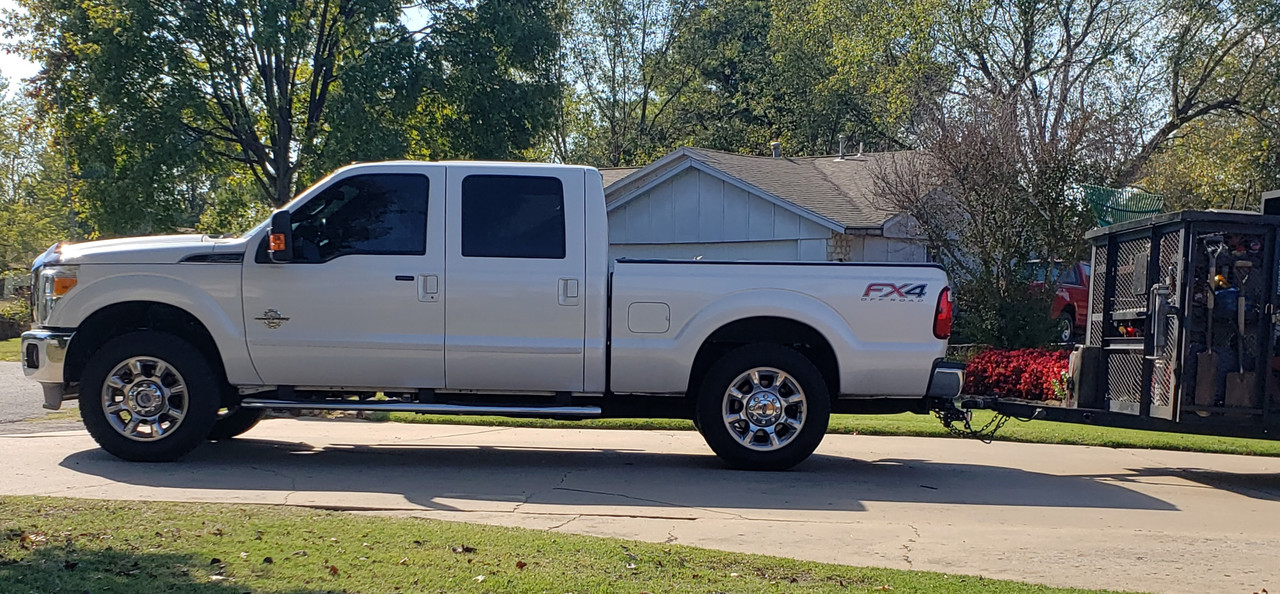
Here are a bunch of pics how the tank looks installed from different angles.
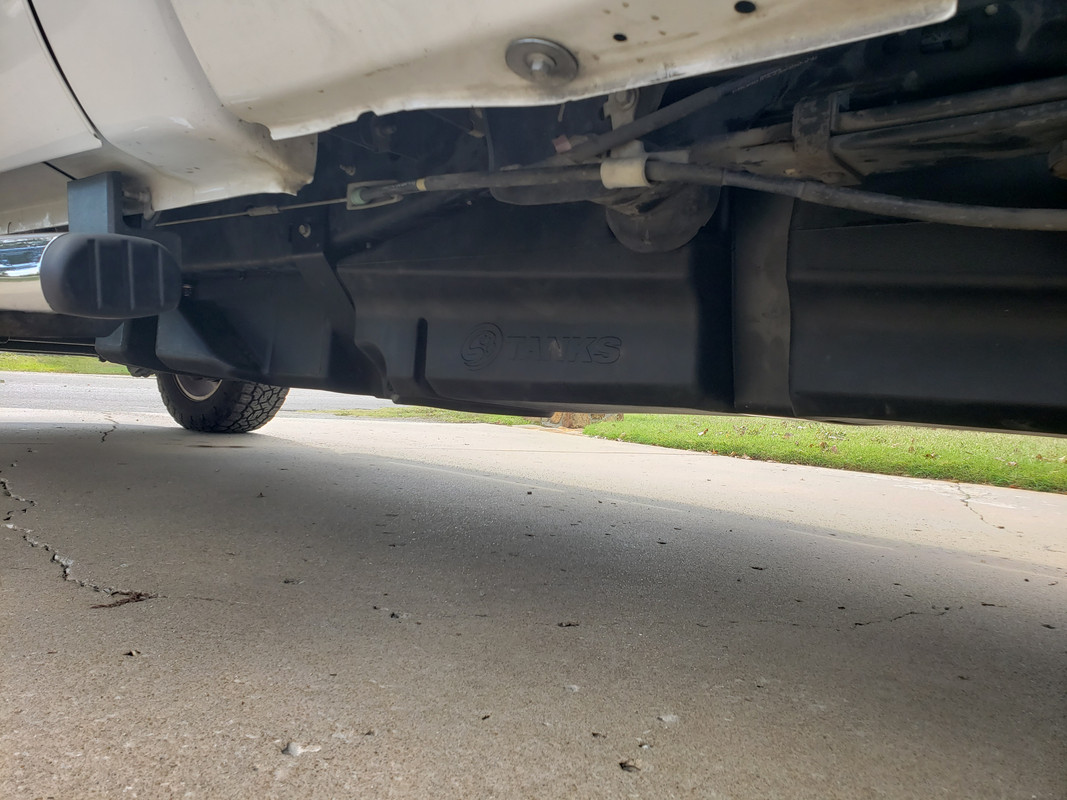
This is the most accurate representation of what it looks like in person. Stock height truck with 12" ground clearance to the tank and 14" ground clearance to the steps.
TLDR; Would I do this again...........Nope, that was a disaster of an install everything that could have went wrong did. Both my hips are bruised, arms are cut up and by back is sore from rolling around on the concrete for 5.5 hours. Even my 15 year old son who was mostly a tool gopher on this project and wants to be a mechanic in the future said "I don't want to do that again either!" Next time I will hire a shop that does this all the time it would be well worth the money. Luckily the newer trucks have larger tanks than these old iron horses.
I hope this helps at least one person in the future.
I ordered the S&B 56 gallon tank back in late September directly from S&B it was just over $1300 after sales tax, shipping was free via Fed-Ex. The tank arrived a week after I placed the order. 12 days after placing the order I received a phone call (voice mail since I missed the call) from Karl with S&B thanking me for my purchase and asking how the install went. He followed up that phone call immediately by sending me an email asking the same. I replied to the email thanking him for taking the time to reach out to me and told him I had not had the time to install the tank as of yet and asked if there were any tips or tricks he could recommend. He linked me to the Install Instructions and Install video which I did watch and read to familiarize myself with the install prior to doing any work.
A week later I was ready to install the tank on a nice Saturday morning which was a week prior to a camping trip I had planned and was excited to take advantage of the larger tank during this trip. The instructions said the install would take 2-3 hours. So I accounted for 4 hours just in case. Opened the box to inspect and account for all the included parts. This is where my luck changed. It appeared Fed-Ex placed the box in an upright position during transit because upon opening the box one of the two smaller white boxes inside which contained small parts was crushed. The box is huge roughly 20" x 20" x 80" so it makes sense to limit the amount of floor space needed in a delivery truck.
After all parts were accounted for and inspected I find the OEM replacement float S&B uses was damaged as a result of the tank shifting in the box and crushing the smaller box. This was a result of the tank traveling in the upright position. As you can see in the image below the float was smashed and the tip of the rod was missing the retaining clip.
Damaged S&B Float
OEM Float
At that point I knew the install was not going to take place that weekend. I fired off an email to S&B with a pic of the damaged float. S&B replied on Monday (email was sent on Saturday) and expedited the replacement part to me. I had the replacement part in just a few days. Excellent customer service from S&B! I also mentioned to the person that ordered my replacement float, that this could have been prevented if the box the float was in was placed in the void of the tank at the rear so there would be no case of a crushed box. He mentioned he would let Packaging know of this issue.
Fast forward a couple more weeks and my 15 year old son and I make attempt number 2 on the install. This is where my opinion on how easy/hard this install is compared to other users here that have installed an aftermarket tank differ. I've watched EpicCowlick's video of the Titan Tank install on his 2017 and the install video of the S&B tank on YouTube so I had an idea what I was getting myself into and it didn't look to bad. I'm fairly mechanically inclined and can tackle most things regarding maintenance and repair on a vehicle, though my experience of later model vehicles is limited.
Since I don't have a lift and was doing this in the driveway I purchased a pair of cam buckle tie down straps from Walmart (highly recommended by the way thanks to EpicCowlicks video) and had 2 floor jacks on hand so I felt I was ready. My tank had roughly 12 gallons of fuel in the tank at the time and the extra weight of the fuel didn't cause any issues for me. Those straps took all the weight and the floor jack was not needed for removing the OEM tank.
My son removing the skid plate under the OEM tank. I placed a few blocks under the rear tires to give a little bit more room under the truck in case the S&B tank needed more ground clearance to slide under the frame. It wasn't necessary but the extra room under truck was nice.
We removed the fill spout from the body in hopes that we would not have to remove the fill hose and vent hoses from the solid fill spout like the instructions indicated. Mostly because the nut for the hose clamps were pointed upwards and not accessible any other way. I read others had issues getting those hoses back on so my first thought was don't remove them if not necessary. It turns out the triangular shape of the fill spout will not fit between the bed and frame, so we had to remove the hoses anyway. Actually as a result re-connecting the hoses was hardly a chore since the solid fill spout was loose and made it easy to maneuver the hoses onto the solid fittings.
We placed each tie down strap over the frame and around the OEM tank in the factory strap locations, placed a floor jack underneath the tank and removed the tank strap bolts. Lowered the tank slowly while keeping an eye on the electrical connector and fuel lines. S&B's instructions say about 6 inches and I'd say that's accurate. At this point we are about an hour into this job and this is where things get tough for us.
With the tank dropped as far as possible with all the slack out of the wire harness going to the connector there is very little room to get one arm up there not to mention 2 arms or hands. There are no detailed instructions or images on how to remove the electrical connector on the sending unit other than (slide the red tab out and press the button to remove). I'm 50 yrs old 6'0" 185 lbs so not an overweight person by any means and I could not get my head up into any area of the truck to get a good look at that connector. If the driveline was removed there would have been plenty of room. I was able to slide the red locking tab out with a pick tool and the locking tab launched out of the connector to some unknown location. I could not get enough light and a close enough look at where the button was located to release that connector. Was it on the bottom? Was it on the top? Was it inside and required a small screw driver to slip in and release it? After 30 minutes of cursing, poking and prodding, scraping up my arms and then finally searching the Web for an image of said connector without any luck I decided to lower the front of the tank a bit more to see if that would gain any more access to find the release tab.
Wow! what do you know I can actually get my head up there behind the transfer case to see what's going on. As it turns out the release button is on the top rear of the connector (where the wires enter the connector) which was covered in wire wrap material so it was not obvious from the other vantage points where it was located. At this point I'm getting impatient and upset that, that damn connector almost defeated me, I decided to release the fuel lines from the sending unit without reading the next step of the instructions. The fittings look similar to the engine mounted fuel filter so I attempted to pull the blue tab on the return line with my fingers to release the lock then push down then pull up when "snap" goes the blue locking tab. These fittings are fragile to begin with and extra brittle since my truck will be 6 years old in January. I was able to get the return line off the sending unit with the help of a pair of needle nosed pliers to manipulate the broken release lock.
Before attempting to remove the yellow feed line I had my son read the instructions on how to remove the fuel lines. He says push-in on the colored tabs then push down then pull the fitting off. The feed line wouldn't budge so I used the needle nose pliers to help pry up on the fitting after pressing down and then "snap" goes the yellow locking tab at the same time the fitting releases from the sending unit. At this point the 4 letter words are flying out of my mouth faster than $%!t attracts flies and I'm thinking I need new fuel lines at this point. I re-attach both the feed and return lines to the tank to see if they lock back on with the tabs broken. Luckily for me they locked back on so I removed the lines a second time and finally lower the OEM tank out from under the truck.
Broken locking tabs from the fuel lines (don't do what I did above)
The next step is to remove the OEM sending unit from the tank and instal the S&B float and make adjustments so it sits level on the table with the basket. Our float was a good 4 inches off the surface of the table and required to be bent downward. I felt that was an excessive amount of deviation but followed S&B's instructions and bent the rod slowly until the float just began to rest on the table. When we went to place the sending unit into the S&B tank there was no way that float was going into the hole with it attached to the sending unit with the extra bends it has in it to clear the baffles in the tank. We detached the float, placed it in the tank and then reattached it after lower the basket part way into the tank (that's step 14 if we would have been following along). Installing the OEM retaining ring onto the S&B tank is a 2 person job no doubt about it. It took us another 30 minutes, 2 screwdrivers, 2 rubber mallets and 4 hands to manipulate that locking ring onto the S&B tank. We marked the hoses and transferred them to the S&B tank and pressure tested. That all went well!
I swapped the Yellow and Blue fuel lines on the frame rail like the instructions indicated. Now for the install of the tank into the truck, using the straps to help lift the larger tank into the truck; the tank wanted to "swing" out from under the frame instead of rise "upward" into position. After a little trial and error we realized if the straps were routed over the frame and around the drive shaft the tank would rise into it's location. This thing is a beast of a tank and there is virtually no room once the the tank is lifted partially into position. The tank wraps around the DFCM on the 11-16 trucks and while I was wrestling the tank into position the tank hit the WIF sensor and broke it. I had to remove 2 x wire harness retainers from the cross frame to get enough slack to reattach the sending unit electrical connector. I'm not sure if it's only my truck or not but we could not reattach the fuel lines to the tank without removing the steel lines from the frame mounts. As a result the fuel lines are loose and could potentially rub a hole in them over time, crossing my fingers that doesn't happen. I was also able to re-attach the WIF sensor even though there was a small piece missing from the outer housing.
The straps for the S&B tank are slightly short and it was a chore to get a bolt started on both sides of the strap. After a bit of trial and error we found that installing the rear strap onto the outer frame first then install the bolt on the driveline side second was the only way that strap would accept both bolts. The center strap was just the opposite, install the bolt on the driveline side of the strap first then fit the outer frame bolt second. The front strap was a breeze connecting it to the supplied U-Bolt.
After having a look at the tank after in place I realized the fuel tank extends out underneath the DEF tank. This was something that concerned me. I had contacted S&B prior to purchase and their reply was "you may have to loosen the rear strap" to get the DEF tank out in the future. From what I can see by looking at it, both the center and rear straps will need to be removed and the rear of the tank dropped slightly to remove the DEF tank should the heater assembly fail again the future. I would have preferred the tank be slightly smaller to not obstruct the DEF tank removal.
We filled the new tank with 10 gallons from the OEM tank which I measured by placing them into my Diesel Jerry Cans first. I'm not sure if it was necessary or not but I made 6 key on engine off cycles to prime the fuel system prior to cranking the engine. It fired right up like it normally would. After start up I got a low fuel warning light and 18 miles to empty. No other warnings or codes (forgot to take a pic at that point). We headed across the street to fill the tank. My son filled the tank while I was inside purchasing some much needed beer at that point. The tank took 37 gallons when the pump clicked off on it's own. I didn't explain to my son how to wait for the foam to subside and then fill it slowly to get the max amount of fuel in the tank. Either there is 9 gallons of foam in the tank or it does not really hold 56 gallons. I will have to update this later when I try to fill the tank a second time.
S&B offers to send an Ez LYnk AutoAgent device at the cost of a $500 refundable deposit out with the purchase of the tank to make the changes to the IPC so the DTE will read correctly. I chose not to use this option since I had used FORScan in the past and was familiar with how the extended license process worked.
Visit the FORScan forums for detailed instructions with images on How to use FORScan to adjust fuel tank size and DTE. You will need a Windows Computer, extended license and an OBII adapter.
Before programming the IPC with FORScan and after driving 50 miles so there should be 42 gallons in the new tank at this point.
After programming the IPC with FORScan.
Here are a bunch of pics how the tank looks installed from different angles.
This is the most accurate representation of what it looks like in person. Stock height truck with 12" ground clearance to the tank and 14" ground clearance to the steps.
TLDR; Would I do this again...........Nope, that was a disaster of an install everything that could have went wrong did. Both my hips are bruised, arms are cut up and by back is sore from rolling around on the concrete for 5.5 hours. Even my 15 year old son who was mostly a tool gopher on this project and wants to be a mechanic in the future said "I don't want to do that again either!" Next time I will hire a shop that does this all the time it would be well worth the money. Luckily the newer trucks have larger tanks than these old iron horses.
I hope this helps at least one person in the future.

FTE Legend

Joined: Mar 2017
Posts: 31,835
Likes: 9,156
From: Western NY

Great thread dirt. Appreciate your insight into this. That's why I have my younger, smaller and more mechanically experienced friend help me out on projects like this. Great job.
Is this the pic of the tank extending under the DEF tank?
Is this the pic of the tank extending under the DEF tank?
Thread Starter
|
Tuned
Joined: Jul 2021
Posts: 372
Likes: 199
From: NE Oklahoma
Yes sir. It's not the best angle to show how much the tank extends under the DEF tank but you get the idea.

Junior User

Joined: Oct 2010
Posts: 76
Likes: 2
From: Palmer, Alaska
Curious as to how much fuel you can get in it now. I've had mine now for almost a year and cannot get more than 46 gallons into the tank. It is also prone to spill over very badly if you are not monitoring if while filling up. Anyone else encountering this?
Thread Starter
|
Tuned
Joined: Jul 2021
Posts: 372
Likes: 199
From: NE Oklahoma

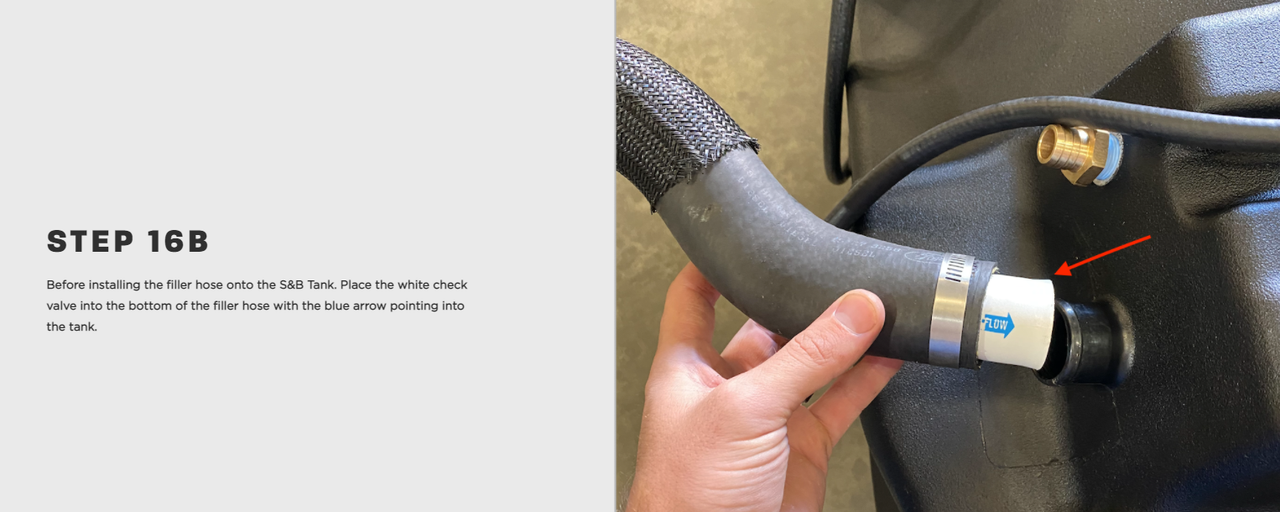
Did your tank include the one way check valve and did you install it in the fill neck in the correct orientation? My son filled the tank initially with a high flow pump at a truck island and once the pump clicked off automatically that's all he put in, and there was no mess down the side of the truck from over spillage..
FTE Legend
Joined: Mar 2017
Posts: 31,835
Likes: 9,156
From: Western NY
Trending Topics
Junior User
Joined: Oct 2010
Posts: 76
Likes: 2
From: Palmer, Alaska
Wow, that might explain the blowback on every fillup. No one way valve included in my kit at all. Needless to say I will be reaching out to them. Glad it's only in the filler neck and therefore not having to drop the whole tank. Still does not address the fact that I can't get over 46 gallons is a supposedly 56 gallon tank. Or maybe it does....we'll see. Thanks
FTE Stories
Ford Trucks for Ford Truck Enthusiasts

2027 Ford Super Duty Buyer's Guide (Every Model, Engine, & Package)
Brett Foote
Top 10 Ford Truck Tragedies
Joe Kucinski
AEV FXL Super Duty - the Super Duty Raptor Ford Doesn't Make
Brett Foote
Lobo Vs Lobo: Proof the F-150 Lobo Should Be Even Lower!
Michael S. Palmer
Ford's 2001 Explorer Sportsman Concept Looks For a New Home
Verdad Gallardo
10 Best Ford Truck Engines We Miss the Most!
Joe Kucinski
2026 Shelby F-150 Off-Road: Better Than a Raptor R?
Brett Foote
2027 Super Duty Carhartt Package First Look: 12 Things You NEED to Know!
Michael S. Palmer
10 Most Surprising 2026 Ford Truck Features!
Joe Kucinski
Thread Starter
|
Tuned
Joined: Jul 2021
Posts: 372
Likes: 199
From: NE Oklahoma
Wow, that might explain the blowback on every fillup. No one way valve included in my kit at all. Needless to say I will be reaching out to them. Glad it's only in the filler neck and therefore not having to drop the whole tank. Still does not address the fact that I can't get over 46 gallons is a supposedly 56 gallon tank. Or maybe it does....we'll see. Thanks
Thread Starter
|
Tuned
Joined: Jul 2021
Posts: 372
Likes: 199
From: NE Oklahoma
Refilled the tank today just to see how much fuel I could cram in it. The fuel mileage is down a bit from my normal 10 mpg that I usually see with my driving conditions. The truck went through 3 regens during that 266 miles, 2 regens that didn't complete because I shut the truck down shortly after each one started. Finally the 3rd I was able to complete while on the trip home on the expressway.
Prior to installing the S&B tank my computer has always been very accurate at calculating mpg and fuel usage when compared to hand calculations. I won't know for sure how accurate it is after the S&B tank install until I get a few more fill ups with this tank.
According to the trip computer I used 27.3 gal of fuel.
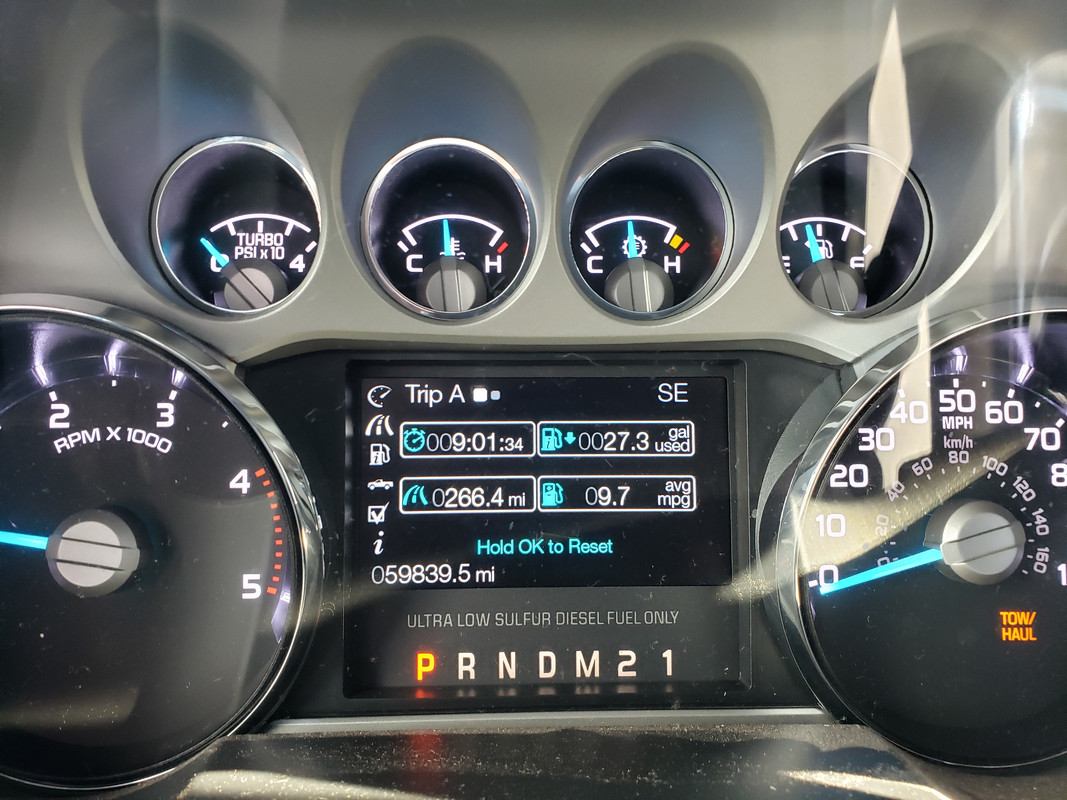
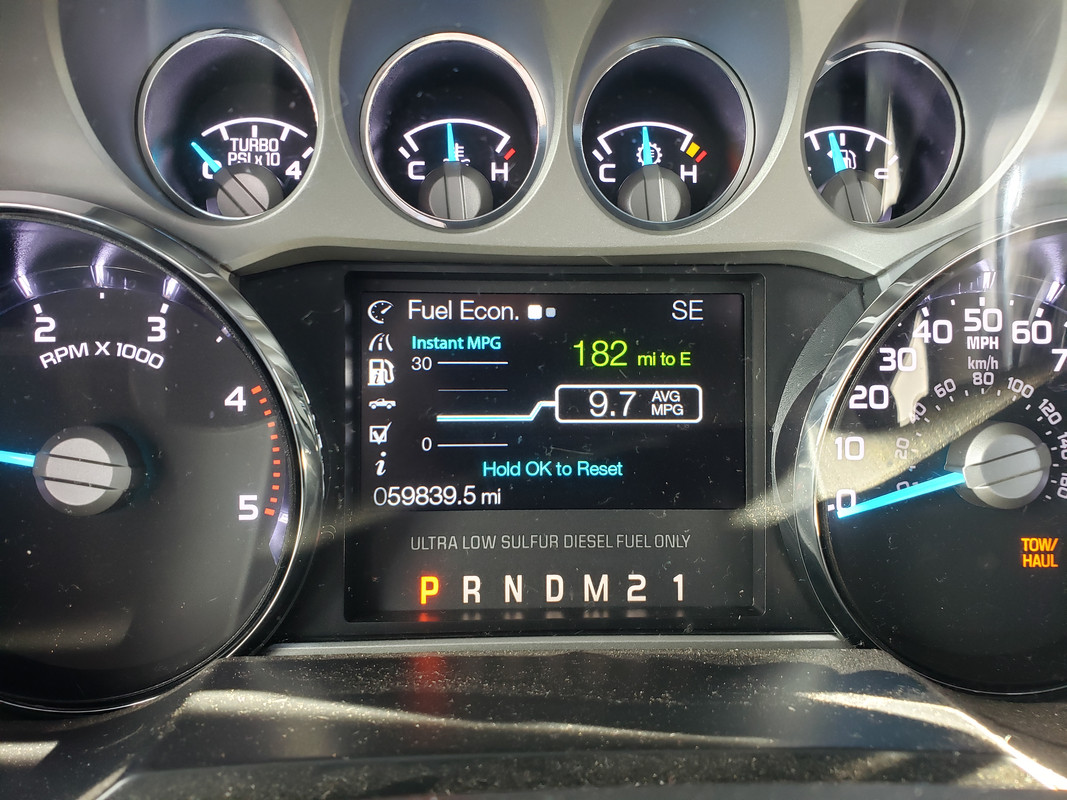
And 182 miles to empty with the fuel gauge between 1\4 and 1\2 tank remaining.
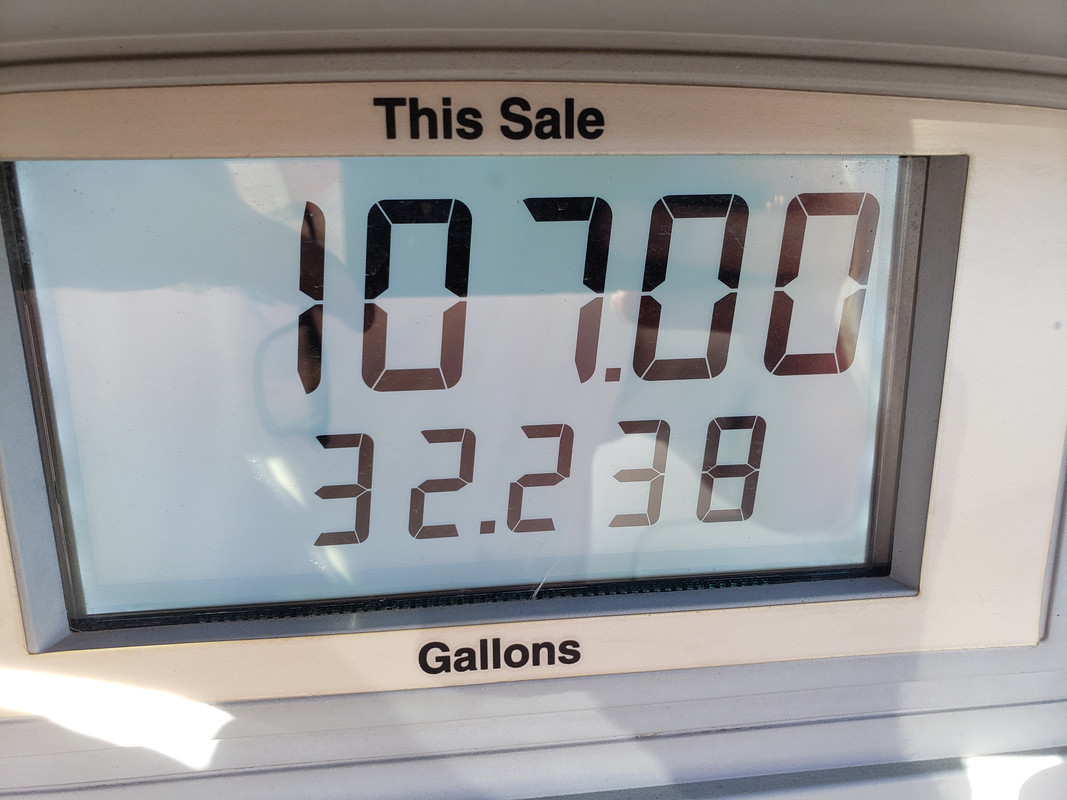
The pump automatically clicked off at 29 gallons. I slowly pumped 3 more gallons into the tank. I stopped at $107.00 because I'm OCD and I like to see round numbers on my CC statements. I could see fuel just a couple of inches from spilling out of the neck.
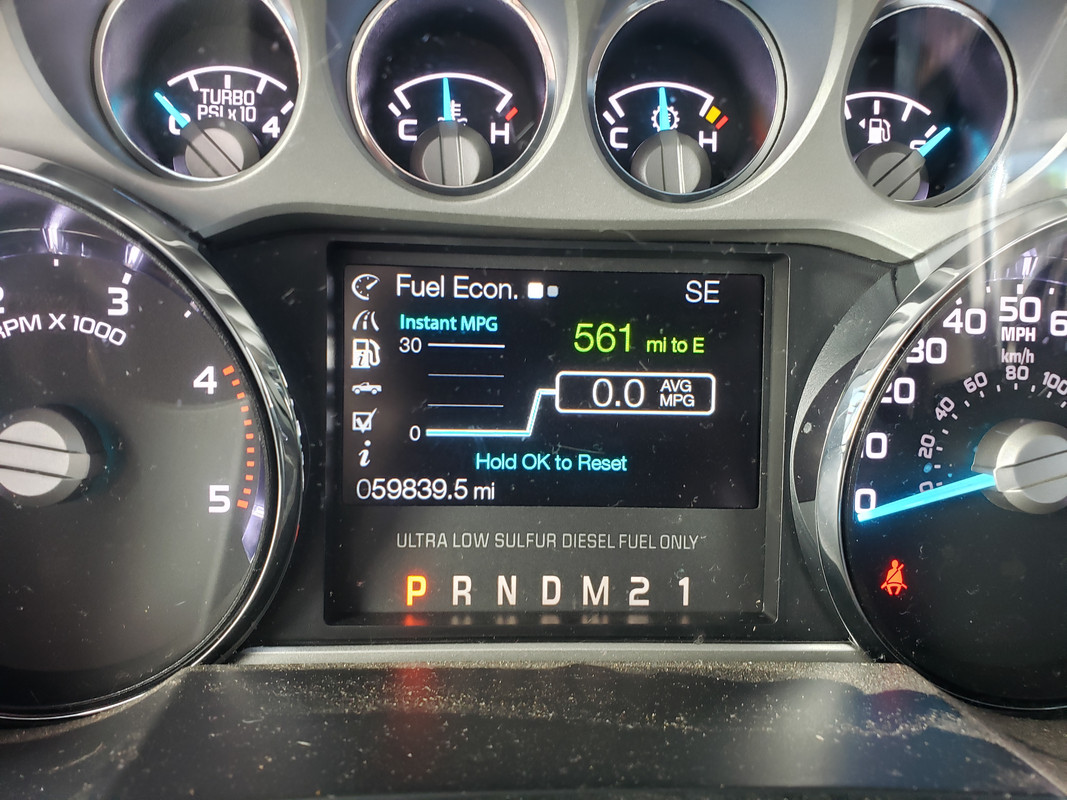
Reset the mpg and it now says 561 to empty. Which sounds about right with a 56 gallon tank and getting 10 mpg.
Remember I originally put 10 gallons in the tank then drove across the street to the fuel station and added another 37 gallons for a total of 47 gallons. I knew it would hold more but didn't know how much more. 47 - 27.3 = 19.7 gallons remaining. 19.7 + 32.2 = 51.9 gallons including the fill neck. If the computer is correct then the tank should have 52 gallons in it currently.
If the computer is off which I suspect it is because the pump auto clicked off at 29 gallons just like the original fill (2 gallons more than the trip computer calculated). 266.4 miles / 29 gallons = 9.18 mpg.
My theory is since my truck consistently gets 10mpg, maybe I actually used 26.6 gallons from the first fill of 47gal. 26.6 + 32.2 = 58.8 gal total. Contacted S&B and they claim it does indeed hold 56 gallons. However the email suggests maybe it only holds 53-55?
I will have to revisit this after I narrow down how far off the trip computer is. And maybe I will adjust the tank size with FORScan to get it nuts on DTE. I'm going to email S&B and see how many gallons they say this tank will hold volume wise minus the air space it looks like this tank has in it.
Prior to installing the S&B tank my computer has always been very accurate at calculating mpg and fuel usage when compared to hand calculations. I won't know for sure how accurate it is after the S&B tank install until I get a few more fill ups with this tank.
According to the trip computer I used 27.3 gal of fuel.
And 182 miles to empty with the fuel gauge between 1\4 and 1\2 tank remaining.
The pump automatically clicked off at 29 gallons. I slowly pumped 3 more gallons into the tank. I stopped at $107.00 because I'm OCD and I like to see round numbers on my CC statements. I could see fuel just a couple of inches from spilling out of the neck.
Reset the mpg and it now says 561 to empty. Which sounds about right with a 56 gallon tank and getting 10 mpg.
Remember I originally put 10 gallons in the tank then drove across the street to the fuel station and added another 37 gallons for a total of 47 gallons. I knew it would hold more but didn't know how much more. 47 - 27.3 = 19.7 gallons remaining. 19.7 + 32.2 = 51.9 gallons including the fill neck. If the computer is correct then the tank should have 52 gallons in it currently.
If the computer is off which I suspect it is because the pump auto clicked off at 29 gallons just like the original fill (2 gallons more than the trip computer calculated). 266.4 miles / 29 gallons = 9.18 mpg.
Hello Darren,
The capacity of the 10-1000 is 56 gallons, however we wouldn't recommend using the full capacity due to injector and fuel pump issues. If you filled your tank from empty and only were able to dispense 47 gallons you had reserve in the tank of approximately 6-8 gallons, should you have any other questions please let us know. Troy Green - Technical Support
S&B Filters
The capacity of the 10-1000 is 56 gallons, however we wouldn't recommend using the full capacity due to injector and fuel pump issues. If you filled your tank from empty and only were able to dispense 47 gallons you had reserve in the tank of approximately 6-8 gallons, should you have any other questions please let us know.
Troy Green - Technical SupportS&B Filters
Last edited by Dirthawg2.0; Nov 8, 2021 at 01:13 PM. Reason: Additional Info from S&B


Junior User
Joined: Oct 2010
Posts: 76
Likes: 2
From: Palmer, Alaska
FYI, just got word from Jerald at S&B, and they are sending me a check valve in the mail at no cost. Will update once installed if it resolves my issues with blowback and lack of fill capacity. Thanks guys, great thread.

Thread Starter
|
Tuned
Joined: Jul 2021
Posts: 372
Likes: 199
From: NE Oklahoma
Right-On! I bet that fixes your issue with overflowing fuel.
Thread Starter
|
Tuned
Joined: Jul 2021
Posts: 372
Likes: 199
From: NE Oklahoma
Thread Starter
|
Tuned
Joined: Jul 2021
Posts: 372
Likes: 199
From: NE Oklahoma
I found the answer to why my S&B tank didn't take a full 56 gallons on the first fill up. My credit card automatically shuts the pump off at $125.00 which is roughly 37 gallons with current fuel prices. 
If I had guess once the fuel gauge reads empty there is still 10 gallons of fuel left in the tank. I ran it down to 50 miles to empty today and filled up with 42 gallons of fuel. I should of had another 5 gallons of available fuel before the gauge read empty and/or 0 miles to empty which would have put me at 47 gallons. 9 gallons in reserve which I will never test because the bottom of this tank is huge so I'm sure it would be sucking air at that point. This tank has roughly 45 gallons of usable fuel to be on the safe side or 450 mile range while towing.
It sure is nice to only visit the fuel station once every other week versus every 4 days because the stock tank only has a 200 mile range and that is pushing it's limits!
If I had guess once the fuel gauge reads empty there is still 10 gallons of fuel left in the tank. I ran it down to 50 miles to empty today and filled up with 42 gallons of fuel. I should of had another 5 gallons of available fuel before the gauge read empty and/or 0 miles to empty which would have put me at 47 gallons. 9 gallons in reserve which I will never test because the bottom of this tank is huge so I'm sure it would be sucking air at that point. This tank has roughly 45 gallons of usable fuel to be on the safe side or 450 mile range while towing.
It sure is nice to only visit the fuel station once every other week versus every 4 days because the stock tank only has a 200 mile range and that is pushing it's limits!