


Another deconstruction
Senior User
Joined: Dec 2010
Posts: 221
Likes: 0
From: Carlisle
The NOS parts look pretty darn sweet!
Quick question about your painting vs. powder coating- are you painting the exposed surfaces and THEN power coating them (don't think that's possible) or are you painting in substitution of the 'very time consuming' power coating? Just want to make sure I'm not missing something on your wicked cool build... It makes compete sense to me to paint in lieu of power coating every part, bolt, nut, washer and clip!
Quick question about your painting vs. powder coating- are you painting the exposed surfaces and THEN power coating them (don't think that's possible) or are you painting in substitution of the 'very time consuming' power coating? Just want to make sure I'm not missing something on your wicked cool build... It makes compete sense to me to paint in lieu of power coating every part, bolt, nut, washer and clip!
Thread Starter
|
Tuned

Joined: May 2001
Posts: 356
Likes: 14
From: California
I have powdercoated everything that can be powdercoated. Items with rubber (such as shocks, shackles, etc) had to be painted by an auto-body shop professionally, using sealers, primers, and automotive grade paints. Items like the steering links, were powdercoated, however the threads and zerk fittings were left bare to facilitate re-assembly. Once assembled with the other components, the bare areas will be masked and painted to match the surrounding areas that are powdercoated. With the hardware, if the original item was in a condition worthy of re-use, it was blasted and re-plated in it's original, correct, plating (cadmium, zinc, etc) thus protecting the threaded areas and bolt shanks against rust following installation . After plating, the items were masked and powdercoated. For example, bolts were masked so only the head was powdercoated and the remaining area displayed the new plating. Nuts were masked on the inside thread area then powdercoated. Once assembled on the chassis, the bolt will appear as if was assembled/installed, then the chassis painted--just as was done at the factory in 1960.
Senior User
Joined: Dec 2010
Posts: 221
Likes: 0
From: Carlisle
I was at the Carlisle PA truck show over the weekend and saw a real beauty of truck and thought of your build. They had it roped off, so I couldn't really get in and dig around, but I grabbed a pic on my phone:
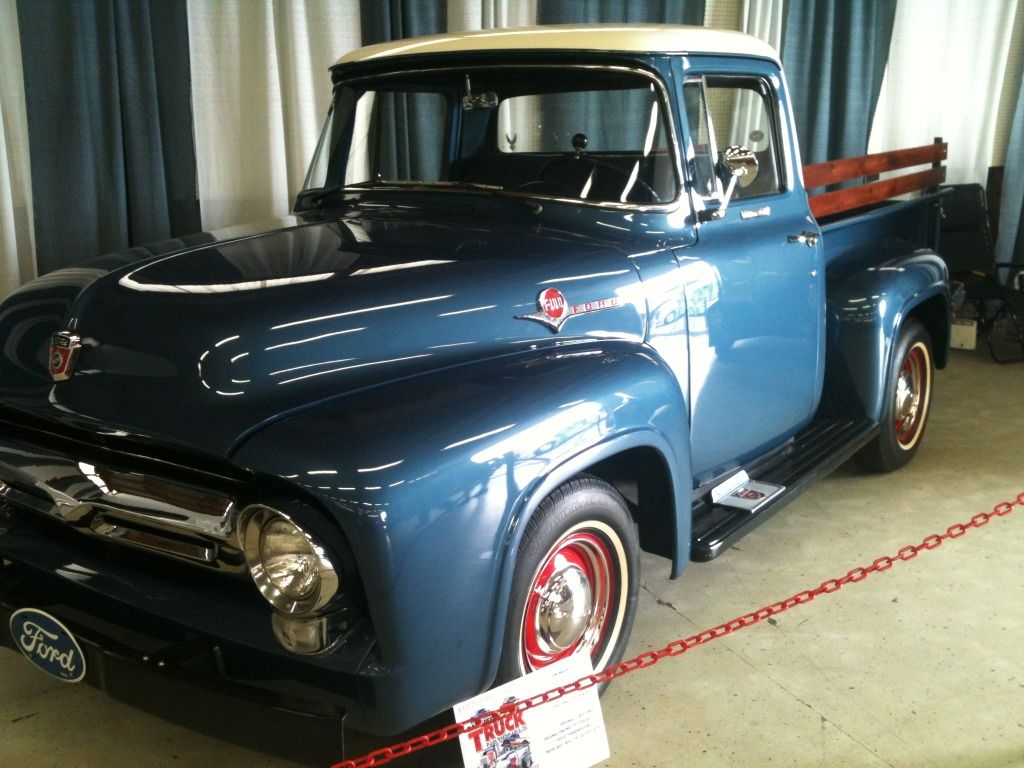
Maybe someday yours will be next to it with the 'best in show' ribbon...
Maybe someday yours will be next to it with the 'best in show' ribbon...
Thread Starter
|
Tuned
Joined: May 2001
Posts: 356
Likes: 14
From: California
Very nice truck! For the first year following completion, I plan to enter several shows with the truck.
The build is progressing slowly. A shipment of NOS parts arrived last week, along with the rear U-bolts of which I had replicated. The rear springs are being disassembled, in preparation for powdercoat. A friend, of who works at a spring shop, checked my spring arch measurements against the stock specs. Both springs measured exactly to the original/new specifications. Rear axle disassembly will commence within the next couple weeks. The rear axle will be send to a differential shop to be checked for straightness and bent back to shape if necessary. Afterward, the whole mess of parts will be send to powdercoat then installed.
In the meantime, here are a few photos I snapped of the chassis with my camera phone last week.
Thread Starter
|
Tuned
Joined: May 2001
Posts: 356
Likes: 14
From: California
It's been a few weeks, but here is the progress since the previous posting.
-Differential has been disassembled and the housing dropped off for acid dipping. Upon return, the housing will be sent to a differential specialist to check its straightness. If necessary, the housing will be bent back into shape then dropped off at the powdercoater.
-Original rear springs have been fully disassembled. All leaves measures to original arch specs, are damage free, and ready for powdercoat.
-The NOS exhaust hanger is finished. Ford's replacement was intended for several applications. For some reason, the mounting bracket flange faced rearward, instead of forward like the original. To ensure the bracket matched the original (of which was not able to be reused), the mounting bracket was cut, flipped, and welded. The final product is a bracket matching the original 100%.
-New U-bolts have arrived, made using the originals as a template.
Immediate work remaining:
-Make final bend adjustments to reproduction rear brake lines to ensure 100% exact match to originals.
-Locate and purchase spring clamps and pads
-Locate used rear spring mounting plates (originals too rusted to reuse)
-Document, categorize, and re-plate parking brake and differential hardware
-Drop all necessary parts off for powdercoating
-Locate used rear Styleside bumper brackets and hardware (missing from my truck)
Progress is rather slow at this point, with focus on preparing a mass of parts for powdercoat. I'll be deploying again for couple months. Upon return, I should have the chassis complete by early spring.
Thread Starter
|
Tuned
Joined: May 2001
Posts: 356
Likes: 14
From: California
Deployment #5 is complete, and it's time to resume work on the restoration. Thanks everyone for the support and positive comments over the course of my departure. This year will be busy, as we'll be moving in the fall, and I'll need the rolling chassis complete by then. Without further ado...
Recent progress (since last post):
-Rear differential has been disassembled, acid dipped, and ready for powdercoat.
-Final adjustments/bending of the reproduction brakes lines are complete. Like the main and front brake lines, this process took several hours to ensure a 100% exact match to the originals.
-Replicated rear U-bolts arrived.
-Rear leaf springs have been disassembled, measured, cataloged, and photographed to ensure all leafs return to their original orientation, position, and respective spring following powdercoat. A couple tabs on the spring clamps broke during disassembly (expected). I'm currently trying to locate a correct set of replacements or NOS clamps (see https://www.ford-trucks.com/forums/1...tion-help.html) if anyone knows a source.
-Exhaust hangar modification is complete. The original was too far deteriorated for reuse. NOS replacements have the bracket facing the opposite direction than the originals. While this doesn't affect anything other than appearance, it's incorrect. The NOS mounting bracket was cut, flipped, re-welded, and finished to ensure a 100% exact match to the original.
-Restored front hubs have been assembled with NOS wheel studs, new/correct Timken bearings, and NOS seals.
Planned progress for the upcoming week:
- Powdercoat rear differential housing, one NOS replacement rear shock mount, generator water shield, NOS replacement exhaust hangar, rear leaf spring leaves, rear brake line junction block, reproduction rear brake lines, brake backing plates, and parking brake hanger/mounting brackets.
- Disassemble rear differential carrier.
- Catalog all remaining differential, rear brake, and parking brake hardware in preparation for re-plating.
- Locate replacement rear spring clamps.
Photos to come once parts return from powdercoat.
Cargo Master


Joined: Aug 2004
Posts: 2,575
Likes: 36
From: Greenville, SC

FTE Stories
Ford Trucks for Ford Truck Enthusiasts

3 Best / 3 Worst Parts of Modern Ford Ownership
Brett Foote
10 Amazing Upgrades That Solve Common Ford Truck Owner Headaches
Pouria Savadkouei
Every 2026 Ford Engine Explained
Brett Foote
10 Ugly Ford Trucks That We Still Kinda Love
Joe Kucinski
10 Things Every Truck Owner NEEDS (2026 Edition)
Michael S. Palmer
Rezvani's Latest Post-Apocalyptic Monster Is a Ford F-150 Raptor Underneath
Verdad Gallardo
Top 10 Most Expensive Ford Trucks Ever Sold on Bring a Trailer
Joe Kucinski
2027 Ford Super Duty Buyer's Guide (Every Model, Engine, & Package)
Brett Foote
Top 10 Ford Truck Tragedies
Joe KucinskiThread Starter
|
Tuned
Joined: May 2001
Posts: 356
Likes: 14
From: California
Here are some long overdue pictures. I would like to send a special thanks to NumberDummy for his assistance this week with the location of the front hub grease baffle gaskets.
This week's progress:
-Installed restored front grease baffles with NOS gaskets and re-plated original hardware
-Disassembled differential carrier
-Located and purchased two NOS rear spring u-bolt plates
-Located and purchased NOS pinion crush sleeve and NOS (Bower) pinion bearing
Next week:
-Pick up powdercoated rear springs, differential, generator shield, rear brake lines, NOS exhaust hanger, rear brake plates, NOS RR shock mount, and misc. hardware.
-Complete de-greasing of differential carrier and pinion retainer in preparation for powdercoat
-Locate and purchase differential carrier bearings and races
-Install restored generator water shield and exhaust hanger
-Press in NOS rear leaf spring bushings
Before:

After:


Differential carrier disassembly:


This week's progress:
-Installed restored front grease baffles with NOS gaskets and re-plated original hardware
-Disassembled differential carrier
-Located and purchased two NOS rear spring u-bolt plates
-Located and purchased NOS pinion crush sleeve and NOS (Bower) pinion bearing
Next week:
-Pick up powdercoated rear springs, differential, generator shield, rear brake lines, NOS exhaust hanger, rear brake plates, NOS RR shock mount, and misc. hardware.
-Complete de-greasing of differential carrier and pinion retainer in preparation for powdercoat
-Locate and purchase differential carrier bearings and races
-Install restored generator water shield and exhaust hanger
-Press in NOS rear leaf spring bushings
Before:
After:
Differential carrier disassembly:
FTE Legend


Joined: Jun 2004
Posts: 32,028
Likes: 2,427
From: Upstate NY
Great to see a Fridge preserved in such detail. There was one recently sold on Ebay for 30K, that makes me think of what you are shooting for. Ford : F-100 CALIFORNIA TRUCK! in Ford | eBay Motors I think there was another one a couple years back that they wanted even more for. I was kind of surprised on the Ebay truck with all the pristine work they did that they used the old radiator with it's dents and all. Of course that is fine with me but it dosen't seem to fit with the sweetness of what they had there!
Thread Starter
|
Tuned
Joined: May 2001
Posts: 356
Likes: 14
From: California
Thanks for the compliments. I've spent the past two nights meticulously cleaning the rear differential carrier, which revealed exactly how the chassis was sprayed during the second paint process on the production line, as well as some assembly line markings. The red oxide primer on the inside of the case looks like it was applied yesterday, and will be kept during the powdercoating process of the outside. All the rear suspension and differential bolts have been documented and bagged according to finish for re-plating. More photos to come soon.
FTE Legend
Joined: Jun 2004
Posts: 32,028
Likes: 2,427
From: Upstate NY
Are you powder coating brake lines as well? Although it will look great, it will look diferent than stock won't it? Aren't they just plated steel? I am not finding fault or saying you shouldn't but with all your attention to original gaskets for the brake back plates I am kind of surprised. Again, it will look awsome.
Posting Guru
Joined: Jul 2006
Posts: 1,181
Likes: 1
From: Fairfield, CA
Are you powder coating brake lines as well? Although it will look great, it will look diferent than stock won't it? Aren't they just plated steel? I am not finding fault or saying you shouldn't but with all your attention to original gaskets for the brake back plates I am kind of surprised. Again, it will look awsome.
