
Bronco, trailer, and canoe build
#16
 05-02-2010, 06:51 AM

Postmaster
Join Date: Jun 2007
Location: Lebanon
Posts: 3,856
Likes: 0
Received 0 Likes
on
0 Posts
#17
05-02-2010, 06:37 PM

The canoe is only 200 pounds, I'll let you know when I get a TIG


#20
05-12-2010, 05:37 PM
#21
05-13-2010, 10:18 PM
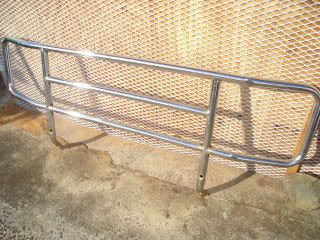
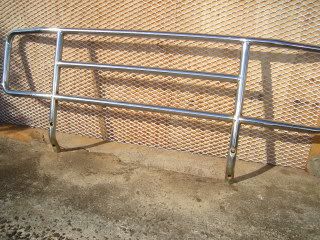
Grille guard old school
Do you guys think I should refurbish and use this grille guard on
my Bronco?
I would have to build a better mounting bracket to install on my 96.
I plan to use black bedliner paint to finish it.
I know it is kind of old school, but I think I may old school the whole rebuild.
It has two light tabs, but I may add many more!
I bought this off a "shady" character today for 20.00. He was at the exhaust
shop when I went to pick up the Bronco.
I will have a story on the engine swap when I bring the Bronco home in the next couple of days.
#22
05-13-2010, 10:25 PM
#23
05-14-2010, 07:20 AM
Postmaster
Join Date: Jun 2007
Location: Lebanon
Posts: 3,856
Likes: 0
Received 0 Likes
on
0 Posts
#24
05-14-2010, 11:43 AM
Elder User
Join Date: Apr 2009
Location: Upstate New York
Posts: 725
Likes: 0
Received 0 Likes
on
0 Posts
I like the idea of the jump seat. I owned a '99 F350 7.3 and I miss that center console/jump seat it had. I had been wondering if one of those seats would fit in a Bronco. On a side note, the factory coats the back of the jumper with some kind of rubbery stuff, so when you fold it down and use it as a console, the surface doesn't allow items to slide around. (cell phones, wallet, etc) A small detail maybe, but it's great to have in a vehicle that rides somewhat rough. The only downside to the "6th seat" for me is the fact that my kids like to load into the truck via that opening between the front seats,(I have no console) plus my dog sometimes rides there on her blanket too.
But the Bronco 6th seat is a great idea, and thanks for the info on the fit!
But the Bronco 6th seat is a great idea, and thanks for the info on the fit!
#25
05-14-2010, 01:39 PM
Postmaster
Join Date: Jun 2007
Location: Lebanon
Posts: 3,856
Likes: 0
Received 0 Likes
on
0 Posts
#26
05-22-2010, 04:06 PM
Update- SHINY PARTS!
We just got the FSB back from the shop.
There is a new "reman" engine and overhauled E4OD in the truck now.
Here are some pictures of the shiny parts.
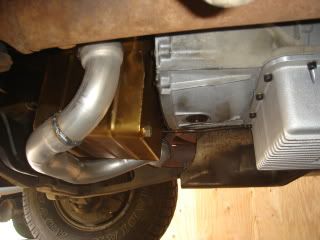
A new Mildon oil pan, oil pick up and Melling HV oil pump now does the oil scavenging.
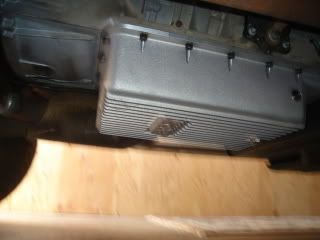
The rebuilt E4OD now sports a B&M deep oil pan with a filter from Torqueshift tranny

The engine got a few new goodies,
JBA shorty stainless steel headers
MSD Steet Fighter coil
MSD cap and rotor, Motorcraft plugs, BWD wires
New radiator, waterpump, hoses and fan clutch.
New oil cooler
Now I just have to replace the battery with a new red top and install
an oil pressure gauge, oil temp and trans temp gauge.
The truck does run cooler(according to the current stock temp gauge) with
the larger capacity Milodon oil pan.
I plan to do the interior work next - remove carpet then install vinyl mat -
remove old window tint then install all new tint and do the final installation
of the new center console seat.
The cost of the work so far sure is astronomical - much higher that I thought it would be - I know after the SAS and other suspension work this truck will cost more than the original purchase price in 1996!
My wife said I could have one project truck - I guess this is it, I hope to finish everything with in 2 years.
There is a new "reman" engine and overhauled E4OD in the truck now.
Here are some pictures of the shiny parts.
A new Mildon oil pan, oil pick up and Melling HV oil pump now does the oil scavenging.
The rebuilt E4OD now sports a B&M deep oil pan with a filter from Torqueshift tranny
The engine got a few new goodies,
JBA shorty stainless steel headers
MSD Steet Fighter coil
MSD cap and rotor, Motorcraft plugs, BWD wires
New radiator, waterpump, hoses and fan clutch.
New oil cooler
Now I just have to replace the battery with a new red top and install
an oil pressure gauge, oil temp and trans temp gauge.
The truck does run cooler(according to the current stock temp gauge) with
the larger capacity Milodon oil pan.
I plan to do the interior work next - remove carpet then install vinyl mat -
remove old window tint then install all new tint and do the final installation
of the new center console seat.
The cost of the work so far sure is astronomical - much higher that I thought it would be - I know after the SAS and other suspension work this truck will cost more than the original purchase price in 1996!
My wife said I could have one project truck - I guess this is it, I hope to finish everything with in 2 years.
#29
05-29-2010, 11:20 PM
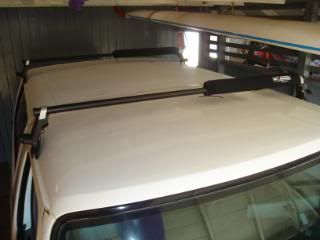
Yakima surfboard racks
Finally installed the Yakima racks today.
Here are the parts.
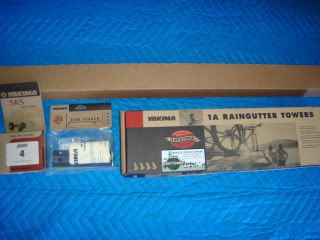
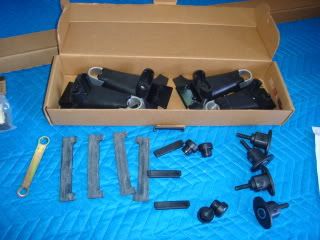
The fronts were easy to install, just hook them on to the raingutters.
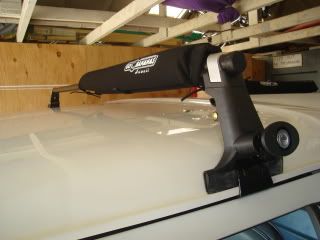
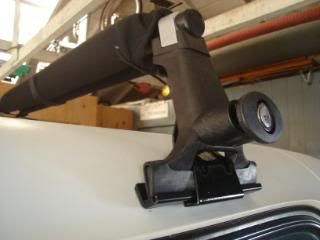
The back rack needed some holes in the glass top.
The holes are 5/16" diameter. The carriage bolts that were supplied with the Yakima kit
were too short. I needed to buy 4 - 2-1/2 inch bolts to secure the Yakima Raingutter kit
to the Bronco roof.

We forgot to install the rubber gasket the first time around, so here it is being installed.

Completed photo.
Here are the parts.
The fronts were easy to install, just hook them on to the raingutters.
The back rack needed some holes in the glass top.
The holes are 5/16" diameter. The carriage bolts that were supplied with the Yakima kit
were too short. I needed to buy 4 - 2-1/2 inch bolts to secure the Yakima Raingutter kit
to the Bronco roof.
We forgot to install the rubber gasket the first time around, so here it is being installed.
Completed photo.
Last edited by khadma; 05-29-2010 at 11:23 PM. Reason: info
#30
06-03-2010, 12:50 AM
Replacing my FSBs speakers were not in the original plan, but I thought I would see if I could get the job done.
The rear speaker covers were starting to rust so they now have a coat of
satin black paint.
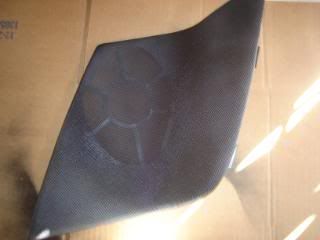
Removing the speaker covers are a pain, just because care is needed to
release the metal clip from the plastic panel.
Most of the clips are easy to remove, but the difficult clips require a tool
to release the clip from the plastic panel.
For the installation of the new speakers. I created my own wiring harness connector using the OEM connector from the stock speaker.
(Iʻll post these photos later)
I soldered one + wire and one - wire to the OEM connector then I soldered
the wires to the new speakers.
Simple solution and I saved 32.00 not having to buy Metra connectors.
The rear speaker covers were starting to rust so they now have a coat of
satin black paint.
Removing the speaker covers are a pain, just because care is needed to
release the metal clip from the plastic panel.
Most of the clips are easy to remove, but the difficult clips require a tool
to release the clip from the plastic panel.
For the installation of the new speakers. I created my own wiring harness connector using the OEM connector from the stock speaker.
(Iʻll post these photos later)
I soldered one + wire and one - wire to the OEM connector then I soldered
the wires to the new speakers.
Simple solution and I saved 32.00 not having to buy Metra connectors.